|
|

After you have rackmounted the DAS Server Shelf and connected the power, you must connect it to the Cisco wide-area switches (i.e., IGX, IPX, BPX/MGX 8220 switches) and to the StrataView Plus Workstation. You must also configure these connections for proper operation. Some of the configuration can be performed locally, through a directly connected terminal. Other portions of the configuration must be performed from the StrataView Plus Workstation.
Since the StrataView Plus Workstation and the DAS Server Shelf are often connected as part of a local area network (LAN), Cisco advises you to have your system administrator available for assigning IP address, subnet masks, host names, etc., consistent with your network. Ideally, the system administrator should be familiar with UNIX and the Sun Microsystems Solaris 2.4 or 2.5 operating systems.
The DAS Server Shelf has three physical interfaces
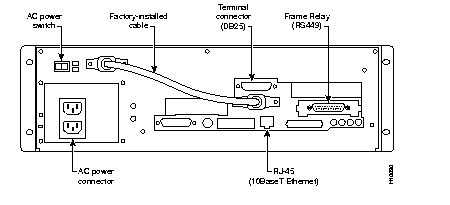
These interfaces are the same on all DAS Server Shelf models. Figure 6-1 points out the interface connectors on the DAS-AC. (These connectors will be located in the same place on the DAS-DC.) Figure 6-2 points out the interface connectors for the DAS-AC-E. (These connectors will be located in the same place on the DAS-DC-E.)

You can attach a terminal (or PC running a terminal emulation program, such as ProCom) to the DAS Server Shelf to perform some of the configuration locally.
Attach your terminal cable, typically a null modem cable, to the terminal connector on the DAS Server Shelf's rear panel. (There is an illustration of the pin connections of a typical null modem cable in the appendix, Cable Information.) The terminal connector is labeled A/B on the DAS-DC or DAS-AC models, and shown on Figure 6-1. The location of the terminal connector for DAS-AC-E and DAS-DC-E models is shown on Figure 6-2. This is an asynchronous ttya port on the UNIX-based DAS Server Shelf. Your terminal or PC and emulation software must be set to match the DAS Server Shelf's communication parameters:
This section provides a sequence of the general steps used to bring up a Cisco WAN switching network to which an DAS Server Shelf and the Dial-Up Frame Relay application are being added. It is a general overview and omits some of the obvious details, such as rack-mounting and connecting power. (These omitted details are covered in previous sections of this publication.) It is intended for Customer Support to understand the sequence that various elements of the DAS Server Shelf and Dial-Up Frame Relay application installation and configuration must be performed.
To bring-up the DAS Server Shelf and Dial-Up Frame Relay application, follow this sequence:
Step 1 Configure the Cisco switch's network IP addresses. (Specifically, use cnflan, cnfnwip, and cnfsnmp.) (This is covered in the section, Configure the Network IP Addresses.)
Step 2 Configure the DAS Server Shelf IP connectivity:
Step 3 Install the DAS (INS) Daemon software on the StrataView Plus Workstation (covered in the chapter, Loading DAS Daemon Software on the StrataView Plus Workstation).
Step 4 Add the DAS (INS) object (icon) to the HP OpenView Topology Map (covered in the chapter, Creating a DAS Topology Object with HP OpenView).
Step 5 Add the signalling PRI PVC, using the StrataView Plus Connection Manager. This is a "Normal" mode frame-relay connection, typically using channel 24 (T1 DS0 #24) and a DLCI 0. (This is described in the section, Configuring a PVC between the PRI and the DAS Server Shelf.)
Step 6 Add the PRI to the DAS Server Shelf, using the DAS CLI (described in the chapter, Understanding the DAS Command Line Interface).
Step 7 Connect the PRI to the end-user equipment (e.g., the ISDN network) and bring up layers 1 and 2 of the ISDN protocol.
Step 8 Configure Dial-Up and/or Dial-Backup connections (covered in Chapter 12, Configuring Dial-Up Connections, and Chapter 13, Configuring Dial-Backup Connections.)Then check Layer two statistics, using the DAS CLI, (described in the chapter, Understanding the DAS Command Line Interface).
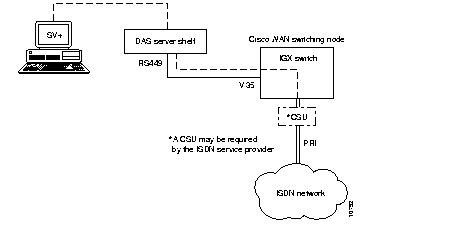
The DAS Server Shelf connection to the Cisco switch provides the ISDN signalling connection to the Dial-Up Frame Relay application, as shown in Figure 6-3. This connection consists of two steps:
Step 1 Making the Physical Connection.
Step 2 Configuring a PVC between the PRI and the DAS Server Shelf.
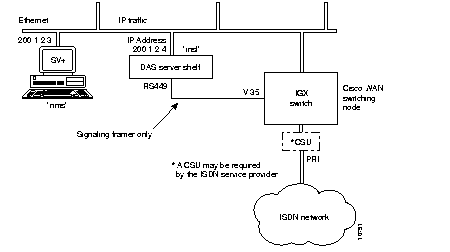
When configured the IGX or IPX will route the ISDN signaling channel, shown as a dashed line, over the physical serial (V.35 to RS-422) connection. The connection between the DAS Server Shelf and the StrataView Plus workstation is also shown as a dashed line because this connection will vary, depending on whether the StrataView Plus Workstation and the DAS Server Shelf are connected to the same Ethernet.
The DAS Server Shelf must be connected to a co-located Cisco switch (e.g., IGX or IPX switch) through a Frame Relay Port (V.35) connection.
1 ) Connect the RS-449 cable (supplied with the DAS Server Shelf) to the Frame Relay (RS449 to V.35 or to X.21) port on the rear of the DAS Server Shelf.
2 ) Connect the V.35-end of the cable to the selected Frame Relay Port (V.35) port of the co-located node (if necessary, see appropriate Cisco WAN switching publication, BPX, IGX, or IPX switch or MGX 8220).
The PRI from the ISDN network is connected to a standard Cisco T1 (or E1) Frame Relay Port. (Refer to the appropriate Cisco WAN switching publication, IGX or IPX switch, etc., for instructions on making this physical connection.)
Next you must configure a PVC with a DLCI of 0 at the PRI's Frame Relay Port on the Cisco wide-area switch to the DAS Server Shelf serial port. For a PRI on a T1 interface, the channel of this connection is normally 24, because the ISDN signalling channel is DS024.
Configuring this PVC consists of two steps:
Step 1 You must use the DAS Command Line Interface (INS_CLI), which is described in the chapter, Understanding the DAS Command Line Interface. You also use the INS_CLI to assign a unique DLCI in the switch table for each PRI that will signal the DAS Server Shelf. (You can also assign these DLCIs through the SNMP.)
Step 2 You use the StrataView Plus Connection Manager to add a Normal mode connection between the PRI port at the Cisco wide-area switch and the Frame Relay Port (V.35) to which the DAS Server Shelf is connected. The DLCI at the PRI-port end (i.e., the port on the Cisco wide-area switch connected to the ISDN PRI) should always be 0. The channel of the PRI-port is normally either 24 (or 16) to match the ISDN signalling channel,
i.e., DS024 for T1 (or TS16 for E1). This procedure is also described in Chapter 14 in the section Add a PRI Dial-Up Port.
The DAS Server Shelf must also have connectivity with the StrataView Plus Workstation. The procedures for doing this are different when the DAS Server Shelf and the StrataView Plus Workstation are located on the same Ethernet and when they are not. These different procedures are described as:
Your system administrator should prescribe the IP address, hostname, and other parameters necessary for operating the DAS Server Shelf in your local area network environment
Before actually configuring the Ethernet connectivity, you should ensure that the Cisco wide-area switch and WAN switching network have been set up for proper IP connectivity. If necessary, refer to the Cisco WAN Switching Command Reference publication and use the following commands:
When the DAS Server Shelf is connected to the same Ethernet as the StrataView Plus, as shown in Figure 6-4, you may have to modify some of the UNIX operating system (i.e., Solaris 2.4) files for your local LAN environment. To do this, you need to use a text editor such as vi to modify files and a few simple Sun operating system (SunOS) commands. (When you are logged in to the DAS Server Shelf, you can find the use and syntax of the operating system commands with the man command; for instance, enter man login to find the login command.)
To connect the DAS Server Shelf to the Ethernet connect the appropriate cable to the connector on the back of the DAS Server shelf (shown in Figure 6-1 or Figure 6-2). (This is typically a 10BaseT connection to an Ethernet hub.)
vi is a UNIX-based screen editor which can be used to make some minor modifications to the UNIX-based files. You can find out more about vi, by typing man vi at the DAS Server Shelf's UNIX prompt and pressing Enter. In vi there is a command mode and an editing (i.e., insertion) mode. Since only minor changes need to be made to DAS Server Shelf UNIX files, you need to know a few commands:
A quick procedure for editing any of the files: CD to where the file is located. vi file name. Position cursor where you want to add or change text. Enter o to add a new line, or i to edit a line. Hit ESC when you are done adding text. At the command mode, ZZ saves file.
After checking with your system administrator, set the IP address, hostname, and other parameters necessary for operating the DAS Server Shelf in your local area network environment, as follows:
Step 1 Connect a terminal to the DAS Server Shelf.
Step 2 Log in to DAS Server Shelf as superuser.
Step 3 Stop the DAS (INS) processes:
Step 4 Use vi to screen edit the file /etc/hosts and add the IP address for DAS Server Shelf and the IP address for the StrataView Plus Workstation.
For direct Ethernet connection, as shown in Figure 6-4, where you have a StrataView Plus Workstation with a hostname of nms and an IP address of 200.1.2.3 and a DAS Server Shelf with a hostname of ins1 and an IP address of 200.1.2.4, you would add the two lines shown in bold type to the hosts file:
Contents of /etc/hosts
#
127.0.0.1	localhost
#
200.1.2.4	ins1	loghost	# INS1 (DAS 1 local Ethernet port)
200.1.2.		nms	# SV+ Workstation
#192..x.x.x	fr-ins1	 frhost	# INS1 (Frame-Relay)
# End of hosts
Note that the frhost (frame-relay host) IP address is used for remote SV+ Workstation connectivity and can be commented out by adding a # sign to beginning of line.
Step 5 Also use vi to edit /usr/net/fr/hosts file to contain these same IP address for the DAS Sever Shelf and the IP address for the StrataView Plus Workstation. (You could also copy /etc/hosts to /usr/net/fr/hosts.)
Step 6 If required for your local network, use vi to screen edit the file /etc/networks, which will appear similar to the following:
Contents of /etc/networks file:
#
# The loopback network is used only for intra-machine communication
#
loopback	127
#
# Internet networks
#
arpanet	10		arpa		# Historical
nms-net	200.1.2				# SV+ network
# End of networks
For our example, the line in bold text, nms-net . . ., is added to the networks file.
Step 7 If required for your local network, use vi to screen edit the file /etc/netmasks to add the appropriate subnet mask for your LAN segment.
Step 8 If required for your local network, use vi to screen edit the file /etc/hostname.le0 to name the DAS Server Shelf's ethernet port.
Step 9 If required for your local network, use vi to screen edit the file /etc/nodename to name the DAS Server Shelf node, and verify that this name is the same name as /etc/hostname.le0.
Step 10 Use the date SunOS command to set the local date and time.
Step 11 Execute the reboot command to restart the DAS Server Shelf.
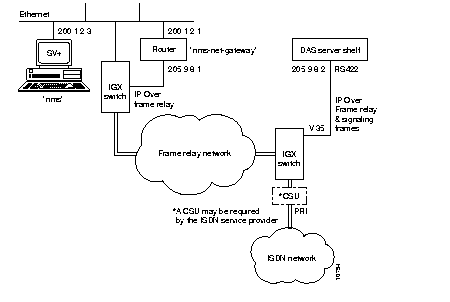
Where the DAS Server Shelf and the StrataView Plus Workstation are not on the same Ethernet, they must communicate over a frame-relay connection. There are two ways this can be done:

In option 1, the route from the remote DAS Server Shelf to the StrataView Plus Workstation does not go over the RS422 to V.35 serial link to the Cisco wide-area switch. Instead the messages are routed over Ethernet 2 to Router 2 to the Frame Relay Network to Router 1 to Ethernet 1 to the StrataView Plus Workstation. The only configuration that needs to be done is to provide the route from the DAS to the StrataView Plus Workstation on the IP network. Consult your network administrator for help in setting up this route over the routers.
In option 2, shown in Figure 6-6, the IP traffic between the StrataView Plus Workstation and the DAS Server Shelf is carried over frame relay (i.e., IP over Frame Relay). The StrataView Plus Workstation communicates with the DAS Server Shelf using IP addressing. Thus, a router must be added to the Ethernet segment to convert between IP addressing and frame relay DLCIs. The messages between the StrataView Plus and DAS Server Shelf are then routed over the Frame Relay Network. At the Cisco wide-area switch co-located with the DAS Server Shelf, these messages are routed over the serial connection from the Frame Relay Port (V.35) to the RS-422 port on the DAS Server Shelf. (This serial connection also carries the signalling frames from the PRI.) (This option reduces the number of PRIs supported by the DAS Server Shelf because bandwidth must be allocated for the IP traffic.)
Four files on the UNIX-based DAS Server Shelf must be modified to complete the IP over Frame Relay PVC at the DAS Server Shelf's frame relay port. They are:
To modify the DAS Serve Shelf UNIX files, follow these steps:
Step 1 Connect a terminal to the DAS Server Shelf.
Step 2 Log in to DAS Server Shelf as superuser.
Step 3 Use vi to screen edit the file /usr/net/fr/fr_conv. The /fr_conv file will be similar to the following:
Contents of /usr/net/fr/fr_conv file:
#
# ADAX Frame Relay IP address to DLCI (0, . . . , 1023) to port mapping
#
# IP Address	Frame Relay DLCI	Port
205.9.8.1	12	0	# Cisco Serial 0 (nms-net-gateway) on DLCI12
#
# Raw Frame Relay conns
-	35	0	35	9	# PRI using DLCI 35
# End of fr_conv
Step 4 Add the router's serial port address (shown here as 205.9.8.1....) and save the file.
Step 5 Use vi to screen edit the file /etc/inet/hosts. The /hosts file will be similar to the following:
Contents of /etc/inet/hosts file, assuming the router is named "nms-net-gateway" and the SV+ Workstation is named "nms":
#
# Internet host table
#
127.0.0.1	localhost
#
192.250.252.4	ins1	loghost	# INS1 (Ethernet)
205.9.8.2	fr-ins1	frhost	# INS1 (Frame-Relay)
200.1.2.3	nms		# NMS
205.9.8.1	nms-net-gateway		# Cisco Router Serial 0
# End of hosts
It is important to include the "frhost" alias for the frame relay interface on the DAS Server Shelf. This tag is used by the DAS Server Shelf frame relay interface start up software to find this IP address.
Be sure to update the correct IP addresses and names for:
1. Local DAS Server Shelf (e.g., 192.250.252.4 if the DAS Server Shelf is physically connected to an Ethernet segment)
2 Frame relay network IP address for the DAS Server Shelf (205.9.8.2)
3. StrataView Plus Workstation (200.1.2.3)
4. Router acting as a gateway (205.9.8.1)
Step 6 Save the hosts file.
Step 7 Use vi to screen edit the file /usr/net/fr/hosts. This hosts file must also contain the IP addresses of the StrataView Plus Workstation and the DAS Sever Shelf's loghost. It will appear similar to the following:
#
#Internet host table
#
#local ethernet
200.1.2.3	NMS		#NMS
192.250.252.4		ins1	  loghost	# INS1 (Ethernet)
#end of hosts
Step 8 Save this hosts file.
Step 9 Use vi to screen edit the file /etc/networks. The /networks file will be similar to the following:
Contents of /etc/networks file:
#
# The loopback network is used only for intra-machine communication
#
loopback	127
#
# Internet networks
#
arpanet	10	arpa	# Historical
frnet	205.9.8		# Frame relay IP DAS/SV+ network
nms-net	200.1.2		# SV+ network
# End of networks
Step 10 Save the file and reboot the DAS Server Shelf.
The router connected to the StrataView Plus Workstation's Ethernet must also be configured properly for IP over frame relay. Its serial port connected to a Cisco wide-area switch's Frame Relay Port must be configured to support frame relay. Its Ethernet port must be configured as a bi-directional gateway between the StrataView Plus Workstation and the IP over frame relay network. Refer to the appropriate router documentation for further information on configuring these ports.
When there are multiple remote DAS Server Shelves, each one must communicate with the StrataView Plus Workstation via IP over frame relay links. In this case, you must carefully configure the frame relay links and IP addresses. Figure 6-7 illustrates three DAS Server Shelves that require remote (i.e., IP over frame relay) connectivity with a StrataView Plus Workstation. The Cisco wide-area switch to which the DAS Server Shelves are connected (and are co-located with) are assumed to be in the Frame Relay (FR) Network cloud. A router interfaces the StrataView Plus Workstation's ethernet segment to the Frame Relay Network, providing a gateway to the logical IP subnetwork (over frame relay) of the DAS Server Shelves.
To implement this configuration, which is provided as an example for the following discussion, you must

For DAS connectivity to the StrataView Plus Workstation, you must configure the four frame relay links (numbered 0 through 3) shown in the figure. The first one, Frame Relay (FR) Link 0, connects the router to the FR Network, which in effect connects the StrataView Plus Workstation Ethernet segment to the FR Network. The speed of this link is a function of the number of DAS Server Shelves in the network, and also of other IP traffic that is transferred between the Ethernet (LAN 0) and the frame relay network (if any). You should configure bandwidth of 128 kbps per DAS Server Shelf over the router.
The remaining three FR links, FR link 1 through 3, connect the three DAS Server Shelves to the FR Network. The links connect to the DAS Server Shell through the individual serial ports (RS-422).
All connections on the FR links which constitute the virtual IP subnet are implemented using Frame Relay PVCs. These PVCs are set up through the Cisco wide-area switch's command line interface (or the StrataView Plus Connection Manager). The PVC topology should thus be reconciled with the existing PVCs on the FR network.
Each DAS Server Shelf needs to communicate only with the StrataView Plus Workstation. The DAS Server Shelves do not need connections between one another. Therefore, you need to configure only a single PVC from/to each DAS Server Shelf. In other words, each DAS Server Shelf needs a single PVC for connecting to the IP/FR subnet. Thus, a single DLCI must be reserved for the serial port (on the DAS Server Shelf) and the corresponding interface on the Cisco wide-area switch. We recommend a common DLCI be chosen for all DAS Server Shelves. In this example, the common DLCI is 12.
It is more complicated at the StrataView Plus Workstation and router- end of the frame relay network. The StrataView Plus Workstation needs to know the IP address of each DAS Server Shelf at their FR interface. It has no knowledge of DLCI assignments, however. This routing of the IP traffic over the appropriate FR PVC to/from the correct DAS Server Shelf is implemented by the router. Thus there are three PVCs over the FR link between the router and the FR network.
The frame relay network and the router must be configured in a complimentary manner. The link between the frame relay network and the Cisco router must be configured to pass many different DLCIs, one for each of the remote DAS Server Shelves (i.e., INS Stations). The router controls mapping between IP addresses and DLCIs (i.e., FR PVCs). The frame relay network controls routing between the router and DAS Server Shelf PVCs, using the appropriate DLCIs. Table 6-1 illustrates this mapping.
| Source System | Destination System | Destination IP Address | FR Link Used | PVC /DLCI Used |
|---|---|---|---|---|
| DAS Server Shelf 1 | Router | 205.9.8.1 | 1 | 12 |
| DAS Server Shelf 2 | Router | 205.9.8.1 | 2 | 12 |
| DAS Server Shelf 3 | Router | 205.9.8.1 | 3 | 12 |
| Router | DAS Server Shelf 1 | 205.9.8.2 | 0 | 15 |
| Router | DAS Server Shelf 2 | 205.9.8.3 | 0 | 16 |
| Router | DAS Server Shelf 3 | 205.9.8.4 | 0 | 17 |
The IP sub-network, along with the relevant IP addresses, is shown in Figure 6-7. Note that all the IP addresses on the frame relay network are on one class C IP network (205.9.8). Each DAS Server Shelf has to know the address of the StrataView Plus Workstation, while only the StrataView Plus Workstation and the router have to know the addresses of all the DAS Server Shelves.
The following files should be checked or modified during the Serial/Frame Relay Port configuration:
The Frame Relay General Configuration File (fr.cf), found at /usr/net/fr/fr.cf, is installed at the factory and does not need to be changed. The contents of the fr.cf file will appear similar to:
#
# ADAX Frame Relay daemon configuration file
#
mode	LAC		# TCP/IP compatibility mode:  ATT, SCO, LAC, or WOL
prom	YES
debug	0		# debug level:  0 (off), 1, 3, 5, 7, 9 (most output)
# End of fr.cf
The Frame Relay Port Configuration File (fr_config), found at /usr/net/fr/fr_config, is also installed at the factory. The contents of fr_config will contain:
port 0
	HOST 			RS449	 N393 0 INARP NO
port 8
				PID 0xCC
port 9
				PID 0xDD TRANS
# End of fr_config
The factory sets the following necessary parameters:
This Frame Relay Address Mapping file (fr_conv), found at /usr/net/fr/fr_conv, must contain the IP address to DLCI mapping for any IP networks accessible across frame relay. In our example, the router's serial port address is specified since it acts as a gateway to the remote StrataView Plus Workstation's ethernet segment. (The rc.inet file will have the route command to map StrataView Plus Workstation network addresses through this gateway.) The DAS Server Shelf serial port needs to know what DLCI to use to access that gateway.
For our example, the fr_conv file on each DAS Server Shelf must be edited to include the IP address to DLCI, shown here as 205.9.8.1 ...., for the router:
#
# ADAX Frame Relay IP address to DLCI (0, . . . , 1023) to port mapping
#
# IP Address Frame Relay DLCI Port
205.9.8.1	12	0		# Router's Serial 0 (SV+ gateway)
#
# Raw Frame Relay port
-	35	0	35	9		# PRI using DLCI 35
# End of fr_conv
This Network Command file (rc.inet), found at /usr/net/fr/rc.inet, contains the appropriate network commands to enable routing across the DAS Server Shelf's IP Frame Relay network. This shell script is executed at boot time from /etc/rc2.d/S72fr (installed by the factory).
For our example, the rc.inet file on each DAS Server Shelf must be modified to include nms-net gateway information:
ifconfig frmux0 frhost plumb -arp
ifconfig frmux0 frhost up
#
# frnet is defined in /etc/networks
# frhost is defined in /etc/inet/hosts
route add net frnet frhost 0
#
# Use cisco (router) serial port as gateway
# nms-net is defined in /etc/networks
# nms-net-gateway is defined in /etc/inet/hosts
route add net nms-net nms-net-gateway 1
#
/usr/net/fr/set_addr -h `nawk '/frhost/ { print \$1 } ' /etc/hosts` -port 0
# End of rc.inet
For our example, there are two other DAS Server Shelf (INS) network configuration parameters that must be considered:
To specify the frame relay network number, you would edit /etc/networks for each DAS Server Shelf to include frnet and nms-net as follows:
#
# The loopback network is used only for intra-machine communication
#
loopback	127
#
# Internet networks
#
arpanet	10	arpa	# Historical
frnet	205.9.8			# Frame relay IP INS/NMS network
nms-net	200.1.2			# NMS network
# End of networks
To specify the router gateway address and the StrataView Plus address in /etc/inet/hosts, you must include the "frhost" alias for the frame relay interface on the DAS Server Shelf. (This must be done for all three DAS Server Shelves in our example. The sample of the hosts file is for DAS Server Shelf 1, which is ins1.)This tag is used by the frame relay start up software to find this IP address. Be sure to update the correct IP addresses for the:
1 ) Local machine (DAS Server Shelf 1, 2, etc.)
2 ) Frame relay network IP address for the local machine (fr-ins1)
3 ) Network management system (nms)
4 ) Router gateway (nms-net-gateway)
For our example, for DAS Server Shelf 1, you would edit the contents of /etc/inet/hosts file to include the IP addresses of fr-ins1, nms, and nms-net-gateway, as follows:
#
# Internet host table
#
127.0.0.1	localhost
#
192.250.252.4	ins1	loghost		# INS1 (DAS 1 local Ethernet port)
							# (not shown in Figure 6-7)
205.9.8.2	fr-ins1	frhost		# INS1 (DAS 1Frame-Relay port)
200.1.2.3	nms				# NMS
205.9.8.1	nms-net-gateway				# Router Serial 0
# End of hosts
The StrataView Plus Workstation needs to know how to route packets to the DAS Server Shelves across the frame relay IP network. The files to be configured on the StrataView Plus Workstation are /etc/networks, /etc/inet/hosts, and a new startup file must be created to hold the route command (/etc/rc2.d/S72insroute.)
For our example, you would edit /etc/networks to include the ins-net as follows:
#
# The loopback network is used only for intra-machine communication
#
loopback	127
#
# Internet networks
#
arpanet	10	arpa		# Historical
ins-net	205.9.8			# INS (DAS Server Shelf) Frame Relay Network
# End of networks
Next, you edit /etc/inet/hosts on the StrataView Plus Workstation to update the correct IP addresses for:
1 ) Local machine (the StrataView Plus Workstation is called nms)
2 ) Router gateway (ins-net-gateway)
3 ) All DAS Server Shelves (called ins1, ins2, and ins3)
#
# Internet host table
#
127.0.0.1	localhost
#
200.1.2.3	nms	loghost		# NMS
205.9.8.2	ins1			# DAS Server Shelf 1
205.9.8.3	ins2			# DAS Server Shelf 2
205.9.8.4	ins3			# DAS Server Shelf 3
200.1.2.1	ins-net-gateway			# Router's Ethernet 0
# End of hosts
Finally, have your system administrator establish a static route through the router gateway to all hosts on the DAS Server Shelf (INS) network. This is done by creating a new file /etc/rc2.d/S72insroute. This file should be owned by root, group sys, permissions 0744.
For our example, the /etc/rc2.d/S72insroute file would appear as:
#
# Add a static route for the INS frame relay network accessible on the
# other side of the local Cisco router.
#
echo "Setting default interface for INS network: \c"
/usr/sbin/route add net ins-net ins-net-gateway 1
# End of S72insroute
The router in our example is assumed to be a Cisco 2500 series. This product has one ethernet port and two high speed serial ports, only one of which is used in this example. One serial port is configured to support frame relay with IETF encapsulation. The ethernet port and the serial port are configured as a bi-directional gateway between the StrataView Plus Workstation ethernet segment and the DAS/NMS frame relay IP network. After all Cisco configuration information is entered, be sure to save the configuration with the appropriate command.
The router's ethernet port need only have an IP address assigned. For our example, this IP address is 200.1.2.1. The configuration commands for a Cisco 2500 series router, after entering the "enable" password, are:
configure terminal
interface ethernet 0
ip address 200.1.2.1 255.255.255.0
The serial port needs an IP address assigned, and must be configured for frame relay IETF protocol encapsulation. The Cisco 2500 series router commands are:
configure terminal
interface serial 0
ip address 205.9.8.1 255.255.255.0
encapsulation frame-relay ietf
^Z
The router also needs to know the DLCI to use for each IP address to be accessed over the frame relay IP network. The system administrator must determine DLCI assignments for each frame relay link and enter appropriate map commands on the router. The configuration commands for our example 3 DAS Server Shelf network with a Cisco 2500 series router, assuming DLCI usage as detailed previously in the DLCI Assignment section, would be:
configure terminal
interface serial 0
frame-relay map ip  205.9.8.2  15
frame-relay map ip  205.9.8.3  16
frame-relay map ip  205.9.8.4  17
^Z
After you have connected and configured the DAS Server Shelf(s), you should log in (or have someone log in) to the StrataView Plus Workstation and Ping the DAS Server Shelf to ensure that they are communicating. If they are not communicating, Appendix C, Troubleshooting, contains troubleshooting information.
Cisco recommends that a modem be attached to the DAS Server Shelf to allow Product Support to dial in and provide remote support.
Appendix B, Dial-In Support, provides the information about connecting a modem to the DAS Server Shelf.
|
|