|
|

This chapter provides procedures for using the configuration interfaces at the DAS Server Shelf and the StrataView Plus Workstation to set up typical DAS Dial-Up Frame Relay network applications.
This chapter describes the following Dial Access Switching tasks:
These procedures are divided into tasks that should be performed at either the DAS Server Shelf or at the StrataView Plus Workstation. Some tasks must be (or can be) performed from both (or either) locations. An empty area indicates that nothing needs to be performed from that location at that time.
Table 14-1 provides a quick procedure for gaining local access to the DAS Server Shelf.
| At the DAS Server Shelf | At the StrataView Plus Workstation |
|---|---|
|
|
|
|
Table 14-2 provides a quick procedure for telneting to the DAS Server Shelf.
| At the DAS Server Shelf | At the StrataView Plus Workstation |
|---|---|
| |
|
| Method 1
Method 2
|
|
|
|
This process defines the StrataView Plus that is running the DAS (INS) Daemon software. An DAS (INS) Daemon enables communication between the DAS Server Shelf and the StrataView Plus. Each DAS Server Shelf can only communicate with one DAS (INS) Daemon that resides on a StrataView Plus system. You can add as many entries of DAS (INS) Daemon as you want, but only the one with the lowest "Preference" number and whose "Admin Status" is UP will be used by the DAS Server Shelf. Table 14-3 provides a quick procedure for adding an DAS (INS) Daemon to the Dial-Up Frame Relay Configuration.
| At the DAS Server Shelf | At the StrataView Plus Workstation |
|---|---|
|
|
|
|
For each PRI Dial-Up port on a Cisco wide-area switch, the corresponding switch table entry must be added to the DAS Server Shelf. A signaling PVC with DLCI=0 also must be set up between this port and the DAS Server Shelf port before it can be used for Dial-Up or Backup Frame Relay. The switch table entry can be added by using the INS_CLI on the DAS Server Shelf or using SNMP set on the DAS Dial-Up Frame Relay MIB objects. Table 14-4 provides the quick steps for adding a PRI Dial-Up port.
| At the DAS Server Shelf | At the StrataView Plus Workstation |
|---|---|
|
|
|
For example, the DLCI for a PRI switch table entry is 1, the PRI port is on Node A Slot 15, and the DAS Server Shelf is connected to Node B Port 16.1. An FRP port 15.24 should be added on Node A and the signalling PVC should be Node A 15.24.0 to Node B 16.1.1. In addition, the LMI for the connection should be set to none.
This procedure adds the dormant dial-up connection to the StrataView Plus Workstation database for a specific ANI. Table 14-5 provides the quick steps for adding an ANI and its associated Dial-Up connection.
| At the DAS Server Shelf | At the StrataView Plus Workstation |
|---|---|
| |
|
|
|
|
|
|
This procedure adds the dormant dial-backup connection for a specific ANI and associates it with an existing frame relay PVC. Table 14-6 provides the quick steps for adding a Dial-Backup connection.
| At the DAS Server Shelf | At the StrataView Plus Workstation |
|---|---|
| |
|
|
|
|
|
|
|
|
|
Table 14-7 provides the quick steps removing a Dial-Up connection. Dormant Dial-Up connections must be removed through the StrataView Plus Connection Manager before configured ANIs can be removed from the Dial-Up Frame Relay Configuration Interface as was described in Chapter 11 in the section, 3. Delete an ANI entry.
| At the DAS Server Shelf | At the StrataView Plus Workstation |
|---|---|
At the Connection Manager window:
|
Table 14-8 provides the quick steps for removing a Dial-Backup connection. Dormant Dial-Backup connections must be removed through the StrataView Plus Connection Manager before configured ANIs can be removed from the Dial-Up Frame Relay Configuration Interface as described in Chapter 11 in section, 3. Delete an ANI entry.
| At the DAS Server Shelf | At the StrataView Plus Workstation |
|---|---|
At the Connection Manager window:
|
Table 14-9 provides the quick steps for removing a configured PRI.
| At the DAS Server Shelf | At the StrataView Plus Workstation |
|---|---|
At the INS CLI:
|
|
Table 14-10 provides the quick step for removing an DAS (INS) Daemon form the Dial-Up Frame Relay configuration.
| At the DAS Server Shelf | At the StrataView Plus Workstation |
|---|---|
|
|
Table 14-11 provides the quick steps for configuring Call Detail Record parameters.
| At the DAS Server Shelf | At the StrataView Plus Workstation |
|---|---|
|
When the INS Daemon is running on the StrataView Plus Workstation, it automatically retrieves any CDR files in the DAS Server Shelf CDR backup directory and stores them as compressed files in an archive. The StrataView Plus Workstation maintains these compressed files for 30 days. |
At the INS CLI:
|
|
The StrataView Plus event log displays descriptions of network- and operator-generated occurrences. Internally, event descriptions are generated as a result of the trap information which is transmitted between the DAS Dial-Up Frame relay agents and the network management system. StrataView Plus uses the HP OpenView Event Browser application to display the list of events and alarms. The event browser application allows you to selectively browse through the events. Table 14-12 provides the quick steps for viewing the StrataView Plus 8.1 Event Browser.
| At the DAS Server Shelf | At the StrataView Plus Workstation |
|---|---|
|
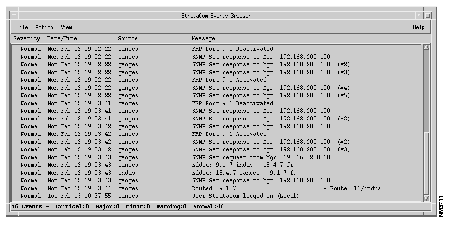
The browser displays the following information about each event:
| Severity | This column displays the criticality of the event. Severity values are: critical, major, minor, and normal. |
| Date/Time | The week day, calendar date, and time of the event occurrence. |
| Source | The object identifier affected by the event. |
| Message | Description of the event. |
Refer to the Cisco StrataView Plus Operations Guide for Release 8.1 for more information about the Event Log and the Event Browser.
StrataView Plus 8.4 has more tools built in for monitoring the Cisco WAN switching network. Refer to the Cisco StrataView Plus Operations Guide for Release 8.4 for more information.
|
|