|
|

This chapter assumes that your DAS Server Shelf is racked, cabled, and ready for startup. You are now ready to connect AC or DC power, turn on the DAS Server Shelf, and access a UNIX login prompt. Guidelines for DAS Server Shelf shutdown are provided at the end of this chapter. This chapter includes the following sections:
The DAS Server Shelf AC power cord is designed to work with single-phase power systems. The appendix, Cable Information, provides further information about the AC Power cable supplied with your DAS Server Shelf. There is a slight difference in connecting AC power to the DAS-AC and the DAS-AC-E; therefore, this section contains the two following procedures:
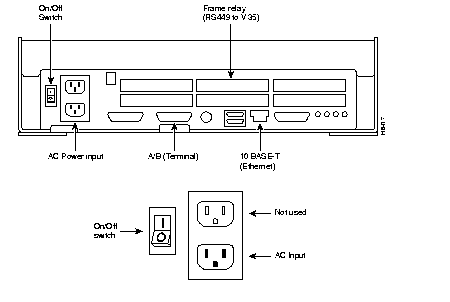
The AC-Power connector and the ON/OFF Switch are on the left-side of the rear panel as shown in Figure 5-1.
To connect AC power to the DAS-AC, follow these steps:
Step 1 Make sure the power switch is in the Off position by pressing the side of the On/Off Switch labeled 0.
Step 2 Attach the power cord to the AC Input connector. Some DAS Server Shelves have an AC-power cord clamp. The clamp, a slotted flange, is secured to the DAS-AC with a screw. Loosen the screw to slide the clamp to one side and allow room to plug in the AC-power cord. Then slide the clamp back over the cable and tighten the screw.
Step 3 Attach the other end of the power cord to the AC power source.
Step 4 Turn power on by pressing the side of the On/Off Switch labeled 1.
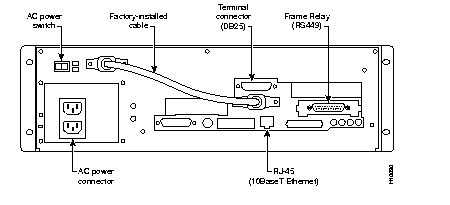
The AC-Power connector and the ON/OFF Switch are on the left-side of the rear panel as shown in Figure 5-2.
To connect AC power to the DAS-AC-E, follow these steps:
Step 1 Make sure the power switch is in the Off position by pressing the side of the On/Off Switch labeled 0.
Step 2 Attach the power cord to the AC Input connector.
Step 3 Attach the other end of the power cord to the AC power source.
Step 4 Turn power on by pressing the side of the On/Off Switch labeled 1.
There is a slight difference in connecting DC power to the DAS-DC and to the DAS-DC-E; therefore, this section contains the two following procedures:
The DC Input Connectors and On/Off Switches are on the top of the rear panel as shown in Figure 5-3.

To connect DC power, follow these steps:
Step 1 Make sure that both DC power supplies are off by pressing the 0-side of their On/Off Switches.
Step 2 Make sure the DC source is off.
Step 3 The cable from the DC-power source should have 3 insulated #14 AWG wires (stranded); the insulation should be stripped back 0.25" (6 mm) on each wire end, where you connect the female EURO connectors supplied in the accessories bag.
Step 4 Observe the way the polarized female EURO connectors will mate with the DC input connector. Insert each wire into the correct hole in the female Euro connector (see Figure 5-3). Secure each wire by tightening the screws in the connector.
Step 5 Insert one (or both) female EURO connectors now connected to the cable from the DC source into DC Inputs A and/or B.
Step 6 Turn on the DC source.
Step 7 Turn on DC power to the DAS Server Shelf by pressing the 1-side(s) of the On/Off switches, Power A and/or Power B, as required.
The DC Input Connectors and On/Off Switches are on the rear panel as shown in Figure 5-4. The two DC Input connectors are EURO Block three-pin male receptacles. Female EURO mating connectors are provided in the DAS-DC accessories bag which was part of the shipping kit.
To connect DC power, follow these steps:
Step 1 Make sure that both DC power inputs are off by pressing the 0-side of their circuit breakers.
Step 2 Make sure the DC source is off.
Step 3 The cable from the DC-power source should have 3 insulated #14 AWG wires (stranded); the insulation should be stripped back 0.25" (6 mm) on each wire end, where you connect the female EURO connectors supplied in the accessories bag.
Step 4 Observe the way the polarized female EURO connectors will mate with the DC input connector. Insert each wire into the correct hole in the female Euro connector (see Figure 5-4). Secure each wire by tightening the screws in the connector. As you face the rear panel, both DC input connectors are oriented as follows:
Pin 1: -48 VDC, is on the left as you face the unit
Pin 2: Safety Ground
Pin 3: -48 VDC Return
Step 5 Insert one (or both) female EURO connectors now connected to the cable from the DC source into DC Inputs A and/or B.
Step 6 Turn on the DC source.
Step 7 Turn on DC power to the DAS Server Shelf by pressing the 1-side(s) of the DC circuit breakers, Power A and/or Power B, as required. The press the 1-side of the DC power switch.

The first time you power on your DAS Server Shelf, you should perform the procedures described in the next chapter, DAS Server Shelf Interface Connections. These procedures include connecting a terminal to the DAS Server Shelf, connecting it to the BPX/MGX 8220 or IGX or IPX switch, and connecting it to a StrataView Plus workstation and creating a DAS (INS) Object on the StrataView Plus Maps.
Before turning on the DAS Server Shelf, it is a good idea to read chapters, DAS Server Shelf Interface Connections, and Configuring the Dial-Up Frame Relay Application, to understand the sequence of operations that have to be completed to bring up a DAS Server Shelf and Dial-Up Frame Relay application for the first time. Once either the DC- or AC-model DAS has been turned on with the On/Off switch, it will began to start running automatically. If a terminal has been connected, the UNIX login prompt appears at an attached terminal interface.
Once the DAS Server Shelf is powered up, you must be careful how you shut it down. The procedures for shutting down a DAS-AC and DAS-DC are different from shutting down a DAS-AC-E and a DAS-DC-E. Therefore, this section contains the two following procedures:
You should shutdown the DAS software processes before you turn off the DAS Server Shelf (DAS-AC or DAS-DC models). To do this, execute the INS STOP script before you proceed with UNIX shutdown or halt commands. The INS STOP script shuts down all the DAS Dial-Up Frame Relay software components running on the DAS Server Shelf.
At the UNIX prompt available on the attached terminal interface, type the following:
INS_STOP
Go ahead with any operation requiring this shutdown.
The INS_STOP command only stops the DAS processes on the DAS Server Shelf. The UNIX halt command shuts down all the UNIX processes. Ideally you should stop the DAS processes before halting and removing power from the DAS Server Shelf.
During the normal operation of DAS-AC-E or DAS-DC-E and the BPX, IGX, or IPX switch, the DAS Server Shelf is typically not turned off. However, in the rare cases where it might be necessary to turn off the DAS, both AC or DC power switches provide for graceful or emergency shutdowns.
To gracefully shut down DAS-AC-E or DAS-DC-E, where DAS processes are stopped and the file system is protected, momentarily press the DC Power Switch. The graceful shutdown will take approximately 30 seconds.
In an emergency situation where it is necessary to remove power from the DAS-AC-E and DAS-DC-E immediately, press and hold the Power Switch down for approximately 5 seconds. The DAS will shutdown without going through the 30-second graceful shutdown.
For the AC unit, the power cord inlet is the disconnecting device.
|
|