|
|

The baseline network topology is created from information contained in a network's router configuration files.
For each active interface described in the router configuration files (via the interface command) and supported by the Connectivity Tools, the following information is extracted in order to build the topology:
ethernet, tokenring, fddi, serial, hssi, or bri
For each interface IP address, the subnet mask is applied to the subnet address. A subnet node is created for each unique subnet address. The subnet type is set to the type of interface. A node containing the IP address of the interface (an interface has one primary IP address and zero or more secondary addresses) is also created and attached to the subnet node.
For each subnet node of type serial, HSSI (High-Speed Serial Interface), BRI (Basic Rate Interface), or Frame Relay in the subnet list, WAN links are created. Otherwise, LAN links are created.
A LAN link is created for each interface address on the subnet. A LAN link contains a link name and information about the interface and the subnet that the interface is connected to. A unique link name is generated by concatenating the router hostname and interface name, for example Ethernet1. If an interface has secondary IP addresses, the link name also contains a link number to ensure uniqueness.
WAN links you create between two routers via the Add Serial Link option have user_asserted added as a prefix to the link's symbolic name. See "Add Serial Link" for detailed information about the Add Serial Link option.
If only two serial router interfaces are connected to the same subnet, a serial link is created between them. If more than two serial router interfaces are connected to the same subnet, a heuristic used by Cisco of assigning consecutive pairs of IP addresses to both ends of a serial link is used. However, there is no guarantee others will follow this convention. Serial links that do not follow this convention appear unconnected (dangling) in the topology. They can be manually connected by modifying the appropriate configuration files used to create the baseline (and hence appear unconnected in the topology.) Links between serial interfaces with ip unnumbered addresses can be created using the Connectivity Tools drawing capabilities. However, if additional protocol information is available for these ip unnumbered interfaces, it is used to try to resolve links. Protocol information currently being looked at by the Connectivity Tools is:
For each pair of end point candidates, if they are the same type (serial and serial, bri and bri, hssi and hssi) a link is created between them. Otherwise, the following table lists how link creation is determined:
| End Point 1 | End Point 2 | Link Created |
|---|---|---|
| | Yes No - if either end has frame-relay encapsulation |
| | Yes |
| | Yes No - if either end has frame-relay encapsulation |
| | No |
| | Yes |
| | No |
If only two router interfaces are connected to the same subnet, a serial WAN link is created between them. Serial WAN links have ser. added to the link's symbolic name. For example, netsys1.ser2/3.0.lnk specifies a serial WAN link
All HSSI WAN links have hssi. added to the link's symbolic name. For example, netsys1.hssi1/0.0.lnk specifies an HSSI WAN link.
Frame Relay WAN links are created in the topology via the frame-relay map command if it exists. Otherwise, links are created to connect all other Frame Relay interfaces on the same subnets (fully meshed). You can use the Connectivity Tools drawing capabilities to delete unwanted data link connection identifiers (DLCI). All Frame Relay WAN links have fr. added to the link's symbolic name. For example, netsys1.fr2/3.0.lnk specifies a Frame Relay WAN link.
All BRI WAN links have bri. added to the link's symbolic name. For example, netsys1.bri2/3.0.lnk specifies a BRI WAN link.
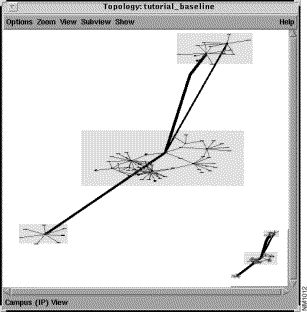
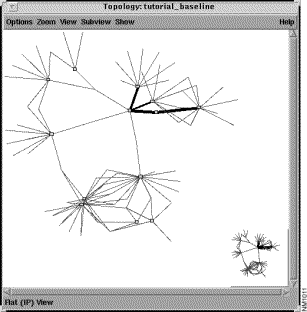
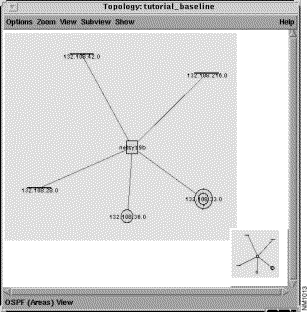
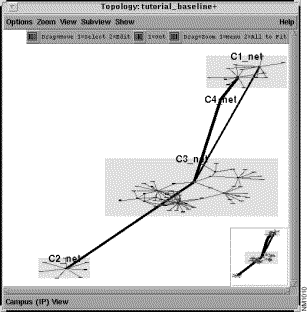
To display a scenario's topology, select a scenario from the Scenarios List in the Connectivity Tools window, then click on the Topology button. The topology can be displayed in a Campus view (the default) or in a Flat view. Figure 4-1 is the topology of the tutorial_baseline scenario displayed in a Campus, IP view. Figure 4-3 is the tutorial_baseline scenario topology displayed in a Flat, IP view.
Using features provided in the Connectivity Baseliner, network elements (routers, LANs, and links) can be highlighted and their configuration attributes can be viewed. Using features provided in the Connectivity Solver, connectivity requirements can be viewed, modified, and analyzed, round trip paths can be displayed in the topology, and network element configuration attributes can be modified. See Chapter 3 in the Enterprise/Solver Connectivity Tools User's Guide for a tutorial describing the use of the topology features. See Chapter 4 in the Enterprise/Solver Connectivity Tools User's Guide for a tutorial describing the use of the topology drawing capabilities.
The icon shapes representing devices (routers), LAN segments (Token Ring, FDDI, LAN), and WAN links (Serial, HSSI, BRI, and Frame Relay) are as follows:
Provided you have access to a Mosaic or Netscape HTML browser, clicking on the Help button displays documentation about the Topology window. The HTML browser specified by the ECSP_HELPVIEWER environment variable is used for this purpose. The other Topology window components are described below.
Select this option to save the current topology layout. This is useful if you have renamed campuses and/or resized or moved network element icons or campus areas to new locations within the Topology window and you want the changes to be in effect when the Topology window is subsequently displayed or reopened.
If you have not renamed campuses or moved or resized objects in the topology layout, this option is deactivated.
Select this option to discard the saved changes to the current topology layout and to display the initial baseline topology layout.
Select this option to save the topology changes related to creating and deleting WAN links.
Select this option to discard the topology changes related to creating WAN links and to display the initial baseline topology. Deleted WAN links are not restored.
Select this option to display the Topology window's Preferences window. You can customize and save various Topology window component colors and font settings using this window. When selecting or changing a color or font, you must position the cursor at the end of the appropriate color or font text, click the left mouse button, and then back-space to delete the existing text prior to specifying a new color or font. Colors can be specified by name (e.g. blue, black, yellow) or X-resource color value (e.g. #7799ff.) Upon making a modification, press Return to apply the change. If you want to save the changes you have made for subsequent Topology window displays, click on the Save button. If you want to return to the system default values, click on the Restore system defaults button.
Select this option to display the Print Options window. A snapshot of the topology can be sent to a printer and/or file. The Print Options windows for Campus and Flat views are identical except for the Campus view's list of symbolic LAN component group names. The Campus Print Options window is shown in Figure 4-2. To print the entire campus topology layout, select the All Campuses and Objects entry. To print a specific campus layout, select the specific campus name entry. For both Campus and Flat views, specify an appropriate UNIX print command in the To Device field. To specify a file to save the topology to, click on the To File button, then specify the name of the file or use the default file displayed in the To File field. A more detailed copy of the topology can be printed in coordinated, labeled pages by adjusting the sliders in the Number of Pages pane to the desired number of pages. Click on the OK button to invoke the specified print options.
This option requires printing to a PostScript printer and produces a PostScript file which can be viewed on-line using a PostScript viewer, such as pageview.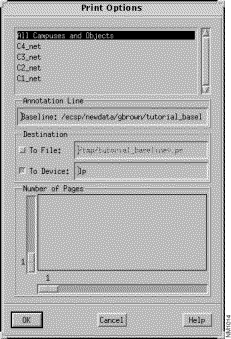
Select this option to dismiss the Topology window.
The Zoom menu provides options to change the way the topology is displayed. The options are as follows:
Select this option to scale the entire topology to fit entirely within the Topology window.
When an entry in the Requirements Analysis window is selected, its round trip path is highlighted in the Topology window. Select this option to zoom in on (display in a larger scale) that path. See "Requirements Analysis Window" for detailed information about the Requirements Analysis window.
Select this option to display the topology in a larger scale.
Select this option to display the topology in a smaller scale.
Select this option to redraw the displayed topology enabling the devices and their associated text to be more easily read. This is especially useful when the displayed topology becomes somewhat skewed when using the Zoom>In option and mouse buttons (described below) to alter the topology display.
Select this option to present a rough approximation of the physical network, with Campus boundaries determined by WAN links. Campus names are derived from the names of the routers they contain; the most common first three letters in the router's names are used to name the Campuses. The WAN link connections (thick lines) can be displayed in the foreground (default) or background by toggling the Show>Inter-campus Links option. The thickness of the WAN link line indicates its bandwidth. Thicker lines represent higher bandwidth WAN links. Not displaying labels (router names, symbolic names, and LAN segment addresses) is the default mode. Displaying the summary map is the default. Not displaying Campus labels is the default. Displaying IP (default), IPX, or AppleTalk views is accomplished via the Subview>IP/IPX/AppleTalk menu options. Figure 4-1 is an example of the tutorial_baseline scenario's topology displayed in a Campus, IP view without labels. This is the default view.
Select this option to display the topology in a Flat view (the subnetworks are not grouped.) In this view, networks and devices are distributed to best display all interconnections. This view is very effective for seeing round trip paths, and is also very good for viewing smaller networks (seventy five or fewer routers.)
The WAN line connections (thick lines) can be displayed (default) or not displayed by selecting the Show>Inter-campus Links option. Not displaying labels (router names, symbolic names, and LAN segment addresses) is the default mode. Displaying the summary map is the default. Displaying the IP, IPX, or AppleTalk views is accomplished via the Subview>IP/IPX/AppleTalk menu options. Figure 4-3 is an example of the tutorial_baseline scenario's topology displayed in a Flat view with IP routes shown.
Select this option to display the Remote-Source Route Bridge components comprising ring group(s) in the Topology window. Figure 4-4 is an example of the 1857 ring group displayed in the Topology window with all network element labels, inter-campus links, and terminal LANs displayed.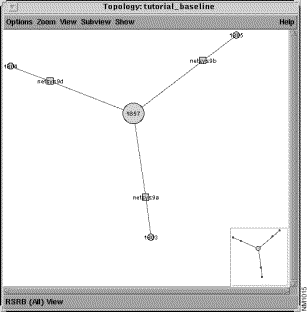
Select this option to group the routers supporting the OSPF (Open Shortest Path First) routing protocol together into campuses in the Topology window. Each campus contains routers belonging to the same OSPF area that use the same autonomous system number. The campus names have a format of 101_0.0.0.0, where 101 is an autonomous system number and 0.0.0.0 is an OSPF area. Figure 4-4 is an example of a tutorial_baseline OSPF view. All is the only Subview menu option available when the View>OSPF option is selected.
An area border router is a router existing in multiple OSPF areas. The symbolic names assigned to area border routers follow the format abr_router_id, where router_id is computed as follows:
loopback interface exists, the IP address of the lowest loopback interface is used. For example, if loopback0 and loopback1 interfaces exist, the IP address of the loopback0 interface is used.
Select this option to group the routers supporting the OSPF routing protocol into campuses in the Topology window. Each campus contains routers belonging to the same OSPF area regardless of the autonomous system ID of the OSPF algorithm. The campus names are assigned with a format of 0.0.0.0. All is the only Subview menu option available when the View>OSPF-Areas option is selected.
An area border router is a router existing in multiple OSPF areas. The symbolic names assigned to area border routers follow the format abr_router_id, where router_id is computed as follows:
loopback interface exists, the IP address of the lowest loopback interface is used. For example, if loopback0 and loopback1 interfaces exist, the IP address of the loopback0 interface is used.
Select this option to display within a campus groups, routers with names containing the same first two letters. For example, if your network contains routers whose names start with ne, ci, and s1, three campus groups are created in the Topology window. The routers whose names start with ne are grouped in one campus, the routers whose names start with ci are grouped in a separate campus group, and the routers whose names start with s1 are grouped in a third campus group.
The Subview menu provides the opportunity to display the network elements based upon the protocol type you select from this menu's options. Depending on the View menu option you select, the available Subview menu options change accordingly. Selecting the View>Campus, View>Flat, and View>By-Name menu options provides IP, IPX, and AppleTalk Subview menu options (IP is the default.) Selecting the View>RSRB menu option provides the All Subview menu option. Selecting the View>OSPF and View>OSPF-Areas menu options provides the Areas Subview menu option.
When the Show>Status Bar option is in effect, the Subview option selected (IP, IPX, AppleTalk, Areas, or All) and currently being displayed in the Topology window is shown in the Topology window's Status Bar.
The following menu options are used to turn on/off various topology display attributes.
Select this option to display device names and network addresses whenever the scale of the topology being displayed enables the values to be easily read. Not displaying object labels is the default.
Select this option to display router names whenever the scale of the topology being displayed enables the values to be easily read. Not displaying router labels is the default.
Select this option to display WAN links as thick, black (default color) lines in the foreground in the Topology window. Deselect this option to not display the WAN links when in a Flat view and to display WAN links in the background, when in a Campus view. Displaying WAN links is the default.
Serial WAN links have ser. added to the link's symbolic name
(e.g. netsys1.ser2/3.0.lnk). Frame Relay WAN links have fr. added to the link's symbolic name (e.g. netsys1.fr2/3.0.lnk). HSSI WAN links have hssi. added to the link's symbolic name (e.g. netsys9a.hssi1/0.0.lnk). BRI WAN links have bri. added to the link's symbolic name (e.g. netsys9b.bri1/0.0.lnk).
Select this option to display LAN segments that are only connected to a single router. In effect, turning off this option keeps links from secondary addresses from being displayed. This feature is used to declutter the topology layout. Displaying terminal LAN segments is the default.
Select this option to display a summary map in the lower right corner of the Topology window. The summary map provides a constant view of the entire topology. As the cursor is moved within the Topology window, the current location of the cursor in relation to the entire topology is tracked within the summary map. Deselect this option to not display the summary map. Displaying the summary map is the default.
When you click in the summary map, the corresponding area within the network is centered within the displayed topology.
Select this option to display a status bar at the bottom of the Topology window. The protocol subview (IP, IPX, AppleTalk, Areas, or All) and view type (Campus, Flat, RSRB, OSPF, OSPF-Areas, or By-Name) displayed in the topology is listed in the left portion of the status bar. A device or element's name and address are displayed in the right portion of the status bar when the cursor is over the corresponding icon in the topology (e.g. ROUTER:netsys9a, SERIAL_LINK:netsys9a.hssi1/0.0.lnk, TOKEN_RING:199.35.38.128, FDDI_RING:199.35.15.96). Deselect this option to not display the status bar. Displaying the status bar is the default.
Select this option to graphically display information about the functionality provided by the mouse buttons. The numbers next to the graphic representing the MENU button refer to clicking on the MENU button once or twice. Deselect this option to not display the mouse buttons graphically (the default.) See "Mouse Controls" for detailed information. Not displaying the mouse button information is the default.
An alternative method for altering the display characteristics of the Topology window is through the use of the mouse buttons (SELECT, ADJUST, and MENU) described in the following sections. To graphically display (in the upper right portion of the window) information about the functionality provided by the mouse buttons, select the Show>Mouse Help menu option. The mouse button graphics are then displayed in the Topology window as shown in Figure 4-6.
The mouse buttons are also used to provide a mechanism for customizing your topology layout through the Connectivity Tools drawing capabilities. See Chapter 4 in the Enterprise/Solver Connectivity Tools User's Guide for a tutorial describing the use of the topology drawing capabilities.
The left mouse button (SELECT) is used to display a router's symbolic interface names, to display network element configuration windows, and to enable drag and drop capabilities.
TokenRing0 and another called Ethernet2, T0/0 is displayed above the corresponding LAN TokenRing icon and E2/0 is displayed over its corresponding LAN Ethernet icon. The first letter in the abbreviated format pertains to the interface type (Tokenring, Ethernet, FDDI, HSSI, BRI.) The numbers pertain to the interface/port and card number. When you click SELECT over a WAN link, the router's symbolic interface names the WAN link is connected to are displayed.Click on the middle mouse button (ADJUST) to display the topology in a smaller scale (zoomed out) within the Topology window.
The right mouse button (MENU) can be used within the Topology window to accomplish many tasks. The location of the cursor within the window when this mouse button is selected determines the action that is initiated.
When the cursor is over a Link segment icon, the Options menu allows you to initiate the following actions:
You are able to add a serial link between two routers by selecting the Add Serial Link option from a router's Options menu. The router's Options menu is displayed when you click on the MENU mouse button with the cursor located over a router icon. If one or more serial link connections are available on the router, the Add Serial Link window, shown in Figure 4-7, is displayed with one or more entries listed in the window's Source and Destination Endpoint panes. Initially, the first entry in each pane is selected and a thick green line representing the serial link between the two selected end points is displayed in the Topology window. Upon selecting the desired serial link, click on the OK button. To save this newly created serial link so that it will be displayed when the Topology window is subsequently opened, select the Options>Save WAN Topology Changes menu option.
Serial links you create are assigned symbolic names prefixed with user_asserted. to differentiate them from other serial links. For example, a serial link you created from the netsys1 router would have a symbolic name assigned to it with a format of: user_asserted.netsys1.Serial2/3.1.

The Add Serial Link window's components are described in the following sections.
A list of the router's currently existing symbolic, unconnected, serial interface and Frame Relay interface names and their associated IP addresses are displayed in this pane. Select an entry from this list to designate it as the source endpoint's interface to be used on the serial link you are creating. If this list is long, you can use the Source Endpoint Filter field to specify a symbolic serial interface name or device address to search for within the list of available source endpoint interfaces. Pressing Return or clicking on the Source Endpoint Search button initiates the search using the filter you have specified. The resulting matches of the search are then displayed in this pane. You can then select the interface entry you desire from the resulting list.
If the list of available serial interfaces on this router is long, you can use this Filter field to specify a symbolic interface name or an IP/IPX address to look for within the list of Source Endpoint entries. Pressing Return or clicking on the Source Endpoint Search button initiates the search using the filter you have specified. The resulting matches are then displayed in the Source Endpoint pane. You then select an interface entry from this list to designate it as the router's serial link interface.
Click on this button to initiate the search using the filter you have specified in the Source Endpoint Filter field. The number of entries matching the specified filter and a total of all available interfaces on the source router are displayed within parentheses next to the Source Endpoint Search button.
A list of the destination endpoint router(s) and their serial interface(s) and addresses that are available for the serial link you are creating are displayed in this pane. Select an entry from this list to designate it as the destination end point for the serial link you are creating. If this list is long, you can use the Destination Endpoint Filter field to specify a router, router interface, or device address to search for within the list of available destination endpoints. Pressing Return or clicking on the Destination Endpoint Search button initiates the search using the filter you have specified. The resulting matches of the search are then displayed in this pane. You can then select the entry you desire from the resulting list.
If the list of available destination routers with serial interfaces is long, you can use this Filter field to specify a router name, symbolic interface name, or an IP/IPX address to look for within the list of Destination Endpoint entries. Pressing Return or clicking on the Destination Endpoint Search button initiates the search using the filter you have specified. The resulting matches are then displayed in the Destination Endpoint pane. You then select an entry from this list to designate it as the destination endpoint of the serial link you are creating.
Click on this button to initiate the search using the filter you have specified in the Destination Endpoint Filter field. The number of entries matching the specified filter and a total of all available destination endpoints are displayed within parentheses next to the Destination Endpoint Search button.
Click on the OK button to add the serial link between the two routers to the baseline's topology and then dismiss the Add Serial Link window. The green line depicting the serial link in the Topology window is changed from green to black or the color you have chosen to represent serial links via the Topology window's Options>Preferences menu option.
Click on the Cancel button to dismiss this window and cancel the actions that have taken place since the window was displayed or the OK button was clicked.
Provided you have access to a Mosaic or Netscape HTML browser, clicking on the Help button displays documentation about the Add Serial Link window. The HTML browser specified by the ECSP_HELPVIEWER environment variable is used for this purpose.
|
|