|
|

The Connectivity Solver provides the following functionality:
See" Connectivity Baseliner" for a complete description of the Connectivity Baseliner's features and components.
Prior to running the Connectivity Solver, the environment variables described in the Enterprise/Solver Connectivity Tools READ THIS FIRST must be set properly. To display the current environment variable settings, enter the following command from the command line:
|
The Connectivity Solver is started from the command line using the following command format shown below. All of the parameters are optional.
|
where:
-home dir_name is used to override the Connectivity Baseliner installation directory specified by the ECSP_HOME environment variable.
-data data_dir is used to override the data directory specified by the ECSP_DATA environment variable.
-editor editor is used to override the editor specified by the EDITOR environment variable.
-helpviewer help_viewer is used to override the help viewer specified by the ECSP_HELPVIEWER environment variable.
-help help_dir is used to override the help index directory specified by the ECSP_HELP environment variable.
-mode [baseline|full] is used to start the Connectivity Solver in baseline or full (the default) mode. Starting in baseline mode can be useful in very large networks where memory and processing time are critical. Routing table calculations, connectivity requirements analysis, and simulating "what-if" scenarios are not available in baseline mode.
Xt_options all Xt command line options are also supported. Use the xman -help command for details about these options.
Upon starting the Connectivity Solver, various checks are performed to ensure the required environment variables are set and the commands used by the Connectivity Solver are accessible. While the checks are being performed, informational messages are displayed on the screen, as shown below. If a problem is detected, the process is aborted.
netsys9% ctk
Connectivity Tools v1.1
Copyright NETSYS Technologies, Inc. 1995
----------------------------------------
Starting up in SOLVER mode.
Checking for `ECSP_HOME'... using /home/ecsp
Checking for `ECSP_DATA'... using /ecsp/newdata/gbrown
Checking for `EDITOR'... using vi
Checking for `ECSP_HELPVIEWER'... using /usr/local/bin/mosaic
Checking for `ECSP_BACKEND'... (not found) using netsys9
Checking for `conn_solver'... using ./conn_solver
Checking for `vi'... using /usr/bin/vi
Checking for `xterm'... using /usr/openwin/bin/xterm
Checking for `rm'... using rm: aliased to rm -i
Checking for `cp'... using cp: aliased to cp -i
Checking for `tar'... using /usr/bin/tar
Checking for `hostid'... using /usr/ucb/hostid
Checking for `sccs'... using /usr/ccs/bin/sccs
Checking for `admin'... using /usr/ccs/bin/admin
Checking for `delta'... using /usr/ccs/bin/delta
Checking for `prt'... using /usr/ccs/bin/prt
Checking for `prs'... using /usr/ccs/bin/prs
Checking for `get'... using /usr/ccs/bin/get
Checking for `unget'... using /usr/ccs/bin/unget
Checking for `delta'... using /usr/ccs/bin/delta
Checking for `val'... using /usr/ccs/bin/val
Checking for `mosaic'... using /usr/local/bin/mosaic

Checking for Connectivity Tools support files... OK
|
Upon successful completion of the checks, the Connectivity Tools window, shown in Figure 6-1, is displayed.
The Connectivity Tools window contains the following components:
Until a new baseline is created or an existing baseline opened, the menu options that apply to existing baselines and scenarios, as well as the Topology, Report, Requirements, and Analysis, buttons are inactive. Upon opening or creating a baseline and loading it, all menu options and buttons are activated.
The Connectivity Tools window components are discussed in the following subsections.
Select this option to load an existing baseline, create the baseline scenario, and compute the Routing Tables according to the Analysis and Routing Table options you specify. Upon selecting this option, the Open Baseline window is displayed. Specify the path to the directory containing existing baselines, select an existing baseline name, select the Analysis and Routing Table options, then click on the OK button. See "Open Baseline Window" for detailed information about the Open Baseline window components.
Upon returning from loading the baseline, creating the baseline scenario, and computing the Routing Table(s), the updated Connectivity Tools window, shown in Figure 6-2, is displayed.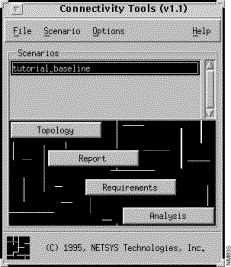
The Connectivity Tools window menu options and buttons are now active enabling you to:
For detailed information about these options, see the corresponding sections later in this chapter.
Select this option to create a new baseline for network simulation and/or analysis. Upon selecting this option, the New Baseline window is displayed. Specify the name of the new baseline, the directory where the router configuration files used to create the new baseline are located, and the directory where the baseline files are to be placed, then click on the OK button. See "New Baseline Window" for detailed information about the New Baseline window components.
Select this option to delete an existing baseline. Upon selecting this option, the Delete Baseline window is displayed. You can not delete the baseline currently loaded. See "Delete Baseline Window" for detailed information about the Delete Baseline window components.
Select this option to save the baseline router configuration files to a specified directory. This feature is useful when the router configuration files have been modified. The modified router configuration files can then be used in another program or with the actual routers in a work environment. Upon selecting this option, the Export Baseline window is displayed. See "Export Baseline Window" for detailed information about the Export Baseline window components.
Select this option to terminate the Connectivity Solver and save the current baseline. If any router configuration files are being edited, the option of aborting all changes to the file(s) prior to exiting, is provided. The termination process can be manually aborted or changes to the configuration files committed before exiting the Connectivity Solver.
When a baseline is initially opened, the baseline name is also used as the name of the initial baseline scenario. An entry for the initial baseline scenario is placed in the Scenarios list. Each subsequent scenario created is a copy of the newest or most current scenario. Only the current scenario (the last scenario displayed in the Scenarios list) is editable for use in "what if" analysis. Textual descriptions of the modifications made to router attributes may be saved by using the Configuration Text button located in the Router Configuration window. These descriptions can not be loaded into the router. See "Router Configuration Windows" for detailed information about the Configuration Text feature. The IOS command delta files created by using this menu's Configuration Changes option can be appended to the router configuration files.
Once the Connectivity Solver is exited, or a new baseline is created, or another baseline is opened, the currently defined scenarios are deleted. The Scenario menu options are described in the following sections.
Select this option to create a copy of the initial baseline scenario, or the last scenario created, if subsequent scenarios were made. Upon selecting this option, a scenario with a plus sign appended to the end of the previous scenario name is created and selected in the Scenarios list. Each subsequent scenario created has an additional plus sign appended to the scenario name. At this point, "what if" scenarios can be created.
This option is inactive if a baseline has not been loaded. See "Open Baseline" for information on how to load a baseline.
Select this option to rename the selected scenario in the Scenarios list. Upon selecting this option, the Rename Scenario window is displayed. Specify the name of the new scenario then click on the OK button. The newly named scenario is displayed in the Scenarios list.
Selecting this option provides you with the following information in the Configuration Changes window:
By selecting an entry from one of the lists in the Configuration Changes window, you are then able to do the following:
The Configuration Changes option is not activated when you are using the initial baseline scenario. Upon selecting this option, the Configuration Changes window remains displayed and is continually updated reflecting the routers whose attributes you have modified this session, and the router configuration files you have modified. See "Configuration Changes Window" for detailed information about the Configuration Changes window components.
Select this option to open all iconified windows associated with this scenario.
Select this option to close all windows associated with this scenario to icons.
The Options menu contains the Find Device and Show Clipboard options.
Select this option to display the Find Device window. Searches for network elements and for routers with particular Routing Table entries can be performed. See "Find Device Window" for a description of the Find Device window components.
Select this option to display the Clipboard window. The clipboard feature is a mechanism allowing you to aggregate various network elements. The collection of these elements can then be used in a variety of ways, such as input to batch processing or as a placeholder for the result of searches. See "Clipboard Window" for a description of the Clipboard window components.
Provided you have access to a Mosaic or Netscape HTML browser, selecting a Help menu option displays documentation about the corresponding topic. The HTML browser specified by the ECSP_HELPVIEWER environment variable is used for this purpose.
The Scenarios pane provides a list of scenarios. This pane is empty until a baseline is loaded, at which point the initial baseline scenario is created. The initial baseline scenario is given the same name as the baseline. The initial baseline scenario is then used to create subsequent scenarios. Each scenario starts out as a duplicate of the scenario it is created from. The subsequently created scenarios are used in "what if" simulation testing.
The Connectivity Solver provides Topology, Report, Requirements, and Analysis buttons allowing you to:
Prior to clicking on any of these buttons, a scenario from the Scenarios list must be selected.
Click on this button to display the current scenario's topology in the Topology window. See "Creating the Topology" for detailed information about creating a topology and a description of the Topology window components.
Click on this button to generate a Diagnostic Report about the current baseline and have it formatted and displayed in the Diagnostic Report window. See "Diagnostic Report" for a detailed description about creating Diagnostic Reports and the Diagnostic Report window components.
Click on this button to display the Requirement Sets window. Access to network connectivity requirements is provided through this window. Some network connectivity requirements are implicitly derived from the router configuration files associated with the current scenario. New connectivity requirements can also be created. Connectivity requirements can be loaded and analyzed and the results displayed by clicking on the Analysis button. The following connectivity requirements options are available to you through the Requirement Sets window:
See "Requirement Sets Window" for detailed information about the Requirement Sets window components and features.
Click on this button to analyze the network connectivity requirements previously loaded from the Requirement Sets window. The results are displayed in the scenario's Requirements Analysis window. The number of available paths, the path's connectivity status, the source router name and address, the destination router name and address, and the port interface used by the routers are displayed in the Requirements Analysis window. See "Requirements Analysis Window" for a description of the Requirements Analysis window components.
|
|