|
|

This chapter describes the components of the Link segment window.
You display the Link window in one of the following ways:
See "Creating the Topology" for detailed information about the Topology window. See "Find Device Window" for detailed information about the Find Device window and "Round Trip Path Window" for detailed information about the Round Trip Path window. A tutorial pertaining to using the Link Segment window features is provided in the Enterprise/Solver Connectivity Tools User's Guide.
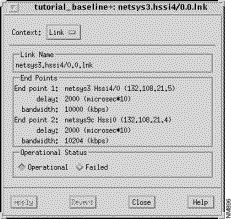
The Link window, shown in Figure 12-1, displays information about a serial, BRI (Basic Rate Interface), HSSI (High-Speed Serial Interface), or Frame Relay link segment and provides the ability to alter the operational status of the link. Placing the cursor within the Link window highlights the link in the Topology window if it is displayed.
The Link window components are described in the following subsections.
Because no other windows are displayed from the Link window, the Context button is not active.
The symbolic name of the link is displayed in this field.
The IP and IPX addresses (where appropriate) of the two end points of the link are displayed in this pane. Also displayed are the delay and bandwidth metrics used by the two end points when communicating over the link.
Click on the appropriate toggle button to set the operational status of the Link to an operational or failed state. Clicking on the Failed button followed by the Apply button turns the corresponding icon in the Topology window red indicating the link has failed. Subsequently clicking on the Operational button followed by the Apply button turns the corresponding icon in the Topology window back to its original color indicating the link is currently operational. Operational is the default setting.
Click on this button to apply changes you have made in the current window. This button is not displayed when using the Connectivity Baseliner, when the initial baseline scenario is selected, or when a scenario other than the last scenario in the Scenarios list in the Connectivity Tools window is selected.
Click on this button to undo the changes made since you last clicked on the Apply button. This button is not displayed when using the Connectivity Baseliner, when the initial baseline scenario is selected, or when a scenario other than the last scenario in the Scenarios list in the Connectivity Tools window is selected.
Click on this button to dismiss the Link window.
Provided you have access to a Mosaic or Netscape HTML browser, clicking on the Help button displays documentation about the corresponding window. The HTML browser specified by the ECSP_HELPVIEWER environment variable is used for this purpose.
|
|