|
|

This chapter describes the uses and components of the LAN Segment Configuration and underlying windows displayed as a result of clicking on the buttons within the LAN Segment Configuration window. The following windows are described in this chapter:
You display the LAN Segment Configuration window in one of the following ways:
See "Creating the Topology" for detailed information about the Topology window. See "Find Device Window" for detailed information about the Find Device window and "Round Trip Path Window" for detailed information about the Round Trip Path window. Tutorials pertaining to some of the features described in this chapter are provided in the Enterprise/Solver Connectivity Tools User's Guide.
The following buttons are present in several windows. For brevity, they are described once here.
The LAN Segment Configuration window, shown in Figure 11-1, provides an external view of the selected LAN segment. Buttons are supplied allowing the context to change to various internal views of the LAN segment. Placing the cursor within the LAN Segment Configuration window highlights that LAN segment's icon in the Topology window.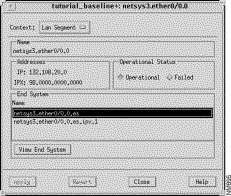
The LAN Segment window contains the components described below. See "General Window Components" for a description of the Context, Apply, Revert, Close, and Help buttons.
The symbolic name of the LAN segment is displayed in this field.
The IP and IPX network addresses (where applicable) of the LAN segment is displayed in this field.
Click on the appropriate toggle button to set the operational status of the LAN segment to an operational or failed state. Clicking on the Failed button followed by the Apply button turns the corresponding icon in the Topology window red indicating the LAN segment has failed. An analysis run at this point shows the effects on the internetwork of the failed LAN segment.
Clicking on the Operational button followed by the Apply button turns the corresponding icon in the Topology window back to its original color indicating the LAN segment is currently operational. An analysis run at this point shows the effects on the internetwork of the operational LAN segment. Operational is the default setting.
The symbolic names of the end systems modeled on this LAN segment are displayed in this pane.
Click on this button to switch the context from the LAN Segment window to the End System window. Prior to clicking on this button, an end system from the entries displayed in the
End System Name list must be selected. See "End System Window" for detailed information about the End System window components.
The End System window, shown in Figure 11-2, is displayed when you select an end system in the End System Name list in the Lan Segment window and then click on the View End System button. This window displays the configuration requirements of an end system connected to the LAN segment running the IP, IPX, or SAP router protocols.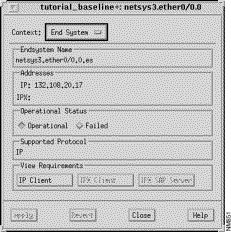
The End System window contains the components described below. See "General Window Components" for a description of the Context, Apply, Revert, Close, and Help buttons.
The symbolic name of the end system is displayed in this field.
The IP or IPX network address, in dotted-decimal format, of the selected end system is displayed in this field.
Click on the appropriate toggle button to set the operational status of the end system to an operational or failed state. Clicking on the Failed button followed by the Apply button turns the corresponding icon in the Topology window red. An analysis run at this point will show the effects on the internetwork of the failed end system.
Clicking on the Operational button followed by the Apply button turns the corresponding icon in the Topology window back to its original color. An analysis run at this point will show the effects on the internetwork of the operational end system. Operational is the default setting.
The network protocol (IP or IPX) supported by this LAN segment is displayed in this pane.
Click on this button to switch the context from the End System window to the IP Client Requirements window. See "IP Client Requirements Window" for detailed information about the IP Client Requirements window. This button is not activated if the IP protocol is not supported on the LAN.
Click on this button to switch the context from the End System window to the IPX Client Requirements window. See "IPX Client Requirements Window" for detailed information about the IPX Client Requirements window. This button is not activated if the IPX protocol is not supported on the LAN.
Click on this button to switch the context from the End System window to the IPX SAP Server Requirements window. See "IPX SAP Server Requirements Window" for detailed information about the IPX SAP Server Requirements window. This button is not activated if the IPX protocol is not supported on the LAN.
The IP Client Requirements window, shown in Figure 11-3, is displayed when you click on the
IP Client button in the End System window. This window displays the IP connectivity requirements currently in effect for this end system, as defined in an IP connectivity requirement file set that has been loaded and analyzed. See "General Window Components" for a description of the Context, Apply, Revert, Close, and Help buttons.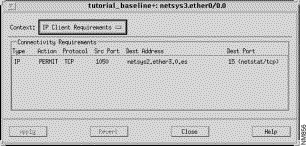
The IP Client Requirements window contains the components described below.
The selected protocol (IP) is displayed in this field.
Whether access from this source end system over the port specified in the Src Port column is permitted or denied to the destination address, is displayed in this field.
The protocol supported is displayed in this field. Possible values are TCP, UDP, ICMP, or other IP.
The source port number used to connect to the destination end system is displayed in this field.
The destination address of the end system is displayed in this field.
The IPX Client Requirements window, shown in Figure 11-4, is displayed when you click on the IPX Client button in the End System window. This window displays the IPX connectivity requirements, as defined in an IPX connectivity requirement file set. See "General Window Components" for a description of the Context, Apply, Revert, Close, and Help buttons.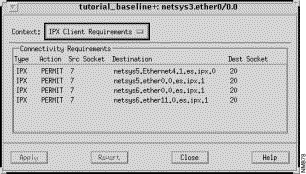
The IPX Client Requirements window contains the components described below.
The selected protocol (IPX) is displayed in this field.
Whether access from this source end system over the socket specified in the Src Socket column is permitted or denied to the destination address, is displayed in this field.
The source socket number used to connect to the destination end system is displayed in this field.
The destination address of the end system is displayed in this field.
The socket number to be used at the destination end system is displayed in this field.
e IPX SAP Server Requirements window, shown in Figure 11-5, is displayed when you click on the IPX SAP Server button in the End System window. This window displays the IPX SAP Server connectivity requirements, as defined in a SAP connectivity requirement file set. See "General Window Components" for a description of the Context, Apply, Revert, Close, and Help buttons.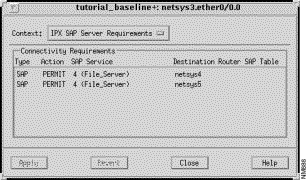
The IPX SAP Server Requirements window contains the components described below.
The protocol (SAP) providing the required service is displayed in this field.
Whether advertisement of the SAP service specified is permitted or denied in the SAP Table of the destination router, is displayed in this field.
The number of the SAP service to be added to the SAP Table of the destination router, is displayed in this field.
|
|