|
|

The Diagnostic Report contains the results of syntactical and global semantic checking performed on the router configuration files used to create the current baseline. The information contained in the report is displayed via the Report window. You can display the Report window by clicking on the Report button in the Connectivity Tools window. The components of the Report window are described in the following sections.
The following windows are described in this chapter:
A tutorial on how to generate a Diagnostic Report and then fix the reported problems is provided in Chapter 5 in the Enterprise/Solver Connectivity Tools User's Guide.
The following buttons are present in several windows described in this chapter. For brevity, they are described once here.
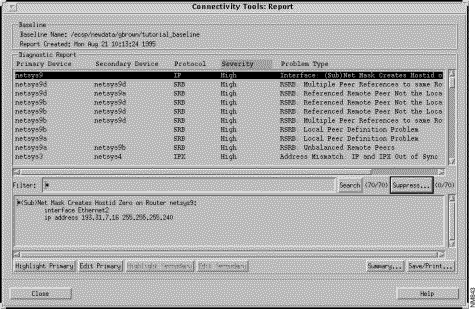
Once a baseline has been opened and loaded, the initial Report window, partially shown in Figure 5-1, is displayed when you click on the Report button in the Connectivity Tools window. Initially the reports displayed in this window are sorted by their severity with high priority reports listed first. You are able to change the way the list of problems is sorted by clicking on a column header.
To receive a summary of the number and types of problems reported in the Diagnostic Report, click on the Summary button. See "Report Summary Window" for a detailed description of the Report Summary window components.
This window's components are described in the following sections. See "General Window Components" for a description of the Close and Help buttons.
The Baseline pane displays the location and name of the baseline the Diagnostic Report was created against, as well as the date and time the report was created.
The Diagnostic Report pane lists the errors that were detected when the baseline router configuration files were parsed. When the Diagnostic Report is initially displayed, the report entries are sorted by Severity (high, followed by warning, followed by configuration file warnings/errors.) Each entry provides the following information:
Selecting an entry in this list provides a more detailed description of the problem in the pane below the Filter field.
Clicking on a column header in the Diagnostic Report pane sorts the information displayed in the report according to the contents of that column. For example, when you click on the Primary Device column header, the information displayed in the Diagnostic Report pane is sorted alphabetically by the primary device names.
Clicking on an entry highlights the primary router's icon in the Topology window if it is displayed. Double-clicking on an entry opens the Router Configuration window of the router listed in the Primary Device column.
The name of the primary router this problem is associated with is displayed in this column.
The name of the secondary router (if applicable) this problem is associated with is displayed in this column. This column has an entry only when the problem corresponds to two routers.
The protocol (IP, IPX, or SRB) this problem is related to is displayed in this column.
The problem's severity (high, warning, or config file warnings/errors) is displayed in this column. Problems are assigned a severity of high priority, warning-level, or router configuration file related user warnings/errors.
A synopsis of the problem is displayed in this column. A more complete description of the problem is displayed in the pane below the Filter field.
You are able to use the Filter field to specify a specific device, protocol, severity, or key word to search for within the Diagnostic Report. Clicking on the Search button initiates the search using the filter you have specified. The results of the search are then displayed in the Diagnostic Report pane. For example, if you specify High in the Filter field then click on the Search button, a list of only the high priority problems are displayed in the Diagnostic Report pane. This feature also enables you to gather specific information and then subsequently save it to a file and/or print it to a PostScript printer if you desire.
The question mark is used to denote any one character. For example, if you specify *netsys?* in the Filter field, all Diagnostic Report entries containing the string netsys and ending with any character are displayed in the list of Diagnostic Report entries.
The negation operator (a tilde) is used to denote the characters not to match on within the Diagnostic Report. It is only allowed as the first character in the Filter field. For example, if you did not want to display the warning-level problems, you would specify ~*Warn* in the Filter field and press Return or click on the Search button. All entries not containing the string Warn are then displayed in the Diagnostic Report pane.
Click on this button to initiate the search of the Diagnostic Report using the filter you have specified in the Filter field. The number of entries containing a match with the specified filter and a total of all problems reported in the Diagnostics Report are displayed within parentheses next to the Search button.
Click on this button to remove specified types of reports from the Diagnostic Report. See "Suppress Entries Window" for detailed information about the Suppress Entries window components. The number of problem reports being suppressed and a total of all problems reported in the Diagnostics Report are displayed within parentheses next to the Suppress button.
Click on this button to highlight the primary router's icon in the Topology window if it is already displayed.
Click on this button to open (in read only or read/write mode) the selected entry's primary router's configuration file using the editor specified by the EDITOR environment variable.
Click on this button to highlight the secondary router's icon in the Topology window if it is already displayed.
Click on this button to open (in read only or read/write mode) the selected entry's secondary router's configuration file using the editor specified by the EDITOR environment variable.
Click on this button to receive a summary and total count (in the Report Summary window) of the problems discovered when the router configuration commands were parsed during the opening of the baseline. See "Report Summary Window" for detailed information about the Report Summary window components.
Click on this button to save the Diagnostic Report to a file in either ASCII or HTML format or to send it to a PostScript printer via the Print Options window. See "Print Options Window" for detailed information about the Print Options window components.
The report generated using this option contains the following categories:
The Suppress Entries window, shown in Figure 5-2, is displayed when you click on the Suppress button in the Diagnostic Reports window. This window allows you to specify the information you wish to keep from being included in the Diagnostics Report being displayed. For example, you can specify to have all IPX related problems or all warning-level IP problems suppressed from the Diagnostics Report.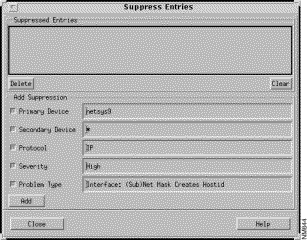
This window's components are described in the following sections. See "General Window Components" for a description of the Help button.
When you click on the Close button, the suppression parameters currently in effect are saved. When you subsequently invoke the Suppress Entries window, the suppression parameters that were in effect when the window was last closed remain in effect.
A list of the suppression entries currently in effect are displayed in this pane. When an entry is added to this list, the Diagnostic Report entries that match the suppression parameters are no longer displayed in the Diagnostic Report pane. Initially suppression is not in effect, therefore the Suppressed Entries list is empty.
Select an entry from the Suppressed Entries list then click on this button to remove that entry from the list. The Diagnostic Report entries that were suppressed due to this entry being in effect are redisplayed and the entry's suppression parameters are removed from existence.
Click on this button to remove all of the entries used to suppress Diagnostic Report entries from the Suppressed Entries list. The Diagnostic Report entries that were suppressed due to these entries being in effect are redisplayed and all suppression parameters are removed from existence.
The Add Suppression pane contains buttons pertaining to the columns in the Report window's Diagnostic Report pane. Deselecting a button removes that category from suppression consideration. Select a button and then specify a value that when found within that column in a Diagnostic Report entry, will cause that entry to be suppressed from the report. For example, if you want to suppress all Diagnostic Report entries that are related to warning-level problems, select the Severity button, specify Warning in the button's text field, deselect the other Add Suppression buttons, then click on the Add button. All entries that contained Warning in the Severity column are no longer shown in the Diagnostic Report. The suppression number within the parentheses next to the Suppress button is updated to reflect the number of Diagnostic Report entries currently being suppressed.
When you initially click on the Suppress button or create a suppression entry and add it to the Suppressed Entries list, all of the Add Suppression buttons in the Suppress Entries window are selected and their corresponding text fields contain the values associated with the selected entry in the Report window. Clicking on the Add button at this point removes that entry from the Diagnostic Report.
You can use the wild card character (an asterisk) to match any or all characters. When a field contains only an asterisk it is equivalent to specifying all items within that category. For example, specifying an asterisk in the Protocol field and clicking on the Add button results in an empty Diagnostics Report as the suppression mode was set to suppress reports for all protocols.
Select the Primary Device button and then specify the name of the device whose problem reports you do not want included in the Diagnostics Report, in the Primary Device field.
Select the Secondary Device button and then specify the name of the secondary device whose problem reports you do not want included in the Diagnostics Report, in the Secondary Device field.
Select the Protocol button and then specify the protocol (IP, IPX, SRB, or APPLE) whose problem reports you do not want included in the Diagnostics Report, in the Protocol field.
Select the Severity button and then specify the severity of the problem reports (High or Warning) you do not want included in the Diagnostics Report, in the Severity field.
Select the Problem Type button and then specify the type of problem you do not want included in the Diagnostics Report, in the Problem Type field.
Once you have selected the problem category button(s) and specified the associated text in the button's text field(s), clicking on the Add button adds the suppression parameters to the Suppressed Entries list and initiates the suppression of the corresponding problems from the Diagnostic Report. The number of reports currently being suppressed (displayed within parentheses next to the Suppression button in the Report window) is updated accordingly.
When you click on the Close button, the suppression parameters currently in effect are saved. When you subsequently invoke the Suppress Entries window, the suppression parameters that were in effect when the window was last closed continue to be in effect.
The Report Summary window, shown in Figure 5-3, is displayed when you click on the Summary button in the Report window. This window provides a summary of the types and total number of problems detected while parsing the router configuration files during the opening of the baseline.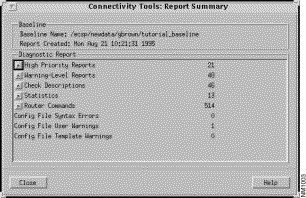
This window's components are described in the following sections. See "General Window Components" for a description of the Close and Help buttons.
The Baseline pane displays the location and name of the baseline the Diagnostic Report corresponds to, as well as the date and time the report was created.
The Diagnostic Report pane contains the following categories:
The above categories are described in the following subsections.
This category contains items thought to cause major network problems. The total number of high priority problems detected by the parser during the opening of the baseline are displayed. Clicking on the High Priority Reports arrow icon displays IP, IPX, SRB, and APPLE subcategories and the total number of problems found by the Connectivity Tools parser, within each of the categories. These categories can be further expanded to provide the total number of protocol specific problems within that category and detailed information about the high priority problems detected. High Priority Reports contain the following sub-categories of problems:
This category contains items considered significant, but not severe. Network performance is not likely to be completely halted by the existence of these problems. However, they could cause inadvertent side effects and performance degradation. For detailed information about specific Warning-Level problems, see "Baseline Integrity Checks." Use the same methods as described in the High Priority Report section for expanding the Warning-Level reports to obtain more information. Warning-Level reports contain the following sub-categories of problems:
This category contains a summary of the total number of problems found when the integrity checks were performed by the Connectivity Tools parser during the opening of the baseline. Clicking on the Check Descriptions arrow icon displays IP, IPX, SRB, and APPLE subcategories. The total number of problems found within each of the subcategories is displayed. Clicking on the arrow icon next to these subcategories displays a more detailed list of problem categories and the number of problems found for each of them.
For example, when you click on the Check Descriptions arrow icon, IP, IPX, SRB, and APPLE categories are displayed with the total number of problems found within each of these categories listed. When you then click on the IP arrow icon, an expanded list of IP integrity checks is then displayed, as shown in Figure 5-4. Clicking on an arrow icon next to these integrity check categories provides a list of the checks within that category.
The categories and integrity checks performed for IP, IPX, SRB, and APPLE are described in the following sections.
This category contains the following information:
async, atm, bri, dialer, ethernet, fddi, hssi, loopback, null, serial, tokenring, and tunnel) detected in the router configuration files.
This category contains the following information:
This category contains the number of syntax errors detected by the parser during the opening of the baseline. "Baseline Syntax and Policy Checking" contains a list of the syntax errors.
This category contains the number of customized checking commands you specified in your $ECSP_HOME/baseline_directory/default.router_template configuration file. $ECSP_HOME is the directory the Connectivity Tools were installed in and baseline_directory is the name you chose for the baseline you created. "Baseline Syntax and Policy Checking" contains detailed information about the customized checking feature.
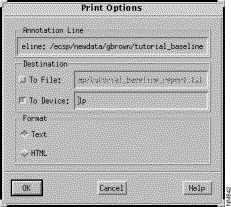
e Print Options window, shown in Figure 5-5, is displayed when you click on the Save/Print button in the Reports window. You are able to print and/or save a copy of the Diagnostic Report from this window.
This window's components are described in the following sections. See "General Window Components" for a description of the OK, Cancel, and Help buttons.
The current baseline's location and name are displayed in this field.
Click on this button to save the Diagnostic Report to the file you specify or to the default file /tmp/baseline_name_report.txt.
Click on this button to send the Diagnostic Report to a printer via the default lp command. This option requires printing to a PostScript printer.
You can specify to print or save the Diagnostic Report in ASCII text or HTML format by clicking on the appropriate button.
Click on the OK button to invoke the specified print options.
|
|