|
|

This chapter describes the windows that can only be displayed when using the Connectivity Solver.
The following windows are displayed as a result of clicking on the Connectivity Tools window's Requirements and Analysis buttons:
The following windows are displayed as a result of selecting the Connectivity Tools window's Scenario>Configuration Changes menu option:
The following windows are displayed as a result of selecting options from the Connectivity Tools window's File and Options menus. They are described in "Baseliner Windows."
Various windows in this section contain buttons that provide like functionality. For brevity purposes, these buttons are described in this section.
The Requirement Sets window, shown in Figure 7-1, is displayed when a baseline is loaded and the Requirements button in the Connectivity Tools window is clicked.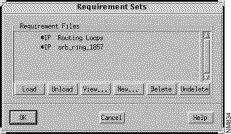
The components of this window are described below. See "General Window Components" for a description of the OK, Cancel, and Help buttons.
A list of existing connectivity requirement file sets are listed in this pane. Double-clicking on an entry in this list selects that entry to be loaded or unloaded for analysis when the OK button is clicked.
Select a requirements file set from the Requirement Files list then click on this button. The network connectivity requirements specified in this file set are loaded for subsequent analysis. LOAD is displayed in the first column of the selected entry, serving as a status of the files that will be loaded for analysis when the OK button is clicked, or have been loaded for analysis after the OK button is clicked. Upon clicking on the OK button, the Requirements Analysis window is displayed showing the results of the analysis done using the specified connectivity requirements. See "Requirements Analysis Window" for detailed information about the Requirements Analysis window components.
Click on this button to remove a set of previously loaded connectivity requirement sets from subsequent analysis the next time the OK button is clicked.
Click on this button to display the contents of the selected requirements file set in the Requirements window. Additional connectivity requirements can be added to, or existing requirements deleted from, the selected requirements file set. The modified requirements can then be loaded and reanalyzed. See "Requirements Window" for detailed information about the Requirements window components.
Click on this button to create a new connectivity requirement file set. The New Requirement Set window is displayed. See "New Requirement Set Window" for detailed information about the New Requirement Set window components. Specify the name of the new requirement set and the requirement type (IP, IPX, or SAP), then click on the OK button. The Requirements window is displayed. See "Requirements Window" for detailed information about the Requirements window components. Initially no entries are defined for a new requirement set, therefore the Requirements pane in this window is empty when first displayed. Clicking on the Add and Edit buttons display the Add IP/IPX/SAP Requirements window.
Click on this button to mark the selected connectivity requirements file for deletion. A DEL prefix is displayed in the selected entry in the Requirement Files list. Click on the OK button to actually delete the entries in the list containing a DEL prefix.
Click on this button to remove the DEL prefix from the selected entry in the Requirement Files list. This option only has an affect if the OK button has not already been clicked.
The New Requirement Set window, shown in Figure 7-2, is displayed when the New button is clicked in the Requirement Sets window. Specifying a name and requirement type (IP, IPX, or SAP) generates an empty requirement file set. Requirements are then added to it using the Add IP/IPX/SAP Requirements window, displayed when the OK button is clicked. The newly created requirement file set is added to the Requirement Files list in the Requirement Sets window.
You can then load the requirements for analysis by clicking on the Requirement Sets window's Load button, followed by the OK button. Analysis of the connectivity requirements can also be performed by clicking on the Analysis button in the Connectivity Tools window.
The components of this window are described below. See "General Window Components" for a description of the OK, Cancel, and Help buttons.
Specify the name of the new connectivity requirement file set in this field.
Click on the IP, IPX, or SAP button to select a particular protocol type and to display the corresponding Add IP/IPX/SAP Requirements window. IP is the default Requirement Type. See "Add IP Requirements Window" for detailed information about the Add IP Requirements window components. See "Add IPX Requirements Window" for detailed information about the Add IPX Requirements window components. See "Add SAP Requirements Window" for detailed information about the Add SAP Requirements window components.
The Requirements window, an example of which is shown in Figure 7-3, is used to add, edit, and delete network connectivity requirements to/from a requirement file set. The Requirements window is displayed in one of the following manners:
If you are creating a new set of requirements or if no requirements exist in the set you are viewing, this window is empty. Otherwise, the existing network connectivity requirements are displayed. To add new requirements to the set click on the Add button. To edit existing requirements, click on the Edit button.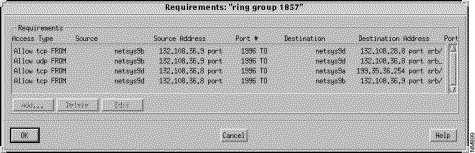
The components of this window are described below. See "General Window Components" for a description of the OK and Help buttons.
A list of the existing network connectivity requirements, defined in the requirements file set selected in the Connectivity Tools window's Requirement Files list, are displayed in this field. If network connectivity requirements do not exist in this requirements file set, this window is empty.
Click on this button to create new or add additional connectivity requirements to the requirements file set. Depending on the protocol (IP, IPX, or SAP) specified when the requirement set was created, the corresponding Add IP/IPX/SAP Requirements window is displayed.
Once the requirements have been specified and control is returned to this window, click on the OK button to add the requirements to the requirements file set.
Click on this button to delete the selected connectivity requirements from the requirements file set. Select the entries to be deleted then click on the OK button to delete the requirements from the requirements file set.
Click on this button to edit the selected connectivity requirement set entry. Depending on the protocol (IP, IPX, or SAP) specified when the requirement set was created, the corresponding Edit IP/IPX/SAP Requirements window is displayed. The entries and fields corresponding to the entry selected in the Requirements window are selected and displayed. Once you have edited the requirements and control has been returned to this window, click on the OK button to apply the edits you made to the requirements file set.
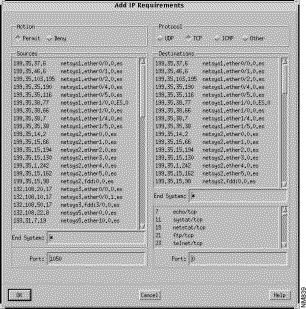
The Add IP Requirements window, shown in Figure 7-4, allows new end-to-end connectivity requirements to be specified. The specification includes the source and destination end systems, the port on the source and destination end systems, the applicable protocol, and whether the requirement is to permit or deny connectivity.
The components of this window are described below. See "General Window Components" for a description of the OK, Cancel, and Help buttons.
Click on the appropriate button to permit or deny access from the source end system selected in the Sources list to the destination end system selected in the Destinations list. End systems are representational of any end system in a given end segment. Permit is the default.
A list of source end system IP addresses and names are listed in this pane. Specify the source end system by selecting the appropriate entries in the Sources list. Clicking on an entry in this list highlights the corresponding end system's icon in the Topology window if it is displayed.
This field provides an alternate method for specifying source end systems. Specify the names or IP addresses of source end systems in this field, then press Return. The Sources list is searched looking for a match. An asterisk can be used as a wildcard character in this field. If one matching source end system is found, the end system entry is displayed and selected in the Sources list. If multiple matches are found, the matching source end system entries are displayed in the Sources list.
You are also able to specify IP addresses that have not yet been allocated in this field. Upon specifying the new end system IP address, a message is displayed informing you the end system does not exist and asking you if you would like to create it. Upon responding yes, the new end system is added to the Sources and Destinations lists. If the address you specified does not correspond to a known LAN segment, a default symbolic name is assigned. The format of the default symbolic name is remote.es.ip.n where n is an incrementing number starting at one. You are now able to create connectivity requirements using this new end system. This enables you to more easily test default networks.
Specify the source end system port number in this field. The default is 1050.
Click on the appropriate button to select the UDP (User Datagram Protocol), TCP (Transmission Control Protocol), ICMP (Internet Control Message Protocol), or Other (other IP protocol) as the transport layer protocol to be used for this IP connection requirement. When you select the ICMP or Other option, the source and destination ports and destination protocol service type settings are deactivated. TCP is the default.
A list of destination end system IP addresses and names are listed in this pane. Specify destination end systems by selecting the appropriate entries in the Destinations list. Clicking on an entry in this list highlights the corresponding end system's icon in the Topology window if it is displayed.
Upon selecting the destination end systems, select the desired protocol service type from the displayed list of protocol services (e.g. echo/tcp, netstat/tcp, snmp/udp, nfs/udp etc.) The port number is automatically displayed in the destination Port field when a protocol service type is selected.
This field provides an alternate method of specifying destination end systems. Specify the names or IP addresses of destination end systems in this field, then press Return. The Destinations list is searched looking for a match. An asterisk can be used as a wildcard character in this field. If one matching destination end system is found, the end system entry is displayed and selected in the Destinations list. If multiple matches are found, the matching destination end system entries are displayed in the Destinations list.
You are also able to specify IP addresses that have not been allocated in this field. Upon specifying the new end system IP address, a message is displayed informing you that the end system does not exist and asking you if you would like to create it. Upon responding yes, the new end system is added to the Sources and Destinations lists. If the address you specified does not correspond to a known LAN segment, a default symbolic name is assigned. The format of the default symbolic name is remote.es.ip.n where n is an incrementing number starting at one. You are now able to create connectivity requirements using this new end system. This enables you to more easily test default networks.
The Add IPX Requirements window, partially shown in Figure 7-5, allows new IPX connectivity requirements to be specified. The specification includes source and destination end systems to be specified, the source and destination socket to use for the requirement, and whether the requirement permits or denies connectivity.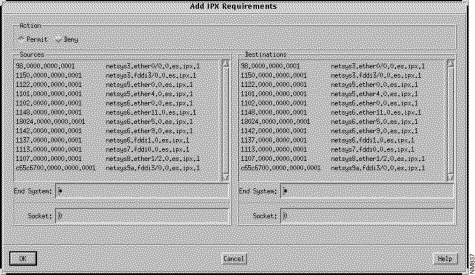
The components of this window are described below. See "General Window Components" for a description of the OK, Cancel, and Help buttons.
Click on the appropriate button to permit or deny access to the source router interfaces selected in the Sources list. Permit is the default.
A list of source end system IPX network addresses and names are listed in this pane. Specify the source end systems by selecting the appropriate entries in the Sources list. Clicking on an entry in this list highlights the corresponding end system's icon in the Topology window if it is displayed.
This field provides an alternate method for specifying source end systems. Specify the names or IPX network addresses of source end systems in this field, then press Return. The Sources list is searched looking for a match. An asterisk can be used as a wildcard character in this field. If one matching end system is found, the end system entry is displayed and selected in the Sources pane. If multiple matches are found, the matching end system entries are displayed in the Sources list.
You are also able to specify IPX network addresses that have not yet been allocated in this field. This enables you to more easily test default networks. Upon specifying the new end system IPX address, a message is displayed informing you the end system does not currently exist and asking you if you would like to create it. Upon responding yes, the new end system is added to the Sources and Destinations lists. If the address you specified does not correspond to a known LAN segment address, a default symbolic name is assigned. The format of the default symbolic name is remote.es.ipx.n where n is an incrementing number starting at one. You are now able to create connectivity requirements using this new end system.
Specify the source socket number in this field.
A list of destination end system IPX network addresses and names are listed in this pane. Specify the destination end systems by selecting the appropriate entries in the Destinations list. Clicking on an entry in this list highlights the corresponding end system's icon in the Topology window if it is displayed.
This field provides an alternate method for specifying destination end systems. Specify the names or IPX addresses of destination end systems in this field, then press Return. The Destinations list is searched looking for a match. An asterisk can be used as a wildcard character in this field. If one matching destination end system is found, the end system entry is displayed and selected in the Destinations list. If multiple matches are found, the matching destination end system entries are displayed in the Destinations list.
You are also able to specify IP addresses that have not been allocated in this field. Upon specifying the new end system IP address, a message is displayed informing you that the end system does not exist and asking you if you would like to create it. Upon responding yes, the new end system is added to the Sources and Destinations lists. If the address you specified does not correspond to a known LAN segment, a default symbolic name is assigned. The format of the default symbolic name is remote.es.ip.n where n is an incrementing number starting at one. You are now able to create connectivity requirements using this new end system. This enables you to more easily test default networks.
Specify the destination socket number in this field.
The Add SAP Requirements window, partially shown in Figure 7-6, allows you to check whether a path exists between the provider of a SAP service and a router that is to contain a SAP Services Table. The router containing the SAP Services Table broadcasts to the other routers on the network its ability to gain access to the SAP services provided by SAP servers. Therefore, in order for the router containing the SAP Services Table to be able to broadcast its ability to gain access to the SAP services provided by a SAP server, a connection between them must exist.
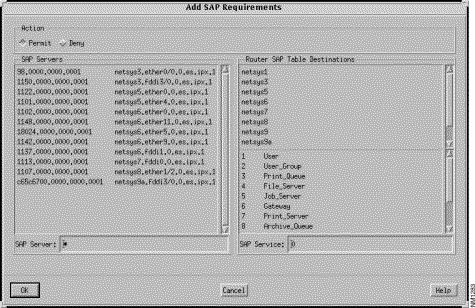
The components of this window are described below. See "General Window Components" for a description of the OK, Cancel, and Help buttons.
Click on either the Permit or Deny toggle button to set the action mode, accordingly. Select the Permit button to permit advertisement of the specified SAP service to particular routers. Select the Deny button to deny advertisement of the specified SAP service to be placed in tables of particular routers. Permit is the default.
A list of available end systems providing SAP services and their associated IPX network addresses are listed in this pane. Choose SAP service providers by selecting the appropriate entries in the SAP Servers list. Clicking on an entry in this list highlights the corresponding end system's icon in the Topology window if it is displayed.
This field provides an alternate method for specifying an end system providing SAP services. Specify the names or IPX addresses of end systems providing SAP services in this field, then press Return. The SAP Servers list is searched looking for a match. An asterisk can be used as a wildcard character in this field. If one matching SAP service provider is found, that SAP service provider's entry is displayed and selected in the SAP Servers list. If multiple matches are found, the matching SAP service provider entries are displayed in the SAP Servers list.
You are also able to specify IPX addresses that have not yet been allocated in this field. Upon specifying the new IPX address of the end system providing SAP services, a message is displayed informing you that the end system does not currently exist and asking you if you would like to create it. Upon responding yes, the new end system is added to the SAP Servers list. If the address you specified does not correspond to a known LAN segment, a default symbolic name is assigned. The format of the default symbolic name is remote.es.sap.n where n is an incrementing number starting at one. You are now able to create connectivity requirements using this new end system to provide SAP services.
A list of routers designated as Router SAP Table destinations are listed in this pane. Choose the destination routers by selecting the appropriate entries in the Router SAP Table Destinations list. Clicking on an entry in this list highlights the corresponding router's icon in the Topology window if it is displayed.
Selecting a SAP service from the list of SAP services (e.g. User, User_Group, Print_Queue, File_Server etc.) automatically enters its corresponding SAP service number in the SAP Service field. Zero is the default (no SAP service provided.)
This window is displayed when a set of connectivity requirements are loaded for analysis from within the Requirement Sets window. Based on the loaded connectivity requirements, the available paths and their status are displayed in this window. Figure 7-7 partially shows results of the analysis performed on the implicitly defined srb_ring_1857 connectivity requirements for the current baseline. The SRB connectivity requirements file set (srb_ring_1857) was loaded from the Requirements Set window and analysis was performed, resulting in the displayed list of available paths.
Clicking on a column header sorts the entries displayed in this window according to the information contained within that column. For example, clicking on the Source Name column header displays the entries sorted alphabetically by the source router names.
Click on an entry to open the Topology window and highlight the corresponding path in the current zoom factor. If the path is outside the current viewing area of the Topology window, it is not displayed. See "Topology Window" in Chapter 4 for detailed information about the Topology window. Double-click on an entry to display the Round Trip Path window. See "Round Trip Path Window" for detailed information about the Round Trip Path window.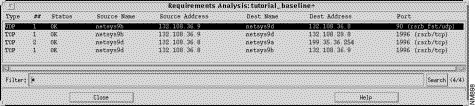
The components of this window are described below. See "General Window Components" for a description of the Close and Help buttons.
The transport layer protocol type used by the route (TCP, UDP, ICMP, IP, IPX, or SAP) is displayed in this column. See "Protocol" for a description of the TCP, UDP, ICMP, and IP transport layer protocol types.
The status of the path is displayed in this column. Possible path status values are described in Table 7-1.
| Path Status Values | Description |
|---|---|
| The path is operational. |
| The status of the path is unknown. |
| There are multiple paths available, however multiple paths are not operational for differing reasons. |
| The path is blocked. |
| The path is blocked because it is filtered out by an access list. |
| No route is available. This is the most common problem. |
| Source Route Bridging problem. |
| Encapsulation problem. |
| The requirement that there not be a path between two components failed, as an actual path is in existence. |
| A routing loop has been detected in this path. |
NOT OK is the status value displayed. For example, if an analysis returns three paths, all with routing loop problems, the status displayed would be ROUTING LOOP. If however, two of the three paths were operational and the third path had an encapsulation problem, the status displayed would be ENCAPSULATION. On the other hand, if one of the paths has an encapsulation problem, one has a routing loop problem, and one is operational, the status value displayed is NOT OK.
The name of the source router is displayed in this column.
The address of the source router is displayed in this column.
The name of the destination router is displayed in this column.
The address of the destination router is displayed in this column.
For IP paths, the port number, if applicable, and transport layer protocol used by the destination router are displayed in this column. For IPX paths, the socket number used by the destination router is displayed in this column. For SAP paths, the socket number and SAP service type used by the destination router are displayed in this column.
You are able to use the Filter field to specify a specific protocol, the number of equivalent (minimum) cost paths available, status, source name, source address, destination name, destination address, or port to search for within the available path entries. Pressing Return or clicking on the Search button initiates the search using the filter you have specified. The Requirements Analysis window entries containing text matching the search pattern are then displayed in the window. For example, if you specify *OK* in the Filter field then press Return or click on the Search button, a list of the entries with an OK status are displayed in this window.
Special characters are available for your use. The backslash character is used as a means to escape special characters. The wild card character (an asterisk) is used to match any character. For example, if you specified *132.108.2* in the Filter field and then clicked on the Search button, a list of the available paths with either a source or destination address containing 132.108.2 in an entry is displayed in the Requirements Analysis window. When the Filter field contains only an asterisk (the default search mode) all available paths are displayed. The question mark is used to denote any one character. For example, if you specify *132.108.3?* in the Filter field, all Requirements Analysis window entries containing the string 132.108.3 and ending with any character are displayed in the window. The negation operator (a tilde) is used to denote the characters not to match on within the available path entries. It is only allowed as the first character in the Filter field. For example, if you do not want to display the available paths using UDP, you would specify ~udp* in the Filter field and then press Return or click on the Search button. All path entries not containing udp are then displayed.
Compound searches are also permitted. For example, if you only wanted to display paths with an OK status using Port 90 (rsrb fst/udp), you would enter *OK*90*.
Click on this button to initiate the search of the available path entries using the filter you have specified in the Filter field. The number of entries containing a match with the specified filter and a total of all available paths are displayed within parentheses next to the Search button.
The Round Trip Path window, shown in Figure 7-8, is displayed from the Requirements Analysis window when you double-click on an entry.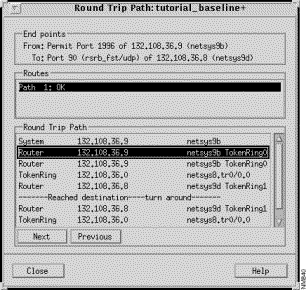
The components of this window are described below. See "General Window Components" for a description of the Close and Help buttons.
The source end point's port number, network address, and symbolic name are displayed in the From field. The destination end point's port number, transport layer protocol, network address, and symbolic name are displayed in the To field.
For SAP, the SAP server and its IPX address and the SAP service it provides are displayed in the From field. The name of the router containing the SAP Services Table is displayed in the To field. The router containing the SAP Services Table broadcasts to the other routers on the network its ability to gain access to the SAP services provided by SAP servers.
The state of the available route(s) between the two end systems is displayed in this pane. Click on an entry in the Routes list to display the corresponding round trip path in the Topology window. The route from the source end point to the destination end point is displayed as a thick, pink (the default color) line with arrows inserted at each network element along the way. The return route from the destination end point to the source end point is displayed as a thin, pink (the default color) line with arrows inserted at each network element along the way.
In the case of SAP, click on an entry in the Routes list to display the path between the provider or a SAP service and the router containing the SAP Services Table, in the Topology window.
Click on an entry in the Round Trip Path list to highlight that network element's icon and display it's name or address, in the Topology window. Double-click on an entry in the Round Trip Path list to highlight that network element's icon in the Topology window and to open its corresponding Router/LAN Segment/Link Segment/End System configuration window. Within the Round Trip Path list, an informational message "Reached destination - turn around" is displayed. This message signifies when the end point of the path is reached. The subsequent entries in the list denote the components in the return path to the other end point. For SAP, a return path does not exist.
Click on this button to go to the next entry in the Round Trip Path list. The corresponding network element's icon is highlighted in the Topology window.
Click on this button to go to the previous entry in the Round Trip Path list. The corresponding network element's icon is highlighted in the Topology window.
A sample Configuration Changes window, shown in Figure 7-9, is displayed when you select the Scenario>Configuration Changes menu option in the Connectivity Tools window. Lists of the router configuration files and routers whose attributes you have modified this session are displayed. This window is continually updated to reflect when router attributes are modified. You are able to display and highlight a router's icon in the Topology window, view or modify a router's attributes, view router configuration text output, and generate delta file(s) containing the changes made to the router configuration files and/or router attributes using this window. See Chapter 12 in the Enterprise/Solver Connectivity Tools User's Guide for a tutorial describing the Connectivity Solver configuration changes capabilities.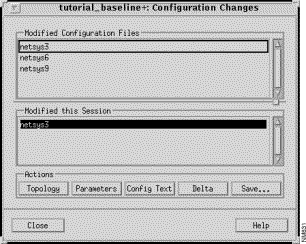
The components of this window are described below. Click on the Close button to dismiss the Configuration Changes window. Provided you have access to a Mosaic or Netscape HTML browser, clicking on the Help button displays documentation about the Configuration Changes window. The HTML browser specified by the ECSP_HELPVIEWER environment variable is used for this purpose.
A list of the router configuration files you have modified, using Connectivity Tools features, since the baseline was created is displayed in this pane. Select an entry from this list prior to clicking on the buttons described below. They can be modified as follows:
A list of the routers whose attributes you have modified via the Router Configuration windows in the current scenario is displayed in this pane. Select an entry from this list prior to clicking on the buttons described below.
Click on this button, with an entry selected in the Router Configuration Files or Modified This Session list, to highlight the router's icon in the Topology window. See "Topology Window" in Chapter 4 for detailed information about the Topology window.
Click on this button, with a router selected in the Router Configuration Files or Modified This Session list, to display the router's Router Configuration window. You can view and modify various router attributes from this window. Double-clicking on a router entry in the Router Configuration Files or Modified This Session list produces the same results. See "Router Configuration Window" in Chapter 8 for detailed information about the Router Configuration window.
Click on this button, with a router selected in the Router Configuration Files or Modified This Session list, to display the router's Configuration Text window. The router's configuration text file is displayed in this window. The configuration text file is a version of the router's configuration file as it is currently understood by the Connectivity Solver program, including any router attribute modifications you have made in a scenario. The purpose of this file is to more easily allow you to track the changes made to routers during "what-if" analysis.
Depending on the list you have an entry selected in the Configuration Changes window, either the Configuration Delta-Initial or Configuration Delta-Baseline window is displayed.
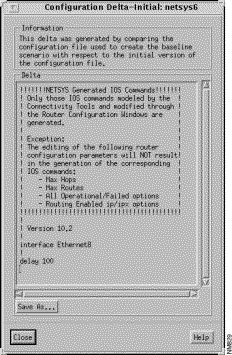
netsys3 Ethernet0/0 interface were modified in the netsys3 Interface Parameters window, an entry for the netsys3 router was placed in the Configuration Changes window's Modified this Session list. Upon selecting the netsys3 entry and clicking on the Delta button, the Configuration Delta-Baseline window, shown in Figure 7-11 is displayed. Click on the Save As button to save the newly generated IOS router commands to a file. See "Save Configuration Information Window" for detailed information about the Save Configuration Information window. 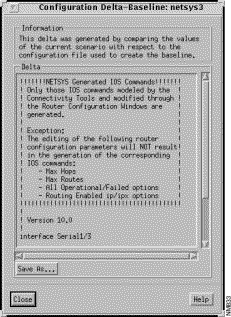
Clicking on this button generates the delta of the changes you have made between the following:
Clicking on this button displays the Save Changes window, shown in Figure 7-12. The Save Changes window contains a list combining the contents of the Modified Configuration Files and Modified This Session lists. Entries found in both lists are only listed once in the Save Changes window. You can select one, some, or all of the entries in the Save Changes For list to have delta files generated containing the changes made to either the baseline scenario or the initial revision of the router configuration file. The Save Changes window, shown in Figure 7-12 is displayed.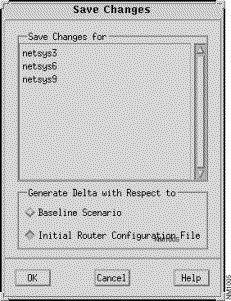
The Save Configuration Information window, shown in Figure 7-13, is displayed when you click on the Save As button in the Configuration Delta-Initial and Configuration Delta-Baseline windows.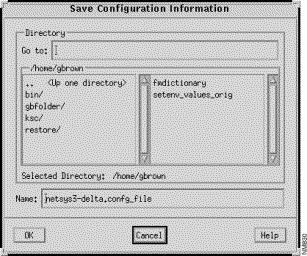
The components of this window are described below. Click on the Cancel button to terminate the save function and to dismiss the Save Configuration Information window. Provided you have access to a Mosaic or Netscape HTML browser, clicking on the Help button displays documentation about the Save Configuration Information window. The HTML browser specified by the ECSP_HELPVIEWER environment variable is used for this purpose.
Specify the directory where the delta file is to be saved to in the Go to field, then press Return. The directories and files located in the current directory are displayed in the panes below the Go to field. Directories are listed in the left pane, files in the right pane. The default directory is your home directory. Navigation through the directories can be accomplished by double-clicking on an entry in the directory list. The Selected Directory field displays the current directory either specified or navigated to.
Specify the name of the file where the delta changes should be saved. The default file name to save the configuration file delta changes to has the format config_file_name-delta.confg_file. The default file name to save the session delta changes to has the format router_name-delta.
Click on the OK utton when the desired directory and file names are specified.
|
|