|
|

This chapter describes the components of the following windows:
The Router Configuration window is used to access router configuration attributes. As there are numerous router related attributes, many windows can be displayed from actions initiated in the Router Configuration window. See "IP Configuration Windows" for detailed information about IP-related attributes and the corresponding windows displayed as a result of clicking on IP-related buttons. See "IPX Configuration Windows" for detailed information about IPX-related attributes and the corresponding windows displayed as a result of clicking on IPX-related buttons.
The following buttons are present in several windows. For brevity, they are described once here.
You display the Router Configuration window in one of the following ways:
See "Topology Window" for detailed information about the Topology window. See "Round Trip Path Window" for detailed information about the Round Trip Path window and "Find Device Window" for detailed information about the Find Device window. Tutorials pertaining to some of the features described in this chapter are provided in the Enterprise/Solver Connectivity Tools User's Guide.
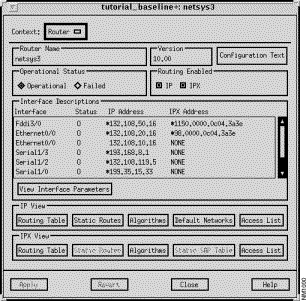
A Router Configuration window, shown in Figure 8-1, is used to view and modify router and router interface attributes. Placing the cursor or clicking (if the mouse is set to click-to-focus mode) within a Router Configuration window highlights that router's icon in the Topology window if it is displayed.

This window's components are described in the following sections. See "General Window Components" for a description of the Context, Apply, Revert, Close, and Help buttons.
The name of the router is displayed in this pane.
The IOS software version number as specified by the version command in the router configuration file, is displayed in this pane.
Click on this button to display the Configuration Text window. A version of the router configuration file, showing the commands modeled by the Connectivity Tools, is displayed. When using the Connectivity Baseliner, the contents of this file do not change. When using the Connectivity Solver, modifications made to the current router attributes are also shown in this text file. You can save the configuration text file for future reference. See "Configuration Text Window" for a detailed description of the Configuration Text window components.
Click on the appropriate toggle button to change the operational status of the router to the desired setting (Operational/Failed). Clicking on the Failed button followed by the Apply button turns the corresponding router icon in the Topology window red. Subsequently clicking on the Operational button followed by the Apply button turns the corresponding icon in the Topology window back to its original color. Operational is the default setting.
Click on the appropriate toggle button to enable/disable the router for IP and/or IPX routing.
The symbolic interface names supported by the router, as specified by the interface command in the router configuration file, are listed in this column. Also listed are the router's slot and/or port numbers. For example, the Interface entry Ethernet2/5 corresponds to an Ethernet interface using the Cisco Series 7000 backplane slot number 2 and port number 5. To obtain additional information about or modify a particular interface's attributes, select it from the list of interfaces, then click on the View Interface Parameters button. The Interface Parameters window is displayed. See "Interface Parameters Window" for a description of the Interface Parameters window components.
The current state of the router interface is displayed in this column. The state is either Operational (O) or Failed (F).
The router interfaces' IPX addresses as specified by the ipx address interface subcommand in the router configuration file, are listed in this column.
Click on this button to switch the context from the Router Configuration window to the Interface Parameters window. An interface entry in the Interface Descriptions list in the Router Configuration window must be selected prior to clicking this button. See "Interface Parameters Window" for a detailed description of the Interface Parameters window components.
Click on this button to switch the context from the Router Configuration window to the IP Routing Table window. Information about the Routing Table as computed in simulation is provided in the IP Routing Table window. See "IP Routing Table Window" for a detailed description of the IP Routing Table window components.
Click on this button to switch the context from the Router Configuration window to the IP Static Routes window. Information about the static routes configured for this router is provided in the IP Static Routes window. See "IP Static Routes Window" for a detailed description of the IP Static Routes window components.
Click on this button to switch the context from the Router Configuration window to the IP Routing Algorithms window. Information about the algorithms used to calculate the Routing Table is provided in the IP Routing Algorithms window. See "IP Routing Algorithms Window" for a detailed description of the IP Routing Algorithms window components.
Click on this button to switch the context from the Router Configuration window to the IP Default Networks window. Information about the default networks configured for this router is provided in the Default Networks window. See "IP Default Networks Window" for a detailed description of the Default Networks window components.
Click on this button to switch the context from the Router Configuration window to the IP Access List Summary window. A summary of the existing IP Access List numbers and the interfaces and/or routing algorithms they apply to are displayed in this window. See "IP Access List Summary Window" for a detailed description of the IP Access List Summary window components.
Click on this button to switch the context from the Router Configuration window to the IPX Routing Table window. Information about the routing table as computed in simulation are provided in the IPX Routing Table window. See "IPX Routing Table Window" for a detailed description of the IPX Routing Table window components.
Click on this button to switch the context from the Router Configuration window to the IPX Static Routes window. Information about the static routes configured for this router are provided in the IPX Static Routes window.
Click on this button to switch the context from the Router Configuration window to the IPX Routing Algorithms window. Information about the algorithms used to calculate the routing table are provided in the IPX Routing Algorithms window. See "RIP IPX Algorithm Window" for a detailed description of the IPX Routing Algorithms window components.
Click on this button to switch the context from the Router Configuration window to the Static SAP Table window. Information about the SAP Table entries are provided in the Static SAP Table window.
Click on this button to switch the context from the Router Configuration window to the IPX Access List Summary window. A summary of the existing IPX Access List numbers and the interfaces and/or routing algorithms they apply to are displayed in this window. See "IPX Access List Summary Window" for a detailed description of the IPX Access List Summary window components.
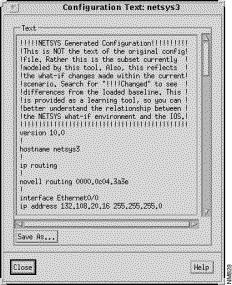
The Configuration Text window, shown in Figure 8-2, is displayed in one of the following manners:
This window displays a version of the router's configuration file currently understood by the Connectivity Tools, including any router attribute modifications you have made in a scenario. The purpose of this file is to more easily allow you to track the changes made to routers during "what-if" analysis.
| The router configuration information displayed in this text file is | Warningnot a usable configuration file for actual implementation in a router. It is a subset of the actual router configuration, as only those configuration commands that were parsed to build the baseline are included. It also does not include no commands. Certain parts of the configuration text file may be useful as is. If so, you can save the router configuration text file and cut and paste the changes into the actual router configuration file. |

Figure 8-2: Configuration Text Window: netsys3 Router
This window's components are described in the following sections. See "General Window Components" for a description of the Close and Help buttons.
A version of the router configuration file, showing the commands modeled by the Connectivity Tools, is displayed in this pane. When using the Connectivity Baseliner, the contents of this file do not change. When using the Connectivity Solver, modifications you have made to the current router attributes through "what-if" scenarios are denoted by !!!!Changed appearing in this text file. For example, if you turn off the IP split horizon feature on an interface, the interface's split horizon entry in the router configuration file changes from ip split-horizon to no ip split-horizon. You can save the configuration text file for future reference.
!!!!Changed comment is inserted in the router's configuration text file. When you edit an existing access list row, a !!!!Changed comment does not appear in the configuration text file. However, the modified access list rule is actually inserted in the configuration text file.
The following limitations exist with the configuration text being displayed:
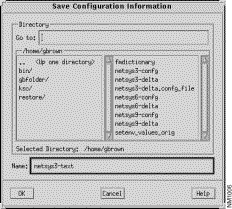
Click on this button to save a copy of the router configuration text file. The Save Configuration Information window, shown in Figure 8-3, is displayed.
Specify the name of the file in the Name field and its location in the Go to field. Navigation through the directories can also be accomplished by double-clicking on an entry in the list of directories displayed in the left pane. The files residing in the current directory are listed in the right pane. The Selected Directory field displays the current directory you have either specified or navigated to. The default directory is your home directory. The default file name has a format of router_name-text. Click on the OK button to save the configuration text to the specified file.
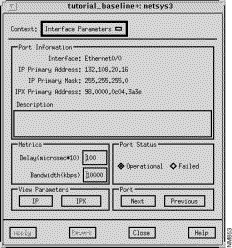
The Interface Parameters window, shown in Figure 8-4, is displayed when you select a router interface from the Interface Descriptions list in the Router Configuration window, then click on the View Interface Parameters button. This window allows you to view or modify the selected router's interface and port attributes. You are also able to view or modify the router's IP and IPX protocol specific parameters from this window.
netsys3 Router
This window's components are described in the following sections. See "General Window Components" for a description of the Context, Apply, Revert, Close, and Help buttons.
This pane provides a description of this router's interface as specified by the description interface subcommand in the router configuration file.
The default delay interval, in microseconds times ten, is displayed in this field. The value is determined by the type of media the port is configured for, as shown in Table 8-1. The port's default delay value can be modified by specifying a new value in the text field, pressing Return, and then clicking on the Apply button.
The default bandwidth, in Kbps, is displayed in this field. The value is determined by the type of media the port is configured for, as shown in Table 8-1. The port's default bandwidth value can be modified by specifying a new value in the text field, pressing Return, and then clicking on the Apply button.
| Media Type | Delay (microseconds times 10) | Bandwidth (Kbps) |
|---|---|---|
| 100 | 10,000 |
| 10 | 100,000 |
| 63 | 16,000 |
| 5 | 1 |
| 2000 | 1544 |
| 2000 | 45,045 |
Click on the appropriate toggle button to set the operational status of the router interface to the desired setting (Operational/Failed). Operational is the default setting.
Click on this button to switch the context from the Interface Parameters window to the IP Interface Parameters window. The interface parameters specific to the IP routing protocol are found in this window. See "Router Configuration Windows" for detailed descriptions of the IP Interface Parameters window components as well as the other IP-related window components.
Click on this button to switch the context from the Interface Parameters window to the IPX Interface Parameters window. The interface parameters specific to the IPX routing protocol are found in this window. See "IPX Configuration Windows" for detailed descriptions of the IPX Interface Parameters window as well as the other IPX-related window components.
Click on this button to display the router interface attributes of the port following the selected interface in the Interface Descriptions list. To display the current port's interface attributes again, click on the Previous button.
Click on this button to display the router interface attributes of the port listed prior to the current interface in the Interface Descriptions list. To display the current port's interface attributes again, click on the Next button.
|
|