|
|

The following buttons are present in several windows. For brevity, they are described once here.
The IPX Interface Parameters window, shown in Figure 10-1, is displayed when you click on the IPX button in the Interface Parameters window's View Parameters pane. This window allows you to assign an IPX access list to the selected router interface.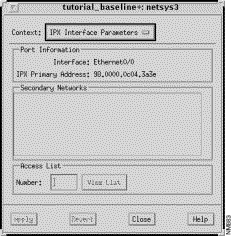
This window's components are described in the following sections. See "General Window Components" for a description of the Context, Apply, Revert, Close, and Help buttons.
The router's symbolic interface name, as specified by the ipx interface command in the router configuration file, selected in the Interface Description list in the Router Configuration window, is displayed in this field.
The router interface's IPX primary address, as specified by the ipx address interface subcommand in the router configuration file, is displayed here. IPX primary addresses are specified as network numbers (32-bits in length written in hexadecimal) followed by a host address (48-bits in length written in hexadecimal) separated by dots. An example IPX primary address of 1b.0000.0a00.12ab specifies a network number of 1b and a host address of 0000.0a00.12ab.
Specify a standard or extended IPX access list number to be assigned to the selected IPX interface, then press Return. If already defined in the configuration, it is displayed automatically. Click on the Apply button to assign the access list number. At this point the View List button is activated. Valid standard IPX access list numbers range from 800 through 899. Valid extended IPX access list numbers range from 900 through 999.
Click on this button to switch the context from the IPX Interface Parameters window to the IPX Access List window. A valid standard or extended IPX access list number must be selected and entered in the Access List Number field for the context switch to occur. If a standard IPX access list number is specified (800 through 899), see "Standard IPX Access List Window" for a detailed description of the Standard IPX Access List window components. If an extended IPX access list number is specified (900 through 999), see "Extended IPX Access List Window" for a detailed description of the Extended IPX Access List window components.
The Standard IPX Access List window, shown in Figure 10-2, is displayed when you specify an standard IPX access list number (800 through 899) in the Number field and then click on the View List button in the IPX Interface Parameters window. This window allows you to view, add, edit, and delete entries in the specified standard IPX access list. The window's components are described in the following sections.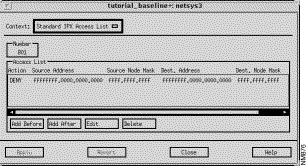
This window's components are described in the following sections. See "General Window Components" for a description of the Context, Add Before, Add After, Edit, Delete, Apply, Revert, Close, and Help buttons. Clicking on the Add Before, Add After, and Edit buttons display the Edit Standard IPX Access List window. A specific entry in the access list can be selected prior to clicking on the Add Before, Add After, and Edit buttons. See "Edit Standard IPX Access List Window Components" for a detailed description of the window's components.
The specified standard IPX access list number is displayed here. Valid standard IPX access list numbers range from 800 through 899.
This pane lists the selected standard IPX Access List entry's values. An entry contains the Action (PERMIT/DENY) setting, the Source IPX Address and Source IPX Node Mask values, and the Destination IPX Address and Destination Node Mask values. These values are described in detail in "Edit Standard IPX Access List Window Components."
The Edit Standard IPX Access List window, shown in Figure 10-3, is displayed when you click on the Add Before, Add After, or Edit buttons in the Standard IPX Access List window. This window allows you to add or modify a standard IPX access list entry. The window's components are described in the following sections.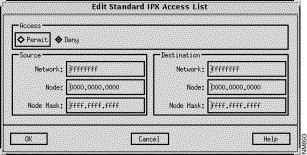
See "General Window Components" for a description of the OK, Cancel, and Help buttons.
Click on either the Permit or Deny toggle button to set the action mode, accordingly. Select the Permit button to permit access from the specified source address to the specified destination address. Select the Deny button to deny access from the specified source address to the specified destination address.
The Extended IPX Access List window, partially shown in Figure 10-4, is displayed when you specify an extended IPX access list number (900 through 999) in the Number field and then click on the View List button in the IPX Interface Parameters window. This window allows you to view, add, edit, and delete entries in the specified extended IPX access list. The window's components are described in the following sections.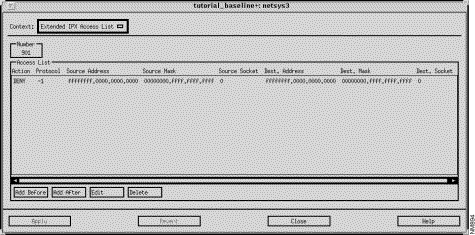
This window's components are described in the following sections. See "General Window Components"or a description of the Context, Add Before, Add After, Edit, Delete, Apply, Revert, Close, and Help buttons. Clicking on the Add Before, Add After, and Edit buttons display the Edit Extended IPX Access List window. A specific entry in the access list can be selected prior to clicking on the Add Before, Add After, and Edit buttons. See "Edit Extended IPX Access List Window Components" for a detailed description of the window's components.
The specified extended IPX access list number is displayed here. Valid extended IPX access list numbers range from 900 through 999.
This pane lists the selected extended IPX Access List entry's values. An entry contains the action (PERMIT/DENY access), protocol (packet) type, source IPX address, node mask, and socket number values, and the destination IPX address, node mask, and socket values. These values are described in detail in "Edit Standard IPX Access List Window Components."
The Edit Extended IPX Access List window, shown in , is displayed when you click on the Add Before, Add After, or Edit buttons in the Extended IPX Access List window. This window allows you to add or modify an extended IPX access list entry. The window's components are described in the following sections. See "General Window Components" for a description of the OK, Cancel, and Help buttons.
Select the Permit button to permit access from the source IPX network and node addresses via the source socket number specified to the destination IPX network and network node addresses through the destination socket number specified. Select the Deny button to deny access from the source IPX network and node addresses via the source socket number specified to the specified destination IPX network and network node addresses through the destination socket number specified. Deny access is the default.
Specify the decimal number of an IPX protocol type (also referred to as a packet type) in this field. In IOS Versions 9.21 through 10.2, a value of zero specifies any protocol over the specified socket number. In IOS Version 10.3, the default value is minus one (any packet type.) A value of one specifies RIP. A value of four specifies SAP.
Specify a valid IPX source network in this field.
Specify a valid IPX source node address, in dotted-triplet format, in this field.
Specify a valid IPX network mask signifying the bits in the source network to be ignored, in this field.
Specify a valid IPX source node mask signifying the bits in the source address to be ignored, in dotted-triplet format, in this field.
Specify a valid IPX source socket number in this field.
Specify a valid IPX destination network in this field.
Specify a valid IPX destination node address, in dotted-triplet format, in this field.
Specify a valid IPX network mask signifying the bits in the source network to be ignored, in this field.
Specify a valid IPX node mask signifying the bits in the destination address to be ignored, in dotted-triplet format, in this field.
Specify a valid IPX destination socket number in this field.
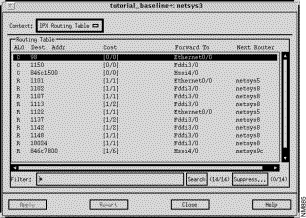
The IPX Routing Table window is displayed when you click on the IPX Routing Table button in the Router Configuration window. The IPX Routing Table window shown in Figure 10-6, displays the IPX Routing Table entries known to the netsys3 router. This table is constructed from the information contained in the baseline router configuration files. Routing Table entries may not be edited from this window. Double-clicking on a Routing Table entry highlights the next hop router in the Topology window.
This window's components are described in the following sections. See "General Window Components" for a description of the Context, Apply, Revert, Close, and Help buttons.
The IPX Routing Table pane displays a particular router's Routing Table entries. An IPX Routing Table entry contains the routing algorithm, destination network address, cost factor, interface used to send packets to the next router along the path to the destination network, and the next router in the path to the destination network values.
Clicking on an IPX Routing Table pane column header automatically sorts the information displayed in that column within the Routing Table pane accordingly. For example, when you click on the Forward to column header, the information displayed in the IPX Routing Table pane is alphabetically sorted by the router's interface names.
The IPX network address of the destination network is displayed in this column.
The first number displayed within the bracket is the administrative distance (trustworthiness) of the routing information source. Administrative distance values range from 0 through 255. The general rule is the higher the value, the lower the trust rating. An administrative distance value of 255 signifies that the routing information source should not be trusted. The second number is the hop count.
This router's interface used to send information to the next router along the path to the destination network, is displayed in this column.
The next router in the path to the destination network is displayed in this column. Double-clicking on an IPX Routing Table entry highlights the next hop router in the Topology window.
You are able to use the Filter field to specify a specific algorithm, destination address, cost factor, or device to search for within the IPX Routing Table. Pressing Return or clicking on the Search button initiates the search using the filter you have specified. The IPX Routing Table entries matching the search pattern are then displayed in the Routing Table pane. For example, if you wish to find all routes with a cost factor of 0/0, you would specify *\[0\/0\]* in the Filter field and then press Return or click on the Search button. Only the IPX Routing Table entries containing routes with a cost factor of 0/0 are then displayed in the Routing Table pane.
The question mark is used to denote any one character. For example, if you specify *netsys?* in the Filter field, all IPX Routing Table entries containing the string netsys and ending with any character are displayed in the Routing Table pane.
The negation operator (tilde) is used to denote the characters not to match on within the IPX Routing Table. It is only allowed as the first character in the Filter field. For example, if you specify ~*132.* in the Filter field and then press Return or click on the Search button, all entries not containing the string 132. are displayed in the Routing Table pane.
Compound searches are also permitted. For example, if you wanted to display all IPX Routing Table entries with forward to interface value of Fddi and whose next hop router is netsys8, you would enter *Fddi*netsys8* in the Filter field and then press Return or click on the Search button.
Click on this button to initiate the search of the IPX Routing Table using the filter you have specified in the Filter field.
Click on this button to remove specified types of entries from the IPX Routing Table. See "IPX Suppress Entries Window Components" for detailed information about the Suppress Entries window components. The number of IPX Routing Table entries being suppressed and a total of all IPX Routing Table entries are displayed within parentheses next to the Suppress button.
The IPX Suppress Entries window, shown in Figure 10-7, is displayed when you click on the Suppress button in the IPX Routing Table window. This window allows you to specify the information you wish to keep from being included in the IPX Routing Table being displayed. For example, you can specify to have all directly connected (C) related entries suppressed from the IPX Routing Table by selecting the Add Suppression ALG button, specifying C in the ALG field, deselecting all other Add Suppression buttons, and then clicking on the Add button.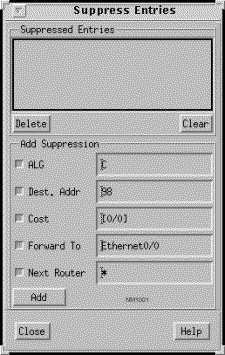
This window's components are described in the following sections. See "General Window Components" for a description of the Close and Help buttons. When you click on the Close button, the suppression parameters currently in effect are saved. When you subsequently invoke the IPX Suppress Entries window, the suppression parameters that were in effect when the window was last closed remain in effect.
A list of the suppression entries currently in effect are displayed in this pane. When an entry is added to this list, the IPX Routing Table entries that match the suppression parameters are no longer displayed in the IPX Routing Table. Initially suppression is not in effect, therefore the Suppressed Entries list is empty.
Select an entry from the Suppressed Entries list then click on this button to remove that entry from the list. This action results in the IPX Routing Table entries that were suppressed due to the suppression parameters associated with this entry being displayed again and also removes the entry's suppression parameters from existence.
Click on this button to remove all of the entries used to suppress IPX Routing Table entries from the Suppressed Entries list. This action results in the IPX Routing Table entries that were suppressed due to the suppression parameters associated with all of the entries being displayed again and also removes all suppression parameters from existence.
The Add Suppression pane contains buttons related to the columns in the IPX Routing Table window's Routing Table pane. Deselecting a button removes that category from suppression consideration. Select a buttonen specify a value that when found within that column in an IPX Routing Table entry, will cause that entry to be suppressed from the table. For example, if you want to suppress IPX Routing Table entries that use the Ethernet0/0 interface to forward packets on to the next router, select the Forward To button, specify Ethernet0/0 in the button's text field, deselect the other Add Suppression buttons, then click on the Add button. All entries that contained Ethernet0/0 in the Forward To column are no longer shown in the IPX Routing Table. The suppression number within the parentheses next to the Suppression button is updated to reflect the number of IPX Routing Table entries currently being suppressed.
When you initially click on the Suppress button or create a suppression entry and add it to the Suppressed Entries list, all of the Add Suppression buttons in the Suppress Entries window are selected and their corresponding text fields contain the values associated with the selected entry in the IPX Routing Table window. Clicking on the Add button at this point removes that entry from the IPX Routing Table.
You can use the wild card character (an asterisk) to match any or all characters. When a field contains only an asterisk it is equivalent to specifying all items within that category. For example, specifying an asterisk in the ALG field, deselecting all other Add Suppression buttons, and then clicking on the Add button results in an empty IPX Routing Table as the suppression mode was set to suppress entries for all protocol algorithms.
Select the ALG button and then specify the protocol algorithm(s) whose entries you do not want included in the IPX Routing Table, in the ALG field.
Select the Dest. Addr button and then specify the IPX network address of the destination network whose entries you do not want included in the IPX Routing Table, in the Dest. Addr field.
Select the Cost button and then specify the administrative distance and hop count cost values whose entries you do not want included in the IPX Routing Table, in the Cost field.
Select the Forward To button and then specify the symbolic name of this router's interface that is used to send information to the next router along the path to the destination network whose entries you do not want included in the IPX Routing Table, in the Forward To field.
Select the Next Router button and then specify the name of the next router along the path to the destination whose entries you do not want included in the IPX Routing Table, in the Next Router field.
Once you have selected the IPX Routing Table category button(s) and specified the associated text in the button's text field(s), clicking on the Add button adds the suppression parameters to the Suppressed Entries list and initiates the suppression of the corresponding entries from the IPX Routing Table. The number of entries currently being suppressed (displayed within parentheses next to the Suppression button in the IPX Routing Table window) is updated accordingly.
When you click on the Close button, the suppression parameters currently in effect are saved. When you subsequently invoke the Suppress Entries window, the suppression parameters that were in effect when the window was last closed remain in effect.
The IPX Routing Algorithms window, shown in Figure 10-8, is displayed when you click on the IPX Algorithms button in the Router Configuration window. This window allows you to view and modify the IPX routing algorithm configured for the router. The Routing Information Protocol (RIP) is the only IPX routing algorithm currently supported by the Connectivity Tools.
This window's components are described in the following sections. See "General Window Components" for a description of the Context, Apply, Revert, Close, and Help buttons.
This pane displays a list of the IPX Routing Algorithms supported by the current router. As RIP is the only IPX routing algorithm supported in this release of the Connectivity Solver, select the rip entry from the list then click on the View IPX Routing Algorithm button. The RIP Algorithm window, described in detail in "RIP IPX Algorithm Window" is displayed.
Select the RIP IPX algorithms entry in the Algorithms list, then click on this button to switch the context from the IPX Routing Algorithms window to the RIP IPX Algorithm window. The RIP Algorithm window, described in detail in "RIP IPX Algorithm Window" is displayed. Information about the RIP routing protocol attributes are displayed in this window. New attributes can be added and existing attributes can be modified or deleted from within this window.
The RIP IPX Algorithm window, shown in Figure 10-9, is displayed when you select the rip routing protocol entry in the Algorithms list in the IPX Routing Algorithms window, and then click on the View Routing Algorithm button. This window allows you to view and modify the RIP IPX routing protocol algorithm attributes being used in the current router configuration.
This window's components are described in the following sections. See "General Window Components" for a description of the Context, Delete, Apply, Revert, Close, and Help buttons.
When an entry in either the SAP or Network Filter Interface List is selected, the standard IPX access list number associated with the selected entry is displayed in this field. The View List button is then activated. Valid access list numbers range from 800 through 899 for IPX Network filters. Valid access list numbers range from 1000 through 1099 for IPX SAP filters.
Click on this button to switch context to the corresponding Filter Interface List window (SAP or Network.) An IPX access list number must be displayed, via the selection of one of the Filter Interface List entries, for the context switch to occur. See "IPX SAP Filter List Window" for a detailed description of the IPX SAP Filter List window components. See "IPX Standard Network Filter List Window" for a detailed description of the IPX Network Filter List window components.
The Edit SAP Filter Interface List window, shown in Figure 10-12, is displayed when you click on the Add button in the SAP Filter Interface List pane in the RIP IPX Algorithm window. This window allows you to create a SAP filter which is then added to the SAP Filter Interface List pane.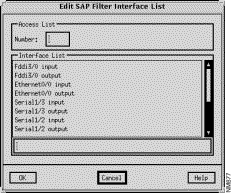
This window's components are described in the following sections. See "General Window Components" for a description of the OK, Cancel, and Help buttons.
The IPX SAP Filter List window, shown in Figure 10-11, is displayed when you select a SAP Filter Interface List entry and then click on the View List button in the RIP IPX Algorithm window. This window allows you to create a SAP filter and then add it to the IPX SAP Filter List.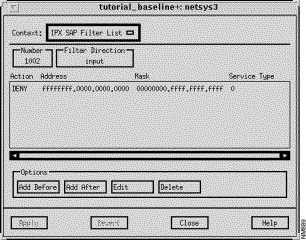
This window's components are described in the following sections. See "General Window Components" for a description of the Context, Add Before, Add After, Edit, Delete, Apply, Revert, Close, and Help buttons. Clicking on the Add Before, Add After, and Edit buttons displays the Edit IPX SAP Filter List window. A specific entry in the IPX SAP Filter List can be selected prior to clicking on the Add Before, Add After, and Edit buttons. See "Edit IPX SAP Filter List Window Components" for a detailed description of the window's components.
The IPX SAP Filter access list number is displayed here. Values range from 1000 through 1099.
The filter direction of this access list is displayed in this field (input or output).
This pane lists the selected standard IPX SAP Filter List entry values. An entry contains the action (PERMIT/DENY) setting, the IPX address, IPX mask values, and the IPX SAP service type values. These values are described in detail in "Edit IPX SAP Filter List Window"
PERMIT or DENY. PERMIT allows forwarding of service advertisements from the specified address(es). DENY blocks service advertisements from the specified address(es). The Edit IPX SAP Filter List window, shown in Figure 10-12, is displayed when you click on the Add Before, Add After, or Edit buttons in the IPX SAP Filter List window. This window allows you to create a SAP filter which is then added to the IPX SAP Filter List in the IPX Routing Algorithms window.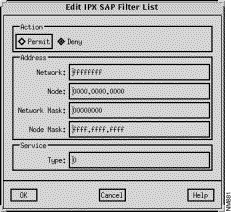
This window's components are described in the following sections. See "General Window Components" for a description of the OK, Cancel, and Help buttons.
Select the Permit button to permit advertisement of the specified SAP service from the specified address. Select the Deny button to deny advertisement of the specified SAP service from the specified address.
Specify the IPX network number in this field. The network number is 32-bits in length written in hexadecimal.
Specify the IPX network mask in this field. The network mask is 32-bits in length written in hexadecimal.
Specify the IPX SAP service type on which to filter in this field. Sample SAP service types are listed in Table 10-1.
| SAP Service Types | Description of the SAP Service Types |
|---|---|
0 | Unknown |
1 | User |
2 | User Group |
3 | Print Queue |
4 | File Server |
5 | Job Server |
6 | Gateway |
7 | Print Server |
8 | Archive Queue |
9 | Archive Server |
A | Job Queue |
B | Administration |
24 | Remote Bridge Server |
47 | Advertising Printer Server |
The Edit IPX Network Filter List window, shown in Figure 10-13, is displayed when you click on the Add button in the Network Filter Interface List pane in the RIP IPX Algorithm window. This window allows you to specify the interface, network filter direction, and IPX access list number to apply to this network filter. Network input filters are used to control which networks are added to the router's Routing Table. Network output filters are used to control the list of networks included in routing updates sent out an interface.
Click on the OK button to add the interface name and filter direction pair to the Network Filter Interface List in the IPX RIP Algorithms window.
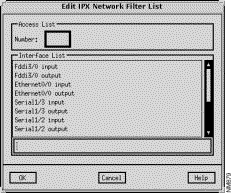
This window's components are described in the following sections. See "General Window Components" for a description of the OK, Cancel, and Help buttons.
Specify a standard or extended IPX access list number to be assigned to the selected IPX network filter. Valid standard IPX access list numbers range from 800 through 899. Valid extended IPX access list numbers range from 900 through 999.
A list of the router's available interfaces and filter directions are displayed in this list. Select an interface and the desired filter direction, then click on the OK button. The selected entry is added to the Network Filter Interface List in the RIP IPX Algorithm window. Upon returning to the RIP IPX Algorithm window, click on the Apply button to have the specified network filter take effect in the current router configuration and to activate the View List button.
The IPX Standard Network Filter List window, shown in Figure 10-14, is displayed when you select a standard IPX Network Filter Interface List entry and then click on the View List button in the RIP IPX Algorithm window. This window allows you to add, modify, or delete a standard IPX network filter list entry.
This window's components are described in the following sections. See "General Window Components" for a description of the Context, Add Before, Add After, Edit, Delete, Apply, Revert, Close, and Help buttons. Clicking on the Add Before, Add After, and Edit buttons displays the Edit IPX Standard Network Filter List window. A specific entry in the IPX Network Filter List can be selected prior to clicking on the Add Before, Add After, and Edit buttons. See "Edit IPX Standard Network Filter List Window Components" for a detailed description of the window's components.
The standard access list number assigned to the IPX network filter is displayed in this field. Standard IPX access list values range from 800 through 899.
This pane lists the selected standard IPX Network Filter List entry values. An entry contains the action (PERMIT/DENY) setting, the source IPX address and source IPX node mask values, and the destination IPX address and destination node mask values. These values are described in detail in "Edit IPX Standard Network Filter List Window."
The Edit IPX Standard Network Filter List window, shown in Figure 10-15, is displayed when you click on the Add Before, Add After, or Edit buttons in the IPX Standard Network Filter List window. This window allows you to define an IPX network filter extended access list entry and add it to the selected access list.

This window's components are described in the following sections. See "General Window Components" for a description of the OK, Cancel, and Help buttons.
Select the Permit button to allow distribution of routing updates between the specified networks/devices. Select the Deny button to block distribution of routing updates between the specified networks/devices. Deny is the default.
The IPX Extended Network Filter List window, partially shown in Figure 10-16, is displayed when you select an extended IPX Network Filter Interface List entry and then click on the View List button in the IPX RIP Algorithm window. This window allows you to add, modify, or delete an extended IPX network filter list entry.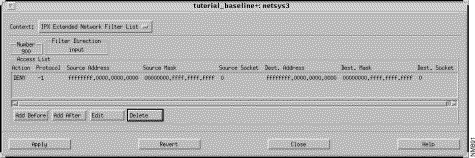
This window's components are described in the following sections. See "General Window Components" for a description of the Context, Add Before, Add After, Edit, Delete, Apply, Revert, Close, and Help buttons. Clicking on the Add Before, Add After, and Edit buttons displays the Edit IPX Extended Network Filter List window. A specific entry in the IPX Network Filter List can be selected prior to clicking on the Add Before, Add After, and Edit buttons. See "Edit IPX Extended Network Filter List Window Components" for a detailed description of the window's components.
The entry's extended IPX network filter access list number is displayed here. Values range from 900 through 999.
This pane lists the selected extended IPX Network Filter List entry values. An entry contains the action (PERMIT/DENY access) setting, the source IPX address, node mask, and socket number values, and the destination IPX address, node mask, and socket number values. These values are described in detail in "Edit IPX Extended Network Filter List Window Components."
The Edit IPX Extended Network Filter List window, shown in Figure 10-17, is displayed when you click on the Add Before, Add After, or Edit buttons in the IPX Extended Network Filter List window. This window allows you to add or modify an extended IPX network filter access list entry. The window's components are described in the following sections. See "General Window Components" for a description of the OK, Cancel, and Help buttons.
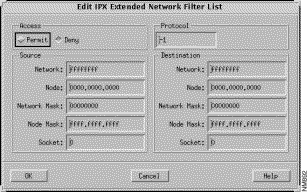
Select the Permit button to permit access from the source IPX network and node addresses via the source socket number specified to the destination IPX network and network node addresses through the destination socket number specified. Select the Deny button to deny access from the source IPX network and node addresses via the source socket number specified to the specified destination IPX network and network node addresses through the destination socket number specified. Deny access is the default.
Specify a valid IPX source network in this field.
Specify a valid IPX source node address, in dotted-triplet format, in this field.
Specify a valid IPX network mask signifying the bits in the source network to be ignored, in this field.
Specify a valid IPX source node mask signifying the bits in the source address to be ignored, in dotted-triplet format, in this field.
Specify a valid IPX source socket number in this field.
Specify a valid IPX destination network in this field.
Specify a valid IPX destination node address, in dotted-triplet format, in this field.
Specify a valid IPX network mask signifying the bits in the source network to be ignored, in this field.
Specify a valid IPX node mask signifying the bits in the destination address to be ignored, in dotted-triplet format, in this field.
Specify a valid IPX destination socket number in this fieldIPX Access List Summary Window
The IPX Access List Summary window, shown in Figure 10-18, is displayed when you click on the IPX Access List button in the Router Configuration window. This window allows you to view the interfaces and/or routing algorithms applied to existing IPX access list numbers.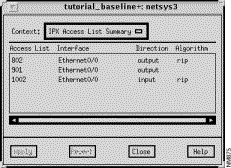
The first entry in Figure 10-18 represents a network output filter. The second entry represents an output access list applied to an interface. The third entry represents a SAP input filter.
This window's components are described in the following sections. See "General Window Components" for a description of the Close and Help buttons.
The existing IPX access list numbers are displayed in this column.
The router interfaces and/or IPX routing algorithms the IPX access list numbers are applied to are displayed in this column.
The filter direction (Input, Output, Both) the IPX access list number is applied to is displayed in this column.
|
|