|
|

Table Of Contents
Display Node, Card, and Network Views
CTC Information and Shortcuts
This appendix describes how to navigate in the Cisco Transport Controller (CTC) and change CTC table data. It also describes menu and tool options and the shelf inventory data presented in CTC. For information about CTC, refer to the Cisco Transport Controller Operation chapter in the Cisco ONS15600 SDH Reference Manual.
Display Node, Card, and Network Views
CTC provides three views of the ONS network:
•
Node view appears when you first log into an ONS15600SDH. This view shows a graphic of the ONS15600SDH shelf and provides access to tabs and subtabs that you use to manage the node.
•
•
TableA-1 lists different actions for changing CTC views.
CTC Window
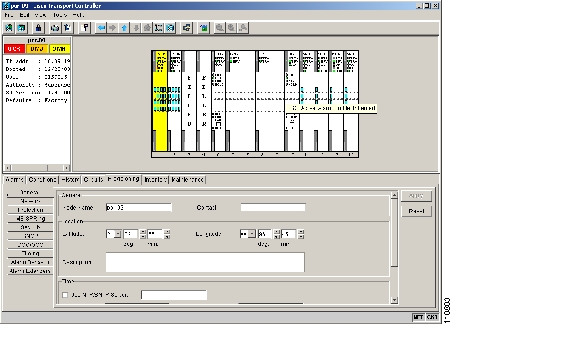
Different navigational methods are available within the CTC window to access views and perform management actions. You can double-click and right-click objects in the graphic area and move the mouse over nodes, cards, and ports to view popup status information ( FigureA-1).
Figure A-1 CTC Node View with Popup Information
CTC Menu and Toolbar Options
The CTC window menu bar and toolbar provide primary CTC functions. TableA-2 shows the actions that are available from the CTC menu and toolbar.
Table A-2 CTC Menu and Toolbar Options
File
Add Node
Adds a node to the current session. See the "DLP-F39 Add a Node to the Current Session or Login Group" task.
Delete Selected Node
Deletes a node from the current session.
Lock CTC
Locks CTC without closing the CTC session. A user name and password are required to reopen CTC.
Prints CTC data. See the "DLP-F65 Print CTC Data" task.
Export
Exports CTC data. See the "DLP-F66 Export CTC Data" task.
Exit
Closes the CTC session.
The exit icon only appears in the File menu.
Edit
Preferences
Displays the Preferences dialog box:
•
•
•
•
•
View
Go To Previous View
Displays the previous CTC view.
Go To Next View
Displays the next CTC view. Available only after you navigate to a previous view. Go to Previous and Go to Next are similar to web browser forward/backward navigation buttons.
Go To Parent View
References the CTC view hierarchy: network view, node view, and card view. In card view, this command displays the node view; in node view, the command displays network view. Not available in network view.
Go To Selected Object View
Displays the object selected in the CTC window.
Go To Home View
Displays the login node in node view.
Go To Network View
Displays the network view.
Go To Other Node
Displays a dialog box allowing you to type in the node name or IP address of a a network node that you want to view.
Show Status Bar
—
Displays/hides the status bar at the bottom of the CTC window.
Show Tool Bar
—
Displays/hides the CTC toolbar.
—
—
Zooms out of the network view area (toolbar only).
—
—
Zooms into the network view area (toolbar only).
—
—
Zooms into a selected network view area (toolbar only).
Tools
Circuits
—
Displays the following options:
•
•
•
•
•
•
•
Manage VLANs
—
Displays a list of VLANs that have been created and allows you to delete or create new VLANs.
Open TL1 Connection
Displays the TL1 session dialog box so you can create a TL1 session to a specific node. Refer to the CiscoONS15600SDH TL1 Command Guide.
Open IOS Connection
Displays the CiscoIOS command line interface dialog box if a CiscoIOS capable card (ML1000-2 or ML100T-12) is installed in the node. Refer to the CiscoONS 15454 SONET/SDH ML-Series Multilayer Ethernet Card Software Feature and Configuration Guide.
Help
Contents and Index
—
Displays the online help window.
Manage Help
—
Displays the versions of online help loaded on your computer.
About CTC
—
Displays the software version and the nodes in the CTC session.
CTC Mouse Options
TableA-3 shows mouse navigation techniques.
Node View Shortcuts
TableA-4 shows actions on ONS15600SDH cards that you can perform by moving your mouse over the CTC window.
Network View Shortcuts
Right-click the network view graphic area or a node, span, or domain to display shortcut menus. TableA-5 lists the actions that are available from the network view.
Table A-5 Network Management Tasks in Network View
Open a node
Do any of the following:
•
•
•
•
•
Move a node icon
Press the Ctrl key and the left mouse button simultaneously and drag the node icon to a new location.
Reset node icon position
Right-click a node and choose Reset Node Position from the shortcut menu. The node icon moves to the position defined by the longitude and latitude fields on the Provisioning> General tabs in node view.
Provision a circuit
Right-click a node. From the shortcut menu, choose Provision Circuit To and select the node where you want to provision the circuit. For circuit creation procedures, see "Create Circuits"
Update circuits with new node
Right-click a node and choose Update Circuits With New Node from the shortcut menu. Use this command when you add a new node and want to pass circuits through it.
Display a link end point
Right-click a span. From the shortcut menu, choose Go To [node/slot/port] for the drop port you want to view. CTC displays the card in card view.
Display span properties
Do any of the following:
•
•
•
Perform an SNCP protection switch for all circuits on a span
Right-click a network span and click Circuits . In the Circuits on Span dialog box, switch options appear in the SNCP Span Switching field.
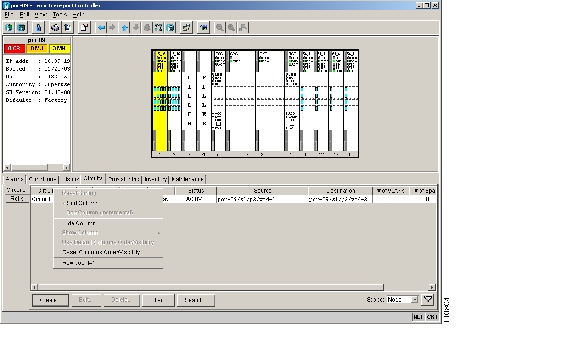
Table Display Options
TableA-6 shows table display options, which include rearranging or hiding CTC table columns and sorting table columns by primary or secondary keys ( FigureA-2).
Figure A-2 Table Shortcut Menu to Customize Table Appearance
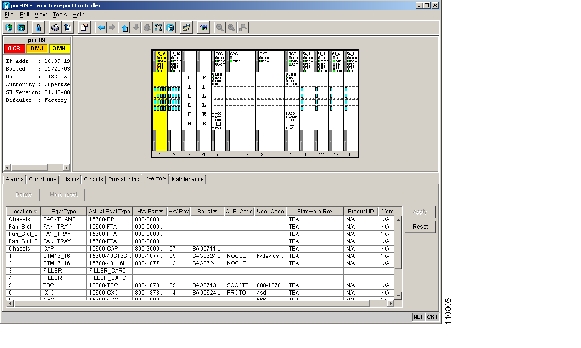
Equipment Inventory
In node view, the Inventory tab ( FigureA-3) displays ONS15600SDH equipment information, including:
•
•
•
•
•
•
•
•
•
Figure A-3 Inventory Tab
CTC Data Export
CTC data exported in HTML format can be viewed with any web browser, such as Netscape Communicator or Microsoft Internet Explorer. To display the data, use the browser's File>Open command to open the CTC data file.
CTC data exported as comma separated values (CSV) or tab separated values (TSV) can be viewed in text editors, word processors, spreadsheets, and database management applications. Although procedures depend on the application, you can typically use File > Open to display the CTC data. Text editors and word processors display the data exactly as it is exported. Spreadsheet and database management applications display the data in cells. You can then format and manage the data using the spreadsheet or database management application tools.
In addition to the CTC exporting, CTC text information can be copied and pasted into other applications using the Windows Copy (Ctrl-C), Cut (Ctrl-X) and Paste (Ctrl-V) commands. You can also print CTC windows and table data such as alarms and inventory by choosing File > Print. TableA-7 shows the CTC tabs and subtabs that contain exportable data.
![]()
![]()
![]()
![]()
![]()
![]()
![]()
![]()
Posted: Thu Feb 26 17:20:58 PST 2004
All contents are Copyright © 1992--2004 Cisco Systems, Inc. All rights reserved.
Important Notices and Privacy Statement.