|
|

This chapter describes the EMS NodeView, and includes the following sections:
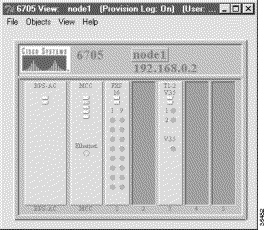
The EMS NodeView provides a graphical representation of an NE, complete with installed cards and LEDs. (See Figure 6-1, Figure 6-2, and Figure 6-3.) Use NodeView to provision all slots, cards, and lines in the NE. See "Initial Node Provisioning," for provisioning information.
From NetView, open the NodeView of an NE using one of the following methods:
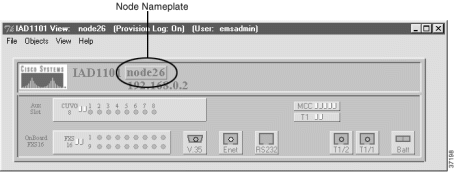
Figure 6-1, Figure 6-2, and Figure 6-3 show the NodeView of the Cisco 6732, Cisco 6705, and Cisco IAD1101, respectively.


Step 2 Select View > Refresh Card Display from the menu bar. EMS refreshes the NodeView display to reflect newly inserted cards.
This procedure describes how to provision a slot for a specific card in a Cisco 6732, Cisco 6705, or Cisco IAD1101 chassis (this example shows the Cisco IAD1101).

Step 2 In the Designated Card Type field, select the desired card type from the pull-down list. EMS displays only the cards that are compatible with the selected slot.
For more information about slot and card compatibility, consult the hardware installation guide for your NE. (See "Obtaining Documentation" of the Preface).
Step 3 Click Apply to provision the slot.
Step 4 Select View > Refresh Card Display from the menu bar. EMS refreshes the display to reflect newly provisioned slots.
The following modules can be provisioned in EMS. This example refers to the Cisco IAD1101 NodeView (see Figure 6-3):
EMS provides both individual and batch procedures for placing cards in service. This section includes the following procedures:
After placing a card in service, refresh the window to confirm the provisioning.

Step 2 Set the Admin Status field to InService.
Step 3 Click Apply to place the card in service.
Step 4 Click the Exit button on the left side of the window to return to Cisco 6700 NodeView.
Step 5 Select View > Refresh Card Display from the menu bar. EMS refreshes the display to reflect the provisioning.
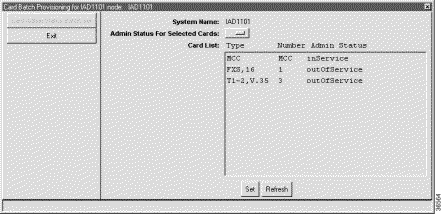
Step 2 In the Admin Status for Selected Cards field, select inService.
Step 3 In the Card List window, select the line cards to be placed in service.
Step 4 Click the Set button to put the cards in service. EMS works down the list, changing each outOfService card to inService.
Step 5 Click the Exit button on the left side of the window to return to Cisco 6700 NodeView.
Step 6 Select View > Refresh Card Display from the menu bar. EMS refreshes the display to reflect the provisioning.
EMS allows one-to-one (1:1) protection of the following broadband cards
 |
Note One-to-one protection only applies to cards installed in the Cisco 6732 chassis. |
If one card fails, the second card automatically restores the traffic through the chassis to the backplane. This ensures greater dependability in the event of a hardware failure.
Broadband protection can be provisioned only on designated broadband slots. The following pairs of slots in the Cisco 6732 chassis are designated for broadband protection:
In addition to provisioning broadband protection with EMS, the protected cards require a special cable, provided with the card, which is designed specifically for joining the two cards. For more information, see the Cisco 6732 Full Access Device Hardware Installation Guide .
|
Note Extended Super Frame (ESF) connections and inter-node data links (INDL) are not protected with broadband line card protection. |

Step 2 Set the following fields to provision broadband 1:1 protection:
Step 3 Click Apply to activate broadband 1:1 protection.
Step 4 Select View > Refresh Card Display from the menu bar. EMS refreshes the display to reflect the provisioning.
Step 5 Repeat this procedure to provision another protection group.
|
Note See "Provisioning Lines," for line provisioning procedures. |
The NE provision window is used to provision important node attributes and parameters. To open the NE provision window, double-click the Node Nameplate in Cisco 6700 NodeView. (See Figure 6-8. and Figure 6-9).

In Figure 6-9, the left side of the window contains the function bar, a group of buttons used to navigate through the provisioning process. The System Basic Provisioning button is grayed out in the function bar. This indicates that the system basic provisioning window is open. To open a different provisioning window, click one of the buttons in the function bar. Click Exit to return to Cisco 6700 NodeView.
You can find information and procedures for the following provisioning windows (launched by clicking the corresponding button on the function bar) in the following chapters:
![]()
![]()
![]()
![]()
![]()
![]()
![]()
![]()
Posted: Mon Feb 5 12:59:29 PST 2001
All contents are Copyright © 1992--2001 Cisco Systems, Inc. All rights reserved.
Important Notices and Privacy Statement.