|
|

This chapter contains information and procedures for data links in the network. A data link can link two NEs, or it can link an NE to an external device such as a router.
This chapter contains the following sections:
EMS offers the following types of inter node links:
A nondata link identifies an established (nailed-up) connection between the local and remote node. A nondata link does not allow provisioning of a remote node, but it can be used to carry traffic and cross connects between the two nodes.
This link is used to carry IP traffic from the Cisco IAD1101 through a Frame Relay cloud. The link must end on a router with a Frame Relay interface.
 |
Note You must provision the interface (line) for Frame Relay before creating an IP over Frame Relay data link. See "Frame Relay," for details about line provisioning. |
This link uses point-to-point protocol (PPP) to carry IP traffic from the Cisco IAD1101 through the Cisco WAN, ending on a router.
An inter node data link (INDL) allows the provisioning of a remote node over an established connection to the local node. There are two types of INDLs:
The remaining, nonmanagement bandwidth is available for cross connects between nodes.
|
Note If you are creating an inter node data link (INDL) or a nondata link between two NEs, Cisco Systems recommends that you use the visual link procedure. See "Inter Node Data Link Procedure" on page 8-12. |
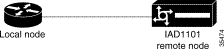
The menu-based link procedure can be used to provision all types of inter node links. This is the only procedure that allows the creation of IP links (IP over Frame Relay and IP over PPP). The following example creates an IP link between a router and a Cisco IAD1101. (See Figure 8-1.) In this example, the router is the local node, and the Cisco IAD1101 is the remote node.
Before an inter node link can be provisioned, you must have an operational physical link between the two nodes. Both ends of the link must be in service and correctly provisioned before you can create an inter node link.
Complete the following procedures to provision an inter node link:
The local node must be provisioned with a link to the remote node.
You must complete the following procedures to provision the remote node with an inter node link:
If you are creating an inter node link over Frame Relay or PPP, you must identify the group of DS0 channels to be used for the inter node link. EMS manages user-defined groups of DS0 channels with fractional T1 line provisioning.

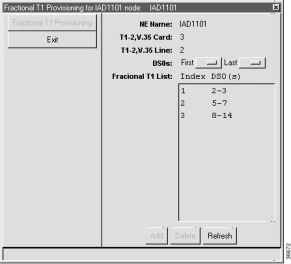
Step 2 In the DS0s field, select the First and Last DS0 to define the range of DS0 channels for the fractional T1.
Step 3 Click Add to provision the fractional T1. EMS adds the fractional T1 to the list and assigns the T1 an index.
Step 4 To provision additional fractional T1s, go to Step 2 and repeat this procedure.
|
Note If fractional T1s have previously been provisioned, their ranges are listed in the Fractional T1 List, as shown in Figure 8-3. If you are creating a new fractional T1, you cannot use DS0 channels that are already part of another fractional T1. |
Step 2 Click Delete. EMS removes the fractional T1 from the list.
Step 2 Double-click the node nameplate to open the NE provisioning window of the remote node.
(See Figure 8-4.)

Step 3 From the NE provisioning window of the remote node, click Node ID Configuration in the function bar. EMS displays a list of all known nodes in the network. (See Figure 8-5.)

Step 4 Look for the IP address of the local node in the Node ID list. If the local node is not listed, complete the following steps to add the node (also see the note following this procedure):
a. Enter an unused node ID in the Node ID field to identify the local node. You cannot select an ID number that is currently being used on the local node.
b. Enter the IP Address of the local node.
c. Click Add to add the node to the list.
d. If you have not yet set the local node as the NE node ID, highlight the local node IP address and click the Set NE Node ID button at the bottom of the screen.
Step 5 Click IP & Inter Node Link Configuration in the function bar. (See Figure 8-6.) EMS launches the inter node link provision window.
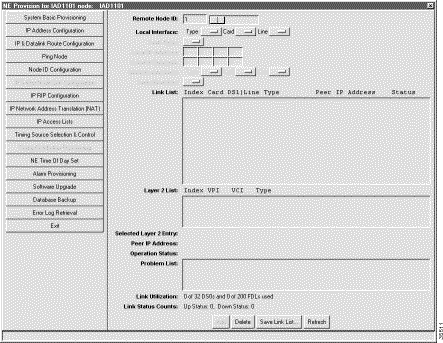
Step 6 Select the Local Interface type, card number, and line number.
Step 7 Select the Link Type:
Step 8 For a PPP link, select the Fractional T1 to carry the link.
Step 9 In the Remote Node ID field, enter the node ID of the remote node.
Step 10 For a Frame Relay link, click the DLCI in the DLCI List that will carry the INDL.
Step 11 Click Add to provision the link.
Step 12 To view information and statistics for the link, click the entry in the Link List.
You must create a default route from the remote node to the local node.
|
Note If you are creating a nondata link, you do not need to create a default route. See "Verifying the Link" to ensure that the nondata link is operational. |
Step 2 Set the following parameters in the data link route configuration window:
Step 3 Click Add to provision the default route to the routing table.
In addition to the default route, you can configure additional routes as needed.
See "IP Services," for more information about assigning routes.
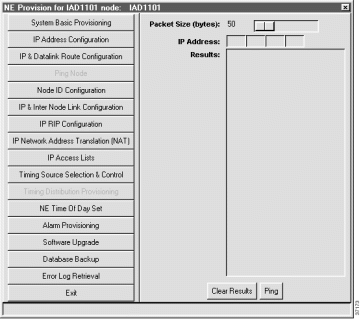
Step 2 Set the following parameters:
Step 3 Click Ping to ping the node. EMS displays results of the attempted ping in the Results list.
Step 4 A result of Success indicates that the IP data link is correctly provisioned.
The visual link procedure is recommended for connecting two NEs with the following link types:
|
Note IP data links (IP over Frame Relay or IP over PPP) cannot be provisioned using this procedure. (See the sections "IP over Frame Relay Link" and "IP over PPP" on page 8-2.) |
Figure 8-9 displays a common inter node link between two NEs. In this example, a Cisco 6732 is the local node, and a Cisco 6705 is the remote node (another Cisco 6732 could also be used as the remote node). The two nodes must be on a different subnet. An INDL allows provisioning of the remote node from the local node network.

Each node must be provisioned with a separate "half link" before the inter node link can be used. The following procedures require local access to both nodes with the EMS workstation.
To create an inter node link, complete the following procedures:
|
Note During these procedures, confirm your most recent action by refreshing the window display. |
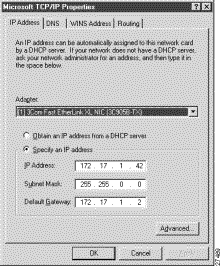
If you are creating an INDL, you must configure the EMS workstation to use the local node as the default gateway.
|
Note You do not need to configure your EMS workstation for a nondata link. This procedure is only required for remote management and provisioning. |
Use the TCP/IP configuration utility on your EMS workstation to set the Default Gateway to the same IP address as the local node. Figure 8-10 shows the TCP/IP configuration window for Windows NT. For the complete TCP/IP configuration procedure, see "Configuring TCP/IP on the EMS Workstation", or contact your network administrator.
This procedure describes how provision the local node by creating a half link from the local node (in this example, a Cisco 6732 called "node9") to the remote node (in this example, a Cisco 6705 called "node8").
Step 2 Launch EMS on the workstation.
Step 3 In Cisco 6700 NetView, make sure that both the local and remote nodes have been created. (See Figure 8-11.)

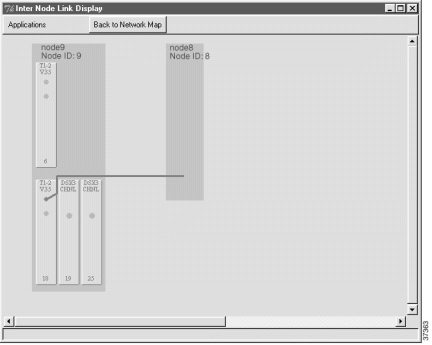
Step 4 Click and drag a line from the local node to the remote node. This creates a visual link between the two nodes. (See Figure 8-12.)

Step 5 From the menu bar, select File > Save to save the visual link.

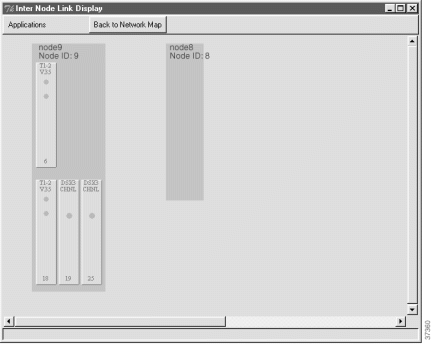
Step 2 Double-click the line between the two nodes (the line turns orange when the cursor is on it). EMS launches the inter node link display. (See Figure 8-14.)
Step 3 Select a line on the local node to provision with the half link.
Step 4 Click and drag a visual link from the selected line on the local node to the remote nod. (See Figure 8-15.)

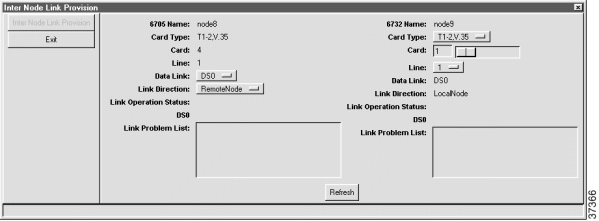
Step 5 After creating the visual link, EMS launches the inter node link provision window. (See Figure 8-16.)
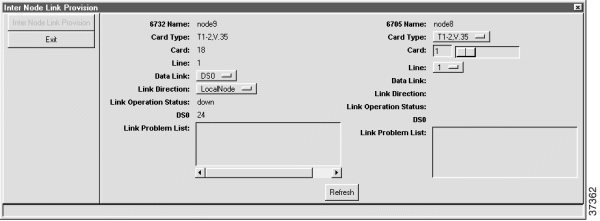
Step 6 In the inter node link provision window, set the following parameters:
|
Note To create a nondata link (used only for cross connects), set the Data Link field to None. |
Step 7 Click Create (at the bottom of the window). EMS changes the Create button to Refresh.
Step 8 Click Exit to close the inter node link provision window. EMS returns to the inter node link display.
The newly-created half link is shown as a blue line connecting the local node and remote node. (See Figure 8-17.)
Step 9 Click Back to Network Map (at the top of the window) to return to the internode provisioning window.
Step 10 Select File>Exit.
After creating a link on the local node (in this example, a Cisco 6732 called "node9"), you must provision the remote node by creating a similar link on the remote node (in this example, a Cisco 6705 called "node8").
Step 2 From Cisco 6700 Netview, click the Internode Provision button (located in the upper right portion of the window). EMS launches the inter node provisioning window. (See Figure 8-13.)
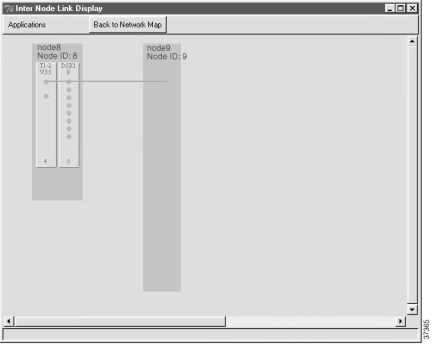
Step 3 Double-click the line between the two nodes. EMS launches the inter node link display. (See Figure 8-18.)

The remote node (Cisco 6705) is at the left side of the display. The local node (Cisco 6732), shown as a gray box, is at the right side of the display.
Step 4 Select the line from the remote node display to be provisioned with the half link. Use the same line as in the "Creating a Visual Link to the Remote Node".
Step 5 Click and drag a visual link from the selected line on the remote node to the local node. (See Figure 8-19.)
After creating the visual link, EMS launches the inter node link provision window. You can now create a link to the local node (see the next procedure).
Step 2 Click Create (at the bottom of the window). EMS changes the Create button to Refresh. (See Figure 8-20.)
Step 3 Click Exit to close the inter node link provision window. EMS returns to the inter node link display. (See Figure 8-21.

The newly-created half link is shown as a blue line connecting the remote node and local node.
Step 4 Click Back to Network Map (at the top of the window) to return to the internode provisioning window.
Step 5 Select File>Exit.
If you are creating an INDL, proceed to the next section to configure the default data-link route.
To allow remote management and provisioning, you must create a default route from the remote node to the local node.
|
Note If you are creating a nondata link, you do not need to create a default route. See "Verifying the Link" to ensure that the nondata link is operational. |
Step 2 Double-click the node nameplate. EMS launches the NE provision window.
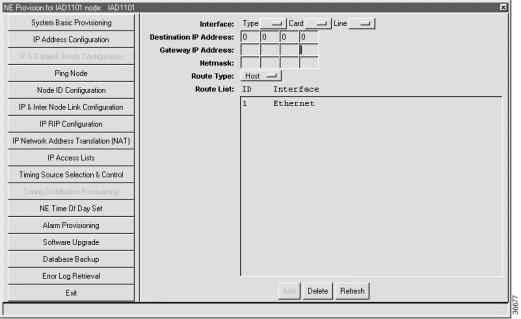
Step 3 From the function bar on the left, click on the IP & Datalink Route Configuration button. This brings up the data-link route configuration window. (See Figure 8-22.)
Step 4 Set the following parameters in the data-link route configuration window:
Step 5 Click Add when you are finished.
Step 6 Click the Exit button (on the function bar) to return to the NodeView.
Step 7 Select File > Exit to return to Cisco 6700 NetView.
|
Note As an alternative to entering the gateway address in Step 4, open the command prompt window and enter (for example): C:>route add 172.17.30.26 192.168.124. 250 (route add<remote IP> <local IP>) |
To verify that an INDL has been successfully created, connect a EMS workstation to the local node (Cisco 6732). Open EMS NetView and double-click the remote node (Cisco 6705). The remote node should open, displaying the NodeView. This means EMS can use the INDL to access the remote node.
![]()
![]()
![]()
![]()
![]()
![]()
![]()
![]()
Posted: Mon Feb 5 13:00:44 PST 2001
All contents are Copyright © 1992--2001 Cisco Systems, Inc. All rights reserved.
Important Notices and Privacy Statement.