|
|

This chapter describes the setup and configuration procedures of the Cisco 6700 series NetView (referred to as Cisco 6700 NetView), and includes the following sections:
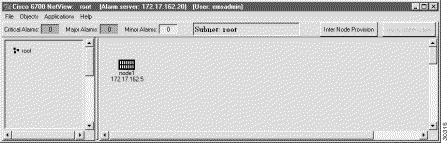
When EMS is initially launched, Cisco 6700 NetView appears, displaying the topology of the network. (See Figure 5-1.) From Cisco 6700 NetView, you can create or modify all nodes, subnets, and end node lists.

A node is a representation of a physical NE in the network (shown as an icon in the Cisco 6700 NetView). Before EMS can communicate with the NE, you must create a node.
 |
Note In the following procedure, the node name and node alias must not include spaces, quotation marks, or other nonalphanumeric characters. |

Step 2 Enter a node name (and optional node alias) for the NE. The node name identifies the node in Cisco 6700 NetView. The node alias provides additional description information (such as location or organization name).
Step 3 In the IP Address field, enter the primary IP address of the NE. If you are provisioning the NE for the first time, enter the default IP address: 192.168.0.2.
Step 4 In the Type field, select the proper NE type (6732, 6705, or IAD1101) from the pull-down menu list.
Step 5 EMS provides a default node ID number for the NE. Consult your EMS administrator for the correct node ID for use with this NE. Highlight the number and enter a new node ID, or use the slider to change the node ID.
Step 6 Click OK when finished. EMS returns to Cisco 6700 NetView. The newly created node appears as an icon, with the node name and IP address below the icon. (See Figure 5-3.)
Step 2 While pressing the Shift key on your keyboard, click and drag the node to its new location.
Step 2 Select Display Node Attributes to view the node information window. (See Figure 5-2.)
Step 3 From the node information window, you can modify the name, alias, IP address, and node ID.
|
Note You cannot change the chassis type of an existing node from the node information window. If the node chassis type is incorrect, delete the node and create a new node with the correct chassis type. |
Step 2 Select Delete Node to delete the node. EMS asks you to confirm the deletion.
Step 3 Click Yes to delete the node.
To launch Cisco 6700 NodeView for a particular node:
End node lists are used to represent a large number of nodes with a single icon.
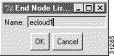
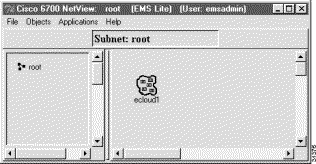
Step 2 Enter a name for the end node list and click OK. The new end node list icon appears in the Cisco 6700 NetView window. (See Figure 5-5.)
Step 2 While pressing the Shift key on your keyboard, click and drag the icon to its new location.
Step 2 Select Display End Node List from the popup menu. EMS opens the end node list display window. (See Figure 5-6.) Each node in the end node list is included in the list, along with its node ID and IP address.

|
Note You can also open the end node list display by double-clicking the end node list icon in Cisco 6700 NetView. |
From the end node list display, click any node listing to open the NodeView for that node.
Step 2 Select Display End Node List from the popup menu. EMS opens the end node list display window. (See Figure 5-6.)
Step 3 Click the Add End Node button at the bottom of the display. You are prompted to enter information for the new node in the node information window (see Figure 5-2), including a node name and IP address.
Step 4 Enter a node name (and optional node alias) for the NE. The node name identifies the node in Cisco 6700 NetView. (See the Note below this procedure.)
Step 5 In the IP address text box, enter the primary IP address of the NE. If you are provisioning the NE for the first time, enter the default IP address: 192.168.0.2.
Step 6 In the Type field, select the proper NE type (6732, 6705, or IAD1101) from the pull-down menu list.
Step 7 EMS provides a default node ID number for the NE. Consult your EMS administrator for the correct node ID for use with this NE. Highlight the number and enter a new node ID, or use the slider to change the node ID.
Step 8 Click OK when you are finished. The end node list now displays the new end node.
|
Note The node alias provides additional description information (such as location or organization name). The node name and node alias must not include spaces, quotation marks, or other nonalphanumeric characters. |
Step 2 Select Delete End Node List from the popup menu. EMS asks you to confirm the deletion.
Step 3 Click Yes to delete the end node list.
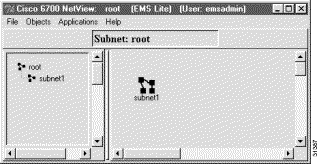
Subnets are used to segment the network into regional or local subnetworks. The use of subnets in EMS allows you to arrange multiple networks in a hierarchy.
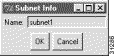
Step 2 Enter a name and click OK.
The Cisco 6700 NetView now contains a subnet icon in the network topology, as shown in Figure 5-8.
|
Note In the left (hierarchical) frame of Cisco 6700 NetView, the new subnet is shown in a hierarchical network view. |
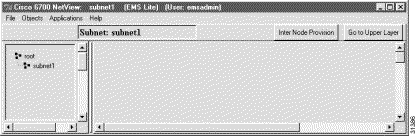
From Cisco 6700 NetView, double-click the Subnet icon. EMS displays the subnet topology in the hierarchical frame. (See Figure 5-9.) In this example, Subnet1 has not yet been configured, so the network frame (right side) is empty.
The subnet can now be configured with nodes and additional subnets. To see the root network topology, showing all nodes and subnet icons, double-click the root icon.
As illustrated in Figure 5-8, a subnet is represented by two icons—the icon in the network frame (right frame), and the icon in the hierarchical frame (left frame).You can double-click either icon to view the subnet topology.
|
Note Clicking the Inter Node Provision button in the upper right portion of Cisco 6700 NetView opens the inter node provisioning window. In this window you can provision connections between two or more NEs. See "Inter Node Links," for inter node provisioning procedures |
To assign a map to a subnet, or replace an existing map, select Objects > New Map from the Cisco 6700 NetView of the appropriate subnet.
To remove an existing map, select Objects > Delete Map from the Cisco 6700 NetView menu bar.
To return to the root network topology, shown in (Figure 5-9, above, double-click the Root icon in the hierarchical (left) frame.
Alternatively, you can click the Go To Upper Layer button, located at the top right of the Cisco 6700 NetView window. This button opens the view for the next-highest network or subnet (as indicated in the hierarchical frame).
![]()
![]()
![]()
![]()
![]()
![]()
![]()
![]()
Posted: Mon Feb 5 12:57:35 PST 2001
All contents are Copyright © 1992--2001 Cisco Systems, Inc. All rights reserved.
Important Notices and Privacy Statement.