|
|

A solution system employing the MGX 8260 media gateway includes a number of other devices and facilities. These elements must be identified and configured in several databases to assure interoperability within the system. Figure 3-1 shows a typical solution system driven by a media gateway controller (call agent or soft switch). Configurable elements are identified in the call out table associated with the figure.

| 1 | Call control messaging—protocol configuration, Ethernet Mgmt ports, in-band management, session management | 2 | DS1, DS3 line and alarm configurations, DS3-to-DS1 line mappings, E1 line and alarm configurations |
| 3 | D channel, DLSAP, MACSAP configurations | 4 | VoIP—Fast Ethernet, Multiservice Modules, voice ports, IP routes; |
| 5 | Media gateway controller—back haul parameters, call routing, resource management, event tracking and reporting, billing, host administration | 6 | Node administration—alarms, reports, user access, diagnostic testing, redundancy, upgrades/downgrades, system information, clock sourcing, node/card resets |
| 7 | Element management—SNMP management, trap registrations, email recipients, network management system ports |
|
There MGX 8260 supports two messaging protocols for call control between a media gateway controller (soft switch or call agent) and the media gateway. The two protocols are mutually exclusive. The protocols are:
This section describes how to enable message tracing facilities as a tool for determining whether call control by the call agent is working.
IPDC supports TDM and VoIP calls. This protocol is fully defined in a document available form Level (3) Communications entitled, Internet Protocol Device Control, Revision 0.15, Limited Scope Protocol For Release 2.
To configure IPDC, perform the following tasks:
1. Switch MGX 8260 node operation from MGCP to IPDC
a. Change the protocol type using the chprotocol 2 command. The node automatically reboots.
b. Verify the change using the lsndinf command.
2. Set the IP addresses and ports for call control by a soft switch over the MGX 8260 node management ports.
a. Set the primary Soft Switch address and port using the chipdcpssip command.
b. If your system includes a redundant Soft Switch, set the secondary IP address and port using the chipdcsssip command.
c. Define the IPDC gateway IP address using the chipdcgwip command.
d. Verify the configuration using the lsipdc command.
3. Configure the IPDC core settings.
a. Specify the system ID using the chipdcssid command.
b. Specify the system type using the chipdcsstype command.
c. Limit the number of IPDC modules (circuit cards) supported using the chipdcmaxm command.
d. Set the bay number using the chipdcssbaynum command.
e. Set the numbering format using the chipdcssnumfor command.
f. Verify the changes using the lsipdc command.
4. Configure the link timers.
a. Set the IPDC link timers and retry counters using the chipdctimer command.
b. Verify the changes using the lsipdctimer command.
5. Configure the COT tones.
a. Specify the IPDC COTs using the chipdccot command.
b. Verify the changes using the lsipdccot command.
6. Activate the protocol and link health checks.
 |
Caution System performance is severely affected when IPDC trace debugging is turned on. |
The mscpPrtOn <2-4> command turns debugging on and prints protocol layer messages. It takes a single parameter value which scales the amount of debug information to print. Level 2 will display the least amount of information and level 4 will display the most.
For example,
POPB.9.ACTIVE->mscpPrtOn 2
Debug information will not print on the screen until the command ttyredir 1 is entered. This command redirects console information to the terminal.
 |
Note Printout to the terminal can be prevented by entering ttyredir 0. However, once trace debugging is turned on and even though the trace output is not directed to the terminal, system performance is still drastically slowed down. |
You should also change the idle time prior to session disconnect to an interval longer than is necessary to run the trace. Use the command chidletm <minutes> to increase the time-out interval.
|
Caution System security maybe jeopardized if the idle time-out value is changed to a very large number. If the telnet session is left unattended for a long interval, unauthorized personnel may gain access to the system. The time-out value should be restored to its original value immediately following trace debugging activities. |
Turn off IPDC trace debugging by entering the command mscpPrtOff.
Another debug trace command—prtOn <number>—traces the messaging associated with a single software element and prints the results. For example:
Turn off IPDC trace debugging by entering the command prtOff.
Table 3-1 lists and briefly describes IPDC messages:
| Name | Description |
|---|---|
NSUP | Notify the soft switch that the access server is coming up |
ASUP | Acknowledgment to NSUP |
NSDN | Indication that the access server has been asked to shut down |
MRJ | Message reject. |
RMS | Request module status |
RLS | Request line status |
RCS | Request channel status |
NMS | Notify module status |
NLS | Notify line status |
NCS | Notify channel status |
SMS | Set a module to a given state |
SLS | Set a line to a given state |
SCS | Set a group of channels to a given state |
RSCS | Response to SCS |
PCT | Prepare channel for continuity test |
APCT | Response to PCT |
SCT | Start continuity test procedure with far end as loopback (Generate tone and check for received tone) |
ASCT | Continuity test result |
STN | Send tones |
ASTN | Completion result of STN command |
RCSI | Request inbound call setup |
ACSI | Accept inbound call setup |
CONI | Connect inbound call (answer) |
RCSO | Request outbound call setup |
ACSO | Accept outbound call setup |
CONO | Outbound call connected |
RCST | Request pass-through call setup (TDM connection between two channels) |
ACST | Accept pass-through call |
RCCP | Request packet call setup |
ACCP | Accept packet call setup |
RMCP | Modify/Query request packet call |
AMCP | Accept modify to packet call |
RCR | Release channel request |
ACR | Release channel complete |
NATV | Native Mode Q.931 Signaling Transport |
TUNL | Tunneled Transport of signaling protocol data units |
Media Gateway Control Protocol (MGCP) is defined by the Internet Engineering Task Force (IETF). MGCP supports TDM, VoIP, and VoATM. Within an MGX 8260 node, VoIP and VoATM are mutually exclusive.
To configure MGCP, you perform the following tasks:
1. Switch node operation from IPDC to MGCP.
a. Issue the chprotocol 1command. The system automatically reboots.
b. Verify the change using the lsndinf command.
2. Set the IP addresses and ports for call control by a call agent via the MGX 8260 node management ports.
a. Set the local address and ports on Network 1 using the chmgcplocaladdr1 command.
b. If your system uses network redundancy, set the local address and ports for Network 2 using the chmgcplocaladdr2 command.
c. Set the primary media controller addresses and ports using the chpmgcpaddr command.
d. If your system includes a redundant media gateway controller (call agent or soft switch), set the secondary media controller addresses and ports using the chsmgcpaddr command.
e. Define the MGCP domain name using the chmgcpdname.
f. Check your configuration using the lsmgcpdef command.
3. Configure MGCP core parameters.
a. Specify the desired parameters using the chmgcpcore command.
b. Confirm the changes using the lsmgcp command.
4. Configure default call setup parameters.
a. Specify the default call setup parameters using the chmpc command.
b. Confirm the changes using the lsmpc command.
5. View MGCP voice parameters—use the lsmgcpvoice command.
6. View default call setup parameters—use the lsmpc command.
7. View MGCP protocol statistics—use the lsmgcpstat command.
|
Note The MGCP protocol collects these statistics continuously after the SCC powers up or resets; you can't reset these counters. This display is a troubleshooting tool for use by experienced technicians who understand the protocol. |
|
Caution System performance is severely affected when MGCP trace debugging is turned on. |
For example,
POPB.9.ACTIVE->mgcpPrtOn 2
value = 0 = 0x3
POPB.9.ACTIVE->ttyredir 1
value = 3 = 0x3
POPB.9.ACTIVE->------TX------
RSIP 3450 *@mms1600 MGCP 0.1
RM: restart

------TX------
MGCP: RSIP transmission timer fired trying to send RSIP

-- mgcp_build_packet()-

MGCP:--- mgcp_build_parameter_lines() ---
MGCP: mgcp_val_mandatory_parms()
MGCP: mgcp_build_restart_method() is called
MGCP: SUCCESS: Building Restart Method (RM:) OK
MGCP: SUCCESS: Building MGCP Parameter lines is OK
- SUCCESS: MGCP message building OK
- SUCCESS: END of building
-----TX--------
RSIP 3451 *@mms1600 MGCP 0.1
RM: restart
Debug information will not print on the screen until the command ttyredir 1 is entered. This command redirects console information to the terminal.
|
Note Printout to the terminal can be inhibited by entering ttyredir 0. However, once trace debugging is turned on and even though the trace output is not directed to the terminal, system performance will still be drastically slowed down. |
You should also change the idle time prior to session disconnect to an interval longer than is necessary to run the trace. Use the command chidletm <minutes> to increase the time-out interval.
|
Caution System security maybe jeopardized if the idle time-out value is changed to a very large number. If the telnet session is left unattended for a long interval unauthorized personnel may gain access to the system. The time-out value should be restored to its original value immediately following trace debugging activities. |
Turn off IPDC trace debugging by entering the command mgcpPrtOff.
Another debug trace command—prtOn <number>—traces the messaging associated with a single software element and prints the results. For example:
prtOn 30—MGCP protocol call control (MPC) full trace debugging
prtOn 31—MGCP protocol call control (MPC) Errors
prtOn 32—MGCP protocol call control (MPC) Control Interface
Turn off MGCP trace debugging by entering the command prtOff.
Table 3-2 lists and briefly describes MGCP messages.
| Verb | Description |
|---|---|
EPCF1 | EndpointConfiguration—specifies the encoding of the signals that will be received by the endpoint. |
RQNT | NotificationRequest—requests the gateway to send notifications upon the occurrence of specified events in an endpoint. |
NTFY | Notify—sent by the gateway in compliance with RQNT when a triggering event occurs. |
CRCX | CreateConnection—creates a connection between two endpoints. |
MDCX | ModifyConnection—modifies the characteristics of a gateway's "view" of a connection. This "view" of the call includes both the local connection descriptor as well as the remote connection descriptor. |
DLCX | DeleteConnection (from the Call Agent)—terminates a connection. As a side effect, it collects statistics on the execution of the connection. DeleteConnection (from the gateway)—issued by the media gateway to clear a connection, for example because it has lost the resource associated with the connection, or because it has detected that the endpoint no longer is capable or willing to send or receive voice. DeleteConnection (multiple connections, from the Call Agent)—used by the Call Agent to delete multiple connections at the same time. The command can be used to delete all connections that relate to a Call for an endpoint or terminate in a given endpoint. |
AUEP | AuditEndpoint—used by the call agent to find out the status of a given endpoint. |
AUCX | AuditConnection—used by the Call Agent to retrieve the parameters attached to a connection. |
RSIP | RestartInProgress—used by the gateway to signal that an endpoint, or a group of endpoints, is put in-service or out-of-service. |
ISDN backhaul protocol (IBP) is used to tunnel ISDN Layer 3 messages to and from a call agent via the IP network. All the ISDN Layer 3 messages received from a peer ISDN device are extracted by LAPD and sent to the SCC using MGX 8260 remote procedure call (MRPC) services. These messages are tunneled through the SCC to the call agent via a backhaul session set.
ISDN Layer 2 (LAPD) runs on service cards (NSCs or BSCs).
|
Note Backhaul protocol is only supported if the call control protocol type is MGCP. Backhauling is not supported for call control via IPDC. |
Calls initiated by SS7 and ISDN are supported. SS7 is handled directly by the call agent. ISDN signaling is backhauled to the call agent.
Figure 3-2 depicts the logical connection between an MGX 8260 node and a media gateway controller (MGC). Solid lines indicate RUDP connections over IP network 1,dashed lines indicate RUDP connections over IP network 2. These logical connection are called sessions. A session is an abstraction for an RUDP connection between two IP address and UDP port tuples. Two sessions on separate IP networks connected to the same MGC form a session group. Two session groups communicating with different redundant MGCs are grouped to form a session set. The session set is the highest level of backhaul channel abstraction. At any given time backhaul messages are exchanged on only one session. However RUDP will always exchange heartbeats on all the sessions.
An MGX 8260 can be configured to have multiple sessions sets between the MGX 8260 and an MGC.
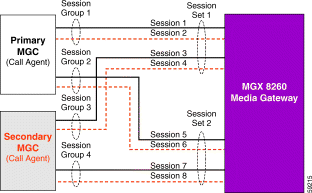
Table 3-3 lists the currently supported parameters for backhaul transcoding of TDM to VoIP calls.
| Codec Type | MGCP Codec String | Bandwidth (bps) | Min. Packetization Period (ms)1 | Max. Packetization Period (ms)1 |
|---|---|---|---|---|
|
| PCMU | 64000 | 10 | 30 |
G.711u | 64000 | 10 | 30 | |
G.711 A-law
| PCMA | 64000 | 10 | 30 |
G.711a | 64000 | 10 | 30 | |
G.729a | 8000 | 10 | 30 | |
G.726-(32) | 32000 | 10 | 30 |
The call agent must request notification of announcement events from the media gateway or Notify messages are not sent.
Hairpinning is supported for two TDM ports itineration on the MGX 8260 node. Both DS0s must use the same PCM encoding rule—A-law or mu-law.
Sessions, session groups and session sets are created using the addsess, addsgrp and addsset commands, respectively. Information about existing sessions, session groups and session sets can viewed by issuing the following commands:
To display information about all ISDN D channels use the lsdchans command
You can display performance statistics related to ISDN backhaul operation via the following commands:
The operating system for the MGX 8260 is VxWorks. By logging in as root, you have access to a number of operating system and Engineering debug commands as described in Appendix B. Several trace commands are described in VxWorks Task Trace.
The trace facilities are very useful for isolating problems down to individual processes. However, they should only be enabled under the guidance of Cisco TAC to assure minimal disruption to node operation.
|
Caution Great care should be taken when executing VxWorks and Engineering debug commands. The trace facility imposes a heavy CPU usage penalty when enabled. |
A site log provides a historical record of all actions relevant to MGX 8260 operation and maintenance. Keep your site log in a common place near the system where anyone who performs tasks has access to it. Use the site log as a record of system maintenance and expansion history. Each time a procedure is performed on the system, update the site log to reflect the following:
Appendix D provides a sample site log for use with an MGX 8260 node.
The complete scope of the database configuration process is described in the Cisco MGX 8260 Configuration Guide.
The database configuration process has the potential to be mishandled when:
If operational problems are encountered shortly after one of the above functions has been performed, the likely cause is erroneous, mismatched or missing database entries. These problems will usually manifest themselves as misrouted or incomplete calls.
The next most likely problem source centers on PSTN facilities. Configuring the MGX 8260 media gateway to interface with intermachine trunks (IMTs), ISDN-PRI span, Ethernet IP networks or SONET OC-3 fiber facilities will involve much consultation with service providers.
Getting the digital spans to the installation site may require a great deal of configuration effort external to the MGX 8260. A number of aggregation and routing devices may be in the chain leading to delivery of services. For SS7 links the complexity of the configuration requirements escalates exponentially.
Physical wiring of the service must match the requirements of the MGX 8260 service circuit cards. Miswired connections can damage components in the media gateway. Damage to the digital facilities -lightning, cut cables, loss of power—will also cause operational problems in the MGX 8260.
Signaling issues—DTMF vs. MF receivers, frame format, signaling protocols—must be accommodated through MGX 8260 line and port configurations.
Routing issues center on which facility goes to a particular carrier and for what purpose. The call agent dialing plan and routing sequence are based on the requirements of the carrier who will be completing the call.
Anomalies can also be caused by the interaction of the MGX 8260 node with call agent applications. The Release Notes accompanying the currently running version of the call agent should identify:
If the problem has not been previously identified, careful notice should be taken of the exact circumstances that revealed the problem. The problem should be immediately reported to the system integrator and/or Cisco TAC for analysis and resolution.
MGX 8260 components were selected for their reliability in telecommunication service over long periods of time. However, components can fail due to physical damage resulting from power surges, electrostatic discharge (ESD), operating environment (excessive heat build-up), broken connectors and cables, mishandling and wear.
The weakest components in the system are those which require continuous mechanical activity—cooling fans. A lack of air flow resulting in the sudden build-up of heat can cause other components to operate erratically or fail completely. Checking fan operation on all system components is a relatively simple precaution that can greatly enhance overall node availability.
Circuit cards with external interfaces—DS1 and DS3 spans, Ethernet 10BaseT or 100BaseTx, fiber optic OC-3, serial console and modem ports, BITS clock—may fail due to electrical problems with the external interfaces to which they are connected.
Cisco Systems has identified a number of MGX 8260 field replaceable units (FRUs) that can be swapped out to restore full system operation as quickly as possible. Refer to Chapter 5 for complete information on MGX 8260 FRUs.
Up to 20 general user profiles can be defined for an MGX 8260 node. Each profile specifies the user name, default password and access level. The root user has unrestricted access to all node features and functions.
|
Note The maximum number of simultaneous user sessions can be restricted by a root user issuing the ussescli command (refer to Appendix A). |
Up to six levels of access can be defined for each user. Level 1 is SuperUser privilege. Level 6 provides very restricted access to system commands. The subset of CLI commands available to a user is associated with the user login name.
Following login, users can type help and press Enter to display the CLI commands available to them. Similar restrictions will be encountered when selecting WebViewer menu options.
Each SCC has serial console and modem ports. These ports support direct terminal connections to the MGX 8260 command line interface. A laptop running terminal emulation software, such as Windows Hyper Terminal or Reflection for UNIX and Digital, can plug directly into these serial ports. The Auxiliary port supports modem dialup access via a serial connection.
Communication via the serial ports requires the following settings on the terminal:
The connection to the DB9S female Console port on the SCC back card requires a null modem cable. The DB9S modem port needs a straight-through cable. Refer to the Cisco MGX 8260 Hardware Installation Guide for detailed pinout requirements.
With the terminal connected to the Console or Auxiliary ports, launch a session. Strike the Enter key to obtain a login prompt.
Login: <user name>
Password: <user password>
Entering a valid login and password will display the Command Line Interface (CLI) prompt.
POPB.9.ACTIVE->
The prompt shows the node name (POPB), physical slot number of the SCC (9) and its current operating mode (ACTIVE). Although standby and active are the expected operating modes, the SCC can be in other modes. For example, upon boot-up, the SCC can be in PLFM-ACTIVE, MSTR-SYNC, SLAVE-SYNC or one of several other modes. While in these modes, the SCC will allow a user to logon. However, the SCC will not respond to any CLI commands.
The active SCC will respond to all CLI commands. If the user is logged in as root, the SCC responds to special vxWorks and debug level commands. (Refer to Appendix B.)
|
Note A Console connection is required to initially set the IP address(es) of the SCC(s). |
Another method for connecting to the Console port is via an Ethernet IP terminal server. The back end of the server connects to the Console port on the SCC. Access to the terminal server is gained via an Ethernet IP connection. A telnet session to the MGX 8260 node is initiated using the IP address and serial port number for the terminal server.
|
Note Always close a console or modem session via CLI command (bye, exit, or logout) before shutting down the terminal or closing the emulator connection. |
Once the MGX 8260 has been assigned an IP address(es), it is possible to directly connect to the node via the UNIX telnet command. Typically, a telnet session is established via one of the two Ethernet management (Mgmt) ports on the active SCC.
Initiating a telnet session by specifying only the IP address of the node will always establish a session with the active SCC module.
For example, the command:
>telnet 10.100.80.20
establishes a terminal session with the active SCC.
You can telnet to another circuit card in the MGX 8260 node by ending the IP address with the suffix 80xx, where xx is the target card's physical slot number.
For example, the command:
>telnet 10.100.80.20 8001
establishes a telnet session to the service circuit card in slot 1 of the target node.
Similarly, the command:
>telnet 10.100.80.20 8010
establishes a telnet session to the SCC in slot 10, regardless of whether it is in active or standby mode.
|
Note Attempting to telnet to a non-existent card will result in a telnet time-out. |
Again, only the Active SCC module will respond to CLI commands. Telneting to the other cards is useful only for diagnostic/debug purposes on those cards.
After establishing a telnet session, the MGX 8260 responds with the login prompt. Entering a valid login and password will place the user at the familiar CLI prompt.
Login: <user name>
Password: <user password>
Entering a valid login and password will display the Command Line Interface (CLI) prompt.
POPB.9.ACTIVE->
If the login prompt does not appear, check the following:
1. Verify that the command and the IP address were properly typed.
2. Check all physical connections between the workstation , MGX 8260 and LAN.
3. Verify (via a console session) that the node's IP address is configured as expected.
4. Verify network connectivity by initiating a "ping" from the workstation to the node.
Any command or configuration possible via the Console port can be achieved via a telnet session with the sole exception of initially configuring the node's IP address.
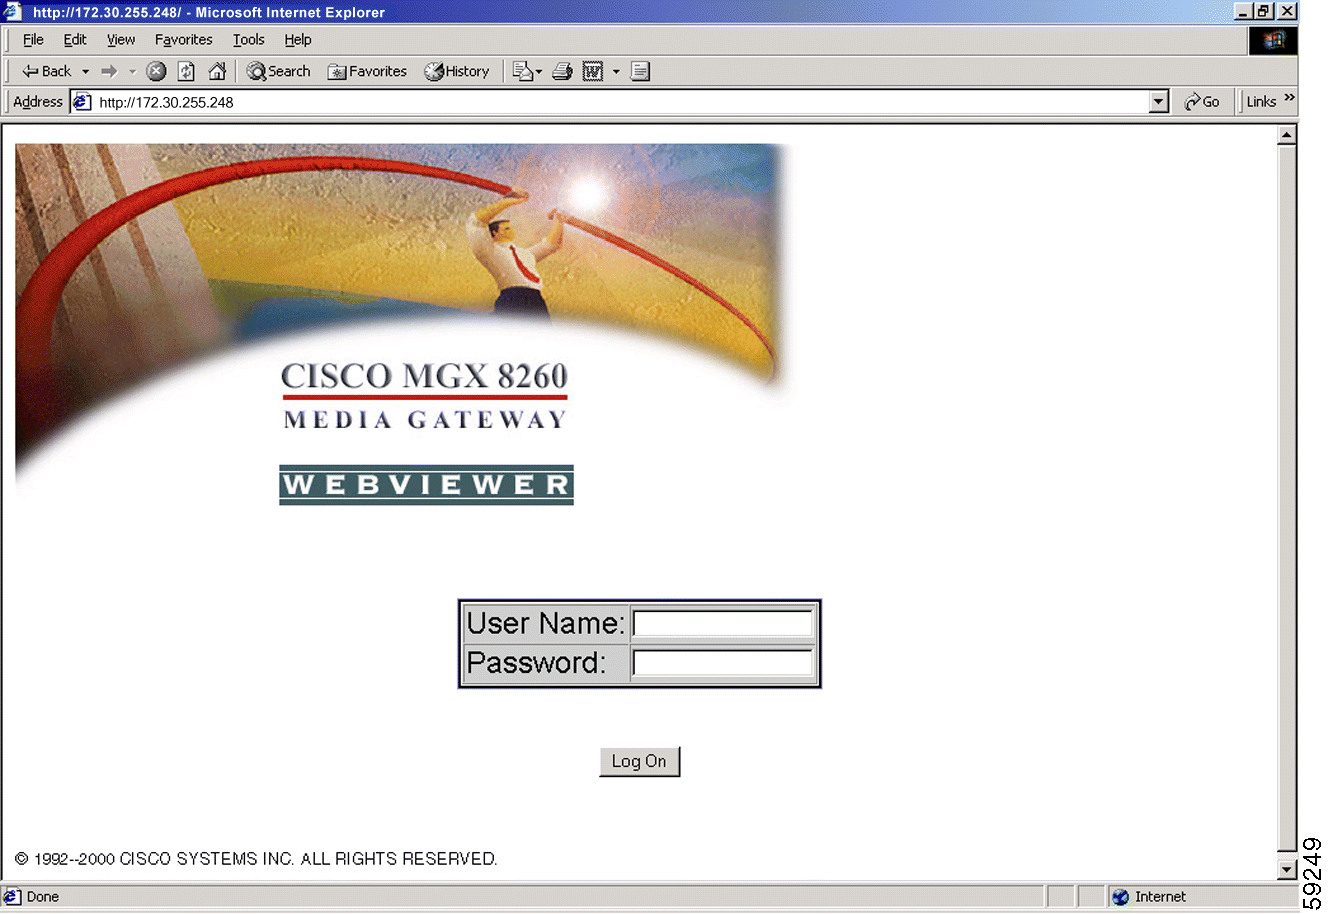
The MGX 8260 node can also be managed via an optional HTML-based graphical user interface (GUI) called WebViewer. A client session is established with the MGX 8260 server via a Java-enabled Web browser such as Netscape or Microsoft Internet Explorer. No specialized software on the user PC/workstation is required. All the necessary files are downloaded from the flash drive on the active SCC.
To initiate the GUI session, simply enter the node's IP address in the browser's address window. (See Figure 3-3.)

When a successful connection is made to the active SCC, the HTML client software is downloaded and the MGX 8260 login screen appears. (See Figure 3-4.)
|
Note WebViewer will not accept the root login name and password. |
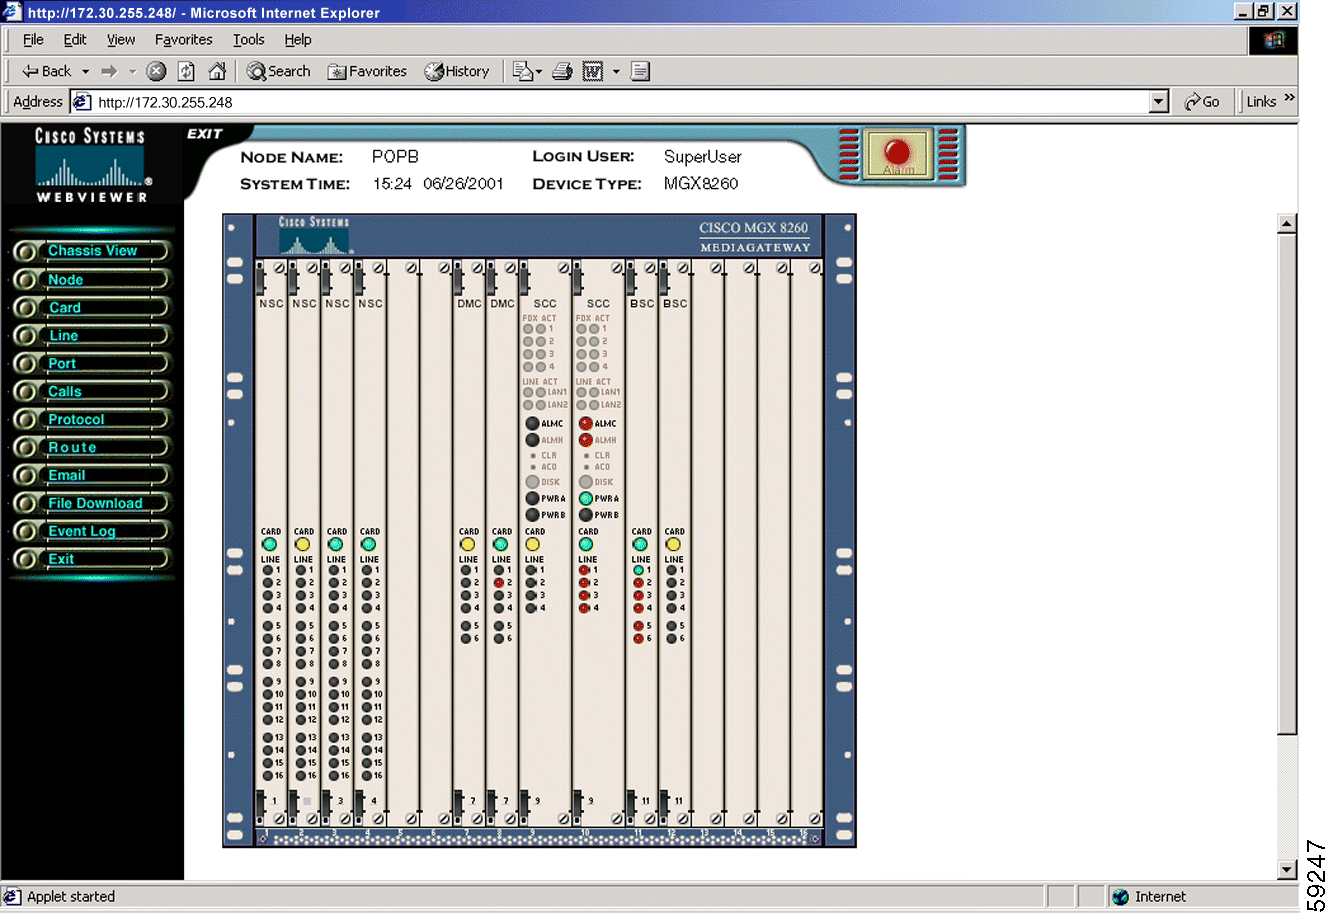
When the user name and password are accepted, the initial WebViewer screen appears, displaying the current card layout and alarm status of the MGX 8260 chassis. (See Figure 3-5.) All the card locations and LED states depicted on this screen exactly match the node's current configuration and operating state.
|
Note Access to WebViewer options is restricted based on the access level associated with the user name. |
The GUI uses CLI commands to display and set node parameters. Appendix C crossreferences WebViewer menu options to CLI commands.
|
Note There may be a slight delay while you are waiting for the WebViewer HTML files to be downloaded from the MGX 8260 server. You may also be prompted by the browser to certify acceptance of the running of Java scripts. |
If the WebViewer GUI screen does not appear after entering the IP address on the browser's address bar, check the following:
1. Verify that the browser is the required version and has been properly configured to run the WebViewer. Refer to the Cisco WebViewer Guide and the MGX 8260 software Release Notes.
2. Verify that the command and the IP address were properly typed.
3. Check all physical connections between the workstation, MGX 8260 and LAN.
4. Verify (via a console session) that the node's IP address is configured as expected.
5. Verify network connectivity by initiating a "ping" from the workstation to the node.
6. Log into the command line and use the command htmlversion to verify that the WebViewer files are located on the SCC flash drive.
It is also possible to control theMGX 8260 via an in-band IP address. An in-band IP address connects to a virtual rather than a physical port. This scheme allows node management to occur over one of the four Fast Ethernet ports. Once configured, the in-band IP address can be used as if it were a third management (Mgmt) port, accepting telnet and WebViewer sessions, and responding to media gateway controller messages (IPDC/MGCP).
|
Caution Configuring the in-band management capability requires resetting the MGX 8260 node. Resetting the node is service affecting and should be done only during a prescribed maintenance window if the MGX 8260 is already carrying live traffic. |
The In-Band IP address may be configured using the chibip command.
For example
POPB.9.ACTIVE-> chibip 192.30.255.250 255.255.255.0
Use the lsmgips command to verify that the in-band IP address has been properly set:
BOX1.9.ACTIVE -> lsmgips
=========================================================================
           Management Interfaces Configuration (lsmgips)
=========================================================================
SNMP Interface IP1 Address   :          192.30.255.248
SNMP Interface IP1 Mask      :          255.255.255.0
SNMP Interface IP2 Address   :          192.30.255.249
SNMP Interface IP2 Mask      :          255.255.255.0
SNMP Interface MAC Address   :          00:50:a3:00:00:d5
In-Band Interface Address    :          192.30.255.250
In-Band Interface Mask       :          255.255.255.0
The MGX 8260's default gateway must be set to match the Fast Ethernet's primary gateway using the chgw command.
For example,
POPB.9.ACTIVE-> chgw 192.30.85.250 255.255.255.0
Use the routeShow and arpShow commands to confirm that the gateway change has been implemented. (Refer to Appendix C.)
CMGM supports four major system management functional areas—fault monitoring, node configuration, performance monitoring, and security. CMGM also conforms to the Telecommunications Management Network (TMN) model, operating as an EMS at the element management layer.
CMGM utilizes a graphical user interface that displays network information and supports device management. This interface extends the capabilities of the Cisco Element Management Framework (CEMF) to include managing MGX 8260 Media Gateways. CMGM includes links to the Cisco WebViewer and the MGX 8260 command line interface, from which you configure individual nodes.
CMGM supports the following features:
CMGM communicates with the MGX 8260 nodes using SNMPv1 and TFTP protocols.
Network management layer applications can communicate with Cisco MGM through an optional CORBA/IDL interface provided by the Cisco Voice CORBA Gateway (Cisco VCG). This gateway is a separate product that extends the capabilities of CMGM product.
For additional information, refer to the following Cisco publications:
Preventive maintenance of the MGX 8260 requires:
|
Note Blank panels should be installed over all slots not containing front or back cards. The panels must remain in place during system operation for NEBS EMI compliance and adequate air flow. |
The node administrator should make backup copies of the configuration database to be used to quickly restore node operation in case of a catastrophic failure. The database contains the card layouts, interface configurations and signaling settings for all interfaces.
A backup should be made whenever changes are made to the node configuration, such as adding DSX lines, Fast Ethernet or SONET interfaces, and/or network management access privileges.
This section describes the use of the dbbkup and dbrstr commands available to a user logged in as root. Refer to Table A-2 for additional information on these commands.
MGX 8260 node configuration files can be backed up to flash disk on the active SCC using the CLI command dbbkup. This command writes the contents of the node database to a single file identified when the backup has been successfully completed. The file is automatically stored in the IMAGE subdirectory. You are asked to confirm the backup procedure before it is initiated.
|
Note The backup process will briefly require CPU usage that may affect a node carrying heavy traffic. |
For example,
POPB.9.ACTIVE-> dbbkup
Are you sure to backup current node configuration(Y/N)? y
moveFile2Target(): Size of file C:/IMAGE/scc_r01.02.03.cfg is 1995264
moveFile2Target(): Creating Remote file C:/IMAGE/scc_r01.02.03.cfg.SAV
moveFile2Targetd(): Copying file C:/IMAGE/scc_r01.02.03.cfg to
C:/IMAGE/scc_r01.02.03.cfg.SAV
dbbackup: Successfully back-up configuration file [C:/IMAGE/scc_r01.02.03.cfg]
value = 0 = 0x0
POPB.9.ACTIVE->
To upload files which reside on the SCC flash drive to your device, you must use the trivial file transfer protocol (tftp). A six-digit security key is needed to initiate the upload. The security key may be displayed by entering the root command dspkey. To configure the security key, issue the command cnfkey "<6-digit key>" on the MGX 8260 node. Note the required use of double quotation marks around the key. (Refer to Appendix B for a description of VxWorks and debug commands, as well as log in procedures.)
The dbbkup command places the configuration file sin the C:/IMAGE subdirectory. Before the file can be uploaded to an external server it must be copied to the root directory of the flash disk. This is done using the VxWorks copy "filename", "filename" command. Note the required use of double quotation marks around each filename and the comma separating the filenames.
For example, from within the IMAGE subdirectory issue the following command:
POPB.9.ACTIVE-> copy "scc_r01.02.03.cfg","C:/scc_r01.02.03.cfg"
value = 0 = 0x0
POPB.9.ACTIVE->
Verify that the file has been copied by popping up to the root directory and issuing the list (ll) command.
POPB.9.ACTIVE-> cd "/"
value = 0 = 0x0
vPOPB.9.ACTIVE-> ll
  size          date       time       name
--------       ------     ------    --------
     512    JAN-01-1980  05:32:30   IMAGE             <DIR>
     512    JAN-01-1980  05:32:30   DIAG              <DIR>
     512    JAN-01-1980  05:32:30   CONFIG            <DIR>
     512    JAN-01-1980  05:32:30   TMP               <DIR>
     512    JAN-01-1980  05:32:30   LOG               <DIR>
  960088    APR-17-2001  09:13:04   scc.fls
 1489208    APR-17-2001  09:13:32   nsc.fls
    1536    JUL-11-2001  09:35:24   scc_r01.02.03.cfg
      50    JUN-01-2001  15:20:14   prtFlag
 1098440    APR-17-2001  09:13:54   bsc.fls
   39296    JUL-11-2001  08:17:22   HD_IMAGE_FILE_TB
       0    JUL-11-2001  15:38:16   hdAnmtFileTb
value = 0 = 0x0
POPB.10.ACTIVE->
Using the tftp command or any tftp software package running on a server, PC or workstation, transfer the backup file by initiating a tftp transfer to the MGX 8260 management IP address. Set for binary mode file transfer. Use the "get" command and the security key to obtain the desired database configuration filename.
|
Note The security key is appended to the end of the filename preceded by a period; see the example below. |
An example of a typical tftp transfer to a UNIX workstation follows:
tftp 192.30.255.248
bin
get scc_r01.02.03.cfg.123456
exit
This file may be renamed once it is on the server, PC or workstation. However, the original filename must be restored once the file is transferred back to the MGX 8260.
Verify the currently active image on the MGX 8260 node by entering the CLI command version.
For example,
POPB.9.ACTIVE-> version
Cisco Systems, Inc.
VxWorks version 5.3.1
Firmware version     = SCC_B_r01.02.03
Software version     = SCC_r01.02.03

CSM version          = /auto/mssbu-nproject/Unix_Project/mms_1600/plfm/scc/FPGA/csm/rel_6/
EGRS FPGA version    =
/auto/mssbu-nproject/Unix_Project/mms_1600/plfm/scc/FPGA/egress/rel_1/
INGR FPGA version    =
/auto/mssbu-nproject/Unix_Project/mms_1600/plfm/scc/FPGA/ingress/rel_8/
DMC FPGA version     = /auto/mssbu-nproject/Unix_Project/mms_1600/plfm/scc/FPGA/dmc/rel_1/
Kernel: WIND version 2.5.
Made on Jun  6 2001, 16:56:41.
value = 31 = 0x1f
POPB.9.ACTIVE->
The software version has been highlighted in bold type. The matching file for this version is scc_r01.02.03.cfg.
To upload files which reside on the hard drive of your server, PC or workstation, you must use the Trivial File Transfer Protocol (tftp). A six-digit security key is needed to initiate the download.
|
Note The security key must match the 6-digit key used when originally uploading the file. |
|
Note If the file has been renamed on the server, PC or workstation it must now be placed on the SCC flash disk using its original filename. Most tftp applications will readily allow a name change between the object and copied files. |
Using the tftp command or any tftp software package running on a server, PC or workstation, transfer the backup file by initiating a tftp transfer to the MGX 8260 management IP address. Set for binary mode file transfer. Use the "put" command and the security key to obtain the desired database configuration filename.
|
Note The security key is appended to the end of the filename precede by a period; see the example below. |
If using a UNIX workstation the command sequence would be:
tftp 192.30.255.248
bin
put scc_r01.02.03.cfg.123456
exit
Ensure that the file transfer was successful by entering a list (ll) command after logging into the root directory of the active SCC.
To restore the configuration using the database backup file, issue the dbrstr <filename> command after logging into the root directory of the active SCC. Use the filename created by the dbbkup command but drop the .cfg extension. You will be prompted for confirmation before the restore process is initiated. For example,
POPB.9.ACTIVE-> dbrstr scc_r01.02.g1.cfg
Restore configuration will require a node reset. Are you sure to proceed (Y/N)? y
A series of messages will appear as the restore process continues. The last message following a successful restore will indicate the node is being reset. Following the reset the MGX 8260 will be ready to process calls. Turn on call routing from the call agent to restore normal system operation.
|
Note The restored configuration will not contain any changes made to the MGX 8260 configuration database after the backup file was created. |
The principal operating parameters for the MGX 8260 node are:
The MGX 8260 is equipped with multiple sensors which monitor these parameters. An administrator should periodically issue the CLI command lsemms to display the current operating state of the MGX 8260. A sample display appears below:
POPB.9.ACTIVE-> lsemms
=======================================================================
             Environment Monitoring Module Readings (lsemms)
=======================================================================
  UnitId     SensorType      SensorId       AlmStatus    SensorReading
  ====== ==================  ========       =========    =============
  slot1      temp-celsius        1            clear              42
  slot1      temp-celsius        2            clear              42
  slot1      temp-celsius        3            clear              31
  slot1      temp-celsius        4            clear              33
  slot1      temp-celsius        5            clear              43
  slot1      temp-celsius        6            clear              45
  slot1      temp-celsius        7            clear              50
  slot1      temp-celsius        8            clear              51
  slot1     voltage-mvolt        1            clear            4944
  slot1     voltage-mvolt        2            clear            3288
  slot1     voltage-mvolt        3            clear            2494
  slot2      temp-celsius        1            clear              40
  slot2      temp-celsius        2            clear              40
  slot2      temp-celsius        3            clear              30
  slot2      temp-celsius        4            clear              30
  slot2      temp-celsius        5            clear              35
  slot2      temp-celsius        6            clear              37
  slot2      temp-celsius        7            clear              41
  slot2      temp-celsius        8            clear              46
  slot2     voltage-mvolt        1            clear            4944


Type <CR> to continue, Q<CR> to stop:
Data is presented for each occupied card slot as well as for the chassis. The only chassis value shows the rotational speed of individual fans.
For additional information on using and interpreting the lsemms command, refer to:
Periodically inspect the 10BaseT Ethernet cables running from the SCC back card(s) to other network devices. Verify that the connections are tight and that a heartbeat LED flash appears on all ports connected to powered-up components. Issue the ifShow command to view performance statistics for the Ethernet management ports. (Refer to Appendix B.)
The SCC also provides serial data connections to a console or modem. Inspect the DB connectors on each serial cable. They should be tightly fitted and secured by setscrews or slide locks.
The Fast Ethernet ports from an SCC-FE support VoIP call routing. Periodically inspect the 100BaseTx cables running from the SCC back card(s) to other network devices. Verify that the connections are tight and that a heartbeat LED flash appears on all ports connected to powered-up components. Issue the ifShow command to view performance statistics for the Fast Ethernet ports. (Refer to Appendix B.)
|
Note As of MGX 8260 software release 1.4, Cisco no longer supports voice over IP (VoIP) functionality for the MGX 8260. |
The OC-3 ports from an SCC-OC3 support ATM over fiber interface with an MGX 8850. Periodically inspect the fiber optic cables running from the SCC back card(s) to the network fiber interface. Issue the lsslinecsts command to display current statistics for all SONET lines. (Refer to Table A-1.)
A single ground connection is made to ground studs at the bottom rear of the MGX 8260 chassis. The dual stud connector should be tightly fastened to the MGX 8260 chassis and building ground point. Verify that the ground cable is securely connected at the chassis ground point.
|
Note Call routing is under the exclusive control of the call agent. Refer to the OEM documentation supplied with the call agent for detailed information on creating and maintaining call routing databases. |
Problems associated with the PSTN interfaces require consultation with service providers to assure precise adherence to required signaling parameters. this is especially true for back haul SS7 applications where changes to DLSAP and MACSAP profiles can greatly affect call routing. Each digital span should be checked for correct signaling per channel.
VoIP calls route over Fast Ethernet lines. VoATM calls route over SONET (OC-3) lines.
Interoperability with a call agent occurs over Ethernet management ports and is based on appropriate protocol settings (IPDC, MGCP). Node management via SNMP requires settings for trap managers and email notifications.
Table 3-4 provides a convenient listing of CLI commands that allow a user to view current interface configuration settings. For additional information refer to Appendix A and Appendix B.
| Interface Type | CLI/Debug Command |
|---|---|
D Channel | ipbmuxprtDChan1 lsdchan, lsdchans lsdlsp, lsdlsps lslapd, lslapds lsmacsapprof, lsmacsapprofs |
DS0s | lsds0, lsds0s |
DS1 Lines | lsds1ln, lsds1lns lsibtcnf, lsibtcnfs lslns |
DS3 Lines | lsds3ln, lsds3lns lslns |
DS3-to-DS1 Line Mappings | lsm13, lsm13s |
E1 Lines | lsds1ln, lsds1lns lslns |
Email (SNMP Trap Notifications) | lsem lsereg, lsergs |
Fast Ethernet | ifShow1 lsethln, lsethln lslns |
IPDC Protocol | lsipdc lisipdccot lsipdctimer |
MGCP Protocol | lsgrp, lsgrps lsmgcp lsmgcpdef lsmgcpvoice lssession, lssessions |
SNMP (Node Management) | lsmgr, lsmgrs |
SONTET (OC-3) Lines | lssonetln, lssonetln |
Software upgrades to the MGX 8260 node are usually accomplished using tftp over an Ethernet management port. Unlike database entries or hardware maintenance, the upgrades should first be made to the standby side of a redundant node. Software upgrades require an SCC or service circuit card to be reset prior to being placed in operation. The upgraded component is made active and the newly switched standby side is then upgraded.
|
Note Software upgrades are not automatically migrated across circuit cards. |
Verify the currently active image on the MGX 8260 node by entering the CLI command version. The currently active WebViewer image can be determined by running the CLI command htmlverison. Refer to Appendix A for additional information on these commands.
For additional information on MGX 8260 software updates, upgrades and downgrades, refer to Software Updates/Upgrades/Downgrades.
|
Note Upgrades to call agent software may affect interoperability with the MGX 8260 node. Check the Release Notes supplied with the currently running version of the call agent software for interoperability requirements. |
|
Note Never simultaneously activate loopback and BERT on the same DS1 line. |
|
Caution BERT interrupts service on the target DS1 line. Perform in a pre-arranged maintenance window or when the line is down. |
The BERT may be initiated by the call agent, via the WebViewer or by issuing the CLI command onbertds1. Refer to Appendix A and the Cisco MGX 8260 Command Line Interface Guide for details on using the onbertds1 command.
For example, the following command activates BERT on channel 1 of line 1 of the NSC in slot 11 using a rand9Bit pattern with no error injection.
onbertds1 11.1 1 1 1
Check the test results using the lsbertds1 command, specifying the slot and line number, delimited by a period, of the DS1 line.
The system displays the BERT status:
=======================================================================
DS1 Bert Status (lsbertds1)
=======================================================================
DS1 Line : 11.1
Bert Status : inSync
Received Bit Pattern : 4050854036
Receive Count : 9345256
Receive Error Count : 0
|
Note Turn off BERT when testing is completed from the call agent or WebViewer, or by issuing the CLI command offfbertds1. |
The COT tones—2010 Hz (co1) and 1780 Hz (co2)—can be set using the command chipdccot. Different COT tones may be used for receive and transmit operation; The default setting is 2010Hz (co1) for both receive and transmit operation. The user can display the configured COT tone(s) via the command lsipdccot.
Supported test line types include:
Three types of loop back configurations are supported on DS1 and DS3 lines.
Four types of loop back configurations are supported on SONET (OC-3) lines.
Loopbacks may be initiated via the WebViewer. Use the Selective-Lines option to set the Loop Config. for a DS1 or DS3 line. For SONET lines, use the All-Lines option to set the Loopback Config.
|
Note WebViewer will not accept the root login name and password. You should login as a Level 1user (SuperUser) with full access privileges when initiating loopbacks. |
To initiate loop backs on DS1, DS3 and SONET lines use the following CLI commands:
For a complete explanation of the variables used to initiate loop backs via the above CLI commands, refer to Table A-2 and the Cisco MGX 8260 Command Line Interface Guide.
|
Note You must log in as a root user to access the above listed commands. |
|
Caution To minimize any potential for loss of service through the MGX 8260 system, all replacement procedures must be performed on components placed in standby (off-line) mode. |
Procedures for swapping out MGX 8260 field replaceable units (FRUs) are detailed in Chapter 5. The procedures vary based on the type of MGX 8260 component. FRU procedures are designed to minimize service disruptions whenever possible.
 |
Warning Never power off an MGX 8260 node by simply disconnecting power supplied to the node. The UNIX based operating systems used by these devices do not tolerate uncontrolled shutdowns. Operation may not be automatically restored if a file system is damaged. The recommended power down procedure is described in Power Up/Down Sequence. |
MGX 8260 front cards incorporate status LEDs which immediately indicate various operational states. These LEDs are fully described in Chapter 2. Table 3-5 crossreferences card types with the tables describing the function of each LED.
| Card Type | Cross-reference |
|---|---|
SCC | |
DMC | |
BSC | |
NSC |
Details for the following categories of alarms can be viewed via CLI commands or the WebViewer:
|
Note Many alarm thresholds can be adjusted via the CLI or WebViewer. An alarm is automatically cleared after the condition which generated it has been remedied. |
The lsalms command displays the status of all shelf and card alarms in the MGX 8260 node. A sample printout appears below.
POPB.9.ACTIVE-> lsalms
=========================================================================
           Shelf Alarms (lsalms)
=========================================================================
Shelf Card Error        :          false
Shelf Software Error    :          false
Shelf Integrated Alarm  :          major
Slot 1                  :          Clear
Slot 2                  :          Major
Slot 3                  :          Clear
Slot 4                  :          Major
Slot 5                  :          Clear
Slot 6                  :          Clear
Slot 7                  :          Clear
Slot 8                  :          Major
Slot 9                  :          Major
Slot 10                 :          Major
Slot 11                 :          Major
Slot 12                 :          Clear
Slot 13                 :          Clear
Slot 14                 :          Clear
Slot 15                 :          Clear
Slot 16                 :          Clear
Card                    :          Major
Chassis Temperature     :          Clear
Voltage                 :          Clear
Fan                     :          Clear
Shelf Alarm History     :          major
value = 0 = 0x0
POPB.9.ACTIVE->
Table 3-6 describes the alarms states displayed by the lsalms command and provides a cross-reference to associated CLI commands that offer additional information.
| Displayed Information | Description | Associated Commands |
|---|---|---|
Shelf Card Error | Indicates existence of card alarm. | lscd <slot> |
Shelf Software Error | Indicates software mismatch or process failure. | version |
Shelf Integrated Alarm | Indicates the combined alarm condition for all shelf, card, line, and environmental alarms. Valid states are clear, major, minor and info. | lscd lsds1lns lsds3lns lsemms lssonetalms |
Shelf Slot Alarm (Slot 1-16) | Indicates the combined alarm condition for the specified card, its associated interfaces and environmental alarms. Valid states are clear, major, minor and info. | lscd lsds1lns lsds3lns lsemms lssonetalms |
Card | Indicates the existence of a card alarm. Valid states are clear, major, minor and info. | lscd |
Chassis Temperature | Indicates that a higher than normal temperature has been detected within the chassis. Valid states are clear, major, minor and info. | lsemms |
Voltage | Indicates a voltage outside the allowable range of voltages has been detected in the chassis. Valid states are clear, major, minor and info. | lsemms |
Fan | Indicates that one or more of the fans in the Fan unit is not rotating at the minimum required speed. Valid states are clear, major, minor and info. | lsemms |
Shelf Alarm History | indicates that an alarm state exists in the alarm history file since it was last cleared. Valid states are no alarm, major, minor and info. | clralmhist |
POPB.9.ACTIVE-> lscd 9
=======================================================================
                      Physical Card Entry (lscd)
=======================================================================
Physical Card Number          :         9
Logical Card Number           :         9
Front Card Type               :         scc
Back Card Type                :         scc4FE
Daughter Card 1 Type          :         bim4FE
Daughter Card 2 Type          :         *
Card State                    :         active
Card Service                  :         8
Hardware Revision             :         0
Firmware Revision             :         SCC_B_r01.02.03
Software Revision             :         SCC_r01.02.03
Front Card Serial #           :         JAB050508SG
Back Card Serial #            :         JAA04153262
Fab Version                   :
Failure Reason                :         failResonNone
Reset Reason                  :         shellReset
Mismatch Reason               :         noMismatch
Integrated line alarm state   :         Major
Line performance alarm state  :         Clear
EMM temperature alarm state   :         Clear
EMM voltage alarm state       :         Clear
SW error alarm state          :         Clear
Component failure alarm state :         Clear
Card Act. removal alarm state :         Clear
ATM Queue Profile #           :         1
RAM Backup                    :         disabled
Interface Mode                :         bkcd
value = 0 = 0x0
POPB.9.ACTIVE->
The system displays information about the card, including alarm and failure details. The type of information displayed varies by card type. Principal alarm fields are listed and briefly described in Table 3-7.
| Display Field | Description |
|---|---|
Integrated line alarm | One of the interface lines raised an alarm. |
Line performance alarm | One of the interface lines raised a performance alarm. |
Integrated port alarm | One of the ports raised an alarm. Check the port configuration and make necessary changes. |
EMM temperature alarm | A temperature sensor raised an environmental alarm. |
EMM voltage alarm | A voltage sensor raised an environmental alarm. |
Component failure alarm | A hardware component of the card failed. Try the following possible remedies:
|
The MGX 8260 supports DS1 andDS3 physical layer alarm signalling. To view current DS1 alarm conditions, enter the lsds1lns command. To view current DS3 alarms, enter the lsds3lns command. A sample display of the lsds1lns output appears below.
POPB.9.ACTIVE-> lsds1lns
=======================================================================
              DS1 Lines  (lsds1lns)
=======================================================================
Slot.Line    Line Type    Line Coding  Signal Mode     LED Status
=========  =============  ===========  ===========  ================
      4.1        dsx1ESF     dsx1B8ZS         none       Solid GREEN
      4.2        dsx1ESF     dsx1B8ZS         none       Solid GREEN
      4.3        dsx1ESF     dsx1B8ZS         none       Solid GREEN
      4.4        dsx1ESF     dsx1B8ZS         none       Solid GREEN
      4.5        dsx1ESF     dsx1B8ZS         none       Solid GREEN
      4.6        dsx1ESF     dsx1B8ZS         none       Solid GREEN
      4.7        dsx1ESF     dsx1B8ZS         none         Solid RED
      4.8        dsx1ESF     dsx1B8ZS         none       Solid GREEN
      4.9        dsx1ESF     dsx1B8ZS         none       Solid GREEN
     4.10        dsx1ESF     dsx1B8ZS         none         Solid RED
     4.11        dsx1ESF     dsx1B8ZS         none         Solid RED
     4.12        dsx1ESF     dsx1B8ZS         none         Solid RED
     4.13        dsx1ESF     dsx1B8ZS         none         Solid RED
     4.14        dsx1ESF     dsx1B8ZS         none         Solid RED
     4.15        dsx1ESF     dsx1B8ZS         none         Solid RED
     4.16        dsx1ESF     dsx1B8ZS         none         Solid RED
     11.1        dsx1ESF     dsx1B8ZS         none         Solid RED
     11.2        dsx1ESF     dsx1B8ZS         none         Solid RED
     11.3        dsx1ESF     dsx1B8ZS         none         Solid RED
     11.4        dsx1ESF     dsx1B8ZS         none         Solid RED


Type <CR> to continue, Q<CR> to stop:
POPB.9.ACTIVE-> lsds1ln 4.3
=======================================================================
              DS1 Line Entry (lsds1ln)
=======================================================================
DS1 Line                                            :  4.3
E1/T1 Line Type                                     :  t1
Related DS3 Line (BSC only)                         :  0
Line Type                                           :  dsx1ESF
Line Coding                                         :  dsx1B8ZS
Send Code                                           :  dsx1SendNoCode
Line Signal Mode                                    :  none
Line Signal Bits                                    :  1
Time Elapsed in Interval                            :  168
Line Valid Intervals                                :  96
Line Idle Code                                      :  127
Line Loopback Config                                :  dsx1NoLoop
Transmit Clock Source                               :  localTiming
Circuit Identifier                                  :  5
IPDC Echo Cancel                                    :  na
Alarm                                               :  Major
Far end LOF (Yellow Alarm)                          :  No
Near end sending LOF Indication                     :  Yes
Far end sending AIS                                 :  No
Near end sending AIS                                :  Yes
Near end LOF (Red Alarm)                            :  Yes
Near end Loss Of Signal                             :  Yes
Near end is looped                                  :  No
E1 TS16 AIS                                         :  No
Far End Sending TS16 LOMF                           :  No
Near End Sending TS16 LOMF                          :  No
Near End detects a test code                        :  No
Far End sending Remote Multiframe Alarm Indication  :  No
Near End Sending Remote Multiframe Alarm Indication :  No
Far End sending Loss of CRC Multiframe              :  No
Other Failure                                       :  No
LED Status                                          :  Solid RED
Line Status                                         :  UP
value = 0 = 0x0
POPB.9.ACTIVE->
| Displayed Information | Possible Cause and Corrective Action |
|---|---|
LOF—Loss Of Frame | Occurs when the MGX 8260 cannot synchronize on frames. Try the following possible remedies:
|
LOS—Loss of Signal | Occurs when the MGX 8260 cannot detect a signal at the line. Try the following possible remedies:
|
Occurs when the receive link encounters problems for a set number of frames. | |
Occurs when the remote equipment encounters problems for a set number of frames at that layer. | |
LOMF (E1 only) | Check for framing format misconfiguration Check for CRC bits errors in the frame Check for line coding misconfiguration |
LOSMF (E1 only) |
|
Yellow (RAI)—Remote Alarm Indication |
|
RMAI (E1 only)—Remote Multiframe Alarm Indication |
|
See LOS and LOF above. | |
Yellow Alarm (RAI or RMAI) | See RAI or RMAI above. |
POPB.9.ACTIVE-> lsethlns
===========================================================================
                        Ether Lines  (lsethlns)
===========================================================================
 Line      IP Address      Subnet Mask        Status         Gateway Addr
======  ===============  ===============  ================  ===============
  9.1    192.168.252.21    255.255.255.0            active    192.168.252.1
  9.2    192.168.252.22    255.255.255.0    linkDownActive    192.168.252.1
  9.3    192.168.252.23    255.255.255.0    linkDownActive    192.168.252.1
  9.4    192.168.252.24    255.255.255.0    linkDownActive    192.168.252.1
value = 0 = 0x0
POPB.9.ACTIVE->
The system displays a summary of the trunk status, including the Operational Status for each line. Use the lsethln <slot.line> command to display specific alarm information for and an individual Fast Ethernet line. A sample of the information output for the FE line 1 on the SCC in slot 9 appears below.
POPB.9.ACTIVE-> lsethln 9.1
=======================================================================
                    Ether Line Entry (lsethln)
=======================================================================
Ether Line               :    9.1
MAC Address              :    00.04.9a.ef.87.76
IP Address               :    192.168.252.21
Subnet Mask              :    255.255.255.0
Primary Gateway          :    192.168.252.1
Router Discovery Protocol:    disabled
Target State             :    active
Operational Status       :    active
Duplex Mode              :    full
value = 0 = 0x0
POPB.9.ACTIVE->
Respond to alarms depending on the alarm indication displayed in the Operational Status field. (Refer to Table 3-9.)
| Displayed Information | Possible Cause and Corrective Action |
|---|---|
Failed | The Fast Ethernet failed. Place the SCC in standby mode. Reset the card. If this does not restore the FE line, replace the card. |
linkDownActive | The Fast Ethernet carrier is down. Try the following possible remedies:
|
linkDownInactive | The Fast Ethernet carrier is down, but the link is inactive. Try the following possible remedies:
|
To view alarms for SONET lines, use the lssonetstat command.
Respond to major alarms according to the guidelines in Table 3-10.
| Major Alarm | Corrective Action |
|---|---|
LOS—Loss Of Signal |
|
OOF—Out Of Framing |
|
|
Respond to minor alarms according to the guidelines in Table 3-11.
| Minor Alarm | Corrective Action1 |
|---|---|
The problem originated from an upstream node; investigate nodes in upstream direction. | |
| |
AIS-P—Alarm Indication Signal (Path Level) | The problem originated from an upstream node; investigate nodes in upstream direction. |
RFI-P—Remote Failure Indication (Path Level) |
|
| |
UNEQ-P—Unequipped (Path Level) |
|
| |
RFI-P server |
|
RFI-P connectivity |
|
RFI-P payload |
|
| 1Applicable only if ERDI-P is enabled |
Internal sensors monitor temperatures and voltage levels at several points in the shelf and on the circuit cards. To view environmental alarms, enter the lsemms command. A sample display of the lsemms output appears below.
POPB.9.ACTIVE-> lsemms
=======================================================================
             Environment Monitoring Module Readings (lsemms)
=======================================================================
  UnitId     SensorType      SensorId       AlmStatus    SensorReading
  ====== ==================  ========       =========    =============
  slot1      temp-celsius        1            clear              42
  slot1      temp-celsius        2            clear              42
  slot1      temp-celsius        3            clear              31
  slot1      temp-celsius        4            clear              33
  slot1      temp-celsius        5            clear              43
  slot1      temp-celsius        6            clear              45
  slot1      temp-celsius        7            clear              50
  slot1      temp-celsius        8            clear              51
  slot1     voltage-mvolt        1            clear            4944
  slot1     voltage-mvolt        2            clear            3288
  slot1     voltage-mvolt        3            clear            2494
  slot2      temp-celsius        1            clear              40
  slot2      temp-celsius        2            clear              40
  slot2      temp-celsius        3            clear              30
  slot2      temp-celsius        4            clear              30
  slot2      temp-celsius        5            clear              35
  slot2      temp-celsius        6            clear              37
  slot2      temp-celsius        7            clear              41
  slot2      temp-celsius        8            clear              46
  slot2     voltage-mvolt        1            clear            4944
  slot2     voltage-mvolt        2            clear            3306
  slot2     voltage-mvolt        3            clear            2494
  slot4      temp-celsius        1            clear              35
  slot4      temp-celsius        2            clear              37
  slot4      temp-celsius        3            clear              28
  slot4      temp-celsius        4            clear              27
  slot4      temp-celsius        5            clear              33
  slot4      temp-celsius        6            clear              35
  slot4      temp-celsius        7            clear              38
  slot4      temp-celsius        8            clear              45
  slot4     voltage-mvolt        1            clear            4944
  slot4     voltage-mvolt        2            clear            3288
  slot4     voltage-mvolt        3            clear            2508
  slot9      temp-celsius        1            clear              34
  slot9      temp-celsius        2            clear              37
  slot9      temp-celsius        3            clear              22
  slot9      temp-celsius        4            clear              21
  slot9      temp-celsius        5            clear              33
  slot9      temp-celsius        6            clear              39
  slot9      temp-celsius        7            clear              33
  slot9     voltage-mvolt        1            clear            4944
  slot9     voltage-mvolt        2            clear            3306
  slot9     voltage-mvolt        3            clear            2468
 slot10      temp-celsius        1            clear              41
 slot10      temp-celsius        2            clear              45
 slot10      temp-celsius        3            clear              23
 slot10      temp-celsius        4            clear              25
 slot10      temp-celsius        5            clear              40
 slot10      temp-celsius        6            clear              46
 slot10      temp-celsius        7            clear              36
 slot10     voltage-mvolt        1            clear            4918
 slot10     voltage-mvolt        2            clear            3306
 slot10     voltage-mvolt        3            clear            2481
 slot11      temp-celsius        1            clear              25
 slot11      temp-celsius        2            clear              43
 slot11      temp-celsius        3            clear              36
 slot11      temp-celsius        4            clear              28
 slot11      temp-celsius        5            clear              41
 slot11      temp-celsius        6            clear              41
 slot11      temp-celsius        7            clear              50
 slot11     voltage-mvolt        1            clear            4944
 slot11     voltage-mvolt        2            clear            3288
 slot11     voltage-mvolt        3            clear            2468
 slot12      temp-celsius        1            clear              29
 slot12      temp-celsius        2            clear              42
 slot12      temp-celsius        3            clear              36
 slot12      temp-celsius        4            clear              26
 slot12      temp-celsius        5            clear              34
 slot12      temp-celsius        6            clear              33
 slot12      temp-celsius        7            clear              43
 slot12     voltage-mvolt        1            clear            4970
 slot12     voltage-mvolt        2            clear            3271
 slot12     voltage-mvolt        3            clear            2468
chassis     voltage-mvolt        1            clear            1490
chassis     voltage-mvolt        2            clear            1490
chassis     voltage-mvolt        3            clear           45829
chassis           fan-rpm        1            clear            3461
chassis           fan-rpm        2            clear            3443
chassis           fan-rpm        3            clear            3461
chassis           fan-rpm        4            clear            3443
chassis           fan-rpm        5            clear            3461
chassis           fan-rpm        6            clear            3479
value = 0 = 0x0
POPB.9.ACTIVE->
The system displays a summary of sensor types, status, and readings. Use the sensor type field described in Table 3-12, find the description that matches your problem, and follow the instructions.
| Sensor Type | Description |
|---|---|
The sensor temperature exceeds the maximum threshold value. Try the following possible remedies:
| |
Voltage reading is over or under the threshold value. Try the following possible remedies:
| |
A fan has failed or is running too slowly; minimum fan speed is 2900 RPM. Try the following possible remedies:
|
POPB.9.ACTIVE-> lsevt


07/11/2001 15:13:35 L09 P10 tAuxTermd  SNMP-USER_LOGOUT****-INFO*
 LOGOUT. User Id: Cisco, IP: 0.0.0.0, Method: CONSOLE, TIMEOUT EXIT
07/11/2001 14:55:34 L09 P09 tmmsShell0 SNMP-USER_LOGIN*****-INFO*
 LOGIN. User Id: Cisco, IP: 192.168.136.189, Method: TELNET.
07/11/2001 14:53:34 L09 P10 tAuxTermd  SNMP-USER_LOGIN*****-INFO*
 LOGIN. User Id: Cisco, IP: 0.0.0.0, Method: CONSOLE.
07/11/2001 14:53:26 L09 P09 tmmsShell0 SNMP-USER_LOGOUT****-INFO*
 LOGOUT. User Id: , IP: , Method: TELNET, NORMAL EXIT
07/11/2001 14:53:23 L09 P09 tmmsShell0 SNMP-USER_LOGOUT****-INFO*
 LOGOUT. User Id: , IP: , Method: TELNET, NORMAL EXIT
07/11/2001 14:51:09 L09 P10 tAuxTermd  SNMP-USER_LOGOUT****-INFO*
 LOGOUT. User Id: Cisco, IP: 0.0.0.0, Method: CONSOLE, NORMAL EXIT
07/11/2001 14:48:35 L09 P10 tAuxTermd  SNMP-USER_LOGIN*****-INFO*
 LOGIN. User Id: Cisco, IP: 0.0.0.0, Method: CONSOLE.
07/11/2001 14:06:17 L09 P09 tmmsShell0 SNMP-USER_LOGOUT****-INFO*
 LOGOUT. User Id: Cisco, IP: 192.168.136.189, Method: TELNET, TIMEOUT EXIT
07/11/2001 13:51:12 L04 P04 tDS1       COME-UASOFF*********-MINOR
 Unavailable Second is off on Line 1
07/11/2001 13:49:20 L04 P04 tDS1       COME-UASON**********-MINOR
 Line 1 is in Unavailable Second
07/11/2001 13:49:11 L04 P04 tDS1       COME-LOSON**********-MINOR
 Line 1 is in LOS
07/11/2001 13:46:12 L09 P09 tmmsShell0 SNMP-USER_LOGIN*****-INFO*
 LOGIN. User Id: Cisco, IP: 192.168.136.189, Method: TELNET.
07/11/2001 13:45:33 L09 P09 tmmsShell0 SNMP-USER_LOGOUT****-INFO*
 LOGOUT. User Id: Cisco, IP: 192.168.136.189, Method: TELNET, NORMAL EXIT
07/11/2001 13:24:43 L09 P09 tmmsShell0 SNMP-USER_LOGIN*****-INFO*
 LOGIN. User Id: Cisco, IP: 192.168.136.189, Method: TELNET.
07/11/2001 11:56:41 L09 P09 tmmsShell0 SNMP-USER_LOGOUT****-INFO*
 LOGOUT. User Id: Cisco, IP: 192.168.136.189, Method: TELNET, TIMEOUT EXIT
07/11/2001 11:02:11 L09 P09 tmmsShell0 SNMP-USER_LOGIN*****-INFO*
 LOGIN. User Id: Cisco, IP: 192.168.136.189, Method: TELNET.
07/11/2001 10:44:22 L09 P09 tHttp26    SNMP-USER_LOGIN*****-INFO*
 LOGIN. User Id: SuperUser, IP: 192.168.136.185, Method: WEBVIEWER.
07/11/2001 10:35:42 L09 P09 tmmsShell0 SNMP-USER_LOGOUT****-INFO*
 LOGOUT. User Id: Cisco, IP: 192.168.136.189, Method: TELNET, TIMEOUT EXIT
07/11/2001 10:05:23 L09 P09 tAuxTermd  SNMP-USER_LOGOUT****-INFO*
 LOGOUT. User Id: Cisco, IP: 0.0.0.0, Method: CONSOLE, NORMAL EXIT
07/11/2001 10:02:24 L09 P09 tAuxTermd   CLI-USER_COMMAND***-INFO*
           Cisco:  chscs
07/11/2001 10:01:15 L09 P09 tmmsShell0 SNMP-USER_LOGIN*****-INFO*
 LOGIN. User Id: Cisco, IP: 192.168.136.189, Method: TELNET.

Type <CR> to continue, Q<CR> to stop:
The trap log can be displayed from the WebViewer by issuing the CLI command lstraps. A sample of the output from the lstraps command appears below.
POPB.9.ACTIVE-> lstraps
07/11/2001    15:10:37    04    04    MINOR    TRAP    Line 16 is in performanc1
07/11/2001    15:10:37    04    04    MINOR    TRAP    Line 15 is in performanc1
07/11/2001    15:10:36    04    04    MINOR    TRAP    Line 14 is in performanc1
07/11/2001    15:10:35    04    04    MINOR    TRAP    Line 13 is in performanc1
07/11/2001    15:10:34    04    04    MINOR    TRAP    Line 12 is in performanc1
07/11/2001    15:10:34    04    04    MINOR    TRAP    Line 11 is in performanc1
07/11/2001    15:10:33    04    04    MINOR    TRAP    Line 10 is in performanc1
07/11/2001    15:10:32    04    04    MINOR    TRAP    Line 9 is in performance1
07/11/2001    15:10:31    04    04    MINOR    TRAP    Line 8 is in performance1
07/11/2001    15:10:30    04    04    MINOR    TRAP    Line 7 is in performance1
07/11/2001    15:10:30    04    04    MINOR    TRAP    Line 6 is in performance1
07/11/2001    15:10:29    04    04    MINOR    TRAP    Line 5 is in performance1
07/11/2001    15:10:28    04    04    MINOR    TRAP    Line 4 is in performance1
07/11/2001    15:10:28    04    04    MINOR    TRAP    Line 3 is in performance1
07/11/2001    15:10:27    04    04    MINOR    TRAP    Line 2 is in performance1
07/11/2001    15:10:24    11    11    MINOR    TRAP    Line 156 is in performan0
07/11/2001    15:10:24    11    11    MINOR    TRAP    Line 155 is in performan0
07/11/2001    15:10:23    11    11    MINOR    TRAP    Line 154 is in performan0
07/11/2001    15:10:23    11    11    MINOR    TRAP    Line 153 is in performan0
07/11/2001    15:10:22    11    11    MINOR    TRAP    Line 152 is in performan0
07/11/2001    15:10:22    11    11    MINOR    TRAP    Line 151 is in performan0

Type <CR> to continue, Q<CR> to stop:
Procedures for turning on trace debugging vary based on whether IPDC or MGCP is used for call control. Refer to IPDC or MGCP for detailed information on initiating and displaying protocol trace information.
|
Caution Trace debugging will affect CPU usage. Do not initiate traces during periods of heavy call volume. |
The task trace (tt) command allows you to investigate a suspended VxWorks task or a task suspected of hogging CPU resources. (Refer to Appendix B.) The command syntax is tt "<taskname>" where <taskname> is the name of the task as shown in the output of the list all active processes (i) command. The taskname must be entered within double quotes. For example:
POPB.9.ACTIVE-> tt "tDBM"
804b9440 vxTaskEntry    +c  : SysTaskSpawn (0, 0, 0, 0, 0, 0, 0, 0)
800441b8 SysTaskSpawn   +4ac: DbmMain (360, 8bb16a2c, 4cf9c, c, 8ff8fb44, 8960,)
800e36e0 DbmMain        +138: SiwMsgQReceive (1, 0, 1, 8bb16a2c, 0, 800e36e8, 3)
800450fc SiwMsgQReceive +d8 : msgQReceive (b, 818e3d60, 8edbc758, 1c, ffffffff,)
804b30d0 msgQReceive    +184: qJobGet (ffffffff, 818e3d60, 8ef97c40, 1c, 8edbc7)
value = 0 = 0x0
POPB.10.ACTIVE->
The task information (ti) command can be implemented upon a task with a SUSPEND state as shown in the output of the list all active processes (i) command. The command syntax is ti "<taskname>".
The ti command helps determine the cause of the exception (indeed, it verifies that an exception has occurred). If an exception has occurred, then obtain the memory location (32-bit hex address) following the INSTR field in the output of the ti command and issue the following command.
lkAddr <addr>
where <addr> is prefixed by 0x since it is a hexadecimal number.
The MGX 8260 supports several automatic and on-demand diagnostic routines. These include:
After receiving power from the midplane, each MGX 8260 circuit card performs a power-on self test (POST). A similar test routine is completed whenever a circuit card is reset as a result of automatic failover (redundancy) or when initiated via manual command (resetcd or resetnd). These tests verify a card's processing capability, download configuration data from persistent memory, and signal availability for call processing.
All the circuit cards use the same boot sequence. The card initially boots up using the boot flash files stored on its flash PROMs. While the card is booting up, its Card LED flashes red. Following boot up the card attempts to download the image software from the active SCC; the Card LED flashes yellow.
After downloading the image software the Card LED again flashes red. It then executes the software (the Card LED flashes yellow) and enters its operating state. If the card test is successfully completed and the card becomes active, its Card LED illuminates green. If the test is successful and the card is in standby mode, its card LED illuminates yellow. If the card test fails, the card LED illuminates red.
|
Note Several attempts (up to five) may be required for the NSCs or BSCs to successfully download the image software. If so, the card will reinitiate that segment of the boot process. The Card LED will again flash red, then yellow, and finally solid green, yellow or red. |
The MGX 8260 supports bit error rate test (BERT), continuity test (COT) and loopback operations on individual DS1 lines. BERT may be initiated by the call agent, via the WebViewer or by issuing appropriate CLI commands. For additional information, refer to:
The dispTransactions command displays all outstanding MRPC transactions on the card where the command is executed. That is, this command can be entered on a session directly connected to any circuit card in the chassis. (Refer to telnet.)
This diagnostic is useful in detecting whether call processing commands have been received and executed on a suspect circuit card.
For example, initiating a telnet session to the NSC module in slot 4 and entering dispTransactions at the NSC prompt results in the following output:
POPB.9.ACTIVE-> dispTransactions

Time Now Is: 3b4e9c2b 3b4e9c2b FRI JUL 13 06:58:51 2001


MRPC Active Transactions:

TxId     Tid    SemId   CbFunc  CbHndl   replyBuf  slot timeStamp
===============================================================
No Active Transactions Found

value = 0 = 0x0
POPB.9.ACTIVE->
To display the contents of the diagnostic table for all circuit cards, issue the CLI command lsonds. A sample output of the lsonds command appears below.
POPB.9.ACTIVE-> lsonds
=======================================================
                On-Line Diagnostic Table
=======================================================
PhyCd     Card      Device      Memory     Datapath
=====     ====     ========    ========    ========
   1      NSC        Pass        Pass            *
   2        *           *           *            *
   3      NSC        Pass        Pass            *
   4      NSC        Pass        Pass            *
   5        *           *           *            *
   6        *           *           *            *
   7        *           *           *            *
   8        *           *           *            *
   9      SCC        Pass        Pass         Pass
  10        *           *           *            *
  11      BSC        Pass        Pass            *
  12        *           *           *            *
  13        *           *           *            *
  14        *           *           *            *
  15        *           *           *            *
  16        *           *           *            *
value = 16 = 0x10
POPB.9.ACTIVE->
To display detailed diagnostic information for a specified card, issue the CLI command lsond <slot>. A sample output appears below.
OPB.9.ACTIVE-> lsond 4

======================================================
    chipstring    validflag    failtime    logflag
======================================================
       ALMCB         1           0000        NA
       ABMCB         1           0000        NA
       ALMSF         1           0000        NA
       ABMSF         1           0000        NA
      CUBITA         1           0000        NA
      CUBITB         1           0000        NA
         SAR         1           0000        NA
     M13MUX1         1           0000        NA
     M13MUX2         1           0000        NA
     M13MUX3         1           0000        NA
     M13MUX4         1           0000        NA
     M13MUX5         1           0000        NA
     M13MUX6         1           0000        NA

=======================================================
     memstring                 failtime    logflag
=======================================================
       MEM1K                     0000        NA

=======================================================
   Dpathstring                 failtime    logflag
=======================================================
   Datapath1                     0000        NA
value = 1 = 0x1
POPB.9.ACTIVE->
Fault isolation involves identifying a problem, analyzing its cause, and applying the appropriate solution. The MGX 8260 incorporate extensive error messaging and logging facilities which help in the identification process. Problems tend to have multiple causes which must be identified, individually analyzed, tested, and confirmed. Repair attempts that simply replace components on a hit-or-miss basis usually mask rather than resolve actual causes of system malfunctions.
The media gateway controller (call agent or soft switch) can trigger events in the MGX 8260 that can have the effect of placing portions of the system out of service. Replacing cards and performing other corrective maintenance procedures will not cure a fault originating at the call agent.
MGX 8260 operation depends on data entered into its configuration database by the administrator. The MGX 8260 node is coupled to external carrier facilities that should be carefully mapped and updated as changes are made to the MGX 8260 configuration.
The technical documentation set supplied with the MGX 8260 contains information about, and organizational tools for, installing and maintaining an MGX 8260 node.
External causes of malfunctions include:
When individual carrier lines fail, system performance degrades because calls are blocked from obtaining service or completing a connection to the intended destination. Statistical reports log the loss of service. Signaling requirements (SS7, DTMF, MF) vary widely from carrier to carrier. The MGX 8260 must be configured to correctly process incoming and outgoing signals.
When a block of carrier circuits fails, the more likely cause of the problem is the failure of a MGX 8260 circuit card. A digital line can be lost at its demarcation point, the service provider's digital switch, or at its interface point with the MGX 8260.
The call agent generates its own error messages. Such alarms are usually the result of a failure in call processing or interprocess communication. A detailed error message should indicate why the alarm was triggered so that a service technician can quickly isolate and remedy the cause.
An element management system can be used to monitor several MGX 8260 nodes. The Cisco Media Gateway Manager (CMGM) supports the SNMP MIBs of the MGX 8260 and other Cisco routers/switches.
The management links can become saturated with messages as call processing escalates. Although the MGX 8260 supports up to 21 simultaneous user logins, the actual number of logins will be limited by the total number of calls being actively processed.
|
Note To assure reliable communications regardless of the volume of messaging, configure the Ethernet management and Fast Ethernet ports for half-duplex operation. Other network devices interfacing with the MGX 8260 media gateway must be also configured for half-duplex operation. |
Problems associated with node management interfaces can manifest themselves as follows:
Call control for VoIP relies on the reliable user data protocol (RUDP) for call setup. Alterations to the IP routing structures and/or router/switch configuration changes within the solution system network affect the processing of calls through the MGX 8260.
IP network problems may result in the following:
The IP network within which the MGX 8260 will operate must be properly engineered and configured to support the anticipated levels of IP traffic.
|
Note As of MGX 8260 software release 1.4, Cisco no longer supports voice over IP (VoIP) functionality for the MGX 8260. |
|
Caution The MGX 8260 system must receive input power from an uninterruptible source, capable of sustaining system operation during prolonged power outages. |
Intermittent power surges and sags, as well as induced noise caused by a faulty ground, can produce the following problems:
Internal causes of malfunctions include:
Problems with the media gateway database can result in the following:
Tracing database problems requires a very detailed examination of database entries across all of the individual tables associated with a potential problem.
CPU usage and memory allocation are associated with the SCC. SCC problems can be caused by card failure or bus faults. Problems associated with the SCC include:
Problems with the flash disk on an SCC may cause the following events to occur:
Causes of hardware failures on individual circuit cards include:
If you experience system problems after loading new software or when replacing a circuit card, check for firmware compatibility. Always refer to the configuration information contained in the Release Notes. Download the correct firmware from Cisco Connection Online (CCO).
|
Caution Occasionally, the SCC's configuration database may be corrupted as a result of a software image upgrade/downgrade. To clear this, issue the SccClearCfg command followed by a resetcd <slot> command. Initiating this command sequence will delete the database configuration. The database is automatically rebuilt from the active SCC (redundant configuration) or can be manually restored using the dbrstr <filename>. (Refer to Appendix A and Appendix B for additional information.) |
For additional information, refer to Software Updates/Upgrades/Downgrades.
The telephony control group (TCG) is a software responsible for downloading and initializing MSMs and associated DSPs on an NSC. TCG also restores connections to an NSC that has switched from standby to active mode.
TCG performs the following tasks:
All DSP channels in an MGX 8260 node are placed in a single pool that is managed by the resource manager (RMG) module. Channel capacity for an individual MSM on an NSC is as follows:
|
Note Each NSC supports two MSMs. One voice path may require one or two DSP channels. |
Loss of DSP services on one or more MSMs will seriously reduce throughput for VoIP calls over Fast Ethernet ports. Faulty DSPs can contribute to:
The following services are available via DSPs for T1/E1 time division multiplexed (TDM) bearer paths:
TDM voice is converted to IP packets before being sent to an IP network. The following DSP services are available for VoIP calls:
|
Note As of MGX 8260 software release 1.4, Cisco no longer supports voice over IP (VoIP) functionality for the MGX 8260. |
|
Warning The MGX 8260 node must be fed power from an uninterruptible source. A power disruption will cause calls in progress to be dropped. Records of calls used for billing purposes will also be irretrievably lost. Additionally the system may not return to normal operation without manual intervention. |
|
Note The MGX 8260 will not resume operation until all components affected by the power disruption have successfully reinitialized. |
If the power disruption is transient and followed by an immediate restoration of power, a high magnitude power surge may damage system components. If the system fails to successfully initialize, begin searching for indications of damage to the MGX 8260 circuit cards.
If an MGX 8260 component—circuit card or fan module—fails and must be replaced, refer to Chapter 5 for detailed instructions. This chapter identifies field replaceable units (FRUs) and provides step-by-step procedures for removing and replacing components while minimizing disruption to call processing.
LAN problems are those associated with 10BaseT node management ports and 100BaseTx Fast Ethernet ports (VoIP with or without in-band management). Node management ports are used by several services, including the media gateway controller, element management and node management systems.
WAN problems are those associated with DS1, DS3 and SONET OC-3 (VoATM) lines.
Service circuit cards can be added to an operational MGX 8260 node currently processing calls. Following physical installation, the card(s) must be configured for redundancy and line-level signaling. The added cards can then be recognized by the call agent or soft switch as being an available resource for handling calls.
|
Caution Observe antistatic precautions when handling a card to avoid damaging sensitive CMOS devices. Wear a ground strap connected to the VCO/4K ground point or an MGX 8260 equipment ground strip whenever removing or replacing cards or assemblies. |
To add a new service circuit card complete the following steps.
Step 1 Identify the front slot which will receive the new card.
Step 2 Remove the blank plate covering the slot.
Step 3 Remove the card from its antistatic envelope.
Step 4 Align the card within the top and bottom card rails in the chassis.
Step 5 Flip up the ejectors on the top and bottom of the card's front panel.
Step 6 Push the card inwards until the card just touches the connectors on the midplane.
Step 7 With the base of the ejectors hooked over the chassis rails, press firmly downward on the ejectors until the card is fully seated in the midplane connectors.
Step 8 Press firmly on the card's front panel until the front panel is flush with the chassis card rails. The card should run its power-on self test (POST) with LEDs illuminating on the front panel.
Step 9 Use a narrow bladed screwdriver to tighten the captive screws at the top and bottom of the front panel.
Step 10 If the card requires a back card, identify the slot into which it will be installed.
Step 11 Remove the blank plate covering the back card slot.
Step 12 Remove the back card from its antistatic envelope.
Step 13 Align the card within the top and bottom card rails in the chassis.
Step 14 Flip up the ejectors on the top and bottom of the card's rear panel.
Step 15 Push the card inwards until the card just touches the connectors on the midplane.
Step 16 With the base of the ejectors hooked over the chassis rails, press firmly downward on the ejectors until the card is fully seated in the midplane connectors.
Step 17 Press firmly on the card's rear panel until it is flush with the chassis card rails.
Step 18 Use a narrow bladed screwdriver to tighten the captive screws at the top and bottom of the rear panel.
Step 19 Label and connect interface cables to the back card. Refer to the Cisco MGX 8260 Hardware Installation Guide.
Step 20 Use the CLI command: lscd <slot> to verify that the new card has successfully booted and has come up in active mode.
Step 21 If the card is to be configured for redundant operation, use addreds to establish the redundant pairings. If the card will not be configured for redundant operation, proceed to line configuration.
For additional information on redundancy, refer to Chapter 4.
In order to successfully configure a redundant BSC pair, the following conditions must be true:
To configure BSC redundancy, follow these steps:
Step 1 Log into the active SCC.
Step 2 Add a redundancy pair using the addreds command.
Step 3 Verify that pairing has been created by issuing the lsreds command.
To configure NSC redundancy, follow these steps:
Step 1 Verify that the secondary NSC has a redundant back card installed and is in the standby state. Enter the lscd command, specifying the card number, to verify the hardware and status:
Step 2 Verify that each primary, active NSC is in the back card mode and is in the active state. List the operational status of all cards using the lscds command.
Step 3 Add a redundancy pair using the addreds command, specifying the primary and secondary slots.
The primary slot is active during normal operation. The secondary slot is in standby mode during normal operation and protects the primary slot in the event of a primary failure.
The following example creates a redundancy pair with slot 1 as primary and slot 3 as secondary:
addreds 1 3
Step 4 Repeat the previous step to assign additional primary slots to the designated secondary slot. Each MGX 8260 chassis can have only one secondary NSC slot.
Line configurations establishes the presence of digital line interfaces on BSCs, DMCs and NSCs. Lines should be configured in the following sequence:
You can add, change, delete, and view DS1 lines from the WebViewer or the CLI. When adding DS3 lines that contain DS1 channels, add the DS3 lines first.
Use the CLI command addds3ln to add a single DS3 line or range of lines to a BSC or DMC. This command supports a number of variables; refer to Table A-1 and the Cisco MGX 8260 Command Line Interface Guide for detailed information.
|
Note The system stops adding lines on the first failure. |
Verify the configuration for the new lines using the lsds1ln command, specifying the location (slot.line) of the new line.
You can add, change, delete, and view DS1 lines from the WebViewer or the CLI. The MGX 8260 supports both T1 and E1 line types, but you must configure the entire chassis as one type or the other.
Use the CLI command addds1ln to add a DS1 line to an NSC or BSC. This command supports a number of variables; refer to Table A-1 and the Cisco MGX 8260 Command Line Interface Guide for detailed information.
|
Note Before adding DS1 lines to a DS3 line, ensure the corresponding DS3 line exists. |
Table 3-13 lists the mapping of DS1 lines to DS3 lines on BSCs and DMCs.
| DS 3 Line Number | DS1 Line Number |
|---|---|
501 | 1-28 |
502 | 29-56 |
503 | 57-84 |
504 | 85-112 |
505 | 113-140 |
506 | 141-168 |
|
Note The system stops adding lines on the first failure, even if later additions are valid. |
Verify the configuration for the new lines using the lsds1ln command, specifying the logical number of the slot in the MGX 8260 chassis and the number of the DS1/E1 line, delimited by a period (slot.line). The display identifies the associated DS3 line, if appropriate.
|
Note The logical slot number for all cards can be displayed by issuing the CLI command lslgcds. |
A single DS3 can map to multiple NSCs or multiple DS3s can map to a single NSC. Map definitions can be organized or arbitrary, but often occur in contiguous groups because you can define a range of mappings with a single command. The MGX 8260 Media Gateway stores map definitions in a map table.
You can initialize or alter the map table from the WebViewer or from the CLI.
You can add map entries individually or within a range. When adding individual map entries, the following restrictions apply:
You simplify the process of mapping DS3 to DS1 lines by mapping a range of DS1s rather than individual lines. A map range is added in a sequential and contiguous manner, and can cross either source or destination boundaries.
The entire range of source and destination lines must be contiguous. The system stops mapping lines if it encounters a source or destination that is already assigned, leaving map pairs before the contiguous break assigned and the rest unassigned.
To add map table entries, enter the addm13 command. This command supports a number of variables; refer to Table A-1 and the Cisco MGX 8260 Command Line Interface Guide for detailed information.
Verify the configuration for the line maps using the lsm13s command.
In VoIP configurations, a voice port is used only for DS0s terminating on an NSC. It is a logical DS0 termination on the NSC used to define default parameters, such as echo cancellation tail time, dejitter buffer and packetization period at an individual DS0 level. It controls how the DSP (when assigned for a call) will be set up, assuming no MGCP control overrides these defaults.
Voice ports are not required for calls terminating on BSCs.
To add a voice port, enter the addvport command. This command supports a number of variables; refer to Table A-1 and the Cisco MGX 8260 Command Line Interface Guide for detailed information.:
To view the information for a single voice port, enter the lsvport command, specifying the logical slot number of an NSC and the logical port number for an existing voice port. The system displays detailed information for the port.
|
Note As of MGX 8260 software release 1.4, Cisco no longer supports voice over IP (VoIP) functionality for the MGX 8260. |
The minimal system consists of a primary MGC, the MGX 8260 node, and an IP network. You can add a secondary network and/or MGC for reliable operation.
The generic requirements for establishing MGX 8260 to MGC communication via MGCP are as follows:
1. Set the domain name—execute mgcpdefcfgcli command (refer to Table A-2)
2. Set IP addresses and ports—execute chsysip1, chsysip2 commands (refer to Table A-1)
3. Configure MGCP core settings—execute mgcpcorecfgcli command (refer to Table A-2)
4. View message statistics—use "snooper" program or lsmgcpstat command (refer to MGCP and Table A-2)
5. Set media platform control (MPC) scalars—execute mmsmpccfgcli command (refer to Table A-2)
The next step is to create one or two session sets for a secure backhaul configuration between the MGC and the MGX 8260. The session manager organizes individual sessions into groups and sets.
The backhaul sessions and groups include the following components in ascending hierarchical order:
When adding sessions, you create a structure that supports reliable operation. The goal for a fully-redundant system is to provide multiple management sessions to multiple MGCs via multiple physical networks.
With full redundancy, you configure the following:
|
Note This assumes that every transport address has a corresponding IP interface address and a UDP port unique for that IP address. |
|
Note If the MGC cannot handle all D channels in one session set, you configure another similar set using different UDP ports and D channels. |
For additional information on creating sessions, refer to ISDN Backhaul.
![]()
![]()
![]()
![]()
![]()
![]()
![]()
![]()
Posted: Sat Sep 28 22:28:07 PDT 2002
All contents are Copyright © 1992--2002 Cisco Systems, Inc. All rights reserved.
Important Notices and Privacy Statement.