|
|

The following items are FRUs for the MGX 8260:
This chapter also describes the procedures for updating or upgrading MGX 8260 flash firmware and software images.
 |
Caution Observe antistatic precautions when handling a circuit card to avoid damaging sensitive CMOS devices. Wear a ground strap connected whenever removing or replacing cards or assemblies. |
The MGX 8260 is incapable of rerouting calls by itself. All call routing through the node is handled via a call agent or soft switch application running on a separate host platform(s). One call agent may control call routing for multiple MGX 8260 nodes.
Understanding the routing configuration, specifically trunk allocations through individual service circuit cards in a route, is critical to the FRU replacement process. You must be able to identify and isolate the call routes through an individual service circuit card. With this information you can turn off or divert incoming calls prior to removing and replacing a specific service circuit card.
The card is secured in its slot with captive retaining screws. Ejectors provide the leverage needed to seat and extract the cards in/from the midplane connectors. (See Figure 5-1.)
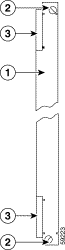
| 1 | Card panel | 2 | Captive retaining screws |
| 3 | Card ejector levers |
|
Step 1 From the call agent reroute call traffic away from the front card to be replaced.
Step 2 Use the lsacps command to verify that the card is no longer actively processing traffic. Refer to the removal procedures for a specific card for a list of CLI commands used to verify a card's operational status.
Step 3 To minimize service disruptions, the card should be in the standby or failed mode prior to being removed. A service circuit card in the active mode can be removed and replaced as long as no stable calls remain connected through the card. To view a card's current state use the lscd <slot number> command.
Step 5 Use a narrow bladed screwdriver to loosen the captive screws at the top and bottom of the card's front panel.
Step 6 Use your thumbs to lift and push the ejectors outwards from the card. Firm pressure is required to extract the card from the midplane connectors.
Step 7 With the card free of the connectors grasp its top and bottom edges and slide the card free of the chassis.
Step 8 Place the removed card on an antistatic mat or in an antistatic envelope.
Step 1 Remove the replacement card from its antistatic envelope.
Step 2 Align the card within the top and bottom card rails in the chassis.
Step 3 Flip up the ejectors on the top and bottom of the card's front panel.
Step 4 Push the card inwards until the card just touches the connectors on the midplane.
Step 5 With the base of the ejectors hooked over the chassis rails, press firmly downward on the ejectors until the card is fully seated in the midplane connectors.
Step 6 Press firmly on the card's front panel until the front panel is flush with the chassis card rails. The card should run its power-on self test (POST) with LEDs illuminating on the front panel.
Step 7 Use a narrow bladed screwdriver to tighten the captive screws at the top and bottom of the front panel.
Step 8 From the call agent restore call routing through the replaced card. Use the lsacps command to view any active calls still being processed through the target front card.
 |
Warning Hazardous network voltages are present in WAN ports (DS1 and DS3 lines). To avoid electric shock, use caution when working near WAN ports. |
|
Warning To avoid electric shock, do not connect safety extra-low voltage (SELV) circuits to telephone-network voltage (TNV) circuits. LAN ports contain SELV circuits and WAN ports contain TNV circuits. Both LAN and WAN ports may use RJ45 connectors. Use caution when connecting cables. |
The card is secured in its slot with captive screws. Ejectors provide the leverage needed to seat and extract the cards in/from the midplane connectors. (See Figure 5-2.)
Step 1 From the call agent reroute call traffic away from the front card associated with the back card to be replaced.
Step 2 Use the lsacps command to verify that the front card is no longer actively processing traffic. Refer to the replacement procedures for a specific card for a list of CLI commands used to verify a card's operational status.
Step 3 To minimize service disruptions, the front card should be in the standby or failed mode prior to being removed. The back card associated with a service circuit card in the active mode can be removed and replaced as long as no stable calls remain connected through the front card. To view a card's current state use the lscd <slot number> command.
Step 5 Verify that all cables connected to the back card have been labeled with their destinations and connector locations. If necessary use a fine point indelible marker to write the needed information on the jacket of each cable.
Step 6 Disconnect all cables connected to the back card.
Step 7 Use a narrow blade screwdriver to loosen the captive retaining screws at the top and bottom of the card's rear panel.
Step 8 Use your thumbs to lift and push the ejectors outwards from the card. Firm pressure is required to extract the card from the midplane connectors.
Step 9 With the card free of the connectors grasp its top and bottom edges and slide the card free of the chassis.
Step 10 Set the back card safely aside.
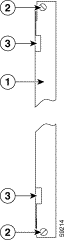
| 1 | Card panel | 2 | Captive retaining screws |
| 3 | Card ejector levers |
|
Step 1 Remove the replacement back card from its antistatic envelope.
Step 2 Align the card within the top and bottom card rails in the chassis.
Step 3 Flip up the ejectors on the top and bottom of the card's rear panel.
Step 4 Push the card inwards until the card just touches the connectors on the midplane.
Step 5 With the base of the ejectors hooked over the chassis rails, press firmly downward on the ejectors until the card is fully seated in the midplane connectors.
Step 6 Press firmly on the card's rear panel until it is flush with the chassis card rails.
Step 7 Use a narrow bladed screwdriver to tighten the captive screws at the top and bottom of the rear panel.
Step 8 Reconnect the previously removed interface cables.
Step 9 From the call agent restore call routing through the associated front card. Use the lsacps command to view any active calls still being processed through the target front card.
Step 1 Use a small bladed screwdriver to loosen the retaining screws on either side of the front panel. (See Figure 5-3.)
 |
Note The fan unit retaining screws are narrow gauged and can be snapped if excessive force is applied. |
Step 2 Firmly grasp the retaining screws and steadily pull the front panel away from the MGX 8260 chassis. The panel is held in place by a series of metal teeth. Considerable pulling force will be required to remove the panel from the chassis.
Step 3 Place the front panel safely aside for later reinstallation.
Step 4 The three fan modules can now be individually removed and replaced. For detailed instructions, refer to Replacement ProcedureFan Tray.
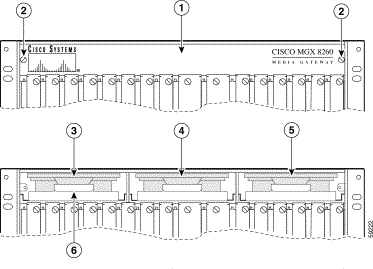
| 1 | Front Access Panel | 2 | Captive Retaining Screw |
| 3 | Fan Module 1, Fans 1 and 2 | 4 | Fan Module 2, Fans 3 and 4 |
| 5 | Fan Module 3, Fans 5 and 6 | 6 |
This section describes the procedures for removing and replacing each type of MGX 8260 front and back card. Procedures vary based on whether the circuit card is configured for non-redundant or redundant operation.
In all cases, to minimize possible service disruption, replacement procedures should be performed when call traffic is expected to be minimal through the media gateway.
Replacement procedures are described below for the following front card types:
|
Note In redundant configurations, the time required to synchronize configuration databases on front cards will vary based on the number and type of circuit cards equipped in the node, as well as the complexity of the provisioning database. |
The SCC controls node operation and handles:
|
Note As of MGX 8260 software release 1.4, Cisco no longer supports voice over IP (VoIP) functionality for the MGX 8260. |
There are two types of SCCs differentiated by the broadband interface module (BIM) installed on each card. One BIM supports four Fast Ethernet ports for VoIP applications. The other BIM supports four SONET fiber optic interfaces for VoATM applications.
|
Note Redundant SCCs in a MGX 8260 node must be a matched pair—same BIM type. If they do not match, the message "MISMATCH" appears on the CLI when a replacement SCC is installed. |
Replacing an SCC in a redundant configuration (two SCCs per node) can be accomplished with no loss of service. When an MGX 8260 node is equipped with two SCCs, both SCCs automatically function as mated pairs having a single logical slot number (slot 9). If the SCC to be replaced is currently active, the resetcd command can used to gracefully transition the active card to standby.
|
Note Graceful transitions preserve currently stable calls while blocking new call attempts. The transition period will last until the final stable call has been terminated by the calling parties. To minimize the waiting period for graceful transitions, SCC replacements should be performed when little or no call traffic is routed through the MGX 8260 node. |
|
Caution In a non-redundant node configuration having only one SCC, replacing the SCC will disrupt traffic throughout the node for the duration of the replacement procedure. The call agent may lose track of stable calls when a non-redundant SCC is replaced, resulting in potential billing errors. |
To replace an SCC:
Step 1 Log into the active SCC using the root login and password.
Step 2 Use the dbbkup command to create a backup copy of the configuration database. You may be forced to use an earlier backup file if the configuration database on the SCC to be replaced has been corrupted. (Refer to Appendix A and dbbkup Command.)
In a redundant configuration, the backup file will be stored on both SCCs. The replacement SCC will be automatically configured from the backup copy on the active SCC.
In a non-redundant configuration, the backup file should be transferred via tftp to an external workstation or server for retrieval after the SCC has been replaced.
Step 3 In a non-redundant configuration, call processing should be halted via the media gateway controller (call agent). The IPDC links or MGCP sessions with the call agent must be gracefully shut down at the call agent to avoid possible database corruption when the SCC shuts down. (Refer to Rerouting Calls, and the OEM documentation supplied with the call agent or soft switch.)
To verify that traffic through the target SCC has been terminated, issue the Engineering debug command dispL2 <9 or 10> while logged in as root. The Msgs in the Tx Q and Msgs in Re-Tx Q fields should both indicate "0" (zero). (Refer to Table B-2.)
In a redundant configuration verify that the target SCC is in standby mode using the CLI command: lscd <9 or 10>. If it is not, issue the resetcd <9 or 10> command against the active SCC to force it into standby mode. (Refer to Appendix A.)
Step 4 Replace the target SCC. (Refer to Replacing Front Cards.) The replacement SCC will automatically reset once it is seated in the chassis midplane.
Step 5 When its reboot is completed, the SCC will either be in active mode (non-redundant configuration) or standby mode (redundant configuration).
In a redundant configuration, the configuration database in the replacement SCC will be automatically synchronized with that of the currently active SCC.
In a non-redundant configuration, the database backup file must be transferred via tftp from the external workstation or server where it was stored to the flash disk on the SCC. After the transfer has been completed, restore the configuration database by issuing the CLI command dbstr <filename> specifying the transferred database backup file. (Refer to Appendix A and dbrstr Command.)
Step 6 In a redundant configuration, the replacement SCC will remain in standby mode until the card is reset. Issue the CLI command swcd 9. The standby SCC will reboot and simultaneously initiate a transition of the currently active SCC to standby mode. Upon completion of the reboot, the replacement SCC will become active.
In a non-redundant configuration, the SCC automatically becomes active, but will not be ready to process calls until the database configuration has been successfully restored.
Step 7 Verify that the replacement SCC is in active mode using the CLI command: lscd <9 or 10>.
Step 8 Verify that the call agent is able to process calls through the newly active SCC. (Refer to the OEM documentation supplied with the call agent.)
|
Caution Replacing a non-redundant DMC will disrupt the traffic among the DS3 lines connected to the DMC for the duration of the replacement procedure. |
To replace a DMC:
Step 1 Log into the active SCC using the root login and password.
Step 2 In a non-redundant configuration, call processing over the DS3 lines connected to the target DMC should be halted via the call agent. (Refer to Rerouting Calls and the OEM documentation supplied with the call agent.)
To verify that traffic through the target DMC has been terminated, issue the Engineering debug command dispL2 <7 or 8> while logged in as root. The Msgs in the Tx Q and Msgs in Re-Tx Q fields should both indicate "0" (zero). (Refer to Table B-2.)
In a redundant configuration verify that the associated SCC is in standby mode using the CLI command: lscd <9 or 10>. If it is not, issue the resetcd <9 or 10> command against the active SCC to force it into standby mode. (Refer to Appendix A.)
Step 3 Replace the target DMC. (Refer to Replacing Front Cards.) The replacement DMC will automatically reset once it is seated in the chassis midplane.
Step 4 When its reboot is completed, the DMC and its associated SCC will either be in active mode (non-redundant configuration) or standby mode (redundant configuration).
The configuration database in the replacement DMC will be automatically synchronized with that stored on the currently active SCC.
Step 5 In a redundant configuration, the replacement DMC and its associated SCC will remain in standby mode until the SCC is reset. Issue the CLI command swcd 9. The standby SCC will reboot and simultaneously initiate a transition of the currently active SCC to standby mode. Upon completion of the reboot, the replacement DMC will become active.
In a non-redundant configuration, the DMC automatically becomes active, but will not be ready to process calls until its database configuration has been successfully restored by the SCC.
Step 6 Verify that the replacement DMC is in active mode using the CLI command: lscd <7 or 8>.
Step 7 Verify that the call agent is able to process calls through the newly active DMC. (Refer to the OEM documentation supplied with the call agent.)
Each BSC can be configured to support up to six DS3 lines equivalent to 168 T1 lines. Replacing a BSC in a mated pair (redundant) configuration can be accomplished with no loss of service. A mated pair configuration for BSCs is created by using the CLI command addreds. To verify the pairings of BSCs issue the lsreds command. (Refer to Appendix A.)
|
Caution Replacing a non-redundant BSC will disrupt the traffic among the DS3 lines connected to the BSC for the duration of the replacement procedure. |
To replace a BSC:
Step 1 Log into the active SCC using the root login and password.
Step 2 In a non-redundant configuration, call processing over the DS3 lines connected to the target BSC should be halted via the call agent. (Refer to Rerouting Calls and the OEM documentation supplied with the call agent.)
To verify that traffic through the target BSC has been terminated, issue the Engineering debug command dispL2 <physical slot number = 11-16> while logged in as root. The Msgs in the Tx Q and Msgs in Re-Tx Q fields should both indicate "0" (zero). (Refer to Table B-2.)
In a redundant configuration, verify that the target BSC is in standby mode using lscd <physical slot number = 11-16>. If it is not, issue the resetcd <physical slot number = 11-16> command against the active BSC to force it into standby mode. Verify that both BSCs share the same logical slot number using the lscds or lslgcds command. (Refer to Appendix A.)
Step 3 Replace the target BSC. (Refer to Replacing Front Cards.) The replacement BSC will automatically reset once it is seated in the chassis midplane.
Step 4 The configuration database in the replacement BSC will be automatically synchronized with that stored on the currently active SCC.
Step 5 In a redundant configuration, the replacement BSC will remain in standby mode until it is reset. Use the CLI command swcd <physical slot number = 11-16> to force the replacement (standby) BSC to reset itself. The BSC will reboot and simultaneously initiate a transition of the currently active BSC to standby mode. Upon completion of the reboot, the replacement BSC will become active.
In a non-redundant configuration, the BSC automatically becomes active, but will not be ready to process calls until its database configuration has been successfully restored by the SCC.
Step 6 Verify that the replacement BSC is in active mode using the CLI command: lscd <physical slot number = 11-16>.
Step 7 Verify that the call agent is able to process calls through the newly active BSC. (Refer to the OEM documentation supplied with the call agent.)
Each NSC equipped with a back card can be configured to support up to 16 DS1 (T1 or E1) lines. Replacing a primary NSC in a redundant configuration with an available secondary NSC can be accomplished with no loss of service. A redundant NSC configuration is created by using the CLI command addreds. To verify the pairings of primary NSCs to the secondary NSC issue the lsreds command. (Refer to Appendix A.) The secondary NSC must be equipped with a redundant back card.
|
Caution Replacing a non-redundant primary NSC will disrupt the traffic among the DS1 lines connected to the NSC for the duration of the replacement procedure. |
To replace a primary NSC equipped with a back card:
Step 1 Log into the active SCC using the root login and password.
Step 2 In a non-redundant configuration, call processing over the DS1 lines connected to the target NSC should be halted via the call agent. (Refer to Rerouting Calls and the OEM documentation supplied with the call agent.)
To verify that traffic through the target NSC has been terminated, issue the Engineering debug command dispL2 <physical slot number = 1-8, 11-16> while logged in as root. The Msgs in the Tx Q and Msgs in Re-Tx Q fields should both indicate "0" (zero). (Refer to Table B-2.)
In a redundant configuration, verify that the target primary NSC is in standby mode using lscd <physical slot number = 11-16>. If it is not, issue the resetcd <physical slot number = 11-16> command against the active primary NSC to force it into standby mode. This command switches the call processing functions and physical interface connections to the secondary NSC. (Refer to Appendix A.)
|
Note The secondary NSC must be set to logical slot number 0 prior to issuing the resetcd command. You can verify the status of the secondary NSC using the lscds or lslgcds command. If the secondary NSC is set to any slot number other than 0 (zero), it is currently unavailable for switchover. |
Step 3 Replace the target NSC. (Refer to Replacing Front Cards.) The replacement NSC will automatically reset once it is seated in the chassis midplane.
Step 4 The configuration database in the replacement NSC will be automatically synchronized with that stored on the currently active SCC.
Step 5 In a redundant configuration, the replacement NSC will remain in standby mode until it is reset. Issue the CLI command swcd <physical slot number = 1-8, 11-16> against the replacement NSC. The NSC will reboot and simultaneously initiate a transition of the currently active secondary NSC to standby mode. Upon completion of the reboot, the replacement primary NSC will become active. The secondary NSC will reset itself to logical slot number 0 and become available for redundant switchover.
In a non-redundant configuration, the NSC automatically becomes active, but will not be ready to process calls until its database configuration has been successfully restored by the SCC.
Step 6 Verify that the replacement NSC is in active mode using the CLI command: lscd <physical slot number = 1-8, 11-16>. The secondary NSC should show logical slot number = 0.
Step 7 Verify that the call agent is able to process calls through the newly active NSC. (Refer to the OEM documentation supplied with the call agent.)
An NSC can be configured without a back card to serve as a DSP farm providing varied services to multiple calling interfaces (DSX, VoIP, VoATM). Such NSCs are configured as multiservice modules (MSMs). The CLI command lsmsms will identify all NSCs configured for MSM services. (Refer to Appendix A.)
In redundant configurations, MSMs are configured across multiple NSCs to assure the availability of services should one NSC-MSM fail. The number of NSC-MSMs provisioned in an MGX 8260 node varies based on the anticipated call traffic requiring such services as codec translation and DTMF/MF reception. In a non-redundant configuration, only one NSC is configured for MSM operation.
Replacing an NSC-MSM in a redundant configuration with other available NSC-MSMs configured for the same services can be accomplished with minimal degradation in overall service. In a non-redundant configuration, replacing the NSC-MSM causes the loss of all specialty services until the replacement NSC becomes active.
To replace an NSC configured with MSMs:
Step 1 Log into the active SCC using the root login and password.
Step 2 In a non-redundant configuration, all call processing requiring MSM services from the target NSC should be halted via the call agent. (Refer to Rerouting Calls and the OEM documentation supplied with the call agent.)
To verify that traffic through the target NSC has been terminated, issue the Engineering debug command dispL2 <physical slot number = 1-8, 11-16> while logged in as root. The Msgs in the Tx Q and Msgs in Re-Tx Q fields should both indicate "0" (zero). (Refer to Table B-2.)
Step 3 Replace the target NSC. (Refer to Replacing Front Cards.) The replacement NSC will automatically reset once it is seated in the chassis midplane.
Step 4 The configuration database in the replacement NSC will be automatically synchronized with that stored on the currently active SCC.
Step 5 Verify that the replacement NSC is in active mode using the CLI command: lscd <physical slot number = 1-8, 11-16>.
Step 6 Verify that the call agent is able to process calls using the MSM services in the newly active NSC. (Refer to the OEM documentation supplied with the call agent.)
Replacement procedures are described below for the following back card types:
This back card supports VoIP operation via its four RJ48 Fast Ethernet (100BaseTx) ports. Replacing an SCCBC-4FE back card in a redundant configuration (two SCCs per node) can be accomplished with no loss of service. When an MGX 8260 node is equipped with two SCCs, both SCCs automatically function as mated pairs having a single logical slot number (slot 9). If the SCCBC-4FE back card is to be replaced for an SCC that is currently active, the resetcd command can used to gracefully transition the standby SCC to active and the active SCC to standby.
|
Note As of MGX 8260 software release 1.4, Cisco no longer supports voice over IP (VoIP) functionality for the MGX 8260. |
|
Note Graceful transitions preserve currently stable calls while blocking new call attempts. The transition period will last until the final stable call has been terminated by the calling parties. To minimize the waiting period for graceful transitions, SCC back card replacements should be performed when little or no call traffic is routed through the MGX 8260 node. |
|
Caution In a non-redundant node configuration having only one SCC, replacing the SCCBC-4FE back card will disrupt traffic throughout the node for the duration of the replacement procedure. The call agent may lose track of stable calls when a non-redundant SCCBC-4FE back card is replaced, resulting in potential billing errors. |
To replace an SCCBC-4FE back card:
Step 1 Log into the active SCC using a SuperUser or root login and password.
Step 2 In a non-redundant configuration, VoIP call processing should be halted through the node via the media gateway controller (call agent). (Refer to Rerouting Calls and the OEM documentation supplied with the call agent.)
In a redundant configuration verify that the SCC is in standby mode using the CLI command: lscd <9 or 10>. If it is not, issue the resetcd <9 or 10> command against the active SCC to force it into standby mode. (Refer to Appendix A.)
Step 3 Replace the target SCCBC-4FE back card. (Refer to Replacing Back Cards.)
Step 4 In a redundant configuration, the SCC associated with the replacement back card will remain in standby mode until the card is reset. Issue the CLI command swcd <9 or 10> against the standby SCC. The standby SCC will reboot and simultaneously initiate a transition of the currently active SCC to standby mode. Upon completion of the reboot, the replacement SCC will become active.
In a non-redundant configuration, the SCC remains active while the SCCBC-4FE back card is replaced. However, fatal errors will be generated when the back card is removed. Use the CLI command resetcd <9 or 10> to force the SCC to reset itself.
Step 5 Verify that the SCC associated with replacement SCCBC-4FE back card is in active mode using the CLI command: lscd <9 or 10>.
Step 6 Verify that the call agent is able to process VoIP calls through the newly active SCC via the replacement back card. (Refer to the OEM documentation supplied with the call agent.)
This back card supports VoATM operation with an MGX 8850 via its four single mode fiber OC-3 ports. Replacing an OC3SMIBC back card in a redundant configuration (two SCCs per node) can be accomplished with no loss of service. When an MGX 8260 node is equipped with two SCCs, both SCCs automatically function as mated pairs having a single logical slot number (slot 9). If the OC3SMIBC back card is to be replaced for an SCC that is currently active, the resetcd command can used to gracefully transition the standby SCC to active and the active SCC to standby.
|
Note Graceful transitions preserve currently stable calls while blocking new call attempts. The transition period will last until the final stable call has been terminated by the calling parties. To minimize the waiting period for graceful transitions, SCC back card replacements should be performed when little or no call traffic is routed through the MGX 8260 node. |
|
Caution In a non-redundant node configuration having only one SCC, replacing the OC3SMIBC back card will disrupt traffic throughout the node for the duration of the replacement procedure. The call agent may lose track of stable calls when a non-redundant OC3SMIBC back card is replaced, resulting in potential billing errors. |
To replace an OC3SMIBC back card:
Step 1 Log into the active SCC using a SuperUser or root login and password.
Step 2 In a non-redundant configuration, call processing should be halted through the node via the media gateway controller (call agent). (Refer to Rerouting Calls and the OEM documentation supplied with the call agent.)
In a redundant configuration verify that the SCC is in standby mode using the CLI command: lscd <9 or 10>. If it is not, issue the resetcd <9 or 10> command against the active SCC to force it into standby mode. (Refer to Appendix A.)
Step 3 Verify that call traffic through the SONET lines connected to the target OC3SMIBC back card has been halted by using the CLI command lssonetlns.
Step 4 Replace the target OC3SMIBC back card. (Refer to Replacing Back Cards.)
Step 5 In a redundant configuration, the SCC associated with the replacement back card will remain in standby mode until the card is reset. Issue the CLI command swcd <9 or 10> against the standby SCC. The standby SCC will reboot and simultaneously initiate a transition of the currently active SCC to standby mode. Upon completion of the reboot, the replacement SCC will become active.
In a non-redundant configuration, the SCC remains active while the OC3SMIBC back card is replaced. However, fatal errors will be generated when the back card is removed. Use the CLI command resetcd <9 or 10> to force the SCC to reset itself.
Step 6 Verify that the SCC associated with replacement OC3SMIBC back card is in active mode using the CLI command: lscd <9 or 10>.
Step 7 Verify that the call agent is able to process VoATM calls through the newly active SCC via the replacement back card. (Refer to the OEM documentation supplied with the call agent.)
Step 8 Verify that call traffic is flowing through the SONET lines connected to the target OC3SMIBC back card by using the CLI command lssonetlns.
This back card supports up to six DS3 interfaces to a DMC or BSC. Replacing a T3E3BC-6DSX back card in a redundant configuration (two DMCs-SCCs per node or mated BSC pairs) can be accomplished with no loss of service. When an MGX 8260 node is equipped with two DMCs-SCCs or mated BSC pairs, the mated pairs of SCCs or BSCs have a single logical slot number.
If the T3E3BC-6DSX back card is to be replaced for a DMC with an SCC that is currently active, the resetcd command can used to gracefully transition the standby SCC to active and the active SCC to standby.
|
Note Graceful transitions preserve currently stable calls while blocking new call attempts. The transition period will last until the final stable call has been terminated by the calling parties. To minimize the waiting period for graceful transitions, T3E3BC-6DSX back card replacements on redundant DMCs or BSCs should be performed when little or no call traffic is routed through the MGX 8260 node. |
|
Caution In a non-redundant node configuration having only one DMC-SCC or non-redundant (unpaired) BSCs, replacing the OC3SMIBC back card will disrupt traffic throughout the node or BSC for the duration of the replacement procedure. The call agent may lose track of stable calls when a non-redundant T3E3BC-6DSX back card is replaced, resulting in potential billing errors. |
To replace a T3E3BC-6DSX back card:
Step 1 Log into the active SCC using a SuperUser or root login and password.
Step 2 In a non-redundant configuration, call processing through the node should be halted via the media gateway controller (call agent). (Refer to Rerouting Calls and the OEM documentation supplied with the call agent.)
In a redundant configuration when replacing a T3E3BC-6DSX back card on a DMC, verify that the associated SCC is in standby mode using the CLI command: lscd <9 or 10>. If it is not, issue the resetcd <9 or 10> command against the active SCC to force it into standby mode. (Refer to Appendix A.)
When replacing a T3E3BC-6DSX back card for a mated pair of BSCs, verify that the target BSC is in standby mode using lscd <physical slot number = 11-16>. If it is not, issue the resetcd <physical slot number = 11-16> command against the active BSC to force it into standby mode. Verify that both BSCs share the same logical slot number using the lscds or lslgcds command.
Step 3 Verify that call traffic through the DS3 lines connected to the target T3E3BC-6DSX back card has been halted by using the CLI command lsds3cursts.
Step 4 Replace the target T3E3BC-6DSX back card. (Refer to Replacing Back Cards.)
Step 5 In a redundant configuration, the DMC-SCC associated with the replacement back card will remain in standby mode until the card is reset. Issue the CLI command swcd <9 or 10> against the standby SCC. The standby SCC will reboot and simultaneously initiate a transition of the currently active SCC to standby mode. Upon completion of the reboot, the SCC associated with the replacement back card will become active.
In a non-redundant configuration, the DMC-SCC remains active while the T3E3BC-6DSX back card is replaced. However, fatal errors will be generated when the back card is removed. Use the CLI command resetcd <9 or 10> to force the SCC to reset itself.
When replacing a T3E3BC-6DSX back card on a redundant pair of BSCs, issue the swcd <physical slot number = 11-16> command against the BSC with the replacement T3E3BC-6DSX back card to transition it from standby to active mode.
Step 6 Verify that the DMC-SCC or BSC associated with the replacement T3E3BC-6DS back card is in active mode using the CLI command: lscd <physical slot number = 7, 8, 11-16>.
Step 7 Verify that the call agent is able to process calls through the DS3 lines via the replacement back card. (Refer to the OEM documentation supplied with the call agent.)
Step 8 Verify that call traffic is flowing through the DS3 lines connected to the target T3E3BC-6DSX back card by using the CLI command lsds3cursts.
|
Note Graceful transitions preserve currently stable calls while blocking new call attempts. The transition period will last until the final stable call has been terminated by the calling parties. To minimize the waiting period for graceful transitions, T1E1BC-50NR back card replacements on redundant NSCs should be performed when little or no call traffic is routed through the MGX 8260 node. |
|
Caution In a non-redundant node configuration having only non-redundant NSCs, replacing the T1E1BC-50NR back card will disrupt traffic flowing through the associated NSC for the duration of the replacement procedure. The call agent may lose track of stable calls when the T1E1BC-50NR back card is replaced, resulting in potential billing errors. |
To replace a T1E1BC-50NR back card:
Step 1 Log into the active SCC using a SuperUser or root login and password.
Step 2 In a non-redundant configuration, call processing through the NSC associated with the target T1E1BC-50NR back card should be halted via the media gateway controller (call agent). (Refer to Rerouting Calls and the OEM documentation supplied with the call agent.)
When replacing a T1E1BC-50NR back card for a primary NSC mapped to a secondary NSC, verify that the target NSC is in standby mode using the CLI command: lscd <1-8, 11-16>. If it is not, use the CLI command resetcd <physical slot number = 1-8, 11-16> to force the target NSC into standby mode and transition call processing to the secondary NSC. (Refer to Appendix A.)
|
Note The secondary NSC must be set to logical slot number 0 prior to issuing the resetcd command. You can verify the status of the secondary NSC using the lscds or lslgcds command. If the secondary NSC is set to any slot number other than 0 (zero), it is currently unavailable for switchover. |
Step 3 Verify that call traffic through the DS1 lines connected to the target T1E1BC-50NR back card has been halted by using the CLI command lsds1cursts.
Step 4 Replace the target T1E1BC-50NR back card. (Refer to Replacing Back Cards.)
Step 5 In a redundant configuration, the primary NSC associated with the replacement back card will remain in standby mode until the card is reset. Issue the CLI command swcd <physical slot number = 1-8, 11-16> against the primary NSC associated with the replacement back card. The primary NSC will reboot and simultaneously initiate a transition of the currently active secondary NSC to standby mode. Upon completion of the reboot, the primary NSC will become active.
In a non-redundant configuration, the NSC remains active while the T1E1BC-50NR back card is replaced. However, fatal errors will be generated when the back card is removed. Use the CLI command resetcd <physical slot number = 1-8, 11-16> to force the NSC to reset itself.
Step 6 Verify that the NSC associated with the replacement T1E1BC-50NR back card is in active mode using the CLI command lscd <physical slot number = 1-8, 11-16>.
Step 7 Verify that the call agent is able to process calls through the DS1-T1 lines via the replacement back card. (Refer to the OEM documentation supplied with the call agent.)
Step 8 Verify that call traffic is flowing through the DS1-T1 lines connected to the target T1E1BC-50NR back card by using the CLI command lsds1cursts.
This back card supports up to 16 DS1-E1 interfaces to an NSC via 16 RJ48 connections.
Replacing a T1E1BC-RJ48 back card in a redundant NSC configuration, primary NSCs mated to a secondary NSC, can be accomplished with no loss of service. The resetcd command can used to gracefully transition the primary NSC associated with the target back card to standby. The secondary NSC automatically assumes call processing via the primary NSC's physical E1 interfaces.
|
Note Graceful transitions preserve currently stable calls while blocking new call attempts. The transition period will last until the final stable call has been terminated by the calling parties. To minimize the waiting period for graceful transitions, T1E1BC-RJ48 back card replacements on redundant NSCs should be performed when little or no call traffic is routed through the MGX 8260 node. |
|
Caution In a non-redundant node configuration having only non-redundant NSCs, replacing the T1E1BC-RJ48 back card will disrupt traffic flowing through the associated NSC for the duration of the replacement procedure. The call agent may lose track of stable calls when the T1E1BC-RJ48 back card is replaced, resulting in potential billing errors. |
To replace a T1E1BC-RJ48 back card:
Step 1 Log into the active SCC using a SuperUser or root login and password.
Step 2 In a non-redundant configuration, call processing through the NSC associated with the target T1E1BC-RJ48 back card should be halted via the media gateway controller (call agent). (Refer to Rerouting Calls and the OEM documentation supplied with the call agent.)
When replacing a T1E1BC-RJ48 back card for a primary NSC mapped to a secondary NSC, verify that the target NSC is in standby mode using the CLI command: lscd <1-8, 11-16>. If it is not, use the CLI command resetcd <physical slot number = 1-8, 11-16> to force the target NSC into standby mode and transition call processing to the secondary NSC. (Refer to Appendix A.)
|
Note The secondary NSC must be set to logical slot number 0 prior to issuing the resetcd command. You can verify the status of the secondary NSC using the lscds or lslgcds command. If the secondary NSC is set to any slot number other than 0 (zero), it is currently unavailable for switchover. |
Step 3 Verify that call traffic through the DS1 lines connected to the target T1E1BC-RJ48 back card has been halted by using the CLI command lsds1cursts.
Step 4 Replace the target T1E1BC-RJ48 back card. (Refer to Replacing Back Cards.)
Step 5 In a redundant configuration, the primary NSC associated with the replacement back card will remain in standby mode until the card is reset. Issue the CLI command swcd <physical slot number = 1-8, 11-16> against the primary NSC associated with the replacement back card. The primary NSC will reboot and simultaneously initiate a transition of the currently active secondary NSC to standby mode. Upon completion of the reboot, the primary NSC will become active.
In a non-redundant configuration, the NSC remains active while the T1E1BC-RJ48 back card is replaced. However, fatal errors will be generated when the back card is removed. Use the CLI command resetcd <1-8, 11-16> to force the NSC to reset itself.
Step 6 Verify that the NSC associated with the replacement T1E1BC-RJ48 back card is in active mode using the CLI command: lscd <physical slot number = 1-8, 11-16>.
Step 7 Verify that the call agent is able to process calls through the DS1-E1 lines via the replacement back card. (Refer to the OEM documentation supplied with the call agent.)
Step 8 Verify that call traffic is flowing through the DS1-E1 lines connected to the target T1E1BC-RJ48 back card by using the CLI command lsds1cursts.
This back card is only used with a secondary NSC in a redundant NSC configuration. Primary NSCs are mapped to the secondary NSC. The T1E1BC-RED back card allows the secondary NSC to assume control of the direct interfaces (T1/E1 lines) connected to a primary NSC. (Refer to NSC Redundancy.)
|
Note When NSCs are mapped in a redundant configuration, there will always be only one T1E1BC-RED back card in an MGX 8260 node. |
The secondary NSC must be in standby mode (logical slot number = 0) before the T1E1BC-RED back card can be replaced.
To replace a T1E1BC-RED back card:
Step 1 Log into the active SCC using a SuperUser or root login and password.
Step 2 Use the CLI command lslgcds to verify that the secondary NSC is currently assigned logical slot number 0 (zero). If it is so assigned, its T1E1BC-RED back card can be replaced. If it is assigned any logical slot number other than 0, it is currently in use; its back card cannot be replaced.
Another option is to issue the lscd <physical slot number = 1-8, 11-16> command. If the NSC is in standby mode, the T1E1BC-RED back card can be replaced.
Step 3 Replace the T1E1BC-RED back card. (Refer to Replacing Back Cards.)
Step 4 Use the CLI command resetcd <1-8, 11-16> to force the secondary NSC to reset itself.
Step 5 Issue the lscd <physical slot number = 1-8, 11-16> command for the secondary NSC. The NSC should be in standby mode.
Fan trays can be replaced while the system is running. Each fan tray holds two fans. (Refer to Table 2-1.) A fan tray should be replaced when one of the fans shows a sensor reading of less than 2900 rpms. You can verify the status of all MGX 8260 sensors using the lsemms CLI command. (Refer to Appendix A.)
|
Note An MGX 8260 node can safely operate for short periods of time with only two working fan modules. |
To replace a fan module:
Step 1 Remove the front access panel of the fan unit. (Refer to Fan Unit.)
Step 2 Identify the fan tray to be replaced.
Step 3 Grasp the handle on the front of the fan tray and pull it out of the chassis. (See Figure 5-3, item 6.)
Step 4 Align the replacement fan tray within the empty fan unit bay. The side rails should be engaged in the chassis slots.
Step 5 Push the fan tray inward until it is fully seated in the midplane connectors.
Step 6 Verify fan unit operation using the following command: lsemm chassis 3 <fan number> [CR]. Repeat the command to verify the operation of both fans. Each fan should indicate a speed greater than 2900 rpms.
Step 7 Replace the front access panel on the fan unit.
|
Note Do not overtighten the retaining screws holding the access panel to the chassis. |
The MGX 8260 supports the storage and downloading of multiple software images. Images are stored as files on the flash disk on an SCC. Changes in the software image may require a change to the flash read only memory (firmware) on individual card types.
This section describes how revisions are made to software and firmware on an MGX 8260 node.
|
Note Always refer to the Release Notes for detailed instructions on updating from previous software versions. |
A database backup using the CLI command dbbkup should be completed immediately before and after a software upgrade or downgrade procedure. (Refer to dbbkup Command.)
The backup file is stored on the flash disk of the active SCC and copied over to the standby SCC in a redundant configuration. For non-redundant configurations, the backup file should be transferred via tftp to an external workstation or server for later retrieval.
The database configuration can be restored using the dbrstr <filename> command. In a non-redundant configuration, the database configuration file must be transferred via tftp from the external workstation or server to the flash disk on the SCC before running dbrstr. (Refer to dbrstr Command.)
To download MGX 8260 software images, refer to Cisco's software center on Cisco Connection Online (CCO), located at the following URL:
For instructions on how to download software, refer to the link for "Using the Software Center."
Step 1 Log into the active SCC using a SuperUser or root login and password.
Step 2 Issue the lskey command to display the current tftp security key.
The security key must be entered when using the tftp function to transfer software image files to the active SCC on this MGX 8260 node.
Two types of files can be transferred to the MGX 8260 node. Flash (.fls) files are firmware instructions that are written to read-only memory on a circuit card. Flash files contain the instructions read when a card reboots. Image (.img) files contain application programs that execute on circuit card processors. Table 5-1 lists the common file types for an MGX 8260 node.
| tftp Filename | Description |
|---|---|
vxWorks_disk.scc.fw scc_r<rev level>.img | Image file for SCC |
vxWorks_disk.scc.fw scc_r<rev level>.fls | Flash firmware for SCC |
vxWorks_dnld.bsc.fw bsc_r<rev level>.img | Image file for BSC |
vxWorks_dnld.bsc.fw bsc_r<rev level>.fls | Flash firmware for BSC |
vxWorks_dnld.nsc.fw nsc_r<rev level>.img | Image file for NSC |
vxWorks_dnld.nsc.fw nsc_r<rev level>.fls | Flash firmware for NSC |
|
Note The tftp procedure described below applies to a tftp server running on a UNIX workstation. The tftp actual command syntax for a tftp server running on a personal computer will vary based on the type of tftp utility. |
Using tftp, transfer the files to the MGX 8260 node as follows.
Step 1 Log onto the workstation running the tftp server and locate the files to transfer.
Step 2 Initiate a tftp session with the target MGX 8260 node using the tftp command.
tftp <IP Address>Specify the IP address of the MGX 8260 management port in standard IP dot notation.
Step 3 Set the transfer mode to binary with the following command:
mode binaryStep 4 Use the following tftp command to transfer SCC software to the MGX 8260:
tftp> put vxWorks_disk.scc.fw scc_r<rev level>.img.[key]tftp> put vxWorks_disk.scc.fw scc_r<rev level>.fls.[key]For information about the security key, refer to the Security Key Requirements.
Step 5 Use the following tftp commands to transfer BSC software to the MGX 8260:
tftp> put vxWorks_dnld.bsc.fw bsc_r<rev level>.img.[key]tftp> put vxWorks_dnld.bsc.fw bsc_r<rev level>.fls.[key]Step 6 Use the following tftp commands to transfer NSC software to the MGX 8260:
tftp> put vxWorks_dnld.nsc.fw nsc_r<rev level>.img.[key]tftp> put vxWorks_dnld.nsc.fw nsc_r<rev level>.fls.[key]
The CLI command updatefls <physical slot number = 1-16> <filename> transfers the flash file (.fls) stored on the active SCC to the card in the specified slot. (Refer to Appendix A.)
|
Caution Great care must be taken not to incorrectly download the wrong flash file to a particular card type. The only way to recover if this happens is to replace the PROMs on the circuit card. |
Graceful upgrades require redundant card configurations to minimize the effect on system performance during the upgrade process. Stable calls that existed prior to a software upgrade are preserved throughout the completion of the upgrade process.
The following prerequisites must be met before initiating a graceful MGX 8260 upgrade:
1. The upgrade images must be transferred to the flash disk on the active SCC. (Refer to Transferring Files to the MGX 8260.)
2. The redundant card configurations should be fully mapped. Card mapping is automatic for redundant SCCs and DMCs. For NSCs and BSCs the mapping of redundant cards is accomplished via the addreds <primary slot number > <secondary slot number> command.
3. Based on information in the Release Notes, upgrade or downgrade the boot flash images on all affected cards, starting with the SCC.
4. The primary card and the secondary card in a redundancy pair should have fully booted to either active or standby mode. For NSCs the secondary NSC must be set to logical slot number 0 to be available for redundant switchover.
5. Both cards in a mated pair (except for NSCs) should share the same logical slot number.
6. The SCC must be upgraded before any other card type.
The graceful upgrade procedure is as follows:
1. Log into the active SCC using the SuperUser or root login name and password.
2. Transfer the new image file via tftp to the flash disk on the active SCC (C:/IMAGE/ ) in binary format. The filename for the new image will be in the format: <card type>_< 9-char string>.img.<tftp key>. The card type can be scc, nsc or bsc).
3. Upgrade the standby card first using the command upgd <logical slot number> <card type>_<9-char string>.fw. The standby card resets and loads the new image; it remains in standby mode.
4. Issue an upgdcmit <logical slot number> command against the standby card. This forces the standby card to active mode. The currently active card is reset and loads the new image; it reboots in standby mode.
|
Note Issuing an upgdcancel <logical slot number> after the upgd command has been executed but before an upgdcmit is executed cancels the upgrade. |
|
Caution Non-redundant upgrades will take the MGX 8260 node out of service for the duration of the upgrade procedure. Perform non-redundant upgrades during light traffic periods or during a pre-arranged maintenance window. |
The upgrade images must be transferred to the flash disk on the SCC before the procedure can begin. (Refer to Transferring Files to the MGX 8260.)
To upgrade a non-redundant MGX 8260 node:
1. From the call agent administrative screens stop call processing through the MGX 8260 node.
2. Log into the active SCC using the SuperUser or root login name and password.
3. Transfer the new image file via tftp to the flash disk on the SCC (C:/IMAGE/ ) in binary format. The filename for the new image will be in the format: <card type>_< 9-char string>.img.<tftp key>. The card type can be scc, nsc or bsc).
4. Beginning with the SCC, upgrade each card using the command upgd <physical slot number> <card type>_<9-char string>.fw. The card resets and loads the new image.
|
Note All card types must be upgraded to the same revision level. |
5. Restart call processing through the node using the call agent administrative screens.
|
Note The downgrade procedure described below may not be supported by a specific software release. Refer to the Release Notes accompanying the software release for details. |
Graceful downgrades require redundant card configurations to minimize the effect on system performance during the downgrade process. Stable calls that existed prior to a software downgrade are preserved throughout the completion of the downgrade process.
|
Note A downgrade may cause the loss of a feature. Feature loss may affect whether certain call types can be handled following the downgrade. Review the Release Notes for the current and earlier versions of the MGX 8260 software to determine the overall effects of downgrading the node. |
The following prerequisites must be met before initiating a graceful MGX 8260 downgrade:
1. The downgrade images must be on or transferred to the flash disk on the active SCC. (Refer to Transferring Files to the MGX 8260.)
2. The redundant card configurations should be fully mapped. Card mapping is automatic for redundant SCCs and DMCs. For NSCs and BSCs the mapping of redundant cards is accomplished via the addreds <primary slot number > <secondary slot number> command.
3. The primary card and the secondary card in a redundancy pair should have full y booted to either active or standby mode. For NSCs the secondary NSC must be set to logical slot number 0 to be available for redundant switchover.
4. Both cards in a mated pair (except for NSCs) should share the same logical slot number.
5. The SCC must be downgraded before any other card type.
The graceful downgrade procedure is as follows:
1. Log into the active SCC using the SuperUser or root login name and password.
2. If the old image files are not already on the SCC disk, transfer the downgrade image files via tftp to the flash disk on the active SCC (C:/IMAGE/ ) in binary format. Refer to the Release Notes supplied for earlier software versions for the actual format of the image filenames.
3. Downgrade the standby card first using the command dngd <logical slot number> <card type>_<9-char string>.fw. The standby card resets and loads the new image; it remains in standby mode.
4. Issue an dngdcmit <logical slot number> command against the standby card. This forces the standby card to active mode. The currently active card is reset and loads the old image; it reboots in standby mode.
|
Note Issuing a dngdcancel <logical slot number> after the dngd command has been executed but before an dngdcmit is executed cancels the downgrade. |
|
Caution Non-redundant downgrades will take the MGX 8260 node out of service for the duration of the downgrade procedure. Perform non-redundant downgrades during light traffic periods or during a pre-arranged maintenance window. |
The downgrade images must be on or transferred to the flash disk on the SCC before the procedure can begin. (Refer to Transferring Files to the MGX 8260.)
To downgrade a non-redundant MGX 8260 node:
1. From the call agent administrative screens stop call processing through the MGX 8260 node.
2. Log into the active SCC using the SuperUser or root login name and password.
3. If the old image files are not already on the SCC disk, transfer the downgrade image file via tftp to the flash disk on the active SCC (C:/IMAGE/ ) in binary format. Refer to the Release Notes supplied for earlier software versions for the actual format of the image filenames.
4. Beginning with the SCC, downgrade each card using the command dngd <physical slot number> <card type>_<9-char string>.fw. The card resets and loads the old image.
|
Note All card types must be downgraded to the same revision level. |
5. Restart call processing through the node using the call agent administrative screens.
Files can be deleted from the flash disk on the active SCC using VxWorks commands. (Refer to Table B-1.)
|
Caution Exercise extreme caution when deleting a file. Only delete files you are certain do not need to reside on the SCC flash disk. |
The safest procedure is to navigate to the subdirectory holding the target file. To delete a specific file from the flash disk on the SCC do the following:
Step 1 At the command line type ll and press Enter. A list of files contained at the root level of the disk will be displayed as show below.
POPB.9.ACTIVE-> ll

 size          date       time       name

--------       ------     ------    --------

     512    JAN-01-1980  06:28:14   IMAGE             <DIR>

     512    JAN-01-1980  06:28:14   DIAG              <DIR>

     512    JAN-01-1980  06:28:14   CONFIG            <DIR>

     512    JAN-01-1980  06:28:14   TMP               <DIR>

     512    JAN-01-1980  06:28:14   LOG               <DIR>

   39232    JUN-21-2001  13:22:52   HD_IMAGE_FILE_TB

      50    JUN-21-2001  10:21:56   prtFlag

       0    JUN-21-2001  13:22:52   hdAnmtFileTb

   49152    JAN-01-1980  00:00:00   CHD00001

     804    JUN-21-2001  13:24:56   crmCfg.cfg

     804    JUN-21-2001  13:23:44   dmcCfg.cfg

value = 0 = 0x0

POPB.9.ACTIVE->
Step 2 Change to the desired subdirectory by typing cd "<directory>" and pressing Enter. The name of the directory must appear within double quotation marks as shown in the example below. Type ll and press enter to display the contents of this subdirectory.
OPB.9.ACTIVE-> cd "IMAGE"
value = 0 = 0x0
POPB.9.ACTIVE-> ll
  size          date       time       name
--------       ------     ------    --------
     512    JAN-01-1980  06:28:14   .                 <DIR>
     512    JAN-01-1980  06:28:14   ..                <DIR>
     512    JAN-01-1980  06:28:14   NMC               <DIR>
     512    JAN-01-1980  06:28:14   SCC               <DIR>
     512    JAN-01-1980  06:28:14   BSC               <DIR>
     512    JAN-01-1980  06:28:14   NSC               <DIR>
     512    JAN-01-1980  06:28:14   html              <DIR>
     512    JAN-01-1980  06:28:14   Announce          <DIR>
     512    JAN-01-1980  06:28:14   misc              <DIR>
 1869824    JUN-07-2001  13:09:04   scc_r01.02.g1.cfg
value = 0 = 0x0
POPB.9.ACTIVE->
Step 3 If necessary, change to the desired subdirectory by typing cd "<directory>" and pressing Enter. The name of the directory must appear within double quotation marks as shown in the example below. Type ll and press enter to display the contents of this subdirectory.
POPB.9.ACTIVE-> cd "SCC"
value = 0 = 0x0
POPB.9.ACTIVE-> ll
  size          date       time       name
--------       ------     ------    --------
     512    JAN-01-1980  06:28:14   .                 <DIR>
     512    JAN-01-1980  06:28:14   ..                <DIR>
  970664    JUN-06-2001  08:57:28   scc_r01.02.03.fls
  960088    JUN-07-2001  09:33:40   scc_r01.02.00.fls
  970664    JUN-06-2001  09:06:20   scc_r01.02.04.fls
 2111688    JUN-06-2001  09:10:14   scc_r01.02.04.fw
 2111688    JUN-07-2001  09:33:28   scc.fw
 2038536    JUN-07-2001  09:33:58   scc_r01.02.00.fw
  981512    JUN-07-2001  09:34:08   scc_r01.03.01.fls
 2224232    JUN-07-2001  09:34:32   scc_r01.03.01.fw
value = 0 = 0x0
POPB.9.ACTIVE->
Step 4 To delete a file, type remove "<filename>" and press Enter. The filename must appear within double quotation marks. For example, remove "scc_r01.03.01.fw" <CR>.
![]()
![]()
![]()
![]()
![]()
![]()
![]()
![]()
Posted: Sat Sep 28 22:28:28 PDT 2002
All contents are Copyright © 1992--2002 Cisco Systems, Inc. All rights reserved.
Important Notices and Privacy Statement.