|
|

This chapter describes the physical installation of an ESP. It does not include configuration or provisioning information. This chapter includes the following sections:
This section contains information about the site requirements for installing an ESP. It includes the following sections:
An AC or DC power source must be easily accessible within 6 feet of the ESP. The ESP must be powered from a dedicated branch circuit. An easily accessible disconnect device should also be included in the facility wiring.
The AC Power input must meet the requirements listed in Table 5-1. The ESP automatically adjusts to input voltages within its range.
| Minimum | Nominal | Maximum | |
|---|---|---|---|
Input voltage | 90 VAC | 120/208 VAC | 264 VAC |
Line frequency | 47 Hz | 50/60 Hz | 63 Hz |
The DC power input must meet the requirements listed in Table 5-2.
| Minimum | Nominal | Maximum | |
|---|---|---|---|
Input voltage | -40 VDC | -48 VDC | -60 VDC |
DC | Ground a 48V DC power feed, if used, on the positive 48 volt and safety ground pins. Ensure that the ESP frame, and all other frames, are attached to an isolated ground connection. The nominal operating voltage of the DC-model ESP is -48V DC. The DC source should be capable of supplying 5 amperes. Only power supplies complying with SELV requirements in EN60950 may be connected to the -48 VDC input. |
AC | An insulated grounding conductor that is identical in size to the grounded and ungrounded branch circuit supply conductors is to be installed as part of the branch circuit that supplies the device. This conductor has green insulation with yellow stripes. |
A 15A DC circuit breaker is recommended for the 48 VDC power source which supplies DC power to the DC version of the ESP. In North America, this circuit breaker should conform to NEC (ANSI/NFPA 70) and CEC (Part 1, C22.1) for protection against excess currents, short circuits, and earth faults.
A 20A AC circuit breaker is recommended for the 120/208 VAC power source which supplies AC power to the AC version of the ESP. In North America, this circuit breaker should conform to NEC (ANSI/NFPA 70) and CED (Part 1. C22.1) for protection against excess currents, short circuits, and earth faults.
The site must be capable of maintaining a maximum ambient temperature of 50º C while the system is operating (recommended range is 20º C to 30º C). Cooling airflow direction is from front to rear.
You can mount the ESP into standard 19" rack or a 23-inch racks. (The Cisco StrataCom BPX Installation manual has information about Cisco StrataCom STRATM cabinet.) The ESP is 5 1/4 inches high. The ESP has front mounting flanges and is shipped with attachable rear and mid-mounting brackets.
You can mount the ESP into a standard 19-inch rack (17.75 " +0.12 and -0.00 inches between the rails), such as Cisco-StrataCom's STRATM cabinet, which contains two front and rear mounting rails.
To install a ESP in a 23-inch rack, you need to provide adapter brackets to adjust the width of the rack opening to 17.75 (+0.12 and -0.00) inches. Adapter brackets for installation of 19-inch equipment are commercially available.
The ESP chassis contains two sets of holes, with attached PEM nuts, for the installation of mid-mounting brackets. These sets of holes are set back, 5 and 10 inches from the front of the unit.
This chapter describes the contents of your ESP system shipping package and the physical characteristics of the ESP front and back panels.
If the shipping container is damaged, or if any of the various shipping indicators show improper handling of the container, contact your local shipping representative.
The content of the container is listed in Table 5-3.
| Item | Description | |
|---|---|---|
Extended Services Processor: | ESP-AC an AC-powered unit | |
Power cord: | AC power cord. Two (2) DC Mating terminal block plugs (Customers are expected to build their own power cords with these DC mating block plugs.) | |
Rack-Mount Kit: | Read-mounting brackets and attaching hardware. Mid-mounting brackets and attaching hardware. | |
Fiber optic cables for connecting the ESP's OC-3 Network Interface Card to the BPX's BXM card are orderable options. See Appendix B, Cable Information, for details. | ||
This section contains descriptions and illustrations of the ESP's front and rear panels.
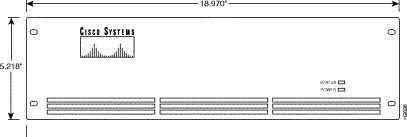
The ESP front panel, illustrated in Figure 5-1, displays the Cisco logo, the product name and the following two indicators:
All physical connections are made to the ESP rear panel. The ESP rear panel differs for AC- and DC-powered models.
The AC-powered ESP contains the components and connectors shown in Figure 5-2. The Power On/Off Switch is to the left of the AC-Power Input connector.

The ESP-AC has the following connectors and switches:

 | Caution The factory-installed cable shown in Figure 5-2 is known as the soft-switch cable. If it is not installed when the ESP is powered on, the Status LEDs will blink red. If it is removed when the ESP is powered on, the ESP will shut down. |
The DC-Powered ESP rear panel contains the components and connectors shown in Figure 5-3. As shown, the DC-powered ESP has inputs for two DC power inputs (DC Input A and DC Input B). Typically these DC inputs are from separate DC power sources to provide for protection against a DC power source failure. Each DC Input has its own On/Off Switch.
The ESP-DC has the following connectors and switches:
| Caution The factory-installed cable shown in Figure 5-3 is known as the soft-switch cable. If it is not installed when the ESP is powered on, the Status LEDs will blink red. If it is removed when the ESP is powered on, the ESP will shut down. |
To ensure safe performance as well as to maintain the integrity of your ESP, please observe a few safety measures as you proceed with this installation.
| Caution Danger of explosion if battery is incorrectly replaced. Replace only with the same or equivalent type recommended by the manufacturer. Discard used batteries according to the manufacturer's instruction. Batterien können nicht vom Kunden ausgewechselt werden. Bei falscher Behandlung können sie explodieren. Batterien nicht in Feuer werfen und nicht auseinandernehmen oder wïederaufladen. |
This chapter describes three mounting methods for positioning your ESP in a rack. You can mount the ESP into a 19- or 23-inch rack, or you can install an ESP at the rack front. During installation, you need to allow enough clearance space at the front of the rack to enable removal and replacement of the ESP.
 | Caution Installation should be performed by authorized personnel only. |
You can mount the ESP into a standard 19" rack (17.75" +0.12 and -0.00 inches between the rails), such as Cisco-StrataCom's STRATM Rack, which contains two front and rear mounting rails. The ESP has a front mounting flange and rear-mounting brackets that will align with the mounting rails.
To use a 23-inch rack for ESP installation, you need to provide adapter brackets to adjust the width of the rack opening to 17.75(+0.12 and -0.00) inches. Adapter brackets for installation of 19-inch equipment are commercially available.
Where depth is restricted in the rack, the ESP can be secured to the front of the rack by using the holes at the sides of the ESP chassis.
 | Caution The ESP is a single, enclosed unit and weighs approximately 60 lbs. Use two people when it is necessary to lift it into place. |
To rack mount the ESP, follow these steps:
Step 2 From the rear of the rack, position the rear-mounting brackets, shown in Figure 5-4, on the outside of the ESP chassis.
Step 3 Loosely secure the rear-mounting bracket to the ESP chassis using the screws that were supplied.
Step 4 Secure the rear-mounting brackets to the rack's mounting posts.
Step 5 Tighten the four screws holding the rear-mounting brackets to the ESP chassis.

To mid-mount the ESP, follow these steps:
Step 2 From the front of the rack, slide the ESP into the rack until the Mid-Mounting brackets are up against the rack posts.
Step 3 Secure the holes in the Mid-mounting Right-Angle brackets to the holes in the rack mounts.
Step 4 From the rear of the rack, position the mid-mounting brackets on the outside of the ESP chassis.
Step 5 Loosely secure the rear-mounting bracket to the ESP chassis using the screws that were supplied.
Step 6 Secure the rear-mounting brackets to the rack's mounting posts as shown in Figure 5-6.
Step 7 Tighten the four screws holding the rear-mounting brackets to the ESP chassis.
This chapter assumes that your ESP is already rack mounted. You are now ready to connect AC or DC power, turn on the ESP, and access a UNIX login prompt. Guidelines for ESP shutdown are also provided at the end of this chapter
The ESP AC power cord is designed to work with single-phase power systems. Appendix B, Cable Information, provides further information about the AC Power cable supplied with your ESP in North America.
The AC-Power connector and the ON/OFF Switch are on the left-side of the rear panel as shown in Figure 5-7.
To connect AC power, follow these steps:
Step 2 Attach the power cord to the AC Input connector.
Step 3 Attach the other end of the power cord to the AC power source.
Step 4 Turn power on by pressing the side of the On/Off Switch labeled 1.
The DC Input Connectors and On/Off Switches are on the rear panel as shown in Figure 5-8. The two DC Input connectors are EURO Block three-pin male receptacles. Female EURO mating connectors are provided in the ESP-DC accessories bag which was part of the shipping kit.
To connect DC power, follow these steps:
Step 2 Make sure the DC source is off.
Step 3 The cable from the DC-power source should have 3 insulated #14 AWG wires (stranded); the insulation should be stripped back 0.25" (6 mm) on each wire end, where you connect the female EURO connectors supplied in the accessories bag.
Step 4 Observe the way the polarized female EURO connectors will mate with the DC input connector, whose location is shown in Figure 5-8. Insert each wire into the correct hole in the female EURO connector . Secure each wire by tightening the screws in the connector. As you face the rear panel, both DC input connectors are oriented as follows:
Pin 1: -48 VDC, is on the left as you face the unit
Pin 2: Safety Ground
Pin 3: -48 VDC Return
Step 5 Insert one (or both) female EURO connectors now connected to the cable from the DC source into DC Inputs A and/or B.
Step 6 Turn on the DC source.
Step 7 Turn on DC power to the ESP by pressing the 1-side(s) of the DC circuit breakers, Power A, and/or Power B, as required. Then press the 1-side of the DC power switch.
The first time you power on your ESP, you should perform the procedures described in the next chapter, Interface Connections. These procedures involve connecting a terminal to the ESP and configuring it for its local LAN environment, configuring the ESP to run the Configuration Interface and to be able to login as espuser, and connecting the ESP to the BPX as part of the BPX Service Node.
Before turning on the ESP, you should read through Chapter 6, Interface Connections, to understand the sequence of operations for configuring an ESP.
During the normal operation of ESP and the BPX Service Node, the ESP is typically not turned off. However, in the rare cases where it might necessary to turn off the ESP, both AC or DC power switches provide for graceful or emergency shutdowns:
To gracefully shut down the ESP, where ESP processes are stopped and the file system is protected, momentarily press the Power Switch. The graceful shutdown will take approximately 30 seconds.
In an emergency situation where it is necessary to remove power from the ESP immediately, press and hold the Power Switch down for approximately 5 seconds. The ESP will shutdown without going through the 30-second graceful shutdown.
For the AC unit, the power cord inlet is the disconnecting device.
![]()
![]()
![]()
![]()
![]()
![]()
![]()
![]()
Posted: Fri Jan 19 20:26:43 PST 2001
All contents are Copyright © 1992--2001 Cisco Systems, Inc. All rights reserved.
Important Notices and Privacy Statement.