|
|

This chapter describes the following tasks for operating ISM:
Starting the ISM program consists of two tasks:
For more information about defining the ISM initialization procedure in SOLVE:Netmaster, see the "Updating SOLVE:Netmaster" section in the "Installing ISM" chapter of the CiscoWorks Blue Internetwork Status Monitor for SOLVE:Netmaster Installation Guide.
To run ISM 3.0, perform the following tasks:
Step 1 Log in to SOLVE:Netmaster.
Step 2 In the Select Option field on the SOLVE : Primary Menu, type N.S.10 and press Enter. The ISM : Primary Menu panel is displayed (Figure 2-1).
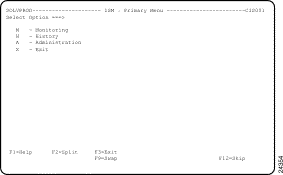
The ISM : Primary Menu panel is the panel that opens when you start the ISM program interface (Figure 2-1). In most cases you can access the ISM : Primary Menu panel from any other ISM panel by pressing F3 until you reach the ISM : Primary Menu.
From the ISM : Primary Menu panel, you can access ISM's primary applications. Each of the options on the panel provides access to one or more of ISM's applications or features.
For more information on setting up ISM's applications, see the "Setting Up the ISM Environment" chapter.
In addition to the ISM : Primary Menu panel, ISM provides secondary menu interfaces for using the monitoring, history, and administration functions of ISM:
The standard function keys in ISM are described in Table 2-1. There are exceptions to the implementation of the standard function keys on some of the ISM panels to provide adequate operation of those panels. However, most panels use the functions keys according to the standard descriptions.
| Function | Key |
|---|---|
Obtain more information on how to use the panel and its options. | F1 |
Split your screen area to display both SOLVE windows. | F2 |
Return to the previously displayed panel, or save the entered data and exit. | F3 |
Add a new resource, or save a new definition. | F4 |
Refresh the data displayed on the panel. | F6 |
Scroll towards the top of the display when the displayed data exceeds the length of a single panel. | F7 |
Scroll towards the bottom of the display when the displayed data exceeds the length of a single panel. | F8 |
Swap to the other SOLVE window. | F9 |
Scroll to the left when the displayed data exceeds the width of a single panel. | F10 |
Scroll to the right when the displayed data exceeds the width of a single panel. | F11 |
F12 |
To help you locate options on any panel within the ISM interface, all data-entry field options are indicated by an underline. Informational and descriptive fields are displayed in green.
Use the following guidelines when making updates to options on the ISM panels:
The activity log allows you to view its contents, using different formats to view different details, and to search for a text string in the log.
To view the SOLVE activity log, perform the following steps:
Step 1 On the ISM : Monitoring Menu panel, type L in the Select Option field and press Enter. The SOLVE Log panel is displayed (Figure 2-2).
 | Tips |
You can also access the SOLVE Log from any ISM panel by typing $LOG in the Command or Select Option field and pressing Enter.
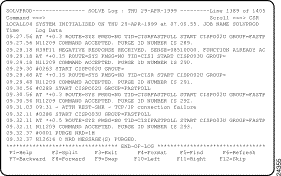
Step 2 To view additional information from within the SOLVE activity log, perform any of the following operations:
There are several panels in ISM that provide the primary functions for managing your router resources. The following sections describe how you can use these panels to monitor your network resources:
Use the ISM : Status Summary panel (Figure 2-3) to monitor the overall status of the resources being managed by ISM. The ISM : Status Summary panel provides a color-coded status by resource type and summarizes the number of resources that are in the corresponding condition.
To use the ISM : Status Summary panel to monitor resources, complete the following steps:
Step 1 On the ISM : Monitoring Menu panel, type S in the Select Option field and press Enter. The ISM : Status Summary panel is displayed.
Step 2 On the ISM : Status Summary panel, tab to the resource type and status condition that you are interested in and press Enter. Depending on where you placed your cursor on the ISM : Status Summary panel, one of the following panels is displayed:
You can access all of ISM's resource-specific status panels from the ISM : Status Summary panel. For example, if you position the cursor in the Total field for routers and press Enter, the ISM : Router List panel is displayed for all of the routers that ISM is managing. If you position the cursor in a router field where there is a performance (PERF) or alert condition and press Enter, the ISM : Router List panel is displayed showing only the routers that are in the condition that you selected.
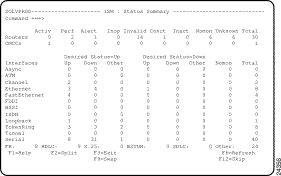
For details about using the panel to monitor a specific resource type, see the following chapters in this guide:
Use the ISM : Router List panel (Figure 2-4) to monitor the status of all of the routers (by service point name) that are being managed by ISM. You can access the ISM : Router List panel from the ISM : Monitoring Menu panel by typing R in the Select Option field and pressing Enter, or from the ISM : Status Summary panel.
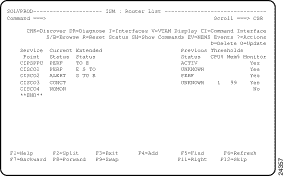
The ISM : Router List panel provides the following functions:
To maintain security integrity across ISM in the remote SOLVE:Netmaster region, the ISM user's SOLVE:Netmaster user ID must be set up on both the local and remote SOLVE:Netmaster regions. When an ISM user attempts to perform management functions on a target system (remote region) ISM verifies that the SOLVE:Netmaster user ID has the required authority on the remote regions before executing any commands.
For information about setting up the Focal Point Management application, see the "Setting Up ISM System Parameters" section.
To monitor routers on a remote region, complete the following steps:
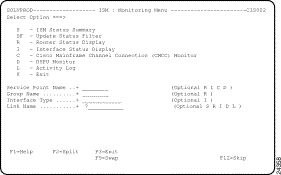
Step 1 On the ISM : Monitoring Menu panel (Figure 2-5), type any valid option code (for example, R) in the Select Option field, type ? in the Link Name field, and press Enter.
The ISM : Link Names List panel is displayed (Figure 2-6), showing the current status of all regions linked to your local region.
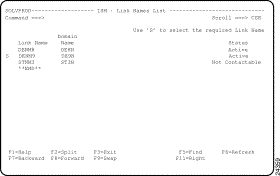
Step 2 On the ISM : Link Names List panel, type S next to a link name.
The panel displayed is the one for the option that you specified when you entered ? to display the ISM : Links Names List panel. The name of your local region is still displayed in the top left corner.
![]()
![]()
![]()
![]()
![]()
![]()
![]()
![]()
Posted: Tue Aug 24 09:27:53 PDT 1999
Copyright 1989-1999©Cisco Systems Inc.