|
|

After you have installed and configured ISM on your mainframe, the next step is to set up our ISM management applications. To access ISM administration functions, type A in the Select Option field on the ISM : Primary Menu and press Enter. The ISM : Administration Menu (Figure 3-1) is displayed.
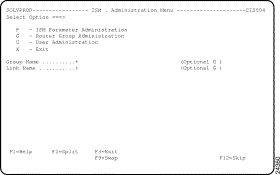
You must be a user with ISM administrator authority to setup and modify the ISM parameters. For more information on setting up user authority, see the "Defining the ISM User Profiles" section.
To enable the ISM management applications and specify the global ISM router management options you must complete the following tasks:
To enable the ISM management applications and to specify the global ISM router management options, complete the following steps:
Step 1 On the ISM : Administration Menu panel (Figure 3-1), type P in the Select Option field and press Enter.
The ISM : Parameters Administration Menu panel is displayed (Figure 3-2).
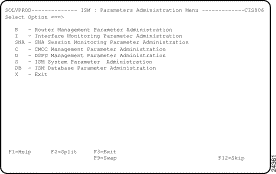
Step 2 To select an ISM management application to enable or disable, or to define parameters for it, type the corresponding option in the Select Option field and press Enter.
The appropriate ISM Parameters Administration panel is displayed in each case.
For more information on setting up each set of parameters, see the following sections in this chapter:
To set up router management parameters for your local system:
Step 1 On the ISM : Parameters Administration Menu panel (Figure 3-2), type R in the Select Option field and press Enter. The ISM : Router Management Parameters panel is displayed (Figure 3-3).
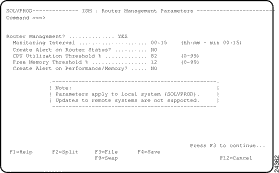
Step 2 To enable router management, type Yes (the initial default) in the Router Management? field.
Enabling router management allows you to monitor routers. It also allows you to enable monitoring of associated resources, such as interfaces, CMCCs, and DSPUs.
The default selection is no alert generation. If you want ISM to indicate router status changes or to indicate when CPU or memory thresholds have been exceeded for routers, then you need to enable ISM's alert generation.
Step 4 To specify global ISM router management options, type the required values in the remaining fields.
Step 5 Press F3 to file your changes.
 | Tips |
To set up interface monitoring parameters for your local system:
Step 1 On the ISM : Parameters Administration Menu panel (Figure 3-2), type I in the Select Option field and press Enter. The ISM : Interface Monitoring Parameters panel is displayed (Figure 3-4).
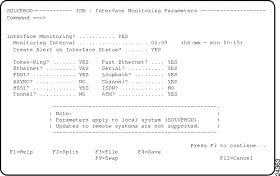
Step 2 To enable interface monitoring, type Yes (the initial default) in the Interface Monitoring? field.
Step 3 To specify global ISM interface monitoring options, type the required values in the remaining fields.
The default interface monitoring interval is two hours (02:00). Cisco recommends 24 hours (23:59).
Step 4 To enable alert generation, type Yes in the Create Alert on Interface Status? field.
The default selection is no alert generation. If you want ISM to indicate interface status changes, then you need to enable ISM's alert generation for interfaces.
Step 5 To specify which types of interface you want to monitor, type Yes in the input field beside each of the required interface types.
Step 6 Press F3 to file your changes.
To set up SNA session monitoring parameters for your local system:
Step 1 On the ISM : Parameters Administration Menu panel (Figure 3-2), type SNA in the Select Option field and press Enter. The ISM : SNA Session Monitoring Parameters panel is displayed (Figure 3-5).
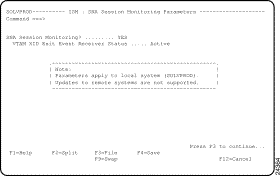
Step 2 To enable SNA session monitoring, type Yes (the initial default) in the SNA Session Monitoring? field.
Step 3 Press F3 to file your changes.
To set up CMCC management parameters for your local system:
Step 1 On the ISM : Parameters Administration Menu panel (Figure 3-2), type C in the Select Option field and press Enter. The ISM : CMCC Management Parameters panel is displayed (Figure 3-6).
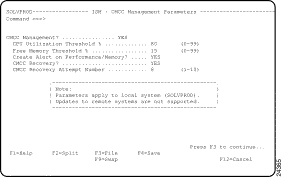
Step 2 To enable CMCC management, type Yes in the CMCC Management? field.
Step 3 To specify global ISM CMCC management options, type the required values in the remaining fields.
The default CPU threshold is 95 percent, and the default free memory threshold is 10 percent.
Step 4 To enable alert generation for CMCCs, type Yes in the Create Alert on Performance/Memory? field.
The default selection is no alert generation. If you want ISM to indicate CMCC status changes or to indicate when CPU or memory thresholds have been exceeded for CMCCs, then you need to enable ISM's alert generation.
Step 5 Press F3 to file your changes.
 | Tips |
You can override the performance thresholds for individual CMCCs by using the ISM : CMCC Administration panel. For more information, see the "Setting Up Router CMCC Management Options" section.
To set up DSPU management parameters for your local system:
Step 1 On the ISM : Parameters Administration Menu panel (Figure 3-2), type D in the Select Option field and press Enter. The ISM : DSPU Management Parameters panel is displayed (Figure 3-7).
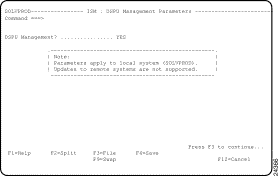
Step 2 To enable DSPU management, type Yes in the DSPU Management? field.
Step 3 Press F3 to file your changes.
To set up ISM system parameters for your local system:
Step 1 On the ISM : Parameters Administration Menu panel (Figure 3-2), type S in the Select Option field and press Enter. The ISM : System Parameters panel is displayed (Figure 3-8).
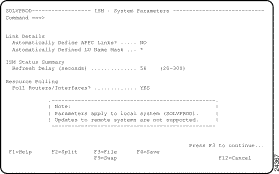
Step 2 To specify parameters for ISM Focal Point Management, complete the Link Details fields.
The Automatically Define APPC Links? field indicates whether you want APPC link definitions to be defined for each INMC link between remote systems.
The Automatically Defined LU Mask field identifies the mask you want to use when ISM defines APPC link definitions.
Step 4 To specify whether you want resources polled, type Yes or No in the Poll Routers/Interfaces? field.
Step 5 Press F3 to file your changes.
To set up ISM database parameters for your local system:
Step 1 On the ISM : Parameters Administration Menu panel (Figure 3-2), type DB in the Select Option field and press Enter. The ISM : Database Parameters panel is displayed (Figure 3-9).
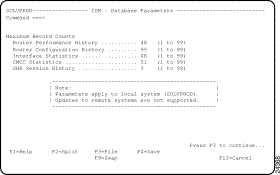
Step 3 Press F3 to file your changes.
In addition, you must change SOLVE:Netmaster for SNA to enable the receipt of these alerts. Do this by ensuring that the NETVALRT PPI receiver is activated during SOLVE initialization. For further details, see the CiscoWorks Blue Internetwork Status Monitor for SOLVE:Netmaster Installation Guide.
For details of how to set up alert generation see the following sections in this chapter:
The order in which you specify a group ID for a router affects the implementation of group polling. If you assign a router to more than one group and also set up polling intervals for groups, then ISM monitors the router according to the monitoring interval associated with the first group to which the router is assigned.
If you choose to use the Router Group Administration option to set up the router and interface monitoring intervals for a group, then, for all routers assigned to that group, the group-defined intervals override the global parameter intervals.
Use the ISM : Router Group Details panel (Figure 3-11) to specify how often to collect router and interface statistics. This function is optional.
To set up the router and interface monitoring intervals for a router group, complete the following steps:
Step 1 On the ISM : Administration Menu panel (Figure 3-1), type G in the Select Option field and press Enter. The ISM : Router Group List panel is displayed (Figure 3-10).
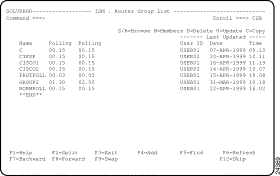
Step 2 Type U beside a group name and press Enter, or press F4 to add a new group. The ISM : Router Group Administration panel is displayed (Figure 3-11).
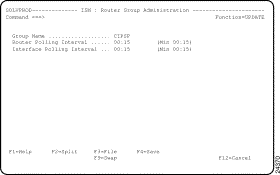
Step 3 Type the required values in the Router Polling Interval and Interface Polling Interval fields.
The default router monitoring interval is 15 minutes (00:15). Cisco recommends two hours (02:00).
The default interface monitoring interval is two hours (02:00). Cisco recommends 24 hours (23:59).
Step 4 Press F3 to update the router group record.
ISM requires two timers for each group of routers; for each defined router group and for the default group. The ISM requirement for timers is in addition to any timers being used by other SOLVE products.
To review the SYSPARM TCMDMAX value and increase it to cover the number of timers required for ISM polling, complete the following steps:
Step 1 Issue the SHOW SYSPARM=TCMDMAX command in OCS to display the current value.
Step 2 Issue the SYSPARM TCMDMAX=nnnn command in OCS for the command to take effect immediately.
Step 3 Include the SYSPARM TCMDMAX=nnnn command in your INIT procedure so that the new value takes effect across system restarts.
If there are insufficient timers specified, ISM polling or functions of other SOLVE products do not function as expected.
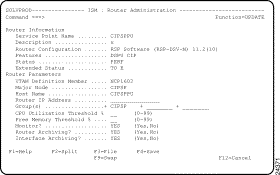
To assign a router to management groups, use the ISM : Router Administration panel (Figure 3-12) to update the router details. Type the names of the required groups (up to three groups) in the Group(s) fields.
To delete a router from management groups, use the ISM : Router Administration panel (Figure 3-12) to update the router details. Delete the names of the required groups from the Group(s) fields.
This section describes the tasks required to define the ISM user profiles.
An ISM administrator with display authority can perform the following tasks:
A user with enable authority is defined by ENABLE in the Router Enable Authority field on the User Administration Details panel. A user with display authority is defined by DISPLAY in the Router Enable Authority field.
ISM operators can update their own profiles for filtering purposes.
An ISM operator with display authority can perform the following tasks:
A user with enable authority is defined by ENABLE in the Router Enable Authority field on the User Administration Details panel. A user with display authority is defined by DISPLAY in the Router Enable Authority field.
All ISM users must have a user profile. Only an ISM administrator can create or change the authority level of another user's profile. To access user administration functions, type A.U in the Select Option field of the ISM : Primary Menu panel and press Enter. The ISM : User Administration Menu panel is displayed (Figure 3-13).
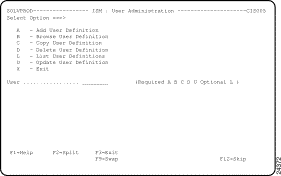
To view a list of all the users defined to ISM, type L in the Select Option field of the ISM : User Administration Menu panel (Figure 3-13) and press Enter. The ISM : User List panel is displayed (Figure 3-14).
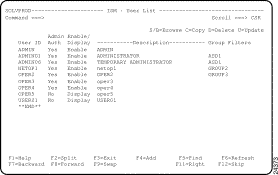
Use the ISM : User Details panel (Figure 3-15) to create or change a user's profile. To access this panel from the ISM : User List panel (Figure 3-14), do one of the following:
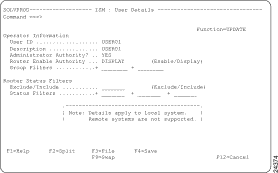
On the ISM : User Details panel, complete the following steps:
Step 1 To set up the user authority, perform one of the following tasks:
For a description of the operator capabilities by authority see the "Overview of the User Types" section.
The routers that are defined to the group names that you specified will be the only routers to appear on the ISM : Router List panel (for this user's ISM session).
Step 3 To enable Status Filters, do the following tasks:
The routers with the status that you specified will be the only routers to appear on the ISM : Router List panel (for this user's ISM session).
Step 4 Press F3 to save the user profile.
![]()
![]()
![]()
![]()
![]()
![]()
![]()
![]()
Posted: Tue Aug 24 11:59:46 PDT 1999
Copyright 1989-1999©Cisco Systems Inc.