|
|

The CiscoWorks for Windows desktop provides you with getting started information, enables you to perform common tasks, and provides tips for launching applications.
The Home Page provides immediate access to the following online help, tasks, and information:
This section provides you with information on:
CiscoWorks for Windows provides three types of user accounts:
Only the admin login and users with Configure Users permission can assign roles to other users. The role or combination of roles dictates which applications are presented to the user.
After they receive logins, users can use administrative tools to change their own passwords and other aspects of their profiles.
You can set up user accounts using one of the following methods:
After starting and logging into CiscoWorks for Windows (refer to "Starting CiscoWorks for Windows" section) you can set up user accounts.
Step 1 From the CiscoWorks for Windows desktop, select Tasks > User Administration.
The Users dialog box opens.
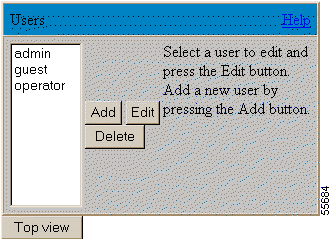
Step 2 Click Add.
The Add User dialog box opens.
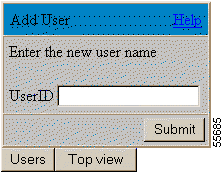
Step 3 Enter a user ID for the new user and click Submit.
The user ID is added and the Users dialog box opens.
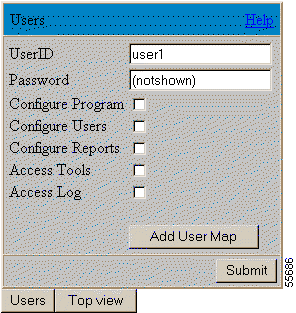
Step 4 Select the permissions for the user.
At this time you also need to set the map level security.
Step 5 Select Add User Map.
The Add User Map dialog box opens.
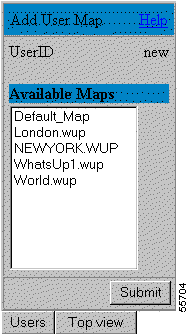
Step 6 Select Default_Map and click Submit.
The Users dialog box opens. This time there is a selection for Default_Map.
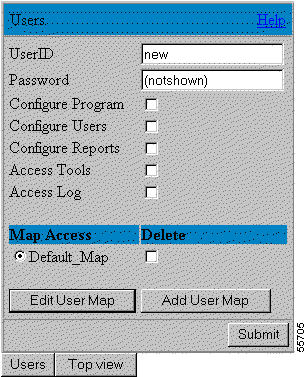
Step 7 Mark the Default_Map check box and click Edit User Map.
The Edit User Map dialog box opens.
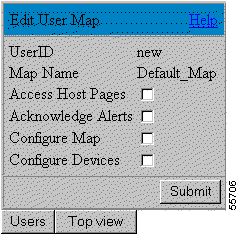
Step 8 Select the desired permissions and click Submit.
Step 9 Click Submit again on the Users dialog box.
The new user is added and permissions are set, for User Security and Map Security. (For recommended security settings, refer to "User Account Settings" section.)
Typically, you log in to WhatsUp Gold as a guest; however, if you are unable to do this, you need to check with your administrator.
Step 1 From the WhatsUp Gold main window, select Configure > Web Server
Step 2 Click on Users. The WhatsUp Gold Users dialog box opens.
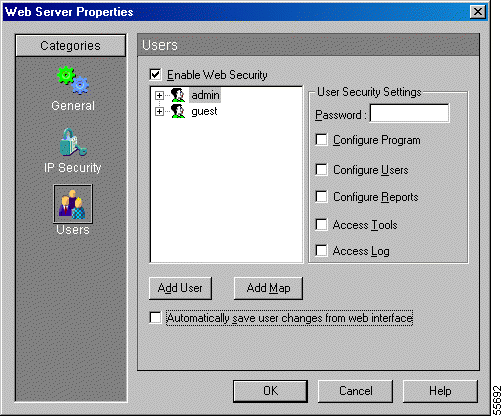
Step 3 Select the type of user you want to add and Click Add User.
The Add User dialog box opens.
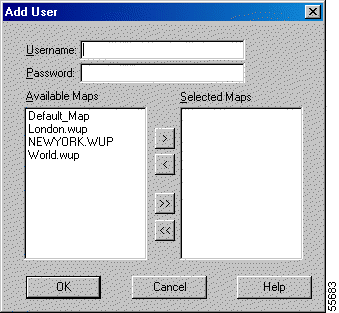
Step 4 Enter the desired username and password. Select Default Map.
Step 5 Click OK to save your settings. The username created is shown in the Users field.
Step 6 Click the plus sign (+) beside the user to display the maps assigned to this user. Click Default Map, then select the following Map Level Security Settings:
For recommended security settings, refer to "User Account Settings" section.
Step 7 Click OK to save your changes.
Following are the recommended settings for a Guest, Operator and Admin account. These settings apply whether you set up the user account through WhatsUp Gold or through the CiscoWorks for Windows desktop. Examples of the WhatsUp Gold windows are shown.
Figure 2-1 and Figure 2-2 show the User Security and Map Security screens when setting up a Guest account.
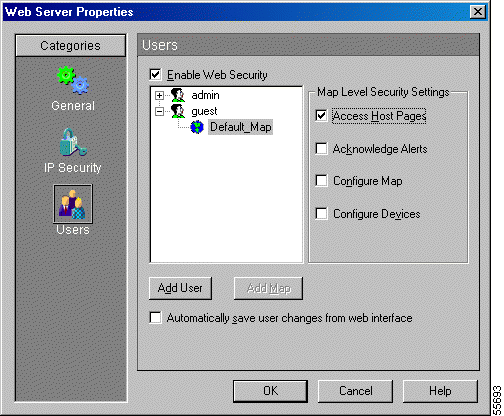
Verify that Access Host Pages is checked.
Figure 2-3 and Figure 2-4 show the User Security and Map Security screens when setting up an Operator account.
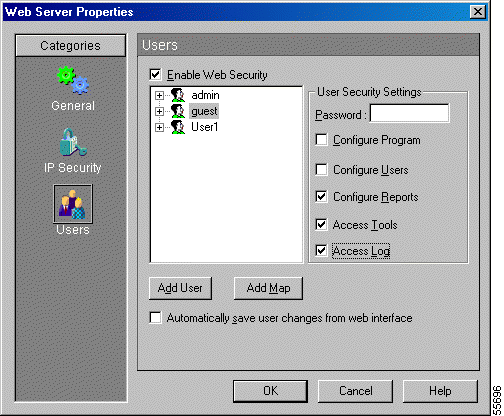
Verify that the following options are checked:
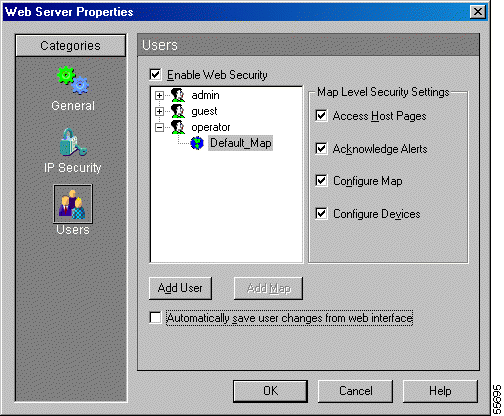
Verify that the following options are checked:
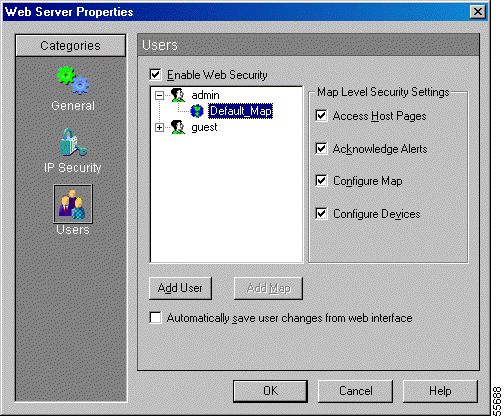
Figure 2-5 and Figure 2-6 show the User Security and Map Security screens when setting up an Admin account.

Verify that the following options are checked:
Verify that the following options are checked:
From WhatsUp Gold, you can create maps in a number of ways. Two of the most common methods are:
 |
Note Maps can only be created from the server where WhatsUp Gold is installed. Maps can not be created from a remote client. |
|
Note Verify that the Discover your network with SNMP SmartScan check box is checked, before proceeding. |
|
Note verify that the SNMP check box is checked in the TCP/IP Service Scan window. |
You can set alerts for all devices, or any number of selected devices, from WhatsUp Gold.
|
Note To configure notifications, go to the Notifications Library. |
To set alerts from WhatsUp Gold:
Step 1 In the WhatsUp Gold network map, right-click on the device for which you want to set alerts. Select Properties., then click Alerts.
(Alternatively, you can select a number of devices, then right-click and select Add Alerts to Group.) The Alerts dialog box appears.
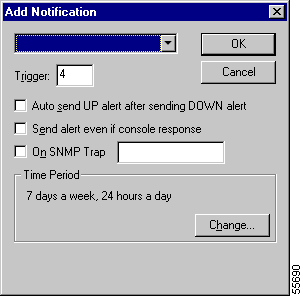
Step 2 Select the Enable Alerts check box, then click the Add button. The WhatsUp Gold Add Notification dialog box is displayed (see Figure 2-7).
Step 3 Use the list box to select the desired notification. Then select the required settings:
Step 4 Click OK to exit Add Notifications dialog box.
You can create new templates, and manage existing threshold settings and templates using Threshold Manager (refer to Chapter 5 "Monitoring Cisco Devices with Threshold Manager"). This capability allows you to tailor alarms and events to your specific network needs.
Integrating Threshold Manager with WhatsUp Gold is a three step process. These steps need to be completed in the following order.
You are required to configure the CiscoWorks for Windows server as the trap receiver for every device you wish to analyze.
To configure the CiscoWorks for Windows server as the trap receiver:
Step 1 Log into CiscoWorks for Windows (refer to "Logging In" section).
Step 2 Launch Threshold Manager for a device (refer to "Launching Threshold Manager from the Desktop" section).
Step 3 Click on Trap Receivers.
If prompted, enter your telnet password and enable passwords.
The Trap Receiver window opens.

Step 4 Click the Add (followed by the servers address) button. The server is added to the Trap Receiver list.
Step 5 Click Apply.
Step 6 Click OK in the confirmation box.
The Trap Receiver is added.
To enable the SNMP Trap Handler in WhatsUp Gold:
Step 1 Launch WhatsUp Gold (refer to "Launching the WhatsUp Gold Application from the Server" section).
Step 2 Select Configure > Program Options.
The Programs Options window opens.
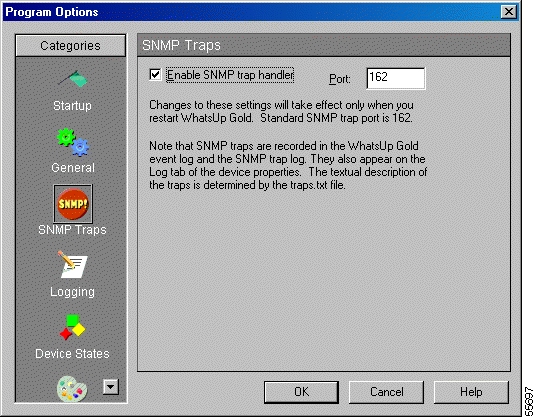
Step 3 Click the SNMP Traps icon under Categories.
Step 4 Mark the Enable SNMP trap handler check box.
Step 5 Restart WhatsUp Gold, so the changes can take effect.
|
Note After starting WhatsUp Gold verify that WhatsUp Gold is using port 162, by looking at the Event Log for WhatsUp Gold. If port 162 is occupied by another application, then you will receive an error in the Event Log. To solve, shut down the other application. |
To set the SNMP Mail option in WhatsUp Gold:
Step 1 Launch WhatsUp Gold (refer to "Launching the WhatsUp Gold Application from the Server" section).
Step 2 Select Configure > Notifications Library > SMTP Mail > Default.
Step 3 Click Edit.
The Edit SMTP Instance dialog box opens.

Step 4 Enter the mail servers IP address in the Mail Server field.
Step 5 Enter the email address in the To field.
Step 6 Click OK.
|
Note The Subject and Body fields use symbols instead of text. These symbols have
specific meanings and will be replaced by the corresponding text in the message
sent. Table 2-1 lists
the available symbols and there meanings.
|
To configure alert notification in WhatsUp Gold:
Step 1 Launch WhatsUp Gold. (refer to "Launching the WhatsUp Gold Application from the Server" section).
Step 2 Right click on the device you are setting thresholds for.
Step 3 Select Properties in the pull down menu. The Items Properties window opens.
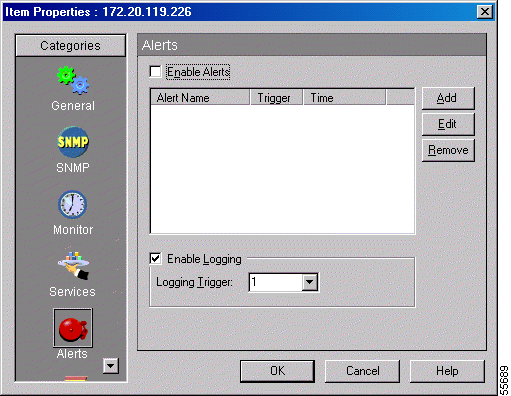
Step 4 Select the Alerts icon.
Step 5 Check the Enable Alerts check box.
Step 6 Click Add. The Add Notification dialog box opens.
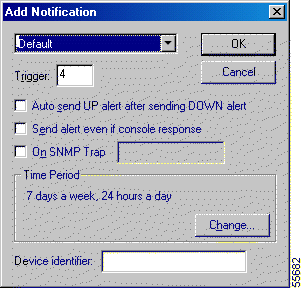
Step 7 Select SMTPMail > Default, from the drop-down list.
Step 8 If only the RMON specific notification is required, check the On SNMP Trap check box and enter the trap name (rmon-6.1) in the text field.
Step 9 Select OK.
Step 10 Select OK in the Item Properties window.
To set thresholds using Threshold Manager:
Step 1 Launch Threshold Manager. (Refer to "Starting Threshold Manager" section.)
Step 2 In the Device Information window, select the device and click OK.
Threshold Manager opens.
Step 3 Click Templates in the tool bar.
The Template window opens, displaying the available templates.
Step 4 Decide which template you want to use and click the Add to Device link in the Action column of the template.
The Add to Device window opens.
Step 5 Modify the parameters, if needed and click Finish.
Step 6 Review the Add to Device - Summary page, to verify your parameters are correct.
Step 7 Click Apply.
Step 8 Click OK in the confirmation box to set thresholds.
Step 9 In the Threshold window, verify your new threshold is added.
CiscoView consists of the engine--core CiscoView software--and device packages--software specific to each device. The engine provides the basic CiscoView interface and functions, and device packages add the views and functions unique to each device.
Because Cisco updates devices regularly, you keep CiscoView up-to-date by adding device packages as they become available.
While all users can view installed package information, only System or Network Administrators can:
|
Note Note Adding or deleting packages requires all active users to close their browsers and restart CiscoView. |
All of the above functions are performed by the Package Support Updater (PSU). You can use the PSU to upgrade CiscoView 5.4 package software. You can also enter CCO and proxy information to facilitate access to CCO.
To manually select packages from CCO, go to http://www.cisco.com/kobayashi/library/netmanage/cview and select and download the packages you want.
After selecting the package:
Step 1 Save the zipped package file to a temporary directory on your CiscoView server and unzip it. This extracts multiple .zip and .readme files, which you should not unzip.
Step 2 Select Package Support Updater >Add Packages, and install from the staging area. (Refer to the "Downloading Device Packages" section.)
You can start the Package Support Updater from Start >Programs > CiscoWorks for Windows 6.1 >Package Support Updater, or from the CiscoWorks for Windows Desktop Tasks menu, select Package Support Updater.
The CiscoView Package Support Updater dialog box appears.
(Refer to the "Starting the Package Support Updater" section in Chapter 3.)
Click Install on the Package Support Updater dialog box, then navigate to the directory into which you downloaded the packages from CCO. Select one or more device packages to install by clicking the Select Install check box and click Install.(Refer to the "Installing Device Packages" section in Chapter 3.))
You can display detailed system and protocol information about devices, without having to remember complicated command-line syntax for each device using Show Commands.
The Show Commands application provides simple access to the show commands for a Cisco device (routers, access servers, and switches). The application hides the process of establishing a telnet session (refer to Chapter 4, "Displaying Cisco Device Information with Show Commands").
To display device information:
Step 1 Launch Show Commands (refer to "Starting Show Commands" section).
Step 2 To retrieve information from a show command, click on it in the left frame.
The left frame lists the available show commands. You can expand and collapse this list to view additional options.
The My Commands option in left frame allows you to create and manage your own set of show commands from the list of show commands available in a device.
The default setting in Show Commands is to display all the show commands in a folder, typically identified using the device name or the device IP address. (For detailed information on My Commands, refer to "My Commands" section.)
Step 3 View the detailed information that Show Commands displays in the right frame.
If you run into problems when using CiscoWorks for Windows, you should:
Step 1 Check the Web Server. Restart, if necessary.
Step 2 Check for the device package. If not present, you can add the new device by downloading the device package from CCO.
The CiscoWorks for Windows Desktop Tasks menu allows you to start:
Select Preferences to set:
You can choose one of three desktop preferences:
Use the Device Community Strings to delete/modify the read and write community strings, SNMP timeout and retries for the device being currently managed.
Use the Common Preferences settings to set default polling frequency, SNMP timeout and retries, and default read and write community strings. You can also set ShowCommand telnet preferences: Telnet Initial Timeout, Telnet Connection Timeout and Telnet Retry Count.
This will appear, only for those users who have Configure Users permissions. (Refer to "User Accounts" section.)
Invoke the Package Support Updater either from the task bar Start menu, or from the CiscoWorks for Windows desktop (refer to the "Maintaining Device Packages" section).
From this page, you can configure CiscoView Server Trace Settings. You can set SNMP and activity trace and/or view the trace log.
This option records trace information into a file located in the displayed directory (a subdirectory of the install directory).
To configure CiscoView Trace Settings:
Step 1 Select either or both:
Step 2 Click View Trace to see the trace activity in a separate window.
Use the Whats New section to access Cisco.com to obtain the latest download and other information.
You can launch WhatsUp Gold, CiscoView, Show Commands, and Threshold Manager applications from the CiscoWorks for Windows desktop.
|
Note The process for launching applications differs, depending whether you are operating on the server where CiscoWorks for Windows is installed or if you are working from a remote client. |
Device-specific applications can be launched from the device map. For example, Cat2900XL and Cat3500XL have a Visual Switch Manager (VSM) which can be launched from the device map. This is a menu item on the console. On the client browser, the VSM URL is displayed on the right side of the device status page.
|
Note If you have not yet defined a topology map of your network, refer to WhatsUp Gold User's Guide for instructions. |
There are two ways you can launch WhatsUp Gold from the server where CiscoWorks for Windows is installed. You can launch it through the Windows Start Menu or through the CiscoWorks for Windows desktop.
To launch WhatsUp Gold from the CiscoWorks for Windows desktop:
Step 1 Click the WhatsUp Gold application link. Which is located on the CiscoWorks for Windows desktop taskbar, along the top of the browser window.
Step 2 Open a topology map.
A topology map with icons of all the devices in your network appears.
To launch WhatsUp Gold from the Windows Start Menu:
Step 1 Click Start > Programs > WhatsUp > WhatsUp Gold. The WhatsUp Gold main window appears.
Step 2 Open a topology map.
A topology map with icons of all the devices in your network appears.
|
Note If you have not yet defined a topology map of your network, refer to WhatsUp Gold User's Guide for instructions. |
To launch the WhatsUp Gold application from a remote client: from the CiscoWorks for Windows desktop taskbar, located along the top of the browser window, click on the WhatsUp Gold link.
A topology map with icons of all the devices in your network appears.
|
Note By default on a remote client machine only, if WhatsUp Gold is running on the server and the default map is set up, WhatsUp Gold will appear in the right window even if you have not selected the WhatsUp Gold application from the CiscoWorks for Windows taskbar. If you do select WhatsUp Gold from the taskbar, it will occupy the entire bottom frame. |
|
Note When launching WhatsUp Gold from a remote client it will only open in the browser. You can not open the WhatsUp Gold application separately. |
|
Note To access a WhatsUp Gold map from the remote client, WhatsUp Gold must be running on the server. |
From the CiscoWorks for Windows desktop, you:
Step 1 Click the Show Commands application link. Which is located on the CiscoWorks for Windows desktop taskbar, along the top of the browser window.
The Device Details window for the device appears.
Step 2 Enter the Device Name (or IP Address), Read Community. If prompted, also enter the Telnet password and Enable password.
Step 3 Click OK.
The application window appears.
For detailed information about using Show Commands, see the Show Commands Online Help.
From the CiscoWorks for Windows desktop, you:
Step 1 Click the Threshold Manager application link. Which is located on the CiscoWorks for Windows desktop taskbar, along the top of the browser window.
The Device Details window for the device opens.
Step 2 Enter the Device Name (or IP Address), Read Community and Write Community.
Step 3 Click OK.
The application window opens.
For detailed information about using Threshold Manager, see the Threshold Manager Online Help.
From the CiscoWorks for Windows desktop, you:
Step 1 Click the CiscoView application link. Which is located on the CiscoWorks for Windows desktop taskbar, along the top of the browser window.
CiscoView main window opens.
Step 2 Select the device to be monitored from the Select Device pull-down list. If the device is not listed, enter the devices IP address in the Select Device field.
The device details window opens.
For detailed information about using CiscoView, see the CiscoView Online Help.
You can launch applications from within a WhatsUp Gold topology map.
|
Note If you have not yet defined a topology map of your network, refer to WhatsUp Gold User's Guide for instructions. |
From the WhatsUp Gold map, you:
Step 1 Right click on the Cisco device icon for the device you want to analyze.
A pull-down menu appears.
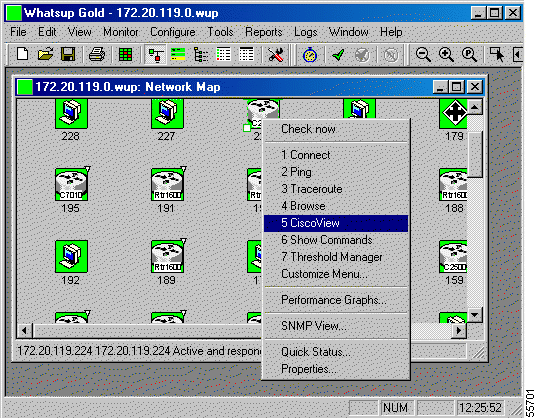
Step 2 Select the application you want to run on the device, from the pull-down menu.
|
Note If CiscoWorks for Windows is not open on your machine prior to opening an application through WhatsUp Gold, the login screen will appear when you select an application and you will be required to login. |
You can launch applications through WhatsUp Gold on a remote client.
From the CiscoWorks for Windows desktop, you:
Step 1 Click the WhatsUp Gold application link. Which is located on the CiscoWorks for Windows desktop taskbar, along the top of the browser window.
WhatsUp Gold opens in the CiscoWorks for Windows desktop.
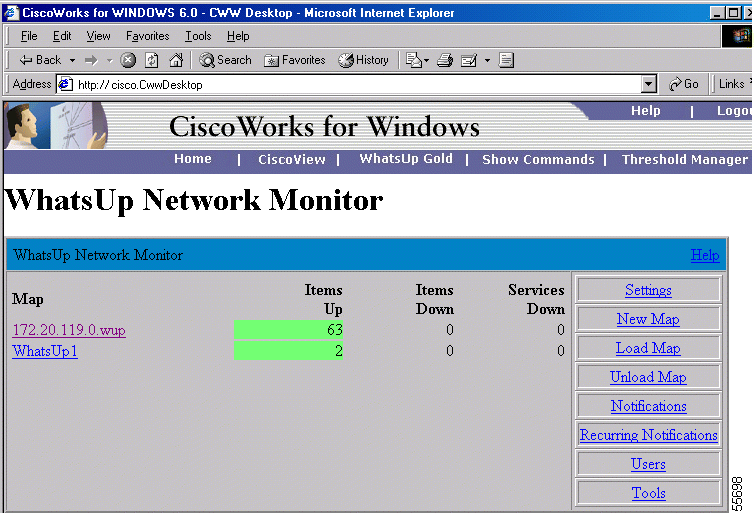
Step 2 Click the link for the desired topology map.
|
Note To access a WhatsUp Gold map from the remote client, WhatsUp Gold must be running on the server. |
The topology map opens.
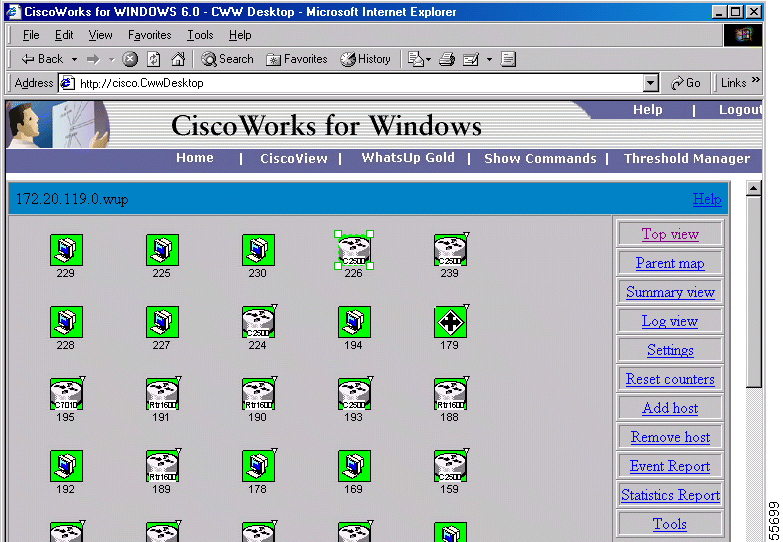
Step 3 Click the device you want to analyze.
The Device Details window for the device opens.
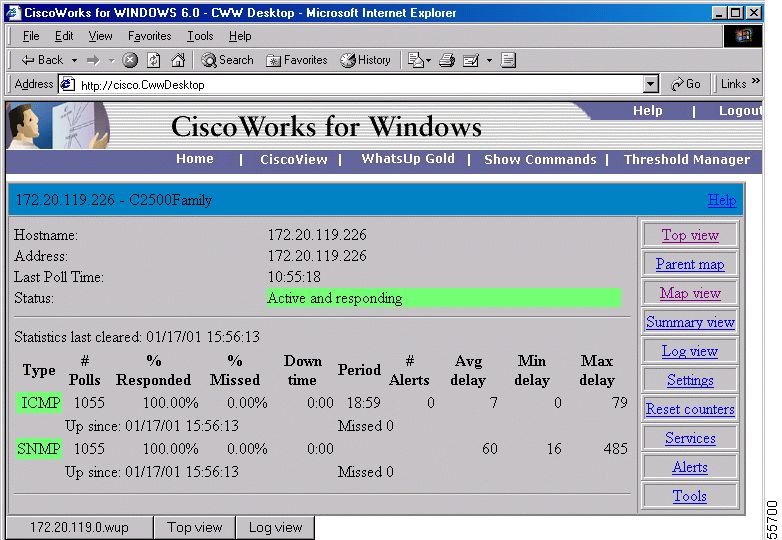
Step 4 Click the link on the CiscoWorks for Windows desktop for the application you want to run on the device.
The application window opens, with the details for the device displayed.
When you select an application, the screen displayed depends on the contents of the bottom frame. For example; if you are in a device status screen, clicking the Show Commands tab launches Show Commands for that device. If you are in a topology map or on the Home page, clicking on the Show Commands tab launches Show Commands. You are then required to enter the device for which you want information
If the CiscoView, Threshold Manager, or Show Commands application is launched from a WhatsUp Gold device map (from the client), then they are launched in a new window (by default). Subsequent invocations of the applications will appear in that window.
Clicking on WhatsUp Gold launches the console application if the browser is on the server. If you are running the desktop from another machine, then clicking on WhatsUp Gold displays the Web version of WhatsUp Gold.
![]()
![]()
![]()
![]()
![]()
![]()
![]()
![]()
Posted: Thu Nov 7 21:12:58 PST 2002
All contents are Copyright © 1992--2002 Cisco Systems, Inc. All rights reserved.
Important Notices and Privacy Statement.