|
|

Table Of Contents
Managing Cisco Devices with CiscoView
Starting CiscoView From the CiscoWorks for Windows Desktop
Starting CiscoView From WhatsUp Gold
Making Selections and Displaying Menus
Using the Package Support Updater
Adding Device Packages Using the CiscoWorks for Windows Desktop
Managing Cisco Devices with CiscoView
CiscoView is a graphical SNMP-based device management tool that provides real-time views of networked Cisco Systems devices. These views deliver a continuously updated physical picture of device configuration and performance conditions, with simultaneous views available for multiple device sessions.
This chapter familiarizes you with the following tasks:
•
Making Selections and Displaying Menus
•
Starting CiscoView
You can start CiscoView from:
•
•
Starting CiscoView From the CiscoWorks for Windows Desktop
You can start CiscoView from the CiscoWorks for Windows desktop on either the server in which CiscoWorks for Windows was installed, or from a remote client. The procedure is the same in both cases. (Refer to "Starting CiscoWorks for Windows" section on page 1-4).
Starting CiscoView From WhatsUp Gold
The procedures for starting CiscoView from WhatsUp Gold are slightly different, depending on whether you are launching from the server or a remote client. Refer to "Launching the WhatsUp Gold Application from the Server" section on page 2-29 and "Launching the WhatsUp Gold Application from a Remote Client" section on page 2-30.
Navigating in CiscoView
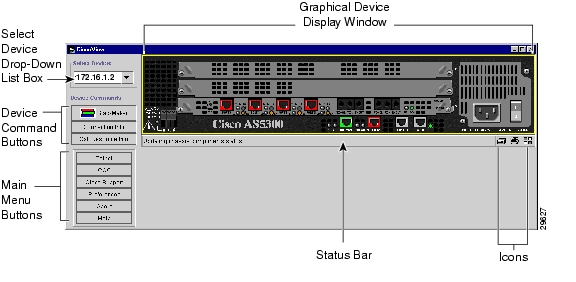
When you start CiscoView, the CiscoView main window appears, see Figure 3-1.
Figure 3-1 CiscoView Main Window
Table 3-1 lists CiscoView Navigation options.
Table 3-1 CiscoView Navigation Options
Select Device Drop-Down List Box
Use the Select Device drop-down list box to select and display a device. Either enter a device name or IP address, or select from the recently displayed devices listed.
Device Commands Buttons
Use the Device Commands buttons to activate device commands unique to the displayed device.
The Device Command buttons are described in the online help for each device package.
Main Menu Buttons
Use the Main Menu buttons to perform various CiscoView tasks.
Refer to Table 3-2 for more information.
Graphical Device Display Window
Use the Graphical Device Display window to view a graphical display of the device's back or front panel once you select a device. The display shows all device components color-coded (refer to Table 3-3) according to their current status and refreshed according to your polling frequency. If a hot swap is detected, the device is rediscovered and the display redrawn at the next poll.
Status Bar and Buttons
Use the Status Bar and buttons to display the progress and result of device polling, selections, and so on.
Refer to Table 3-3 for more information.
Main Menu Buttons
Table 3-2 describes the Main Menu buttons for all Cisco devices.
Table 3-2 Main Menu Buttons
Telnet
Launches a Telnet command-line session to the managed device.
CCO
Launches a separate browser containing the Cisco Connection Online (CCO) web page.
Cisco Support
Opens the TAC Mailer dialog box for sending reports to the Cisco Technical Assistance Center (TAC). To proceed with this option, you must provide a Case number. You can describe your device problem using the available options and the comment field. You then click the Send button to send information about the runtime device package and operating environment to the specified mail recipients.
Preferences
Opens the User Preferences dialog box where you can specify SNMP, community strings, look and feel, and debug parameters. Preference settings are preserved for all CiscoView sessions.
For a description of the preference parameters, see Setting Preferences.
About
Displays the following:
•
•
•
Help
•
•
Status Bar and Icons
Table 3-3 describes the Status Bar and icons.
Setting Preferences
When you click on the Preferences button on the CiscoView main menu, a User Preferences dialog box appears. From this dialog box, you can set SNMP, community strings, and debug parameters.
Table 3-4 describes the preference options.
Making Selections and Displaying Menus
When you select a device in CiscoView, a graphical representation of the device appears. You can view the front or back panel, and select different components (cards, ports, power supply) and menu options to configure and monitor status. You can also display a logical view of the device such as the modems in an access server.
To make selections and display menus, use these methods:
•
•
The popup menu options vary by the components you select, but usually contain those described in Table 3-5.
•
•
Configuring Devices
Configuration is a process that establishes the characteristics of the device and its connections and components on the network, and records this information in appropriate files. After detailed aspects of the device are configured, the system can identify the device and dynamically monitor its performance. You can use the CiscoView GUI device displays, tables, and statistical/status windows, to manage, monitor, and troubleshoot the device and its components on an ongoing and automatically updated basis.
CiscoView enables you to configure a device by defining its characteristics, connections, and components (such as cards and ports). You can configure and display multiple categories of information such as Interface, Management, Physical, and ARP Table simultaneously.
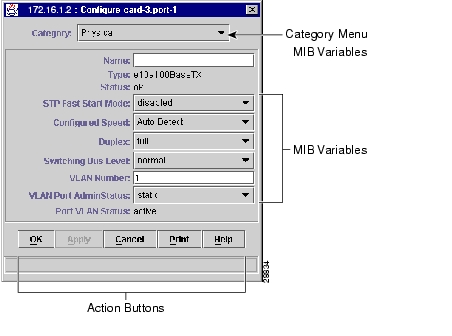
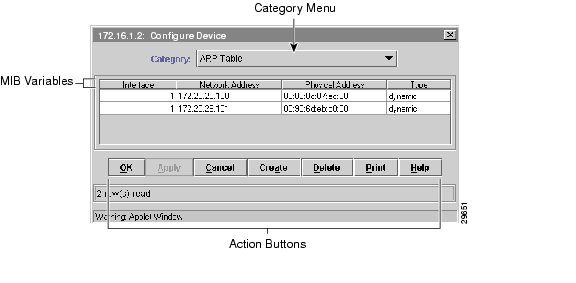
When you select Configure from the popup menu options, CiscoView displays the Configure dialog box. Each display provides information about MIB variables. Depending on the category you select, the Configure dialog box will either display the MIB variables in a list format ( Figure 3-2), or in a table format ( Figure 3-3).
The Configure dialog box is device-specific, it varies depending on the type of device or port you have selected to configure. Depending on your device, you might not see the Category menu, or different options in the Category menu.
For information about the Configure dialog box, click the Help button on the dialog box.
Figure 3-2 shows a device specific Configure dialog box with the MIB variables in a list format.
Figure 3-2 Configure Dialog Box with the MIB Variables in a List Format
Table 3-6 describes the action buttons available within the Configure dialog box with the MIB variables in a list format.
Figure 3-3 shows a device-specific Configure dialog box with the MIB variables in a table format.
Figure 3-3 Configure Dialog Box with the MIB Variables in a Table Format
You can add, modify, or delete entries from a configuration table. Read-only configuration information is displayed in read-only format. Configuration information that require your input, and is subsequently modifiable, is displayed in read-write format.
Table 3-7 describes the action buttons available within the Configure dialog box with the MIB variables in a table format.
Monitoring Devices
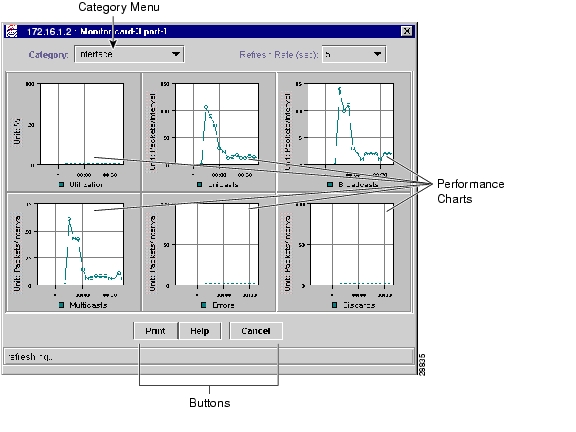
CiscoView enables you to monitor the performance of different categories of information such as Ethernet collisions, Management, Physical, and so on. When you select Monitor from the popup menu options, a Monitor window appears and displays a summary of performance charts ( Figure 3-4). The charts are device-specific, they vary depending on the type of device or port you have selected to monitor. Each display represents information provided by a MIB variable, with the common meaning indicated below the display. CiscoView supports pie, strip, x-y, dial, and bar charts.
For information about the Monitor dialog box, click the Help button on the Monitor window.
Figure 3-4 shows a device-specific Monitor window.
Figure 3-4 Device-Specific Monitor Window
Table 3-8 describes the buttons available within the Monitor window.
Table 3-8 Buttons Within the Monitor Window
Prints the current category
Help
Opens context-sensitive help for the Monitor window
Cancel
Exits the dialog box
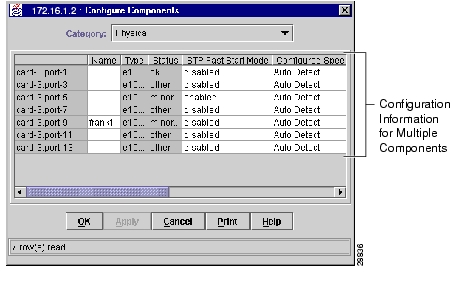
Selecting Multiple Components
You can display configuration or performance information for multiple components in one window. When you select multiple components of a device, and then select configure or monitor from the popup menu options, a table appears ( Figure 3-5).
Figure 3-5 shows a device-specific configuration table.
Figure 3-5 Device-Specific Configuration Table
You can modify entries from a configuration table. Read-only configuration information is displayed in read-only format. Configuration information that require your input, and is subsequently modifiable, is displayed in read-write format.
All entries in a monitor table are displayed in read-only format.
The table entries use the following color scheme to distinguish between read-only and read-write entries ( Table 3-9).
Maintaining Device Packages
CiscoView provides you with the ability to perform the following device support tasks:
•
•
•
•
•
•
Understanding Device Packages
Cisco routers and switches are referred to as network devices. To manage these devices using CiscoView, you must verify:
•
•
Device software is installed as a device package; for example, the Catalyst 5000 software is installed as the CAT5000.zip. CiscoView uses the device package to display a dynamic panel view of the physical device and all its modules, submodules, ports, and so on.
You can install device packages directly from the CiscoWorks for Windows CD-ROM package, or download device packages from Cisco Connection Online (CCO), a Cisco World Wide Web location for software upgrades. The device packages are available in the D:\install\jars\devpkgs directory (assuming that the D drive is your CD-ROM drive).
Additional devices can be added to CiscoView any time after the initial product release or installation. When new device packages become available, they are placed on CCO. Check this site to ensure that you have the latest device release.
Using the Package Support Updater
Note
Refer to the Package Support Updater online help for more information.
Downloading Device Packages
This section provides a quick reference for downloading device packages from CCO.
For detailed description about downloading from CCO, see the software library Web page at http://www.cisco.com/public/library.
To download device packages from CCO:
Step 1
Step 2
a.
b.
c.
Step 3
http://www.cisco.com/cgi-bin/Software/CiscoView/cvplanner.cgi
Note
Step 4
Step 5
Step 6
Note
Step 7
Step 8
Step 9
This will extract multiple .zip and readme files. Do not unzip these individual files.
Step 10
a.
For instructions about starting the CiscoView Package Support Updater, see "Starting the Package Support Updater."
b.
For instructions about installing device packages, see "Installing Device Packages."
Starting the Package Support Updater
To start the CiscoView Package Support Updater:
Step 1
a.
or
b.
The CiscoView Package Support Updater dialog box appears.
Installing Device Packages
Note
To install new device packages or upgrade existing device packages:
Step 1
The CiscoView Package Support Updater dialog box appears.
Step 2
The Install Device Packages dialog box appears.
Step 3
Note
A list of available device packages is displayed. Each entry provides the package name, the .zip file name, the version number of the device packages in the ZIP file, and the version numbers of any installed device packages.
Step 4
Note
Step 5
When you download a device package, the NMIDB is also downloaded in the current source file location.
Step 6
The CiscoView Package Support Updater verifies that there is sufficient disk space. If there is not enough disk space, an error message is displayed.
If sufficient disk space exists, a Confirm Install Operation dialog box appears.
Step 7
The CiscoView Incremental Package Install dialog box appears. Installation progress is indicated by messages displayed in a new dialog box.
Table 3-10 describes error messages that might be displayed if the utility encounters problems.
When the installation is complete, a summary page displays the results.
Step 8
The device packages are installed.
Uninstalling Device Packages
Note
To uninstall device packages:
Step 1
The CiscoView Package Support Updater dialog box appears and displays the installed device packages, including package names, descriptions, and current version numbers.
Step 2
If the file you want to uninstall is a prerequisite for another installed device package, that file is not selectable.
Step 3
The Uninstall button is active only when one or more check boxes are selected.
The CiscoView Package Support Updater validates the selection and displays an error message if the selected set of device packages are not compatible.
If the selected device packages are compatible, the Confirm Uninstall Operation dialog box appears.
Step 4
The CiscoView Device Package Uninstall dialog box appears and displays the uninstallation progress. When the uninstallation is complete, a summary page displays the results.
Step 5
The device packages are uninstalled.
Note
Tip
Adding Device Packages Using the CiscoWorks for Windows Desktop
Device Packages can be added using the CiscoWorks for Windows desktop.
To add device packages:
Step 1
Step 2
Getting CiscoView Help
For detailed information about CiscoView, see the context-sensitive online help. This comprehensive help system provides procedures, overview material, and links to related information.
You can access online help in CiscoView as follows:
•
•
•
•
–
Select Device Manager > CiscoView > Basics.
–
Select Device Manager > CiscoView.
Select the device package.
•
–
–
–
![]()
![]()
![]()
![]()
![]()
![]()
![]()
![]()
Posted: Wed Sep 19 12:26:51 PDT 2007
All contents are Copyright © 1992--2007 Cisco Systems, Inc. All rights reserved.
Important Notices and Privacy Statement.