|
|

Show Commands is an application that allows you to display detailed system and protocol information about devices, without having to remember complicated command-line syntax for each device.
This chapter contains the following sections:
The Show Commands application provides simple access to the show commands for a Cisco device (routers, hubs, access servers, and switches). The application hides the process of establishing a telnet session, where you must remember complicated command-line syntax for each device.
You can invoke the Show Commands from the CiscoWorks for Windows and the WhatsUp Gold application.
The Show Commands application displays the show commands for the device on the left frame using a tree-view structure. When you select a command in the tree-view, Show Commands performs the following functions:
You can then save the collected information into a file, or print it to a printer.
Show Commands provides the following features:
You can start Show Commands from the CiscoWorks for Windows Desktop, or from the WhatsUp Gold application.
To start Show Commands from the CiscoWorks for Windows:
Step 1 Select Start > Programs > CiscoWorks for Windows 6.1 > CiscoWorks for Windows Desktop.
The CiscoWorks for Windows login window appears in your default browser.
Step 2 Enter the login name and password and click Login.
The CiscoWorks for Windows home page appears.
Step 3 Click the Show Commands link.
The Show Commands Device Details window appears.
Step 4 Do one of the following:
Select the device from the list of devices. The devices you have accessed earlier from CiscoWorks for Windows is listed in the dropdown list.
Or
Enter the name or IP address of the device, if you are accessing the device from CiscoWorks for Windows for the first time, and enter the Read Community string if it is not the default.
Step 5 Click OK.
Show Commands determines if any form of user authentication (Tacacs, Radius, user authentication inside router, etc.) is present.
If user authentication is present, Show Commands displays the User Authentication window for Telnet Mode and Enable Mode. If user authentication is not set, Show Commands prompts you for passwords only.
If you had opted to save passwords in a previous session, Show Commands skips all the login screens and displays the Main Screen.
Step 6 Enter the Telnet Mode user name and password, if prompted, and click OK.
Step 7 Select the Skip Enable Mode check box if you do not have access to enable mode, or need only the show commands available at the standard level.
Step 8 If you have not selected the Skip Enable Mode in Telnet Mode window, you are prompted for your enable mode user name and password.
You can select Skip Enable Mode check box in this window, if you do not have access to enable mode, or need only the show commands available at the standard level.
Step 9 Select the Save Passwords check box if you choose to save the enable mode password.
You can use the save password option to store the passwords (both telnet mode and enable mode passwords) for a particular device in an encrypted format. This enables you to launch Show Commands for that particular device using the stored passwords to login. If the launch is successful, you will not be prompted to enter the passwords in future sessions. The default setting is to store passwords.
Step 10 Click OK.
The Show Commands Main Screen appears.
If you are invoking CiscoWorks for Windows from the server where you have installed CiscoWorks for Windows, do the following to launch Show Commands from WhatsUp Gold:
Step 1 Select Start > Programs >WhatsUp >WhatsUp Gold.
The WhatsUp Gold main window appears.
Step 2 Open a topology map.
A topology map with icons of all the devices in your network appears.
 |
Note If you have not yet defined a topology map of your network, refer to WhatsUp Gold User's Guide for instructions. |
Step 3 Right-click on the Cisco device icon.
A popup menu appears and displays several menu options.
Step 4 Select Show Commands.
CiscoWorks for Windows login screen appears in your default browser.
Step 5 Enter the login name and password and click Login.
Show Commands determines if any form of user authentication (Tacacs, Radius, user authentication inside router, etc.) is present in the device.
If user authentication is present, Show Commands displays the User Authentication window for Telnet Mode and Enable Mode. If user authentication is not set, Show Commands prompts you for passwords only.
If you had opted to save passwords in a previous session, Show Commands skips all the login screens and displays the Main Screen.
Step 6 Enter the Telnet Mode user name and password, if prompted, and click OK.
Step 7 Select the Skip Enable Mode check box if you do not have access to enable mode, or need only the show commands available at the standard level.
Step 8 If you have not selected the Skip Enable Mode, you are prompted for your enable mode user name and password.
You can select Skip Enable Mode check box in this window, if you do not have access to enable mode, or need only the show commands available at the standard level.
Step 9 Click the Save Passwords check box to save the passwords.
You can use the save password option to store the passwords for a particular device in an encrypted format. This enables you to launch Show Commands for that particular device using the stored passwords to login. If the launch is successful, you will not be prompted to enter the passwords. The default setting is to store passwords.
Step 10 Click OK.
The Show Commands Main Screen appears.
If you are invoking CiscoWorks for Windows from a remote client, do the following to launch Show Commands from WhatsUp Gold:
Step 1 In your browser window, type the name of the server where CiscoWorks for Windows is installed, and press Enter.
In Netscape Navigator, type the name of the server in the Location field, and press Enter.
In Internet Explorer, type the name of the server in the Address field, and press Enter or click Go.
For example, if CiscoWorks for Windows 6.1 is installed on the computer emch-pc, you must type the following in the Location (Netscape Navigator), or Address (Internet Explorer) field:
http://emch-pc/
When the standard HTTP port (port 80) is used by other applications, CiscoWorks for Windows installs the web server on port 1741. In such cases, you must type the name of the server and port number separated by a colon (:).
For example, you must type the following to invoke CiscoWorks for Windows on the server emch-pc, if CiscoWorks for Windows web server is installed on port 1741:
http://emch-pc:1741/
The CiscoWorks for Windows login window appears in the browser window.
Step 2 Enter the login name and password and click Login.
The CiscoWorks for Windows home page appears.
Step 3 Click the WhatsUp Gold link.
A topology map with icons of all the devices in your network appears.
|
Note WhatsUp Gold should be running in the server to access the WhatsUp Gold topology map from the remote client. |
Step 4 Click the Cisco device icon.
WhatsUp Gold displays the details of the device in the CiscoWorks for Windows desktop.
Step 5 Click Show Commands.
Show Commands determines if any form of user authentication (Tacacs, Radius, user authentication inside router, etc.) is present in the device.
If user authentication is present, Show Commands displays the User Authentication window for Telnet Mode and Enable Mode. If user authentication is not set, Show Commands prompts you for passwords only.
If you had opted to save passwords in a previous session, Show Commands skips all the login screens and displays the Main Screen.
Step 6 Enter the Telnet Mode user name and password, if prompted, and click OK.
Select the Skip Enable Mode check box if you do not have access to enable mode, or need only the show commands available at the standard level.
Step 7 If you have not selected the Skip Enable Mode, you are prompted for your enable mode user name and password.
Step 8 You can select Skip Enable Mode check box in this window, if you do not have access to enable mode, or need only the show commands available at the standard level.
Step 9 Click the Save Passwords check box to save the passwords.
You can use the save password option to store the passwords for a particular device in an encrypted format. This enables you to launch Show Commands for that particular device using the stored passwords to login. If the launch is successful, you will not be prompted to enter the passwords. The default setting is to store passwords.
Step 10 Click OK.
The Show Commands Main Screen appears.
Essentially there are two levels of information on a Cisco device:
At the standard level, you can query information about the device. You get to the standard level by telneting to the device and entering user name and password.
If you want to configure the device, you need to be in "enable" mode. To do this, you type "enable" at the standard level. You are then prompted for the enable user and enable password. The "show" command available at this level is a superset of that available at the standard level.
So, if the user does not have access to enable mode, but has access to the device, then he/she can set the "skip enable mode" flag and see the show commands at the standard level (which is a subset of the enable mode commands).
The Show Commands application consists of the following windows:
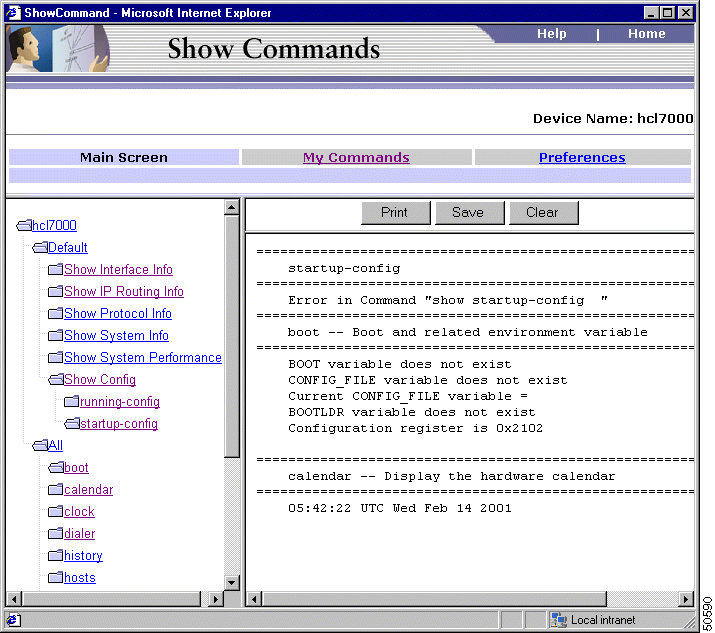
When you start the Show Commands application, the Show Commands Main Screen appears (Figure 4-1).
The Show Commands Main Screen comprises three frames.(Figure 4-1)
The top frame contains the links to navigate to the My Commands and Preferences windows, links to CiscoWorks for Windows main window and Show Commands online help, and the device name (or IP address).
The left frame lists the available Show Commands. You can expand and collapse this list to view additional options. Some Show Commands have parameters, which require your input. Enter the appropriate string in the field provided to display output (system and protocol information) from the device.
The right frame displays the Show Commands output (system and protocol information). When you select show commands in succession, the output of the command gets appended at the top. For example, if you select the command boot first, and clock next, the output of clock gets appended above the command output for boot. The command buttons at the top lets you manage the information displayed in this frame.
Table 4-1 describes the function of each command button
| Button | What it does |
|---|---|
Print the show command output. | |
| Save | Save the show command output. |
| Clear | Clear the show command output. Note Once you clear the contents, you need to re-execute the command to display the output. |
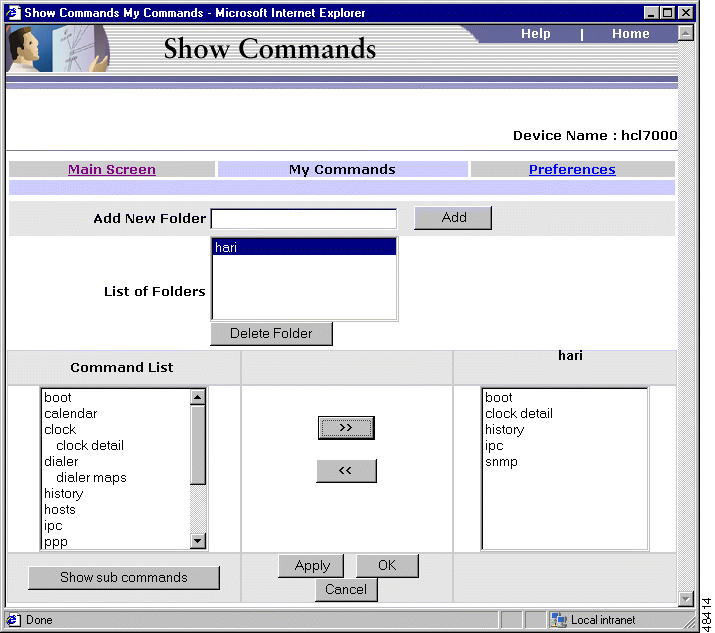
The My Commands option in Show Commands allows you to create and manage your own set of show commands from the list of show commands available in a device. The default setting in Show Commands is to display all the show commands in a folder, typically identified using the device name or the device IP address.
When the list of show commands in a device is too long, it helps to group the set of commands you use frequently and keep them in a separate folder. Show Commands gets installed with a default commands set which contains the most frequently used commands for most of the devices. This default command set is displayed in the folder Default, at the top of the list of show commands in the left frame. You can create your own command sets using the My Commands option.
You can create any number of command sets for a device. The My Commands window displays all the command sets in the folder My Commands at the top of the show commands tree in the left frame. A list of all show commands is also displayed under the folder All.
The My Commands window (Figure 4-2) allows you to create new command sets, modify existing command sets or delete existing command sets.
|
Note When you add show commands available only in the enable mode to the My Commandset, those commands will be visible when you connect to the device in standard mode also. You cannot execute such commands using Show Commands, when you are connected to the device in standard mode. |
Select Preferences to set the options listed in Table 4-2.
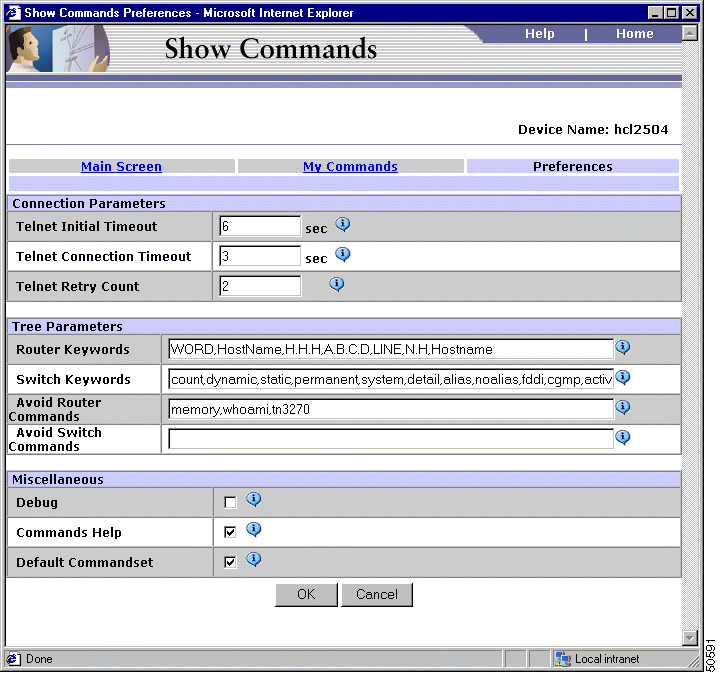
| Preference | Values | What it Does |
|---|---|---|
Telnet Initial Timeout | Value in seconds. Default value is 2. | The time wait period during connection. |
Telnet Connection Timeout | Value in seconds. Default value is 1. | The time wait period during interaction with the device, after the connection is established. |
Telnet Retry Count | Integer. Default value is 5. | Telnet I/O connection retries. |
Router Keyword | Default value: WORD,HostName,H.H.H,A.B.C.D,LINE,N.H, | These are the commands which require user input. A command that requires user input usually starts with the character "<" and ends with the character ">". Router Keywords contains those commands which require user input but do not start with the character "<" and ends with the character ">". |
Switch Keyword | Default value: count, dynamic, static, permanent, system, detail, alias, noalias, fddi, cgmp, active, trunk, notrunk | These are the commands which require user input. A command that requires user input usually starts with the character "<" and ends with the character ">". Switch Keywords contains those commands which require user input but do not start with the character "<" and ends with the char ">". |
Avoid Router Commands | Default value: memory,whoami,tn3270 | Lists those Router commands to be suppressed on tree. In the following cases it is better to include the show command in the Avoid Router Commands list:
The changes you make in this field will take effect only after you log in to CiscoWorks for Windows again. |
Avoid Switch Commands | Default value is null | Lists those Switch commands to be suppressed on tree. In the following cases it is better to include the show command in the Avoid Switch Commands list:
The changes you make in this field will take effect only after you log in to CiscoWorks for Windows again. |
Debug | Default is unchecked. | If Debug checkbox is selected, then the info messages (the messages exchanged between the device and management station) will be logged into a log file. Error messages and warning messages are logged by default. The Show Commands debug log file(SC.log) is located in $NMSROOT\Log\ folder. |
Commands Help | Default is checked. | If Help checkbox is selected, a brief description of the show command is displayed as a tool tip, when you move the mouse over the show command. |
Default Commandset | Default is checked. | If Default Commandset checkbox is selected, the Show Commands MainScreen displays the most frequently used commands for the device in the folder Default, at the top of the list of commands. |
For detailed information about Show Commands, see the context-sensitive online help. This comprehensive help system provides procedures, overview material, and links to related information.
You can access online help in Show Commands as follows:
![]()
![]()
![]()
![]()
![]()
![]()
![]()
![]()
Posted: Fri Nov 8 09:23:45 PST 2002
All contents are Copyright © 1992--2002 Cisco Systems, Inc. All rights reserved.
Important Notices and Privacy Statement.