|
|

Table Of Contents
Viewing an Individual Virtual Server
Managing Virtual Servers
Virtual servers represent groups of real servers and are associated with real server farms through policies. CVDM-CSM displays the details of the configured virtual servers and allows you to create or delete virtual servers, associate them with server farms and policies, enable specific client IP addresses to connect to the virtual servers, and turn the virtual services on or off.
To configure a virtual server, you set its attributes by specifying the default server farm (default policy) and associate other server farms through a list of policies. The default policy is used if a request does not match any SLB policies or if there are no policies associated with the virtual server. Before you associate a server farm with the virtual server, you must configure the server farm.
Server farms that function as virtual servers can improve scalability and availability of services for your network. You can add new servers or remove failed servers at any time without affecting the virtual server's availability. A server farm must be configured before associating it to the virtual server.
Instead of using a virtual server on the CVDM-CSM for the server-side connection, you can now configure it to forward packets directly to a real server. To do this, the CVDM-CSM must have the virtual server configured for predictor-forward. Additionally, for all real servers for which direct forwarding of connections is to be done, each real server must be assigned to a server farm that is not associated with any virtual server.
To enable partial server farm failover, you can now define the threshold number of real servers to be out of service for the backup server farm to take over. You can also define the number of real servers to be in service for the server farm to be considered active.
From the Virtual Server window, you can do the following:
•
Create and delete virtual servers.
•
•
•
•
•
•
This section includes the following topics:
•
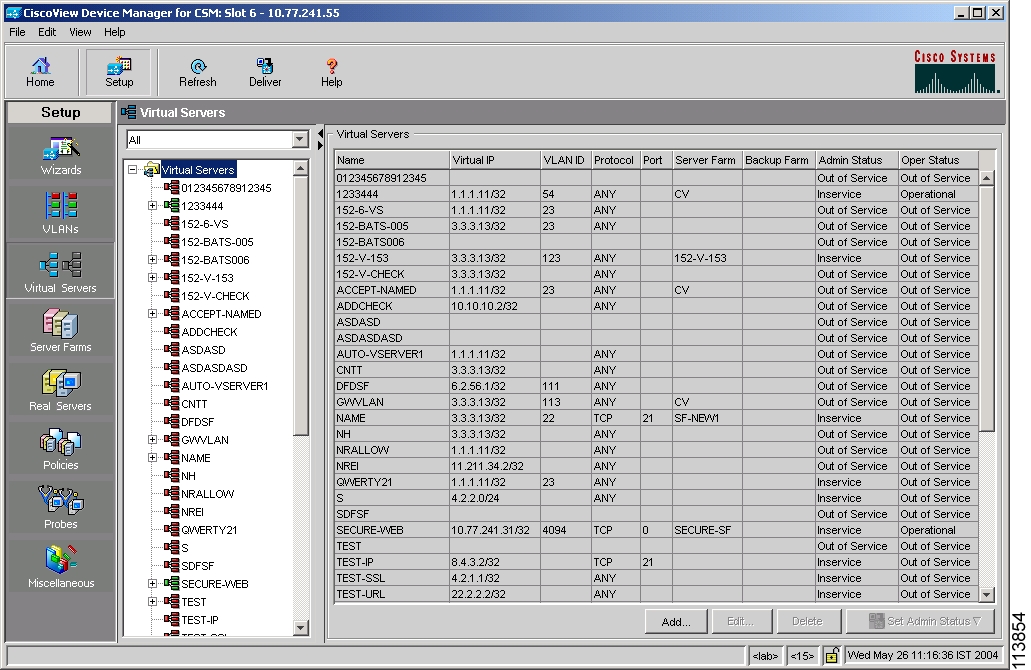
Viewing Virtual Servers
Figure 4-1 Virtual Servers Page
You can view all virtual servers that exist on a device.
Step 1
•
Or
•
The following virtual server details appear in a table:
You can group the virtual servers based on various common parameters.
To group the virtual servers, click
on top of the object selector; then select one of the following options from the list:
•
•
•
•
From the Virtual Servers dialog box, you can do the following:
•
•
•
•
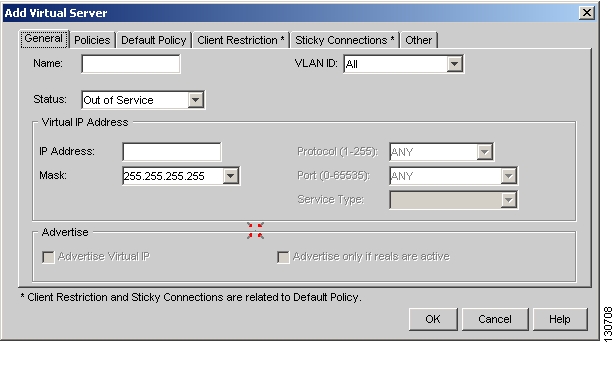
Adding a Virtual Server
You can add a virtual server by giving the required configuration details.
Step 1
•
Or
•
Step 2
Step 3
•
•
•
General
Click the General tab to configure the basic configuration details.
Figure 4-2 Add Virtual Server > General Dialog Box
The following columns appear:
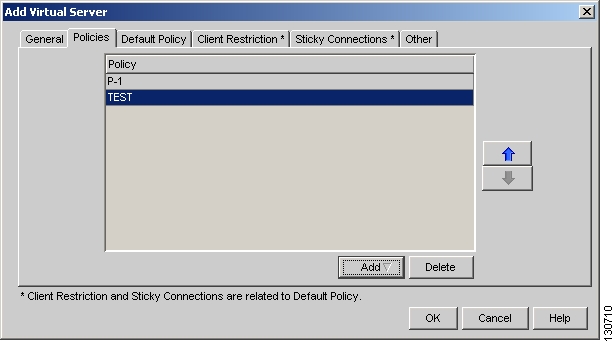
Policies
Click the Policies tab to add or delete policies
Figure 4-3 Add Virtual Server > Policies Dialog Box
You have the following options:
•
–
–
•
•
•
Note
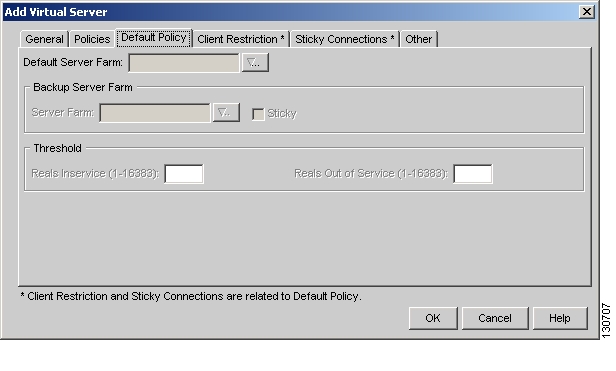
Default Policy
Click the Default Policy tab to configure a virtual server to operate at Level 4. You can specify the server farm (default policy) and backup server farms. You can configure a backup server farm to operate when a server farm is out of service.
To enable partial server farm failover, you can now define the threshold number of real servers to be out of service for the backup server farm to take over. You can also define the number of real servers to be in service for the server farm to be considered active.
Figure 4-4 Add Virtual Server > Default Policy Dialog Box
The following details appear when you click this tab:
Default Server Farm
Click
•
•
•
Server Farm
Click
•
•
•
Sticky
Select this check box to enable the sticky property.
This ensures that multiple connections from the same client, that match the same SLB policy stick (or attach) to the same real server.
Reals Inservice
The number of real servers to be in service for the server farm to be active.
Reals Out of Service
The number of real servers to be out of service for the backup server farm to take over.
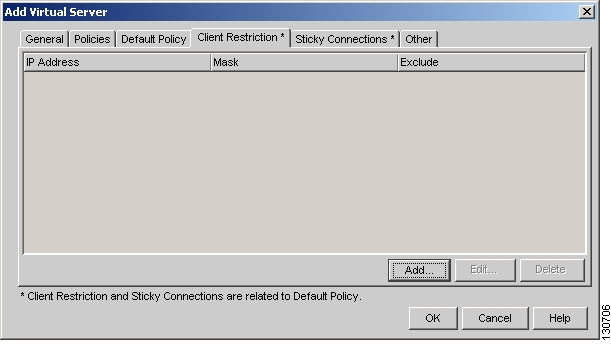
Client Restriction
Click the Client Restriction tab to add details of the clients restricted to use the virtual server.
Figure 4-5 Add Virtual Server > Client Restriction Dialog Box
You have the following options:
•
•
•
When you click Add or Edit, the following columns appear:
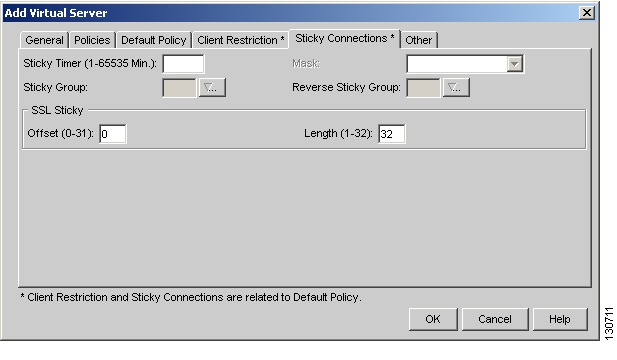
Sticky Connections
Sticky connections are connections from a client that conform to an SLB policy. Sticky connections use the same real server for subsequent connections. To ensure that the CVDM-CSM changes its connections to the opposite direction and sends them back to the source, you can configure a reverse sticky group.
Click the Sticky Connections tab to add details.
Figure 4-6 Add Virtual Server > Sticky Connections Dialog Box
The following details appear:
Sticky Timer
Specifies the period of time (in minutes) that the sticky information is kept.
Mask
From the list, select, Class A, Class B, Class A, and Class D masks.
If it is not specified, the default for network mask is 255.255.255.255.
Sticky Group
Click
•
•
•
Reverse Sticky Group
Click
•
•
•
You can stick an incoming SSL connection based only on the offset and length values of the SSL ID.
Offset
Enter the offset for the SSL ID.
Length
Enter the length of the SSL ID.
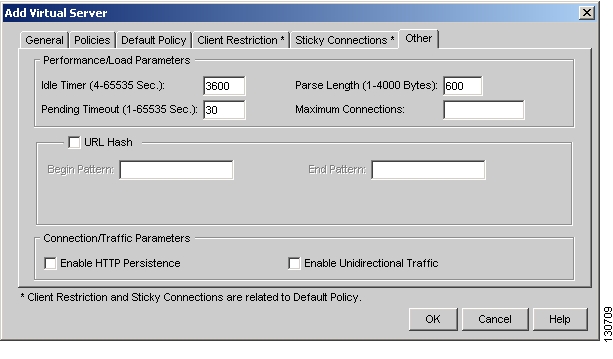
Other
Click the Other tab to configure performance, load, and traffic parameters. You can configure each virtual server with a pending connection timeout to terminate connections quickly if the switch becomes flooded with traffic.
Figure 4-7 Add Virtual Server > Other Dialog Box
The following details appear:
Idle Timer
Enter the idle connection timer duration (in seconds).
This is the time (in seconds) that connection information is maintained, in the absence of packet activity, for a connection
Pending Timeout
Enter the time (in seconds) to wait before a connection is considered unreachable.
Parse Length
Enter the maximum number of bytes to parse for URLs and cookies.
Maximum Connections
Enter the maximum number of active connections on the real server.
URL Hash
Select this check box to enable URL hash load-balancing algorithm.
You can enable the Begin Pattern and End Pattern fields only if you select this check box.
For more information on URL Hashing, see Configuring URL Hashing.
Begin Pattern
Specify the beginning pattern of the URL to parse.
End Pattern
Specify the ending pattern of the URL to parse.
Enable HTTP Persistence
Select this to enable or disable HTTP persistence for connections on the virtual server.
Enable Unidirectional Traffic
Select this to enable unidirectional traffic.
Configuring URL Hashing
When you choose a server farm for a connection, you can select a specific real server in that server farm. You can choose least connections, round robin, or URL hashing to select a real server.
URL hashing is a load-balancing predictor for Layer 7 connections. You can configure URL hashing on CVDM-CSM on a server farm-by-server farm basis. CVDM-CSM chooses the real server by using a hash value based on a URL. This hash value may be computed on the entire URL or on a portion of it.
You can specify the beginning and ending patterns in the URL to select only a portion of the URL for hashing. Hashing occurs from the start of the specified beginning pattern through the specified ending pattern.
For example, in the following URL, if the beginning pattern is c&k=, and the ending pattern is &, only the substring c&k=c is hashed:
http://quote.mypage.com/q?s=csco&d=c&k=c1&t=2y&a=v&p=s&l=on\
Note
Editing a Virtual Server
You can edit virtual server connection details and the list of policies for the selected virtual servers.
Step 1
•
Or
•
Step 2
Step 3
•
•
•
General
Click the General tab to edit basic configuration details.
The following details appear:
Policies
Click the Policies tab to edit policies. You have the following options:
•
•
•
•
Note
Default Policy
Click the Default Policy tab to configure a virtual server to operate at Level 4. You can specify the server farm (default policy) and backup server farms. You can configure a backup server farm to operate when a server farm is out of service.
To enable partial server farm failover, you can now define the threshold number of real servers to be out of service for the backup server farm to take over. You can also define the number of real servers to be in service for the server farm to be considered active.
The following details appear when you click this tab:
Default Server Farm
Click
•
•
•
Server Farm
Click
•
•
•
Sticky
Select this check box to enable the sticky property.
This ensures that multiple connections from the same client that match the same SLB policy stick (or attach) to the same real server.
Reals Inservice
The number of real servers to be in service for the server farm to be active.
Reals out of service
The number of real servers to be out of service for the backup server farm to take over.
Client Restriction
Click the Client Restriction tab to add details of the clients restricted to use the virtual server. You have the following options:
•
•
•
When you click Add or Edit, the following details appear:
Sticky Connections
Sticky connections are connections from a client that conform to an SLB policy. Sticky connections use the same real server for subsequent connections. To ensure that the CVDM-CSM changes its connections to the opposite direction and sends them back to the source, you can configure a reverse sticky group.
Click the Sticky Connections tab to add details of the sticky connections.
The following details appear:
Sticky Timer
Specifies the period of time (in minutes) that the sticky information is kept.
Mask
From the list, select, Class A, Class B, Class A and Class D masks.
If it is not specified, the default for network mask is 255.255.255.255.
Sticky Group
Click
•
•
•
Reverse Sticky Group
Click
•
•
•
You can stick an incoming SSL connection based only on the offset and length values of the SSL ID.
Offset
Enter the offset for the SSL ID.
Length
Enter the length of the SSL ID.
Other
Click the Other tab to edit details of performance, load, and traffic parameters. You can configure each virtual server with a pending connection timeout to terminate connections quickly if the switch becomes flooded with traffic.
The following details appear:
Idle Timer
Enter the idle connection timer duration (in seconds).
This is the time that connection information is maintained, in the absence of packet activity, for a connection
Pending Timeout
Enter the time (in seconds) to wait before a connection is considered unreachable.
Parse Length
Enter the maximum number of bytes to parse for URLs and cookies.
Maximum Connections
Enter the maximum number of active connections on the real server.
URL Hash
Select this check box to enable URL hash load-balancing algorithm.
You can enable the Begin Pattern and End Pattern fields only if you select this check box.
For more information on URL Hashing, see Configuring URL Hashing.
Begin Pattern
Specify the beginning pattern of the URL to parse.
End Pattern
Specify the ending pattern of the URL to parse.
Enable HTTP Persistence
Select this to enable or disable HTTP persistence for connections on the virtual server.
Enable Unidirectional Traffic
Select this to enable unidirectional traffic.
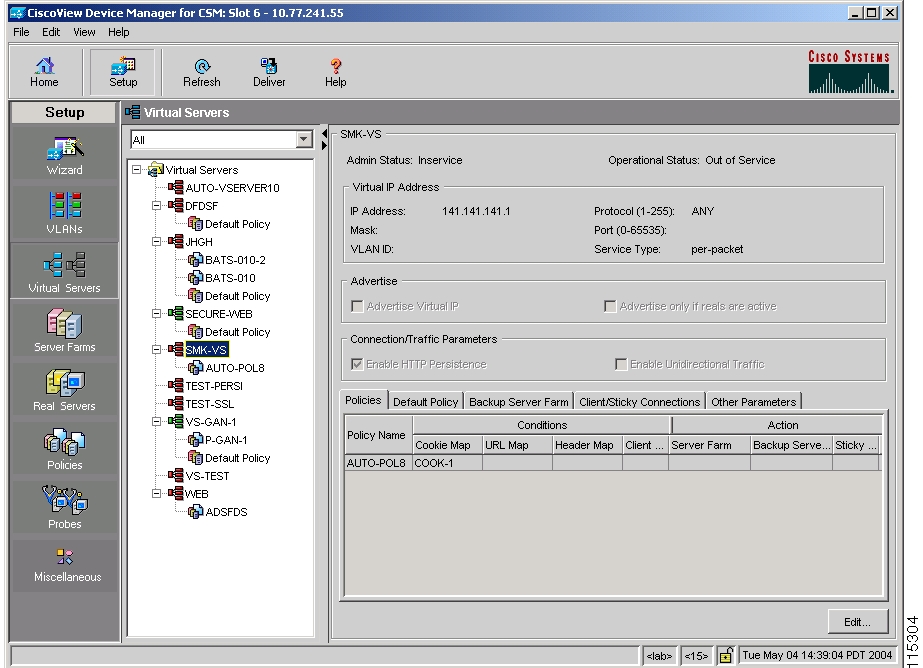
Viewing an Individual Virtual Server
You can view the configuration details of each virtual server when you click any of them. When a virtual server is out of service it turns red, and when it is in service it turns green.
Figure 4-8 Virtual Servers - Individual Virtual Server Page
Step 1
•
Or
•
Step 2
Step 3
•
•
Policies
Click the Policies tab to view the details of various policies.
The following details appear:
Default Policy
Click the Default Policy tab to configure a virtual server to operate at Level 4. You can specify the server farm (default policy) and backup server farms. You can configure a backup server farm to operate when a server farm is out of service.
To enable partial server farm failover, you can now define the threshold number of real servers to be out of service for the backup server farm to take over. You can also define the number of real servers to be in service for the server farm to be considered active.
The following information appears:
Backup Server Farm
Click the Backup Server Farm tab to view the details of the backup server farm.
The following information appears:
Client and Sticky Connections
Sticky connections are connections from a client that conform to an SLB policy. Sticky connections use the same real server for subsequent connections. To ensure that the CVDM-CSM changes its connections to the opposite direction and sends them back to the source, you can configure a reverse sticky group.
Click the Client/Sticky Connections tab to view details of the restricted clients and sticky connections. The following information appears:
Other Parameters
Click the Other Parameters tab to view details of performance, load and traffic related parameters. You can configure each virtual server with a pending connection timeout to terminate connections quickly if the switch becomes flooded with traffic.
You can limit the number of connections going through the CVDM-CSM to a particular virtual server by specifying the maximum and minimum number of connections.
Idle Timer
Enter the idle connection timer duration (in seconds).
This is the time that connection information is maintained, in the absence of packet activity, for a connection
Pending Timeout
Enter the time (in seconds) to wait before a connection is considered unreachable.
Parse Length
Enter the maximum number of bytes to parse for URLs and cookies.
Maximum Connections
Enter the maximum number of connections to the real server.
URL Hash
Select this check box to enable URL hash load-balancing algorithm.
You can enable the Begin Pattern and End Pattern fields only if you select this check box.
For more information on URL Hashing, see Configuring URL Hashing.
Begin Pattern
Specify the beginning pattern of the URL to parse.
End Pattern
Specify the ending pattern of the URL to parse.
Enable HTTP Persistence
Select this check box to enable or disable HTTP persistence for connections in the virtual server.
Enable Unidirectional Traffic
Select this check box to enable unidirectional traffic.
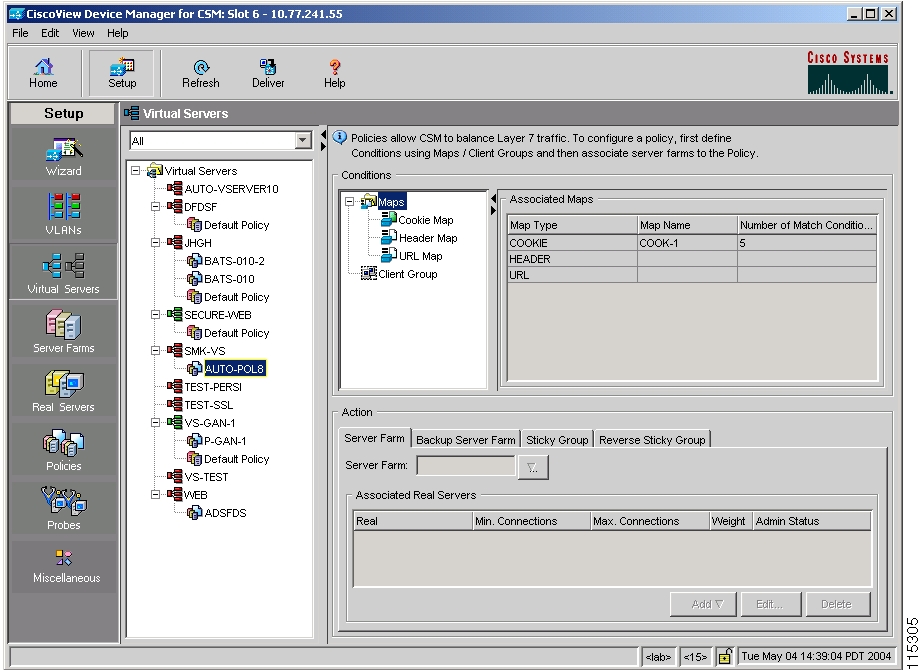
Viewing a Policy
You can view the details of the conditions and actions of the policy associated with each virtual server.
Figure 4-9 Virtual Servers - Policy Page
Step 1
•
Or
•
Step 2
For more information on policies associated with the individual virtual servers see Viewing Policy Nodes, page 7-16.
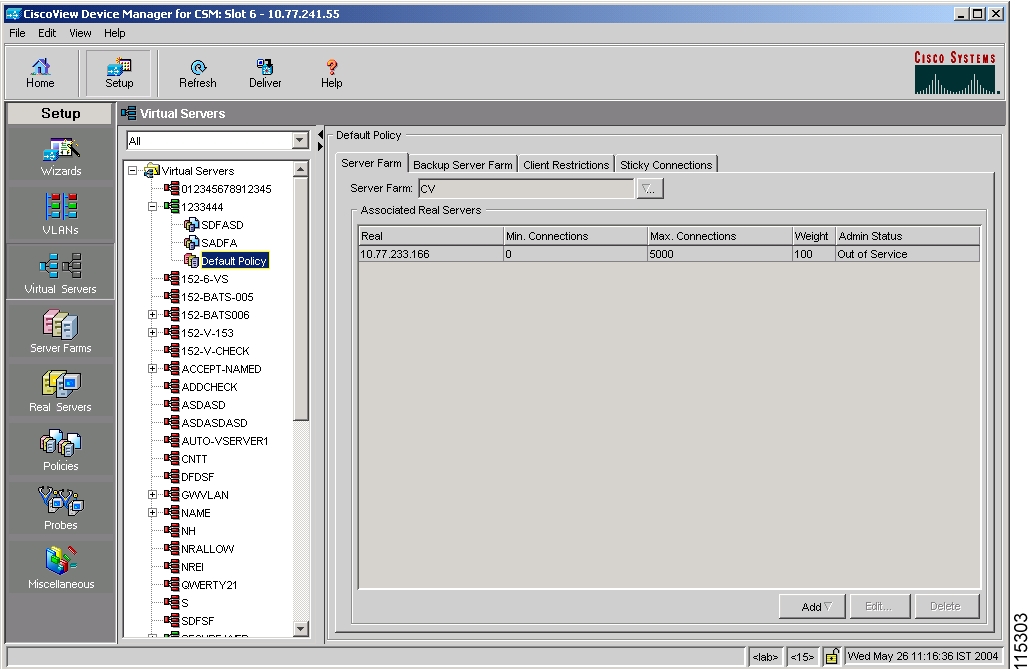
Viewing a Default Policy
You can view the details of the default policy associated with each virtual server.
Figure 4-10 Virtual Servers - Default Policy Page
Step 1
•
Or
•
Step 2
Step 3
Server Farms
Click the Server Farms tab to view details of all the server farms that are associated to a policy.
The following details appear:
Server Farm
You can create or choose one server farm to associate it to the policy.
Click
•
•
Real
Real server associated to the Server farms through the policy.
Local SSL
Indicates if the real server is the SSL card.
Minimum Connections
Minimum number of connections to the real server.
Maximum Connections
Maximum number of connections to the real server.
Weight
Weight assigned to the real server. The weight identifies the capacity of the real server compared to other real servers in the server farm.
Admin Status
Lets you know the status of the real server.
From this dialog box, you can do the following:
•
–
–
•
•
For more information on server farms, see Viewing Server Farms, page 5-3.
Backup Server Farms
Click the Backup Server Farms tab to view details of all the backup server farms that are associated to this policy.
The following information appears:
Backup Server Farm
You can create or choose one backup server farm to associate it to the policy.
Click
•
•
Sticky
Select this check box to enable the sticky property.
This ensures that multiple connections from the same client that match the same SLB policy stick (or attach) to the same real server.
Real
Real server associated to the Server farms through the policy.
Local SSL
Indicates if the real server is the SSL card.
Minimum Connections
Minimum number of connections to the real server.
Maximum Connections
Maximum number of connections to the real server.
Weight
Weight assigned to the real server. The weight identifies the capacity of the real server compared to other real servers in the server farm.
Admin Status
Lets you know the status of the real server.
From this dialog box, you can do the following:
•
–
–
•
•
For more information on server farms, see Viewing Server Farms, page 5-3.
Client Restrictions
Click the Client Restrictions tab to add details of the restricted clients.
The following details appear:
Sticky Connections
Sticky connections are connections from a client that conform to an SLB policy. Sticky connections use the same real server for subsequent connections. To ensure that the CVDM-CSM changes its connections to the opposite direction and sends them back to the source, you can configure a reverse sticky group.
Click the Sticky Connections tab to add details of the sticky connections.
The following details appear:
![]()
![]()
![]()
![]()
![]()
![]()
![]()
![]()
Posted: Fri Apr 15 03:31:37 PDT 2005
All contents are Copyright © 1992--2005 Cisco Systems, Inc. All rights reserved.
Important Notices and Privacy Statement.