|
|

Table Of Contents
Adding a Redirect Virtual Server
Editing Redirect Virtual Servers
Managing Server Farms
From the Server Farms page, you can do the following:
•
Configure server farms.
•
•
•
•
•
•
This section includes the following topics:
Server Farms
A server farm (or server pool) is a collection of servers that contain the same content. You can specify the server farm name when you configure the server farm and add real servers to it, and when you bind the server farm to a virtual server.
When you configure server farms, do the following:
•
•
•
•
•
Related Topics:
•
Viewing Server Farms
Figure 5-1 Server Farms Page
Step 1
•
Or:
•
The Server Farm dialog box appears with the following columns.
From this dialog box, you can do the following:
•
•
•
Adding Server Farms
Step 1
•
Or:
•
Step 2
Step 3
•
General
When you click on the General tab, the following information appears:
Name
Enter the name of the server farm.
Load-Balancing Algorithm
Specify the load-balancing algorithm for the server farm from the list. Based on the load balancing algorithm the traffic will be diverted to the respective real server. If not specified, the default is Round Robin.
It can be one of the following:
•
•
•
•
•
Mask Type
It can be source, destination, or both.
This field is enabled only for Hash Address algorithm type.
Mask
The mask of the real server in the server farm. This field is enabled only for Hash Address algorithm type.
Server NAT
Select the check box to enable Server NAT.
Client NAT
Select the check box to enable Client NAT.
Back-End SSL encryption
Select the check box to enable backend SSL encryption.
This field will be enabled only when you select the Server NAT check box.
Pool
Enter the name of the client pool. You can modify this field only if client NAT is enabled in this server farm.
Click
and select one of the following:
•
•
•
Real Servers
When you select the Real Servers tab, the following information appears:
From this dialog box, you can do the following:
•
–
–
–
•
•
Health Checkup
When you select the Health Checkup tab, the following information appears:
Fail Action
From the list, specify the behavior of the connection when the real server fails. It can be one of the following:
•
•
•
Return Code Map
Specify the return code map.
Click
•
•
•
Inband Health Checkup
Select the check box to enable inband health monitoring for all the servers in the server farm. You can set the retry attempts and the number of retries.
Number of Retries
Enter the number of consecutive connection attempts before considering the real server failed.
Retry Interval
Enter the retry interval in seconds.
Name
You can see the probes associated to the server farm.
From this dialog box, you can do the following:
•
•
Redirect Virtual Server
When you select the Redirect Virtual Server tab specify a virtual server to receive traffic redirected by a server farm. When you map real servers to redirect virtual servers, it provides persistence for clients to real servers across TCP sessions.
The following information appears:
Name
The name of the redirect virtual server.
SSL Port
The SSL port number.
Status
Status of the redirect virtual server.
From this dialog, you can do the following:
•
•
•
Adding Multiple Real Servers
Step 1
•
Or:
•
Step 2
Step 3
Step 4
From this dialog box, you can do the following:
•
•
•
•
Editing Server Farms
Step 1
•
Or:
•
Step 2
Step 3
•
General
When you select the General tab the following information appears:
Name
Enter the name of the server farm.
Load-Balancing Algorithm
Specify the load-balancing algorithm for the server farm from the list. Based on the load balancing algorithm the traffic will be diverted to the respective real server. If not specified, the default is Round Robin.
It can be one of the following:
•
•
•
•
•
Mask Type
It can be source, destination or both.
This field is enabled only for Hash Address algorithm type.
Mask
The mask of the real server in the server farm. This field is enabled only for Hash Address algorithm type.
Server NAT
Select the check box to enable Server NAT.
Client NAT
Select the check box to enable Client NAT.
Back-end SSL encryption
Select the check box to enable back-end SSL encryption.
This field will be enabled only when you select the Server NAT check box.
Pool
Enter the name of the client pool. You can modify this field only if client NAT is enabled in this server farm.
Click
•
•
•
Real Server
When you select the Real Servers tab the following information appears:
From this dialog box, you can do the following:
•
–
–
–
•
•
Health Checkup
You can configure probes by specifying the probe name and type. After configuring a probe, you must associate it with a server farm for the probe to take effect. All servers in the server farm receive probes of the probe types that are associated with that server farm. You can associate one or more probe types with a server farm.
When you select the Health Checkup tab, the following information appears:
Fail Action
From the list, specify the behavior of the connection when the real server fails. It can be one of the following:
•
•
•
Return Code Map
Specify the return code map.
Click
•
•
•
Inband Health Checkup
Select the check box to enable inband health monitoring for all the servers in the server farm. You can set the retry attempts and the number of retries.
Number of Retries
Enter the number of consecutive connection attempts before considering the real server failed.
Retry Interval
Enter the retry interval (in seconds).
Name
You can see the probes associated to the server farm.
From this dialog box, you can do the following:
•
•
Redirect Virtual Server
When you select the Redirect Virtual Server tab to specify a virtual server to receive traffic redirected by a server farm. A table appears with the following informations:
Name
The name of the redirect virtual server.
SSL Port
The SSL port number.
Status
Status of the redirect virtual server.
From this dialog box, you can do the following:
•
•
•
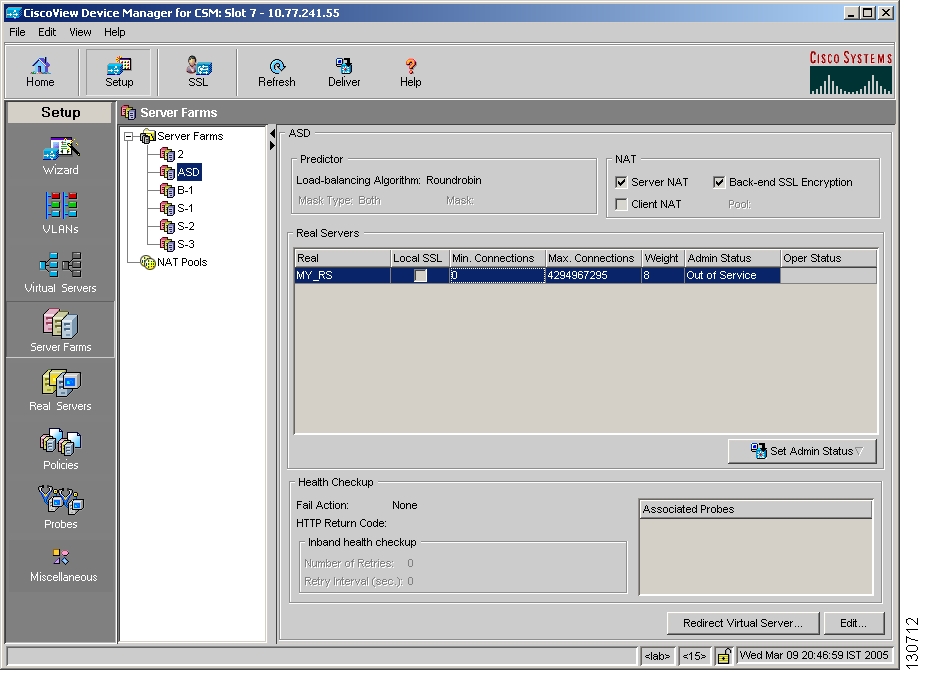
Viewing a Server Farm Node
You can see details of individual server farms. You can add redirect virtual servers and also set the administrative status of real servers in the server farm.
Figure 5-2 Server Farm Node Page
Step 1
•
Or:
•
Step 2
From this dialog box, you can do the following:
•
•
–
–
•
Adding a Named Real Server
Step 1
•
Or:
•
Step 2
Step 3
Step 4
The Add Named Real Server dialog box appears, displaying the following columns.
Name
From the list, select the name of the named real server.
Real Server
Enter the name of the real server.
Click
•
•
•
Port
Enter the port number.
Min. Connections
Enter the minimum number of connections for the real server.
Max. Connections
Enter the maximum number of connections for the real server.
Weight
Enter the weight assigned to the real server.
The weight identifies the capacity of the real server compared to other real servers in the server farm.
Redirect Virtual Server
Click
•
•
•
Local SSL
Select the check box to indicate that the real server is the SSL daughter card.
Status
Specify the status of the real server.
Name
Click
•
•
•
Port
Displays the port number of the backup real server.
Probe Name
Click
•
•
•
Tag
Enter the tag for the probe.
Adding an Unnamed Real Server
Step 1
•
Or:
•
Step 2
Step 3
Step 4
The Add Unnamed Real Server dialog box appears, displaying the following columns.
IP Address
Enter the IP address of the destination.
Port
Enter the port number.
Min. Connections
Enter the minimum number of connections for the real server.
Max. Connections
Enter the maximum number of connections for the real server.
Weight
Enter the weight assigned to the real server.
The weight identifies the capacity of the real server compared to other real servers in the server farm.
Redirect Virtual Server
Click
•
•
•
Local SSL
Select the check box to indicate that the real server is the SSL daughter card.
Status
Specify the status of the real server.
Name
Click
•
•
•
Port
Displays the port number of the backup real server.
Probe Name
Click
•
•
•
Tag
Enter the tag for the probe.
Editing a Real Server
Step 1
•
Or:
•
Step 2
The Add Server Farm dialog box appears.
Step 3
Step 4
The Edit Real Server dialog box appears, displaying the following columns.
IP Address
(For unnamed real servers) Enter the IP address of the real server.
Port
Enter the port number.
Real Server
(For the named real server) IP address of the named real server.
Min. Connections
Enter the minimum number of connections for the real server.
Max. Connections
Enter the maximum number of connections for the real server.
Weight
Enter the weight assigned to the real server.
The weight identifies the capacity of the real server compared to other real servers in the server farm.
Redirect Virtual Server
Click
•
•
•
Local SSL
Select the check box to indicate that the real server is the SSL daughter card.
Status
Specify the status of the real server.
Name
Click
•
•
•
Port
Displays the port number of the backup real server.
Probe Name
Click
•
•
•
Tag
Enter the tag for the probe.
Redirect Virtual Servers
You can specify a virtual server to receive traffic redirected by a server farm. When you map real servers to redirect virtual servers, it provides persistence for clients to real servers across TCP sessions.
If the redirect virtual server does not have any real servers available, you need to specify a backup or relocation string sent in response to HTTP requests.
To see the details of the redirect virtual servers that you have configured for a server farm:
Step 1
•
Or:
•
Step 2
Step 3
From this dialog box, you can do the following:
•
•
Adding a Redirect Virtual Server
You can specify a virtual server to receive traffic redirected by a server farm. When you map real servers to redirect virtual servers, it provides persistence for clients to real servers across TCP sessions.
If the redirect virtual server does not have any real servers available, you need to specify a backup or relocation string sent in response to HTTP requests.
Step 1
•
Or:
•
Step 2
Step 3
The Redirect Virtual Server dialog box appears.
Step 4
The Add Redirect Virtual Server dialog box appears, displaying the following columns.
Editing Redirect Virtual Servers
Step 1
•
Or:
•
Step 2
Step 3
The Redirect Virtual Server dialog box appears.
Step 4
The Edit Redirect Virtual Server dialog box appears, displaying the following columns.
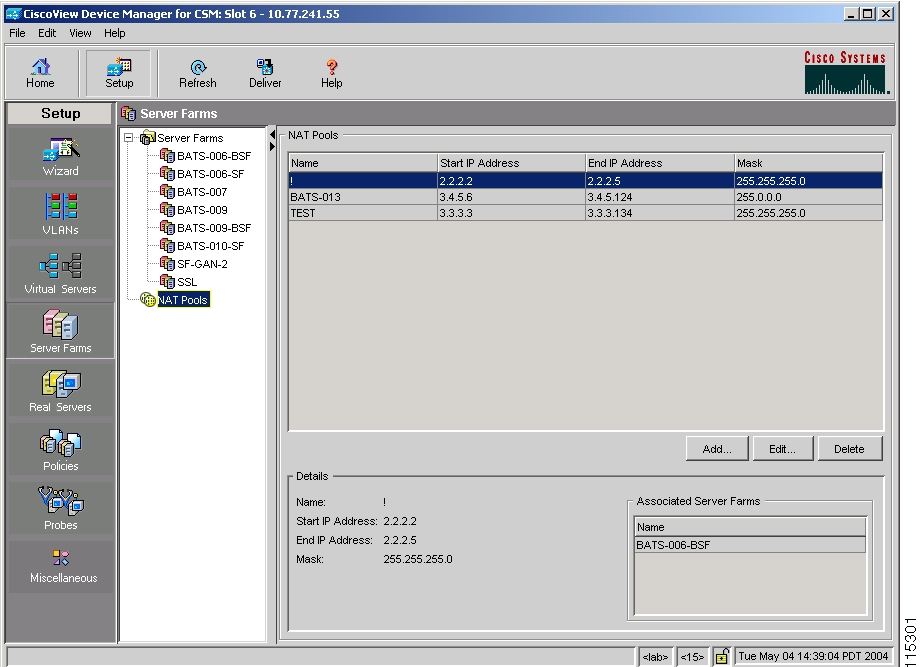
NAT Pools
When you configure client Network Address Translation (NAT) pools, NAT converts the source IP address of the client requests into an IP address on the server-side VLAN. You can configure a NAT pool with a range of IP addresses. To configure an NAT pool with a single IP address, you can specify the same IP address for starting and ending IP address.
Related Topics:
Viewing NAT Pools
Figure 5-3 NAT Pools Window
Step 1
•
Or:
•
Step 2
The NAT Pools dialog box appears, displaying the following columns.
When you select a NAT pool from the table, you can see the corresponding details:
From this section, you can do the following:
•
•
•
Adding NAT Pools
Note
Step 1
•
Or:
•
Step 2
Step 3
Editing NAT Pools
Step 1
•
Or:
•
Step 2
Step 3
![]()
![]()
![]()
![]()
![]()
![]()
![]()
![]()
Posted: Fri Apr 15 03:25:53 PDT 2005
All contents are Copyright © 1992--2005 Cisco Systems, Inc. All rights reserved.
Important Notices and Privacy Statement.