cc/td/doc/product/rtrmgmt/cvdmcsm/csm1_1
hometocprevnextglossaryfeedbacksearchhelp
PDF

Table Of Contents

Managing Policies

Viewing Policies

Adding Policies

Editing Policies

Viewing Policy Nodes

Conditions and Action

Cookie Maps

Header Maps

URL Maps

Client Group

Action

Server Farms and Backup Server Farms

Sticky Group

Reverse Sticky Group

Virtual Servers


Managing Policies


Policies are access rules that traffic must match when load balancing to a server farm. Policies allow the CVDM-CSM to balance Layer 7 traffic. Multiple policies can be assigned to one virtual server, creating multiple access rules for that virtual server. The server farm associated with a policy receives all the requests that match that policy.

When configuring policies, you must first configure the access rules (maps and/or client groups) and then you combine these access rules under a particular policy.


Note You must associate a server farm with a policy. A policy that does not have an associated server farm cannot forward traffic.


When the CVDM-CSM is able to match policies, it selects the policy that appears first in the policy list. Policies appear in the policy list in the sequence in which they are bound to the virtual server.

A policy will match even if all the servers in the associated server farm are down. The default behavior of the policy in that case is to not accept those connections and to send back a reset (RST) to the clients. To change this behavior, you can add a backup server farm for that policy.

If you configure a sticky group for a policy, the primary server farm in this policy becomes sticky. The client will stick to the configured real server in the primary server farm. When all of the real servers in the primary server farm fail, new requests from this client are sent to the backup server farm. When the real server in the primary server farm returns to the operational state, the following will occur:

If you enable sticky option for the backup server farm, the new requests from the client will be sent to the backup real server.

If you do not use sticky option on the backup server farm, the new requests will go back to the primary real server.

The backup real server will continue to service existing connections.

From the Policy page, you can do the following:

Configure access rules such as maps (cookie map, header map, URL map), client groups (access control lists), sticky group (cookie, header, netmask. and SSL).

Associate server farm and backup server farm with a particular policy.

Related Topics

Viewing Policies

Adding Policies

Editing Policies

Viewing Policy Nodes

Viewing Policies

Figure 7-1 Policies Page

You can view all policies configured in the device.


Step 1 Do one of the following:

Click Home at the top of the window and click Policies under Services Dashboard.

Or

Click Setup from the task bar and click Policies in the Setup pane.

Step 2 Select Policies from the object selector. A table appears, displaying the following columns:

Column
Action/Description

Policy Name

Policy associated with a virtual server.

Conditions

Cookie Map

Name of the cookie map associated with a policy. Only one cookie map can be associated with a policy.

URL Map

Name of the URL map associated with a policy. Only one URL map can be associated with a policy.

Header Map

Name of the header map associated with a policy. Only one header map can be associated with a policy.

Client Group

Client group can be either standard access lists names or an ID from 1 to 99. Only one client group can be associated with a given SLB policy.

Action

Server Farm

Backup Server Farm

Name of the server farm associated to the real server. You can choose one server farm and/or backup server farm to associate to the policy.

Sticky Group

Number identifying the sticky group to which the virtual server belongs.

Reverse Sticky Group

Number identifying the sticky group to which the virtual server belongs.

Ensures that CVDM-CSM changes its connections to the opposite direction and sends them back to the source.


From this dialog box, you can do the following:

Click Add to add new policies. For more information, see Adding Policies.

Click Edit to edit policies. For more information, see Editing Policies.

Select a row and click Delete to delete policies.

Adding Policies

You can add a policy, and you can associate one map of each type and one sticky group to the policy.

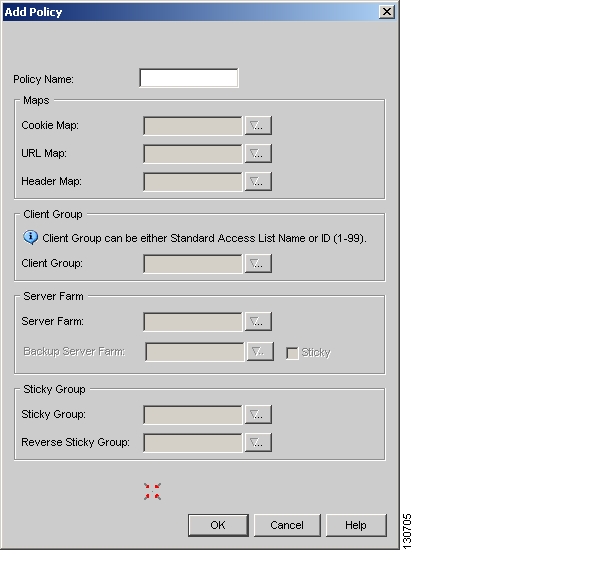
Figure 7-2 Add Policy Dialog Box


Step 1 Do one of the following:

Click Home at the top of the window and click Policies under Services Dashboard.

Or:

Click Setup from the task bar and click Policies in the Setup pane.

Step 2 Select Policies from the object selector.

Step 3 Click Add to add policies. The Add Policy table appears, displaying the following columns.

Column
Description

Policy Name

Enter the policy associated with a virtual server. The string is limited to 15 characters.

Maps

Cookie Map

From the list, select the name of the cookie map to be associated with the policy. Only one cookie map can be associated with a policy.

Click and select one of the following:

Select Cookie Map—Opens the Select Cookie Map dialog box and allows you to select from a list of configured cookie maps.

Create Cookie Map—Opens the Add Cookie Map dialog box and allows you to create a cookie map. For more information, see Adding a Cookie Map, page 8-9.

Clear Cookie Map—Allows you to clear the field.

URL Map

From the list, select the name of the URL map to be associated with the policy. Only one URL map can be associated with a policy

Click and select one of the following:

Select URL Map—Opens the Select URL Map dialog box and allows you to select from a list of configured URL maps.

Create URL Map—Opens the Add URL Map dialog box and allows you to create a URL map. For more information, see Adding a URL Map, page 8-19.

Clear URL Map—Allows you to clear the field.

Header Map

From the list, select the name of the header map to be associated with the policy. Only one header map can be associated with a policy.

Click and select one of the following:

Select Header Map—Opens the Select Header Map dialog box and allows you to select from a list of configured header maps.

Create Header Map—Opens the Add Header Map dialog box and allows you to create one. For more information, see Adding a Header Map, page 8-23.

Clear Header Map—Allows you to clear the field.

Client Group

From the list, select the client group number or name. Only one client group can be associated with a given server-load balancing (SLB) policy.

Click and select one of the following:

Create Client Group—Allows you to create a Client group. Enter the Client group ID or Name.

Clear Client Group—Allows you to clear the field.

Server Farm

Server Farm

From the list, select the name of the server farm associated to the real server. You can choose one server farm to associate to the policy.

Click and select one of the following:

Select Server Farms—Opens the Server Farm dialog box and allows you to select from a list of configured server farms.

Create Server Farms—Opens the Add Server Farm dialog box and allows you to create the server farms. For more information, see Adding Server Farms, page 5-5.

Clear Server Farms—Allows you to clear the field.

Backup Server Farm

From the list, select the name of the backup server farm associated to the real server. You can choose one backup server farm to associate to the policy.

Click and select one of the following:

Select Server Farms—Opens the Server Farm dialog box and allows you to select from a list of configured server farms.

Create Server Farms—Opens the Add Server Farm dialog box and allows you to create the server farms. For more information, see Adding Server Farms, page 5-5.

Clear Server Farms—Allows you to clear the field.

Sticky

Select this check box to enable the sticky property.

This ensures that multiple connections from the same client that match the same SLB policy stick (or attach) to the same real server.

Sticky Group

Sticky Group

From the list, select the number identifying the sticky group to which the virtual server belongs.

Click and select one of the following:

Select Sticky Groups—Opens the Select Sticky Group dialog box and allows you to select from a list of configured Sticky Groups.

Create Sticky Groups—Opens the Add Sticky Groups dialog box and allows you to create Sticky Groups. For more information, see Adding a Sticky Group, page 9-6.

Clear Sticky Groups—Allows you to clear the field.

Reverse Sticky Group

From the list, select the number identifying the reverse sticky group to which the virtual server belongs.

Click and select one of the following:

Select Sticky Groups—Opens the Select Sticky Group dialog box and allows you to select from a list of configured Sticky Groups.

Create Sticky Groups—Opens the Add Sticky Groups dialog box and allows you to create Sticky Groups. For more information, see Adding a Sticky Group, page 9-6.

Clear Sticky Groups—Allows you to clear the field.


Editing Policies


Step 1 Do one of the following:

Click Home at the top of the window and click Policies under Services Dashboard.

Or:

Click Setup from the task bar and click Policies in the Setup pane.

Step 2 Select Policies from the object selector.

Step 3 Select a row in the table and click Edit to launch Edit Policy dialog box for the selected policy. A table appears, displaying the following columns.

Column
Description

Policy Name

Enter the policy associated with a virtual server. The string is limited to 15 characters.

Cookie Map

From the list, select the name of the cookie map to be associated with the policy. Only one cookie map can be associated with a policy.

Click and select one of the following:

Select Cookie Map—Opens the Select Cookie Map dialog box and allows you to select from a list of configured cookie maps.

Create Cookie Map—Opens the Add Cookie Map dialog box and allows you to create a cookie map. For more information, see Adding a Cookie Map, page 8-9.

Clear Cookie Map—Allows you to clear the field.

URL Map

From the list, select the name of the URL map to be associated with the policy. Only one URL map can be associated with a policy

Click and select one of the following:

Select URL Map—Opens the Select URL Map dialog box and allows you to select from a list of configured URL maps.

Create URL Map—Opens the Add URL Map dialog box and allows you to create a URL map. For more information, see Adding a URL Map, page 8-19.

Clear URL Map—Allows you to clear the field.

Header Map

From the list, select the name of the header map to be associated with the policy. Only one header map can be associated with a policy.

Click and select one of the following:

Select Header Map—Opens the Select Header Map dialog box and allows you to select from a list of configured header maps.

Create Header Map—Opens the Add Header Map dialog box and allows you to create one. For more information, see Adding a Header Map, page 8-23.

Clear Header Map—Allows you to clear the field.

Client Group

From the list, select the client group number or name. Only one client group can be associated with a given server load-balancing (SLB) policy.

Click and select one of the following:

Create Client Group—Allows you to create a Client group. Enter the Client group ID or Name.

Clear Client Group—Allows you to clear the field.

Server Farm

Server Farm

From the list, select the name of the server farm associated to the real server. You can choose one server farm to associate to the policy.

Click and select one of the following:

Select Server Farms—Opens the Server Farm dialog box and allows you to select from a list of configured server farms.

Create Server Farms—Opens the Add Server Farm dialog box and allows you to create the server farms. For more information, see Adding Server Farms, page 5-5.

Clear Server Farms—Allows you to clear the field.

Backup Server Farm

From the list, select the name of the backup server farm associated to the real server. You can choose one backup server farm to associate to the policy.

Click and select one of the following:

Select Server Farms—Opens the Server Farm dialog box and allows you to select from a list of configured server farms.

Create Server Farms—Opens the Add Server Farm dialog box and allows you to create the server farms. For more information, see Adding Server Farms, page 5-5.

Clear Server Farms—Allows you to clear the field.

Sticky

Select this check box to enable the sticky property.

This ensures that multiple connections from the same client that match the same SLB policy stick (or attach) to the same real server.

Sticky Group

Sticky Group

From the list, select the number identifying the sticky group to which the virtual server belongs.

Click and select one of the following:

Select Sticky Groups—Opens the Select Sticky Group dialog box and allows you to select from a list of configured Sticky Groups.

Create Sticky Groups—Opens the Add Sticky Groups dialog box and allows you to create Sticky Groups. For more information, see Adding a Sticky Group, page 9-6.

Clear Sticky Groups—Allows you to clear the field.

Reverse Sticky Group

From the list, select the number identifying the reverse sticky group to which the virtual server belongs.

Click and select one of the following:

Select Sticky Groups—Opens the Select Sticky Group dialog box and allows you to select from a list of configured Sticky Groups.

Create Sticky Groups—Opens the Add Sticky Groups dialog box and allows you to create Sticky Groups. For more information, see Adding a Sticky Group, page 9-6.

Clear Sticky Groups—Allows you to clear the field.


Viewing Policy Nodes

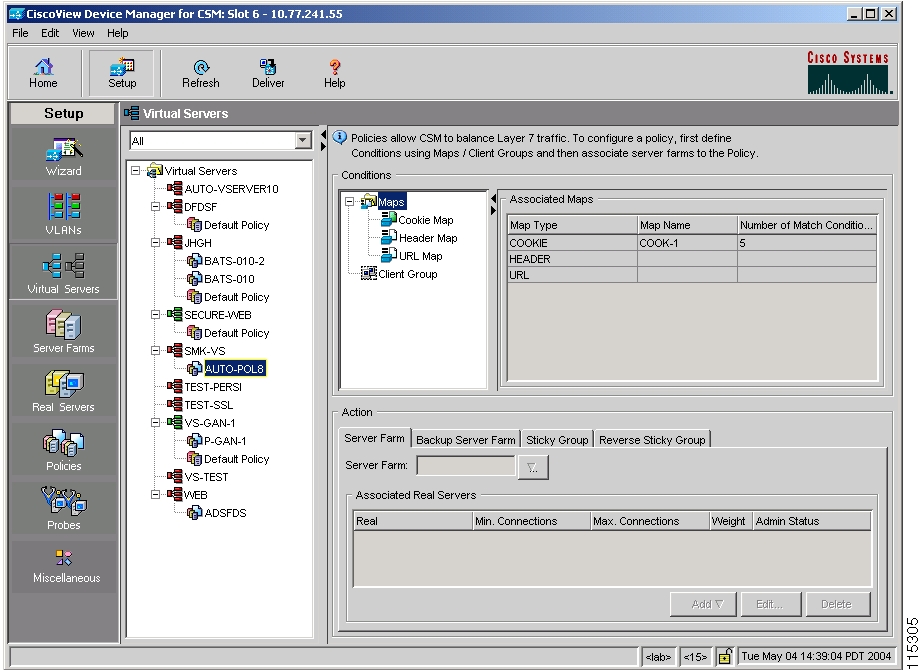
Figure 7-3 Policy Node Window


Step 1 Do one of the following:

Click Home at the top of the window and click Policies under Services Dashboard.

Or:

Click Setup from the task bar and click Policies in the Setup pane.

Step 2 Select Policies from the object selector and click any of the policy nodes.

Step 3 Click one of the following tabs, then proceed to the corresponding section for configuration information:

Conditions and Action

Virtual Servers


Conditions and Action

Click on the Conditions and Action tab to see the various conditions and their actions. The Conditions tree displays the various conditions such as maps or client groups. The columns under the Conditions tree will change according to the map and client groups that you select.

When you click Maps, you can see a table with a summary of details of all the associated maps. You can associate the different types of maps when you click Cookie Maps, Header Maps, or URL Maps under Maps.

The following fields appear when you click Maps:

Column
Description
Map Type

Specifies if it a cookie, header or a URL type map.

Map Name

Name of the map.

Number of Match Conditions

Specifies the total number of match conditions.


Note When you click the Maps tree, a list of maps and icons appears. The icons have a color status display; for example, the icons are white by default. When you associate a map, it turns green. This icon appears for all the three types of maps: Cookie, Header, and URL maps.


The following types of conditions are available:

Cookie Maps

Header Maps

URL Maps

Client Group

Cookie Maps

From the Conditions tab, when you select Cookie Maps the following columns appear:

Column
Description

Cookie Map

Name of the cookie map associated with the policy selected in the object selector.

Click and select one of the following:

Select Cookie Map—Opens the Select Cookie Map dialog box and allows you to select from a list of configured cookie maps.

Create Cookie Map—Opens the Create Cookie Map dialog box and allows you to create cookie maps. For more information on creating cookie maps, see Adding a Cookie Map, page 8-9.

Clear Cookie Map—Allows you to clear the field.

Cookie Name

Name of the cookie.

Cookie Value

Value of the cookie.


From this dialog box, you can do the following:

Click Add to add new match conditions by entering the name and value.

Click Edit to edit match conditions.

Select a match condition and click Delete to delete it.

Header Maps

From the Conditions tab, when you select Header Maps the following columns appear:

Column
Description

Header Map

Click and select one of the following:

Select Header Map—Opens the Select Header Map dialog box and allows you to select from a list of configured header maps.

Create Header Map—Opens the Create Header Map dialog box and allows you to create header maps. For more information, see Adding a Header Map, page 8-23.

Clear Header Map—Allows you to clear the field.

Header Name

Name of the header.

Header Value

Value of the header.


From this dialog box, you can do the following:

Click Add to add new header maps and values by entering the name and value.

Click Edit to edit the header maps and values.

Select a row and click Delete to delete a header map.

URL Maps

From the Conditions tab, when you select URL Maps the following columns appear:

Column
Description

URL Map

Click and select one of the following:

Select URL Map—Opens the Select URL Map dialog box and allows you to select from a list of configured URL maps.

Create URL Map—Opens the Create URL Map dialog box and allows you to create URL maps. For more information on creating URL maps, see Adding a URL Map, page 8-19.

Clear URL Map—Allows you to clear the field.

URL Method

Specifies the method in incoming HTTP requests.

URL

Specifies the URL in incoming HTTP requests.


From this dialog box, you can do the following:

Click Add to add new URL expressions by entering the name and value.

Click Edit to edit the URL expressions.

Select a row and click Delete to delete a URL map.

Client Group

From the Conditions tab, when you choose the Client Group the following columns appear:

Column
Description

Client Group

Client group can be either standard access lists names or an ID from 1 to 99. Only one client group can be associated with a given SLB policy.

Click and select one of the following:

Create Client Group—Opens a dialog box and allows you to create Client Group by entering the Client Group ID.

Clear Client Group—Allows you to clear the field.


Action

The following tabs appear under the actions section when you select a policy:

Server Farms and Backup Server Farms

Sticky Group

Reverse Sticky Group

Server Farms and Backup Server Farms


Note You can configure a backup server farm only after you configure a server farm.


Click Server Farms and/or Backup Server Farms to view all the server farms and backup server farms that are associated to this policy.

The following columns appear:

Column
Description

Server Farm/Backup Server Farm

You can choose one server farms and/or backup server farm to associate to the policy.

Click and select one of the following:

Select Server Farm—Opens a dialog box and allows you to select from a list of configured server farms.

Create Server Farm—Opens the Add Server Farm dialog box and allows you to create server farms or backup server farms. For more information, see Adding Server Farms, page 5-5.

Clear Server Farm—Allows you to clear the field.

Real

Number of real servers configured in the server farm.

Local

Indicates if this real server is the SSL card.

Min. Connections

The minimum number of connections for the real server.

Max. Connections

The maximum number of connections for the real server.

Weight

Weight assigned to the real server. The weight identifies the capacity of the real server compared to other real servers in the server farm.

Admin Status

Lets you know if the status of the real server.


From this dialog box, you can do the following:

Click Add and do one of the following:

Select Named Real Server—Opens the Add Named Real Server dialog box and allows you to create a named real server. For more information, see Adding a Named Real Server, page 5-23.

Create Unnamed Real Server—Opens the Add Unnamed Real Server dialog box and allows you to create an unnamed real server. For more information, see Adding an Unnamed Real Server, page 5-27.

Select a real server and click Edit to edit the configuration values.

Select a real server and click Delete to delete it.

For more information on server farms, see Viewing Server Farms, page 5-3.

Sticky Group

Click the Sticky Groups tab to view all the sticky groups that are associated to this policy.

The following columns appear:

Column
Description

Sticky Groups

Number identifying the sticky group to which the virtual server belongs. The range is from 0 to 255.

Click and select one of the following:

Select Sticky Groups—Opens the Select Sticky Group dialog box and allows you to select from a list of configured Sticky Groups.

Create Sticky Groups—Opens the Add Sticky Group dialog box and allows you to create Sticky Groups. For more information on creating Sticky Groups, see Adding a Sticky Group, page 9-6.

Clear Sticky Groups—Allows you to clear the field.

Type

Type of Sticky Group.

Timeout

Time in seconds to wait before a connection is considered unreachable.


Reverse Sticky Group

Click the Reverse Sticky Groups tab to view all the reverse Sticky Groups that are associated to this policy. To ensure that the CVDM-CSM changes its connections to the opposite direction and sends them back to the source, you can configure a reverse sticky group.

The following columns appear:

Column
Description

Reverse Sticky Groups

Number identifying the sticky group to which the virtual server belongs. The range is from 0 to 255.

Click and select one of the following:

Select Sticky Groups—Opens the Select Sticky Group dialog box and allows you to select from a list of configured Sticky Groups.

Create Sticky Groups—Opens the Add Sticky Group dialog box and allows you to create Sticky Groups. For more informations, see Adding a Sticky Group, page 9-6.

Clear Sticky Groups—Allows you to clear the field.

Type

Type of reverse sticky group.

Timeout

Time in seconds to wait before a connection is considered unreachable.


Virtual Servers

Click the Virtual Servers tab to view the details of all the virtual servers to which the policy selected in the object selector is associated.

For more information on Virtual Servers, see Viewing Virtual Servers, page 4-3.


hometocprevnextglossaryfeedbacksearchhelp

Posted: Fri Apr 15 03:08:51 PDT 2005
All contents are Copyright © 1992--2005 Cisco Systems, Inc. All rights reserved.
Important Notices and Privacy Statement.