cc/td/doc/product/rtrmgmt/cvdmcsm/csm1_1
hometocprevnextglossaryfeedbacksearchhelp
PDF

Table Of Contents

Managing VLANs

Viewing a VLAN

Adding a VLAN

Editing a VLAN

Viewing VLAN Clients

Viewing a VLAN Server


Managing VLANs


Client-side or a server-side VLAN terminology logically distinguishes the VLANs facing the client-side and the VLANs connecting to the servers or destination devices. However, CVDM-CSM client and server VLANs function very similarly.

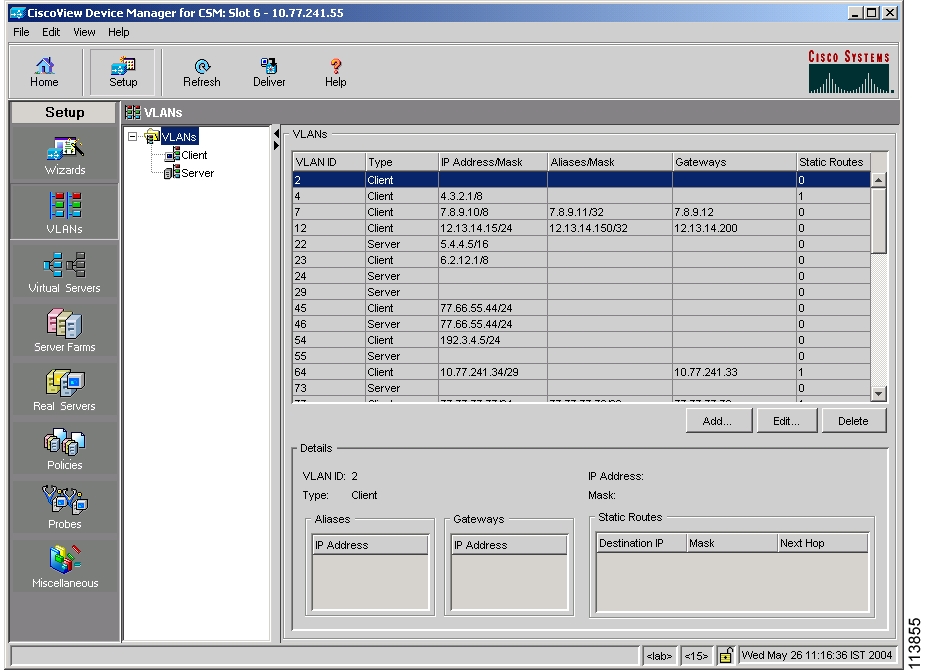
CVDM-CSM allows you to configure the client-side and server-side VLANs. You can configure up to 7 gateways and 255 alias IP addresses per VLAN.

This section includes the following topics:

Viewing a VLAN

Adding a VLAN

Editing a VLAN

Viewing VLAN Clients

Viewing a VLAN Server

Viewing a VLAN

Figure 3-1 VLAN Page


Step 1 Click Setup from the task bar.

Step 2 Click VLANs in the Setup pane.

The VLAN table appears, displaying the following columns.

Column
Description

VLAN ID

ID of the client or server VLAN.

Type

Specifies if the VLAN is of client or server type.

IP Address/Mask

IP address or mask of the VLAN.

Aliases/Mask

Alias IP address or mask.

You can assign multiple IP addresses to the VLAN.

Gateways

IP address of the gateway.

Static Routes

Static Route of the VLAN.


Step 3 When you select any row, the configuration details of the corresponding VLAN appears, displaying the following columns:

Column
Description

VLAN ID

ID of the client or server VLAN.

IP Address

IP Address of the VLAN.

Type

Specifies if the VLAN is of client or server type.

Mask

Mask of the VLAN.

Aliases

Alias IP address.

Gateways

IP address of the gateway.

Static Routes

Destination IP

The IP address of the destination.

Mask

The mask address of the VLAN.

Next Hop

The next hop address.


From this dialog box, you can do the following:

Click Add to add a VLAN. For more information, see Adding a VLAN.

Click Edit to edit a VLAN. For more information, see Editing a VLAN.

Select a row and click Delete to delete a VLAN.

Adding a VLAN


Step 1 Click Setup from the task bar.

Step 2 Click VLANs from the Setup pane.

Step 3 Select VLANs from the object selector.

Step 4 Click Add. The Add VLAN dialog box appears, displaying the following columns.

GUI Element
Description

VLAN ID field

Enter the ID of the client or server VLAN.

Type list

Specify, from the list, if the VLAN is of client or server type.

IP Address field

Enter the IP Address of the VLAN.

Mask field

Enter the subnet mask of the VLAN.

Aliases and Gateways tab
Aliases pane

IP Address field

Alias IP addresses of the VLAN.

Gateways pane

IP Address field

IP address of the gateway.

Static Routes pane

Destination IP address field

Enter the IP address of the destination.

Mask field

Enter the mask address of the destination IP address.

Next Hop field

Enter the next hop IP address.


From this dialog box, you can do the following:

Click Add under aliases to add an alias IP address.

Select an alias IP address and click Delete to delete it.

Click Add under gateways to add a gateway.

Select an alias IP address and click Delete to delete it.

Editing a VLAN


Step 1 Click Setup from the task bar.

Step 2 Click VLANs from the Setup pane.

Step 3 Select VLANs from the object selector.

Step 4 From the table, select the VLAN that you want to modify and click Edit.

The Edit VLAN dialog box appears, displaying the following columns.

GUI Element
Description

VLAN ID field

ID of the client or server VLAN.

Type list

Specifies if the VLAN is of client or server type.

IP Address field

Enter the IP Address of the VLAN.

Mask field

Enter the subnet mask of the VLAN.

Aliases and Gateways tab
Aliases pane

IP Address field

Alias IP address of the VLAN.

Gateways pane

IP Address field

IP address of the gateway.

Static Routes pane

Destination IP address field

Enter the IP address of the destination.

Mask field

Enter the mask address of the destination IP address.

Next Hop field

Enter the next hop IP address.


From this dialog box, you can do the following:

Click Add under aliases to add an alias IP address.

Select an alias IP address and click Delete to delete it.

Click Add under gateways to add a gateway.

Select an alias IP address and click Delete to delete it.

Viewing VLAN Clients


Step 1 Click Setup from the task bar.

Step 2 Click VLANs in the Setup pane.

Step 3 Select Client from the object selector. The Client table appears, displaying the following columns:

Field
Description

VLAN ID

The ID of the client VLAN.

IP Address/Mask

IP address and mask of VLAN.

Alias IP Address/Mask

Alias IP address or mask.

You can assign multiple IP addresses to the VLAN.

Gateways

IP address of the gateway.

Static Routes

Static route of the VLAN.


From this dialog box, you can do the following:

Click Add to add a client VLAN. For more information, see Adding a VLAN.

Click Edit to edit a client VLAN. For more information, see Editing a VLAN.

Select a row and click Delete to delete a client VLAN.

Viewing a VLAN Server


Step 1 Click Setup from the task bar.

Step 2 Click VLAN in the Setup pane.

Step 3 Select Server from the object selector.

The following fields appear:

Field
Description

VLAN ID

The ID of the server VLAN.

IP Address/Mask

IP address and mask of VLAN.

Alias IP Address/Mask

Alias IP address or mask.

You can assign multiple IP addresses to the VLAN.

Gateways

IP address of the gateway.

Static Routes

Static route of the VLAN.


From this dialog box, you can access functions to do the following:

Click Add to add a server VLAN. For more information, see Adding a VLAN.

Click Edit to edit a server VLAN. For more information, see Editing a VLAN.

Select a row and click Delete to delete a server VLAN.


hometocprevnextglossaryfeedbacksearchhelp

Posted: Fri Apr 15 03:18:09 PDT 2005
All contents are Copyright © 1992--2005 Cisco Systems, Inc. All rights reserved.
Important Notices and Privacy Statement.