|
|

Table Of Contents
Editing a Netmask Sticky Group
Managing Sticky Groups
Sticky connections limit traffic to individual servers by allowing multiple connections from the same client to stick to the same real server using source IP addresses, source IP subnets, cookies, and the secure socket layer (SSL) or by redirecting these connections using HTTP redirect messages.
Configuring a sticky group involves configuring the attributes of that group and associating it with a policy. This ensures that connections from the same client matching the same policy use the same real server. The default sticky time value is 1440 minutes (24 hours).
Session persistence (or stickiness) refers to the functionality of sending multiple (simultaneous or subsequent) connections from the same client consistently to the same server. This is a typical requirement in certain load balancing environments.
The CVDM-CSM can uniquely identify clients and perform stickiness with the following methods:
•
Cookie sticky, offset and length—Allows you to configure a specific cookie name and automatically learn its value either from the client request HTTP header or from the server Set Cookie message.
By default CVDM-CSM learns the entire cookie value, this feature enables CVDM-CSM to learn only a portion of the cookie value.
•
This section contains the following topics:
•
•
•
Note
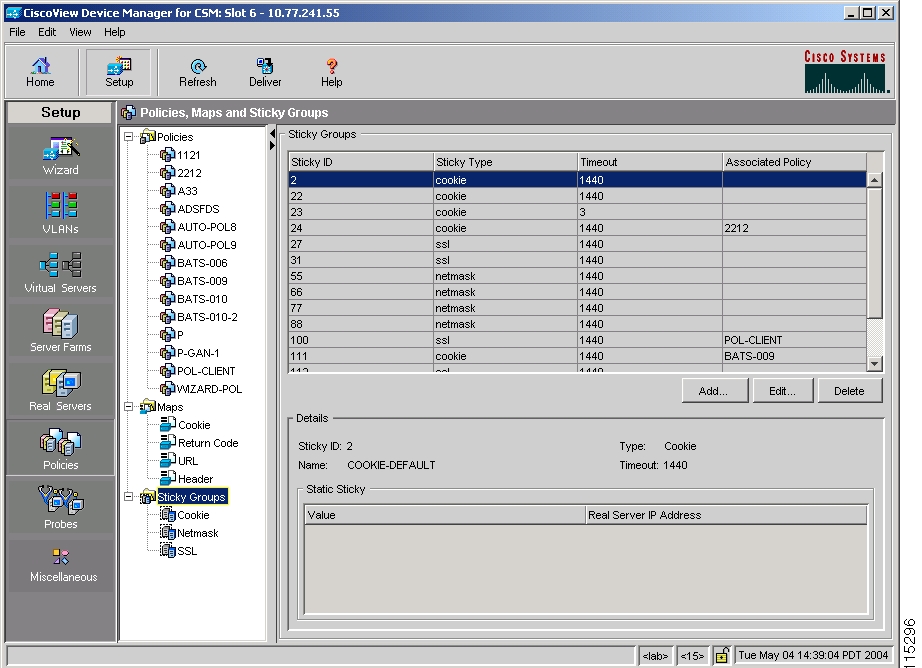
Viewing Sticky Groups
Figure 9-1 Sticky Groups Page
You can view the existing configuration details in the configuration dialog box and edit the specified fields.
Step 1
•
Or:
•
Step 2
Step 3
Step 4
From the Sticky Group dialog box, you can do the following:
•
•
Related Topics
•
•
•
Adding a Sticky Group
Step 1
•
Or:
•
Step 2
Step 3
The columns that appear in the dialog box will vary according to the type of sticky group that you choose.
Related Topics
•
•
•
Editing a Sticky Group
Step 1
•
Or:
•
Step 2
Step 3
The columns that appear in the dialog box will vary according to the type of sticky group that you choose.
Related Topics
•
•
•
Viewing Cookie Sticky Groups
Step 1
•
Or
•
Step 2
Step 3
From the Cookie Sticky Group dialog box, you can do the following:
•
•
•
Adding a Cookie Sticky Group
Step 1
•
Or:
•
Step 2
Step 3
From this dialog box, you can do the following:
•
•
Editing a Cookie Sticky Group
Step 1
•
Or:
•
Step 2
Step 3
From this dialog box, you can do the following:
•
•
Viewing Header Sticky Groups
Note
Step 1
•
Or:
•
Step 2
Step 3
From the Header Sticky Group dialog box, you can do the following:
•
•
•
Adding a Header Sticky Group
Note
Step 1
•
Or:
•
Step 2
Step 3
From this dialog box, you can do the following:
•
•
Editing a Header Sticky Group
Note
Step 1
•
Or:
•
Step 2
Step 3
From this dialog box, you can do the following:
•
•
Viewing Netmask Sticky Groups
Step 1
•
Or
•
Step 2
Step 3
From this dialog box, you can do the following:
•
•
•
Adding a Netmask Sticky Group
Step 1
•
Or:
•
Step 2
Step 3
From this dialog box, you can do the following:
•
•
Editing a Netmask Sticky Group
Step 1
•
Or:
•
Step 2
Step 3
From this dialog box, you can do the following:
•
•
Viewing SSL Sticky Groups
Step 1
•
Or
•
Step 2
Step 3
From the SSL sticky group dialog box, you can do the following:
•
•
•
Adding an SSL Sticky Group
Step 1
•
Or:
•
Step 2
Step 3
From this dialog box, you can do the following:
•
•
Editing an SSL Sticky Group
Step 1
•
Or
•
Step 2
Step 3
From this dialog box, you can do the following:
•
•
![]()
![]()
![]()
![]()
![]()
![]()
![]()
![]()
Posted: Fri Apr 15 03:13:53 PDT 2005
All contents are Copyright © 1992--2005 Cisco Systems, Inc. All rights reserved.
Important Notices and Privacy Statement.