cc/td/doc/product/rtrmgmt/cvdmcsm/csm1_1
hometocprevnextglossaryfeedbacksearchhelp
PDF

Table Of Contents

Managing Maps

Viewing Maps

Adding a Map

Viewing Cookie Maps

Adding a Cookie Map

Viewing Return Code Maps

Adding a Return Code Map

Adding and Editing Match Conditions for a Return Code Map

Viewing URL Maps

Adding a URL Map

Viewing Header Maps

Adding a Header Map


Managing Maps


You can configure maps to define multiple URLs, cookies, HTTP headers, and return codes as groups that can be associated when you configure a policy.

HTTP header insert allows CVDM-CSM to insert information such as the client's IP address into the HTTP header. This feature is useful when CVDM-CSM performs source NAT and the application on the server side requires client information.

This section contains the following topics:

Viewing Maps

Adding a Map

Viewing Cookie Maps

Adding a Cookie Map

Viewing Return Code Maps

Adding a Return Code Map

Adding and Editing Match Conditions for a Return Code Map

Viewing URL Maps

Adding a URL Map

Viewing Header Maps

Adding a Header Map

Viewing Maps

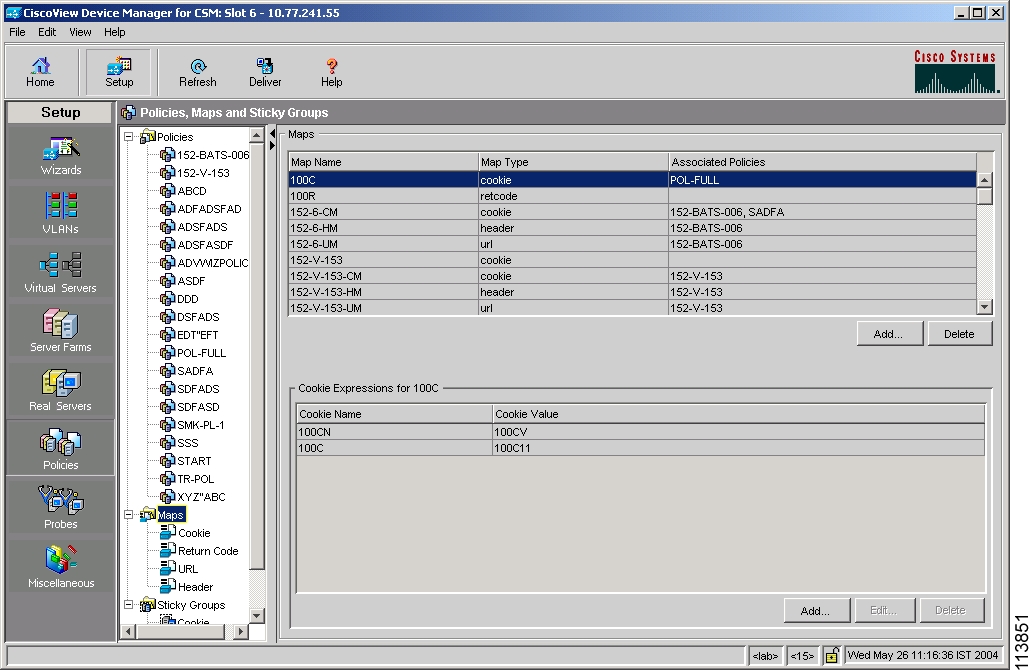
Figure 8-1 Maps Page

You can view details of all maps on the device.


Step 1 Do one of the following:

Click Home at the top of the window and click Policies under Services Dashboard.

Or:

Click Setup from the task bar and click Policies in the Setup pane.

Step 2 Select Maps from the object selector. A table appears, displaying the following columns.

Column
Description

Map Name

Displays the map name.

Map Type

Displays the type for the corresponding map name.

Associated Policies

Displays the associated policies for the map type.


From this main dialog box, you can do the following:

Click Add under the Maps table to add a new map. For more information, see the Adding a Map.

Select a map and click Delete to delete an existing map.

Related Topics

Viewing Cookie Maps

Viewing Return Code Maps

Viewing URL Maps

Viewing Header Maps

The lower pane of the Map window displays the various match conditions of the selected map. The match conditions will differ according to the type of map that you select in the table.

If you choose cookie map, the following columns appear:

Column
Description

Cookie Name

Name of the cookie.

Cookie Value

Value of the cookie.


From this dialog box, you can do the following:

Click Add to add a cookie match conditions by entering the cookie name and value.

Select a match condition and click Edit to edit cookie match conditions.

Select a match condition and click Delete to delete the cookie match conditions.

If you choose return code map, the following columns appear:

Column
Description
Match Conditions

Lowest Return Code

The lowest return code.

Highest Return Code

The highest return code.

Action for Return Codes

Action for the return code. It can one of the following:

Count—Specifies the number of occurrences of return codes received.

Log—Specifies where syslog messages are sent when a threshold is reached.

Remove—Specifies where the syslog messages are sent when a threshold is reached and the server is removed from service.

Return Code Instances

Instances of the return code.

Reset Time after Threshold

Number of seconds to wait before the processing can resume.


From this dialog box, you can do the following:

Click Add to add match conditions. For more information, see Adding and Editing Match Conditions for a Return Code Map.

Select a match condition and click Edit to edit match conditions for return code maps.

Select a match condition and click Delete to delete the match conditions for return code maps.

If you choose URL Map, the following columns appear:

Column
Description

URL Method

Specifies the method in incoming HTTP requests.

URL

Specifies the URL in incoming HTTP requests.


From this dialog, you can do the following:

Click Add to add URL expressions and enter the URL method and URL.

Select a URL expression and click Edit to edit URL expressions.

Select a URL expression and click Delete to delete it.

If you choose header map, the following columns appear:

Column
Description

Header Name

Name of the generic field in the HTTP header.

Header Value

Header value string to insert in the request.


From this dialog box, you can access functions to do the following:

Click Add to add header match conditions by entering the cookie name and value.

Select a header match condition and click Edit to edit header match conditions.

Select a header match condition and click Delete to delete the header match condition.

Adding a Map


Step 1 Do one of the following:

Click Home at the top of the window and click Policies under Services Dashboard.

Or:

Click Setup from the task bar and click Policies in the Setup pane.

Step 2 Select Maps from the object selector.

Step 3 Click Add. The Add map dialog box appears, displaying the following columns.

Column
Description

Map Type

Specify the map type. The map types are cookie, header, URL, and return code.

Map Name

Enter the map name.


The fields will differ according to the type of map that you select in the table.

Related Topics

Adding a Cookie Map

Adding a Return Code Map

Adding a URL Map

Adding a Header Map


Viewing Cookie Maps


Step 1 Do one of the following:

Click Home at the top of the window and click Policies under Services Dashboard.

Or:

Click Setup from the task bar and click Policies in the Setup pane.

Step 2 Select Maps > Cookie Maps from the object selector. The Cookie Map table appears, displaying the following columns.

Column
Description

Map Name

Enter the map name.

Associated Policies

The policy associated to the cookie map.


Step 3 When you select a map, the following columns appear in the Cookie Expressions pane:

Column
Description

Cookie Name

Name of the cookie map.

Cookie Value

Value of the cookie map.


From the Cookie Map dialog box, you can do the following:

Click Add to add a new cookie map. For more information, see Adding a Cookie Map.

Select a row and click Delete to delete a cookie map.

Click Edit to edit the cookie value.

From the Cookie Expressions dialog box, you can do the following:

Click Add to add a cookie match conditions by entering the cookie name and value.

Select a match condition and click Edit to edit cookie match conditions.

Select a match condition and click Delete to delete the cookie match conditions.

Adding a Cookie Map


Step 1 Do one of the following:

Click Home at the top of the window and click Policies under Services Dashboard.

Or:

Click Setup from the task bar and click Policies in the Setup pane.

Step 2 Select Maps > Cookie Maps from the object selector.

Step 3 Click Add. The Add Cookie Map dialog box appears, displaying the following columns.

Column
Description

Cookie Map Name

Enter the cookie map name.


Step 4 To add the match conditions for the cookie map, click Add. The Match Conditions page appears, displaying the following columns.

Column
Description

Cookie Name

Enter a name for the cookie.

Cookie Value

Enter a value for the cookie.


Note The cookie map can have a maximum of five match conditions.


From this dialog box, you can select a cookie map and click Delete to delete it.

Viewing Return Code Maps

Return code maps are used for return code error checking.


Step 1 Do one of the following:

Click Home at the top of the window and click Policies under Services Dashboard.

Or:

Click Setup from the task bar and click Policies in the Setup pane.

Step 2 Select Maps > Return Code Map from the object selector. A table appears, displaying the following columns.

Column
Description

Map Name

Name of the map.

Associated Server Farms

Server Farms associated with the map.


Step 3 When you select a return code map, the following details appear in the Match Condition pane:

Column
Description

Lowest Return Code

The lowest return code.

Note You cannot configure overlapping return codes.

Highest Return Code

The highest return code. Maximum number of return codes that can be configured is 100.

Note You cannot configure overlapping return codes.

For example, if you are already using 100-116,200-216, you cannot configure more than
(100 - (116-100+1) - (216-200_1)) = 66. You are limited to 300 - 365. If you add 300 - 366, an error message will appear.

Action for Return Codes

Action for the return code. It can one of the following:

Count—Specifies the number of occurrences of return codes received.

Log—Specifies where syslog messages are sent when a threshold is reached.

Remove—Specifies where the syslog messages are sent when a threshold is reached and the server is removed from service.

Return Code Instances

Instances of the return code.

Reset Time after Threshold

Number of seconds to wait before the processing can resume.


From the return code map dialog box, you can do the following:

Click Add to add a new return code map. For more information, see Adding a Return Code Map.

Select a row and click Delete to delete a return code map.

From the Match Condition pane, you can do the following:

Click Add to add match conditions. For more information, see Adding and Editing Match Conditions for a Return Code Map.

Select a match condition and click Delete to delete the match condition.

Adding a Return Code Map


Step 1 Do one of the following:

Click Home at the top of the window and click Policies under Services Dashboard.

Or:

Click Setup from the task bar and click Policies in the Setup pane.

Step 2 Select Maps > Return Code Map from the object selector.

Step 3 Click Add. The Add Return Code Map dialog box appears, displaying the following columns.

Column
Description

Map Name

Enter a map name.

Click Add to add match conditions. For more information, see Adding and Editing Match Conditions for a Return Code Map.

Lowest Return Code

Enter the lowest return code.

Note You cannot configure overlapping return codes.

Highest Return Code

Enter the highest return code. Maximum number of return codes that can be configured is 100.

Note You cannot configure overlapping return codes.

For example, if you are already using 100-116,200-216, you cannot configure more than
(100 - (116-100+1) - (216-200_1)) = 66. You are limited to 300 - 365. If you add 300 - 366, an error message will appear.

Action for Return Codes

The action for the return code. It can be one of the following:

Count—Specifies the number of occurrences of return codes received.

Log—Specifies where syslog messages are sent when a threshold is reached.

Remove—Specifies where the syslog messages are sent when a threshold is reached and the server is removed from service.

Return Code Instances

Enter the instances of the return code.

This feature is enabled if you select log or remove.

Return Code Reset

Select this checkbox to enable reset.

Reset Time after Threshold

Number of seconds to wait before the processing can resume.


From this dialog box, you can do the following:

Click Add to add match conditions. For more information, see "Adding and Editing Match Conditions for a Return Code Map" section.

Select a row and click Delete to delete a match condition.

Adding and Editing Match Conditions for a Return Code Map


Step 1 Do one of the following:

Click Home at the top of the window and click Policies under Services Dashboard.

Or:

Click Setup from the task bar and click Policies in the Setup pane.

Step 2 Select Maps > Return Code Map from the object selector.

Step 3 Click Add. The Add Return Code Map dialog box appears.

Step 4 Click Add in the dialog box to add match conditions for the selected type of return code map. The Match Conditions for Return Code Maps dialog box appears, displaying the following columns.

Column
Description

Lowest Return Code

Enter the lowest return code.

Note You cannot configure overlapping return codes.

Highest Return Code

Enter the highest return code. Maximum number of return codes that can be configured is 100.

Note You cannot configure overlapping return codes.

For example, if you are already using 100-116,200-216, you cannot configure more than
(100 - (116-100+1) - (216-200_1)) = 66. You are limited to 300 - 365. If you add 300 - 366, an error message will appear.

Action for Return Code

The action for the return code. It can be one of the following:

Count—Specifies the number of occurrences of return codes received.

Log—Specifies where syslog messages are sent when a threshold is reached.

Remove—Specifies where the syslog messages are sent when a threshold is reached and the server is removed from service.

Return Code Instances

Enter the instances of the return code.

Return Code Reset

Select this check box to enable reset time after threshold.

Reset Time after Threshold

Enter the number of seconds to wait before the processing can resume.


Viewing URL Maps


Step 1 Do one of the following:

Click Home at the top of the window and click Policies under Services Dashboard.

Or:

Click Setup from the task bar and click Policies in the Setup pane.

Step 2 Select Maps > URL Maps from the object selector. The following fields appear:

Column
Description

Map Name

The name of the map

Associated Policies

Policies associated with the map.


Step 3 When you select a map, the match conditions for the map appears:

Column
Description

URL Method

Specifies the URL Method to match.

URL

Specifies the URL associated with the map.


From the URL Map dialog box, you can do the following:

Click Add to add a new URL Map. For more information, see Adding a URL Map.

Select a row and click Delete to delete a URL Map.

From the Match Conditions pane, you can do the following:

Click Add to add match conditions by specifying the URL method and URL. For more information, see Adding a URL Map.

Select a URL expression and click Edit to edit the match conditions to edit the URL.

Select a URL expression and click Delete to delete a match condition.

Adding a URL Map


Step 1 Do one of the following:

Click Home at the top of the window and click Policies under Services Dashboard.

Or:

Click Setup from the task bar and click Policies in the Setup pane.

Step 2 Select Maps > URL Maps from the object selector.

Step 3 Click Add. The Add URL Map dialog box appears, displaying the following columns:

Column
Description

URL Map Name

Enter the URL map name.


Step 4 To add the match conditions for the URL map, click Add. The Add URL Conditions dialog box appears, displaying the following columns.

Column
Description

URL Method

Click and from the list, select or enter a URL method to match.

URL

Enter the URL associated with the map.


Viewing Header Maps


Step 1 Do one of the following:

Click Home at the top of the window and click Policies under Services Dashboard.

Or:

Click Setup from the task bar and click Policies in the Setup pane.

Step 2 Select Maps > Header Maps from the object selector. The Header Maps table appears, displaying the following columns:

Column
Description

Map Name

The name of the header map.

Associated Policies

The policies associated with the header map.


Step 3 When you select a header map, the following columns appear in the Match Conditions/Insert Conditions pane:

Column
Description

Header Name

Name of the generic field in the HTTP header.

Header Value

Header value string to insert in the request.


When receiving an HTTP request, you can specify the name of the field and the corresponding value for the CVDM-CSM to match.


Note CVDM-CSM allows you to specify one or more fields in the HTTP header for policy matching. When you configure multiple fields in a single HTTP header group, all of the expressions in this group must match in order to satisfy this criteria.


For more information on HTTP Header Insert, see HTTP Header Insert.

From this dialog box, you can do the following:

Click Add to add a new header map. For more information, see Adding a Header Map.

Select a map and click Delete to delete a header map.

Click Add under the Match Conditions/Insert Conditions pane, to add match condition by entering the header name and value. For more information, see Adding a Header Map.

Click Edit under the Match Conditions/Insert Conditions pane to edit the match conditions.

Select a match condition, and click Delete under the Match Conditions/Insert Conditions pane, to delete a match condition.

HTTP Header Insert

The HTTP header insert feature provides CVDM-CSM with the ability to insert information, such as the client's IP address, into the HTTP header. This is useful when CVDM-CSM performs source NAT and the application on the server side requires client information.

Specify the header name and value to insert information into the HTTP header. You can also use the %is and %id special parameters for header values. The %is value inserts the source IP into the HTTP header and the %id value inserts the destination IP into the header. You can specify each special parameter once per header map.


Note A header map may contain multiple insert headers. If you insert header values that are made of multiple keywords that includes spaces, you must use double quotes around the entire expression.


Adding a Header Map


Step 1 Do one of the following:

Click Home at the top of the window and click Policies under Services Dashboard.

Or:

Click Setup from the task bar and click Policies in the Setup pane.

Step 2 Select Maps > Header Maps from the object selector.

Step 3 Click Add. The Add header map dialog box appears.

Column
Description

Header Map Name

Enter a header name.


Step 4 Do one of the following:

Click the Match Conditions tab. A table appears, displaying the following.

When receiving an HTTP request, you can specify the name of the field and the corresponding value for the CVDM-CSM to match.


Note CVDM-CSM allows you to specify one or more fields in the HTTP header for policy matching. When you configure multiple fields in a single HTTP header group, all of the expressions in this group must match in order to satisfy this criteria.


Column
Description

Header Name

Name of the generic field in the HTTP header.

Header Value

Header value string to insert in the request.


From this dialog box, you can do the following:

Click Add to add match conditions. The Add Header Insert Conditions dialog box appears and allows you to enter the header name and value

Select a match condition and click Delete to delete it.

Click the Insert Conditions tab. A table appears, displaying the following.

Column
Description

Header Name

Name of the generic field in the HTTP header.

Header Value

Header value string to insert in the request.


For more information on HTTP Header Insert, see HTTP Header Insert.

From this dialog box, you can do the following:

Click Add to add match conditions. The Add Header Match Conditions dialog box appears and allows you to enter the header name and value.

Select a match condition and click Delete to delete it.


hometocprevnextglossaryfeedbacksearchhelp

Posted: Fri Apr 15 02:32:20 PDT 2005
All contents are Copyright © 1992--2005 Cisco Systems, Inc. All rights reserved.
Important Notices and Privacy Statement.