|
|

This chapter describes how to manually configure internal corporate IP addresses on a Cisco Secure VPN Client (VPN Client). With manual configuration, you can assign a static, internal IP address to a client, making it easier to administer IP Security Protocol (IPSec) policy from the Cisco router (gateway) to the VPN Client.This chapter includes the following sections:
 |
Note Throughout this chapter, there are numerous configuration examples that include unusable IP addresses, passwords, and public key examples. Be sure to use your own IP addresses, passwords, and public keys when configuring your VPN Clients and gateway. |
To configure manual configuration between a VPN Client and a Cisco router, perform the following tasks:
To specify an internal network address on a VPN Client, perform the following tasks:
To open the Security Policy Editor
Click Start>Programs>Cisco Secure VPN Client>Security Policy Editor.
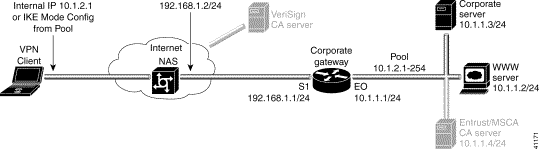
The SafeNet/Soft-PK Security Policy Editor window appears, as shown in Figure 3-2. Table 3-2 describes the field descriptions for the SafeNet/Soft-PK Security Policy Editor.
| Field | Description |
|---|---|
Security Policy Editor | This window establishes connections and their associated proposals, and lists connections in a hierarchical order that defines an IP data communications security policy. |
Other Connections | This object is a policy, or a default connection, and the first step in establishing security policies for individual connections. |
Connection Security | Under Connection Security, you can define IP access for this connection using Secure, Non-secure, and Block options. |
|
|
|
|
|
|
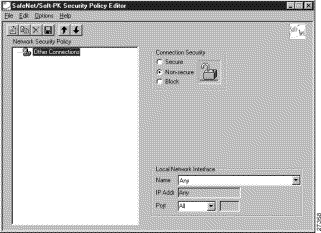
To open and define Global Policy Settings
The Global Policy Settings window appears, as shown in Figure 3-3. Table 3-2 describes the field descriptions for the Global Policy Settings window.
Step 2 Select the Allow to Specify Internal Network Address check box, and then click OK.
| Field | Description |
|---|---|
Global Policy Settings | Using this window, set preferences for all transmissions. |
Retransmit Interval (seconds) | In this box, specify the amount of time your computer waits before it retransmits a protocol packet to which a device has not responded. The default interval is 15 seconds. |
Number of retries | In this box, specify the number of times your computer retransmits a protocol packet before abandoning the exchange. The default is 3 retries. |
Send status notifications to peer hosts | If selected, this check box sends messages that inform communicating parties whether their security proposals have been accepted or rejected, and the timeout periods. |
Enable Non-IP Connections | If selected, this option allows your computer to transmit non-IP data without security. As a default, the VPN Client secures IP data and discards all non-IP data. |
Allow to Specify Internal Network Address | If selected, this option allows you to enter the exact IP address under My Identity. An internal network address is the actual IP address for the VPN Client behind a network firewall. Use this option to specify that you want to indicate an internal network address. This allows you to enter the IP address in the Network Security Policy window under My Identity in the Internal Network IP Address box. |
To configure a new gateway for a security policy on a VPN Client, perform the following tasks:
To create a new connection
Step 2 On the File menu, click New Connection.
Step 3 In the left pane, the default New Connection placeholder appears for the New Connection pane.
Step 4 Select New Connection, and in its place, define a unique name for the connection to your gateway.
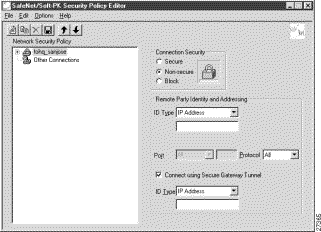
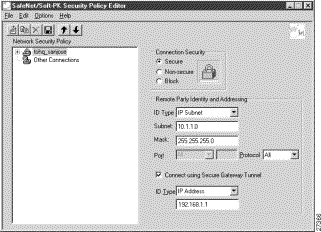
For example, if your router name is hq_sanjose, you might rename the connection tohq_sanjose, as shown in Figure 3-4. Table 3-3 describes the field descriptions for the New Connection pane.
The new connection pane appears.
Step 2 In the right pane, under Connection Security, click Secure.
Step 3 In the right pane, under Remote Party Identity and Addressing, enter the following:
a. In the ID Type list, click IP Subnet.
b. In the Subnet box, enter the IP address of your corporate subnet. In this example, the IP address of the corporate subnet, 10.1.1.0 is entered.
c. In the Mask box, enter the subnet mask of the IP address of your corporate subnet. In this example, the subnet mask of the corporate subnet, 255.255.255.0 is entered.
d. The Port list and box are inactive as a default. In the Protocol list, click All.
e. Select the Connect using Secure Gateway Tunnel check box.
f. In the ID_Type list, click IP Address. In the ID_Type box, enter the IP address of the secure gateway. In this example the secure gateway, 192.168.1.1 is entered.
Figure 3-5 shows how this is displayed on the New Connection pane. Table 3-3 describes the field descriptions for the New Connection pane.
| Field | Description |
|---|---|
Network Security Policy | Under Network Security Policy, the proposals that will be used to negotiate the authentication and encryption methods are displayed. |
|
|
|
|
Connection Security | Under Connection Security, you can define IP access for this connection. |
| |
|
|
|
|
Remote Party Identity and Addressing | Under Remote Party Identity and Addressing, define the IPSec peer with which the VPN Client will establish a secure tunnel. |
ID Type | This list displays options for defining the IPSec peer identity including IP address, domain name, email address, IP subnet, IP address range, and distinguished name. Depending on the option you choose, different values will appear in the right pane. |
|
|
|
|
|
|
|
|
|
|
|
|
|
|
|
|
|
|
|
|
|
|
|
|
|
|
|
|
|
|
|
|
|
|
Port | This list shows the IPSec peer's protocol ports. A default of All secures all protocol ports. |
If selected, this check box specifies that the IPSec peer is protected by a secure IPSec-compliant gateway, such as a firewall. | |
ID_Type | This list shows the identification type of the gateway including IP address, domain name, and distinguished name. Depending on the option you choose, different values will appear in the right pane. |
|
|
|
|
|
|
|
|
|
|
|
|
|
|
|
|
To specify the remote party's identity on a VPN Client, perform the following tasks:
To choose an identity
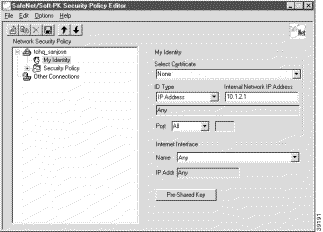
The new connection expands with My Identity and Security Policy.
Step 2 Click My Identity.
The My Identity pane appears in the right pane.
Step 3 In the right pane, under My Identity, enter the following:
a. If you are using digital certificates, select your digital certificate in the Select Certificate list. If you are not using digital certificates, then leave this field as-is.
b. In the ID_Type list, click IP Address.
c. In the Internal Network IP Address box enter VPN Client static IP address. In this example, 10.1.2.1 is entered.
d. In the Port list, click All.
e. In the Name list, click Any. The IP Addr list is inactive as a default.
f. If you are using pre-shared keys, click Pre-shared. Enter the key to be used during the Authentication Phase. Click OK when done. If you are not using pre-shared keys, then leave this field as-is.
Figure 3-6 shows how this is displayed on the My Identity pane. Table 3-4 describes the field descriptions for the My Identity pane.
| Field | Description |
|---|---|
My Identity | This pane allows you to specify the identity of the VPN Client. Choose an identification that will allow the IPSec peer to identify you during the key exchange phase in the My Identity pane. |
My Identity | Under My Identity, specify options for determining the identity of the VPN Client. These options include selecting certificate or pre-shared key, ID Type, and Port. |
If you are using digital certification, this list displays all the available digital certificates from which to choose. If you are not using digital certification, None is the default option. | |
This list indicates the IP address option for the VPN Client on the corporate subnet. | |
| |
This list shows the VPN Client's protocol ports. A default of All secures all protocol ports. | |
Local Network Interface or Internet Interface | Under Local Network Interface or Internet Interface, the hardware interface on the PC or laptop through which the connection will be established. |
Name | This list indicates the name of the hardware interface. A default of Any enables all hardware interfaces. |
IP Addr | A default of Any enables all hardware interface IP addresses. |
The Pre-shared Key button enables the Pre-shared Key window. To specify a pre-shared key or a wildcard pre-shared key, enter the key to be used during the Authentication Phase in the Pre-shared Key window. |
To specify authentication
To configure manual configuration on the gateway, perform the following tasks:
To configure the gateway, perform the following tasks, as described in Table 3-5:
| Command | Purpose |
|---|---|
router> enable
| To enter privileged EXEC mode, enter the enable user EXEC command. |
router# configure terminal
Enter configuration commands, one per line. End with CNTL/Z.
| To enter global configuration mode, enter the configure privileged EXEC command. To configure the terminal attached at console port, enter the terminal keyword. |
router(config)# ip domain-name example.com
| To define a default domain name that the Cisco IOS software uses to complete unqualified host names, use the ip domain-name global configuration command. An unqualified host name is a host name without a dotted-decimal domain name. In this example, example.com is defined as the default domain name. |
router(config)# hostname hq_sanjose
| To specify or modify the host name for the network server, enter the hostname global configuration command. The host name is used in prompts and default configuration filenames. In this example, hq_sanjose is defined as the host name. The hq_sanjose host name replaces the default router host name. |
hq_sanjose(config)# ip name-server 192.168.1.1
| To specify the address of a name server to use for name and address resolution, enter the ip name-server global configuration command. In this example, the gateway is defined as the IP name server. The gateway's IP address is 192.168.1.1. |
To define an IPSec transform set on the gateway, perform the following tasks, as described in Table 3-6:
| Command | Purpose | ||
|---|---|---|---|
| To define a combination of security associations to occur during IPSec negotiations, enter the crypto ipsec transform-set global configuration command. This command invokes the crypto transform (cfg-crypto-trans) configuration mode. In this example, the transform set named vpn-transform is defined with two security algorithm keywords: esp-des and ah-md5-hmac.
| ||
| To specify IPSec encapsulation between the gateway and the VPN Client, enter the mode crypto transform configuration command. The mode command is only applicable to traffic whose source and destination addresses are the IPSec peer addresses; it is ignored for all other traffic. (All other traffic is in tunnel mode only.) In this example, the tunnel mode is configured for vpn-transform for an IPSec encrypted tunnel. | ||
| To exit crypto transform (cfg-crypto-trans) configuration mode, enter the exit crypto transform configuration command. |
To define a dynamic crypto map, perform the following tasks, as described in Table 3-7:
| Command | Purpose | ||
|---|---|---|---|
hq_sanjose(config)# crypto dynamic-map vpn-dynamic 1
| To define a dynamic crypto map entry, enter the crypto dynamic-map command. This command invokes the crypto map (config-crypto-map) configuration mode. In this example, the dynamic map name is vpn-dynamic, and the sequence number (or priority) is 1. | ||
hq_sanjose(config-crypto-map)# set transform-set vpn-transform
| To specify which transform sets are allowed for the crypto map entry, enter the set transform-set crypto map configuration command. In this example, the transform set previously defined in "Defining an IPSec Transform Set," vpn-transform is applied to the vpn-dynamic dynamic crypto map.
| ||
hq_sanjose(config-crypto-map)# match address 101
| To specify an extended access list for a crypto map entry, enter the match address crypto map configuration command. This access list determines which traffic should or should not be protected by IPSec. If this is configured, the data flow identity proposed by the IPSec peer must fall within a permit statement for this crypto access list. If this is not configured, the router will accept any data flow identity proposed by the IPSec peer. However, if this is configured but the specified access list does not exist or is empty, the router will drop all packets. | ||
hq_sanjose(config-crypto-map)# exit
| To exit crypto map (config-crypto-map) configuration mode, enter the exit crypto map configuration command. |
To define a static crypto map, perform the following tasks, as described in Table 3-8:
| Command | Purpose | ||
|---|---|---|---|
hq_sanjose(config)# crypto map vpnclient 1 ipsec-isakmp vpn-dynamic
| To define a static crypto map and add a dynamic crypto map set to a static crypto map set, enter the crypto map global configuration command. In this example, the vpn-dynamic dynamic map (child) is applied to the vpnclient static crypto (parent) map. | ||
hq_sanjose(config)# access-list 101 permit ip 192.168.1.1 255.255.255.0 host 10.1.2.1
| To permit all IP traffic between the host and the gateway, use the extended version of the access-list global configuration command.
All IP traffic is permitted between the two IPSec peers. | ||
hq_sanjose(config)# crypto map vpn-dynamic local-address loopback0
| To specify and name an identifying interface to be used by the dynamic crypto map for IPSec traffic, use the crypto map local-address global configuration command. In this example, the address that the IPSec will use on the gateway interfaces is loopback0. The loopback0 interface is specified as the local IP address for encryption on the gateway. |
For more information on manual configuration, refer to the "Manual Configuration (Static IP Addressing)" section in "Case Study for Layer 3 Authentication and Encryption."
For more information on configuring Cisco IOS software commands, refer to the "Cisco IOS Software Documentation Set" section in the "Preface."
![]()
![]()
![]()
![]()
![]()
![]()
![]()
![]()
Posted: Thu Jul 27 18:11:53 PDT 2000
Copyright 1989-2000©Cisco Systems Inc.