|
|

This chapter describes how Cisco Secure VPN Client interoperates with Cisco networking devices using digital certificates in certification authority (CA) and Registration Authority (RA) modes with file-based enrollment and Simple Certificate Enrollment Protocol (SCEP). Using IPSec, digital certificates allow devices to be automatically authenticated to each other without manual key exchanges. This chapter includes the following sections:
 |
Note Throughout this chapter, there are numerous configuration examples that include unusable IP addresses, passwords, and public key examples. Be sure to use your own IP addresses, passwords, and public keys when configuring your VPN Clients and gateway. |

 |
Note Before configuring digital certification, it is recommended you configure pre-shared key authentication to establish VPN connectivity for debugging purposes. Once you have successfully established the VPN, then you can implement digital certification. For details on configuring pre-shared keys, refer to "Configuring a Pre-Shared Key or Wildcard Pre-Shared Key." |
To import the root CA certificate on the VPN Client, perform the following steps:
To open the My Certificates folder
Click Start>Programs>Cisco Secure VPN Client>Certificate Manager.
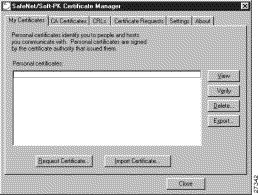
The SafeNet/Soft-PK Certificate Manager dialog box appears with the My Certificates folder as a default, as shown in Figure 6-2. Table 6-1 describes the field descriptions for the My Certificates folder.
| Field | Description | ||
|---|---|---|---|
Certificate Manager | This folder allows you to request, import, and store the digital certificates that you receive from the certification authority (CA). There are two types of digital certificates: root CA certificates and personal certificates. | ||
My Certificates | This folder shows the available personal certificates and provides options for certificate management. | ||
Personal certificates | This box lists the personal digital certificates available for this VPN Client. You must have your own personal digital certificate from a CA, which verifies your identity to the IPSec peers with which you will communicate.
| ||
|
| ||
|
| ||
|
| ||
|
| ||
|
| ||
|
|
To open the CA Certificates folder
Click the CA Certificates tab.
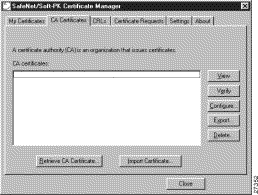
The CA Certificates Folder appears as shown in Figure 6-3. Table 6-2 describes the field descriptions for the CA Certificates folder.
| Field | Description | ||
|---|---|---|---|
CA Certificates | This folder allows you to retrieve, import, view, verify, configure, export, or delete the certificates you receive from the CA. | ||
CA certificates | This box lists the root CA digital certificates available for this VPN Client. Each CA you contact must provide you with its own root CA digital certificate, which verifies its identity.
| ||
|
| ||
|
| ||
|
| ||
|
| ||
|
| ||
|
|
To import the Root CA certificate
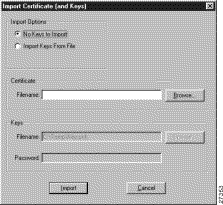
The Import Certificate (and Keys) dialog box appears as shown in Figure 6-4. Table 6-3 describes the field descriptions for the Import Certificate (and Keys) dialog box.
Step 2 Under Import Options, click the No Keys to Import option.
Step 3 Under Certificate, click Browse.
| Field | Description |
|---|---|
Import Certificate (and Keys) | This dialog box allows you to import a previously exported digital certificate or to import a recently downloaded digital certificate. Use this dialog box to obtain the root CA file from the system administrator, who should also supply you with the URL for IPSec CSR enrollment. The system administrator receives the root CA file and URL from the CA Administrator. |
Import Options | Under Import Options, specify whether or not you want to import your keys by indicating either the No Keys to Import option or the Import Keys From File option. |
|
|
|
|
Certificate | Under Certificate, specify the location of the certificate file using the Filename box. |
| This box allows you to enter the certificate file's drive, directory, and filename, or use Browse to find it. |
Keys | Under Keys, you can specify the location of the certificate file with keys. |
|
|
|
|
|
|
The Open dialog box appears, as shown in Figure 6-5. Use the Open dialog box to locate the root CA file on your hard drive. Open the root CA file for importing to the CA Certificates folder.
Step 2 In the Files of Type list, click Base64 encoded certificate files.
Step 3 Locate the root CA file (the .cer file), and then click Open.
The Import Certificate (and Keys) dialog box reappears, as shown in Figure 6-4.
Step 4 To add the certificate to the root store, click Import.

To create a public and private key pair, perform the following tasks:
To open the My Certificates folder
Click Start>Programs>Cisco Secure VPN Client>Certificate Manager.
The SafeNet/Soft-PK Certificate Manager dialog box appears with the My Certificates folder as a default, as shown in Figure 6-2. Table 6-1 describes the field descriptions for the My Certificates folder.
 |
Note You must have your root CA certificate before requesting a personal certificate. Otherwise, only a file-based request is possible. |
To specify On-line Certificate Request
 |
Note To configure an online enrollment, you must click the CA Certificate tab in the Certificate Manager dialog box, and retrieve a CA certificate first. |
Step 2 In the Online Certificate Request dialog box, fill in the sections based on the identity of the owner of the certificate, and then click OK.
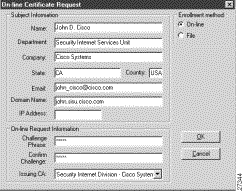
Figure 6-6 shows how these sections can be specified. Be sure to use your own identity specifications.
The client will generate public/private key pairs.
 |
Note This information binds your identity to a public key that others will look for in a public key directory. Entering inaccurate or misleading information defeats the purpose of using public key. |
| Field | Description |
|---|---|
On-line Certificate Request | This dialog box allows you to specify public and private key pairs and enroll your personal certificate online. You can configure a certificate request for online or file-based enrollment. |
Subject Information | Under Subject Information, specify the identity of the certificate owner, including Name, Department, Company, State, Email, Domain Name, and IP Address options. |
|
|
|
|
|
|
|
|
| |
|
|
|
|
Online Request Information | Under Online Request Information, fill in the Challenge Phrase, Confirm Challenge, and Issuing CA box. |
|
|
|
|
|
|
To import the signed digital certificate on the VPN Client, perform the following steps:
To open the My Certificates folder
Click Start>Programs>Cisco Secure VPN Client>Certificate Manager.
The SafeNet/Soft-PK Certificate Manager dialog box appears with the My Certificates folder as a default, as shown in Figure 6-2. Table 6-1 describes the field descriptions for the My Certificates folder.
To import the signed digital certificate
 |
Note The CA Administrator should have sent you a signed digital certificate through email. |
Step 2 In the Import Certificate (and Keys) dialog box, select the No Keys to Import option.
Step 3 Under Certificate, click Browse.
To locate and import the signed digital certificate
The Open dialog box appears, as shown in Figure 6-5.
Step 2 In the Files of Type list, click Base64 encoded certificate files.
Step 3 Add your signed digital certificate, and then rename the file with a ".cer" filename extension.
Step 4 Select your signed digital certificate, and then, click Open.
The Import Certificate (and Keys) dialog box reappears.
Step 5 Click Import.

To confirm signed digital certificate
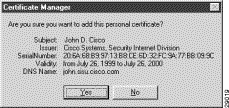
After clicking Import, the Certificate Manager dialog box appears displaying the personal certificate to be added, as shown in Figure 6-8. To confirm that you want to add this personal certificate, click Yes.
To configure a new gateway for a security policy on a VPN Client, perform the following tasks:
To open the Security Policy Editor
Click Start>Programs>Cisco Secure VPN Client>Security Policy Editor.
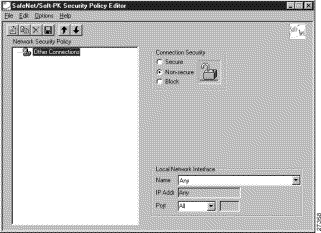
The SafeNet/Soft-PK Security Policy Editor dialog box appears, as shown in Figure 6-9. Table 6-5 describes the field descriptions for the SafeNet/Soft-PK Security Policy Editor.
| Field | Description |
|---|---|
Security Policy Editor | This window establishes connections and their associated proposals, and lists connections in a hierarchical order that defines an IP data communications security policy. |
Other Connections | This object is a policy, or a default connection, and the first step in establishing security policies for individual connections. |
Connection Security | Under Connection Security, you can define IP access for this connection using Secure, Non-secure, and Block options. |
|
|
|
|
|
|
To configure other connections
In the left pane, Other Connections appears.
The Other Connections pane appears in the right pane. Use the Other Connections as the default for your security policy.
Step 2 In the right pane, under Connection Security, click the Non-Secure option. Leave all other fields as-is.
Figure 6-9 shows how this is displayed on the Other Connections pane. Table 6-6 describes the field descriptions for the Other Connections pane.
To create a new connection
Step 2 On the File menu, click New Connection.
In the left pane, the default New Connection placeholder appears for the New Connection pane.
Step 3 Select New Connection, and in its place, define a unique name for the connection to your gateway.
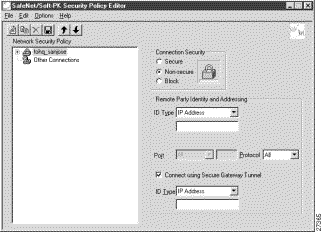
For example, if your router name is hq_sanjose, you might rename the connection tohq_sanjose, as shown in Figure 6-10. Table 6-6 describes the field descriptions for the New Connection pane.
To define the new connection
The New Connection pane appears in the right pane.
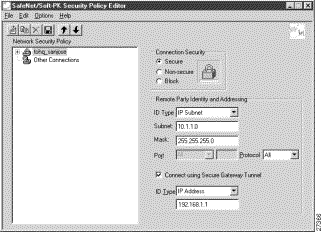
Step 2 In the right pane, under Connection Security, click the Secure option.
Step 3 In the right pane, under Remote Party Identity and Addressing, enter the following:
a. From the ID Type list, click IP Subnet. In this example, the IP address of the corporate subnet, 10.1.1.0 is entered.
b. In the Mask list, enter the subnet mask of the IP address of your corporate subnet. In this example, the subnet mask of the corporate subnet, 255.255.255.0 is entered.
c. The Port list and box are inactive as a default.
d. In the Protocol list, click All.
e. Select the Connect using Secure Gateway Tunnel check box.
f. In the ID_Type list, click IP Address.
g. In the ID_Type box, enter the IP address of the secure gateway. In this example the secure gateway, 192.168.1.1 is entered.
Figure 6-11 shows how this is displayed on the New Connection pane for digital certificates. Table 6-6 describes the field descriptions for the New Connection pane.
| Field | Description |
|---|---|
Network Security Policy | Under Network Security Policy, the proposals that will be used to negotiate the authentication and encryption methods are displayed. |
|
|
|
|
Connection Security | Under Connection Security, you can define IP access for this connection using Secure, Non-secure, and Block options. |
|
|
|
|
|
|
Remote Party Identity and Addressing | Under Remote Party Identity and Addressing, define the IPSec peer with which the VPN Client will establish a secure tunnel. |
ID Type | This list displays options for defining the IPSec peer identity including IP address, domain name, email address, IP subnet, IP address range, and distinguished name. IP subnet is the default option. Depending on the option you choose, different values will appear in the right pane. |
|
|
|
|
|
|
|
|
|
|
|
|
|
|
|
|
|
|
|
|
|
|
|
|
|
|
|
|
|
|
|
|
|
|
Port | This list shows the IPSec peer's protocol ports. A default of All secures all protocol ports. |
Connect using Secure Gateway Tunnel | If selected, this check box specifies that the IPSec peer is protected by a secure IPSec-compliant gateway, such as a firewall. |
ID_Type | This list shows the identification type of the gateway including IP address, domain name, and distinguished name. IP Address is the default option. Depending on the option you choose, different values will appear in the right pane. |
|
|
|
|
|
|
|
|
|
|
|
|
|
|
|
|
To specify the remote party's identity on a VPN Client, you must choose an identity, as follows:
To choose an identity
The new connection expands with My Identity and Security Policy.
Step 2 Click My Identity.
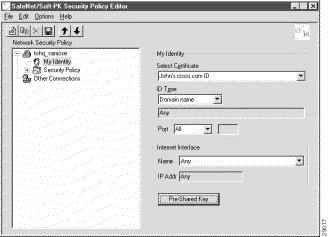
The My Identity pane appears in the right pane. Figure 6-12 shows how this is displayed on the My Identity pane. Table 6-6 describes the field descriptions for the My Identity pane.
Step 3 In the right pane, Under My Identity, select the following:
a. From the Select Certificate list, click your digital certificate. In this example, John's example.com ID is selected.
b. In the ID_Type list, click Domain name.
c. In the Port list, click All.
d. In the Name list, click Any. The IP Addr list is inactive as a default.
| Field | Description |
|---|---|
Network Security Policy | Under Network Security Policy, the proposals that will be used to negotiate the authentication and encryption methods are displayed. |
|
|
My Identity | Under My Identity, specify options for determining the identity of the VPN Client. These options include Select Certificate, ID Type, Port and Name lists. |
Select Certificate | If you are using digital certification, this list displays all the available digital certificates from which to choose. If you are not using digital certification, None is the default option. |
ID_Type | This list indicates the IP address option for the VPN Client on the corporate subnet. |
|
|
This list shows the VPN Client's protocol ports. A default of All secures all protocol ports. | |
Local Network Interface | Under Local Network Interface, the hardware interface on the PC or laptop through which the connection will be established. |
Name | This list indicates the names of the hardware interfaces on the PC or laptop. A default of Any enables all hardware interfaces. |
IP Addr | This list indicates the IP addresses of the hardware interfaces on the PC or laptop. A default of Any enables all hardware interface IP addresses. |
|
To configure authentication on the VPN Client, perform the following tasks:
To specify authentication security policy
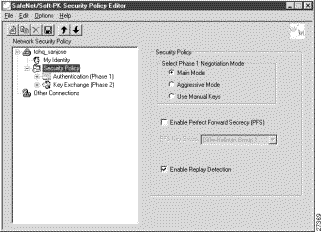
The Security Policy pane appears in the right pane.
Step 2 In the right pane, under Security Policy, select the following:
a. Click Main Mode.
b. Select the Enable Replay Detection check box.
Figure 6-13 shows how this is displayed on the Security Policy pane. Table 6-8 describes the field descriptions for the Security Policy pane.
| Field | Description |
|---|---|
Network Security Policy | Under Network Security Policy, the proposals that will be used to negotiate the authentication and encryption methods are displayed. |
|
|
Security Policy | Under Security Policy, define the Select Phase 1 Negotiation Mode, Enable Perfect Forward Secrecy, or Replay Detection options. |
Select Phase 1 Negotiation Mode | Under Select Phase 1 Negotiation Mode, select the mode for authenticating ISAKMP SAs using Main Mode, Aggressive Mode, or Use Manual Key options. |
| |
| |
| |
When selected, this check box triggers an authentication method protects against repeat compromises of a shared secret key. | |
When selected, this check box sets a counter, which determines whether or not a packet is unique to prevent data from being falsified. |
To specify authentication for Phase 1 IKE
A new proposal appears called Proposal 1.
Step 2 The Proposal 1 pane appears in the right pane.
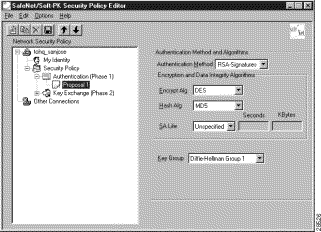
In the right pane, under Authentication Method and Algorithms, from the Authentication Method list, RSA-Signatures displays.
Step 3 In the right pane, under Authentication Method and Algorithms, select the following:
a. In the Encrypt Alg list, click DES.
b. In the Hash Alg list, click MD5.
c. In the SA Life list, click Unspecified.
d. In the Key Group list, click Diffie-Hellman Group 1.
Figure 6-14 shows how this is displayed on the Authentication Phase---Proposal 1 pane for pre-shared key. Table 6-9 describes the field descriptions for the Authentication Phase---Proposal 1 pane for pre-shared key.
| Field | Description | ||
|---|---|---|---|
Network Security Policy | Under Network Security Policy, the proposals that will be used to negotiate the authentication and encryption methods are displayed. | ||
|
| ||
Authentication Method and Algorithms | Under Authentication Method and Algorithms, define the authentication method used and authentication and encryption algorithms. | ||
Authentication Method | This list defines the authentication method being used, either Pre-Shared Key or RSA Signatures. The default is the method of authentication selected under My Identity. | ||
|
| ||
|
| ||
Encryption and Data Integrity Algorithms | Under Encryption and Data Integrity Algorithms, define the algorithms to be used during Phase 1 negotiation including Encrypt Alg, Hash Alg, SA Life, and Key Group. | ||
Encrypt Alg | This list allows you to specify encryption with DES or Triple DES options. | ||
|
| ||
|
| ||
Hash Alg | This list allows you to specify authentication with MD5 and SHA-1 options. | ||
|
| ||
SA Life | (Optional) This list allows you to specify the period for which the IKE SA is valid using Unspecified, Seconds, Kbytes, or Both options.
| ||
|
| ||
|
| ||
|
| ||
|
| ||
Key Group | This list allows you to specify the Diffie-Hellman key exchange using Diffie-Hellman Group 1 or Diffie-Hellman Group 2 options.
| ||
|
| ||
|
|
To specify authentication for phase 2 IKE
In the left pane, under Key Exchange (Phase 2), a new proposal appears called Proposal 1.
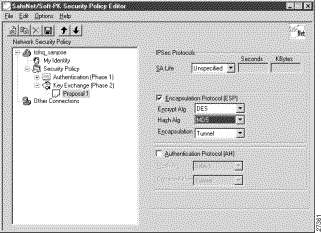
Step 2 In the right pane, under IPSec Protocols, select the following:
a. In the SA Life list, click Unspecified.
b. Select the Encapsulation Protocol (ESP) check box.
c. In the Encrypt Alg list, click DES.
d. In the Hash Alg list, click MD5.
e. In the Encapsulation list, click Tunnel.
| Field | Description | ||
|---|---|---|---|
Network Security Policy | Under Network Security Policy, the proposals that will be used to negotiate the authentication and encryption methods are displayed. | ||
|
| ||
IPSec Protocols | Under IPSec Protocols, define the algorithms to be used during Phase 2 key exchange, including SA Life, Encrypt Alg, Hash Alg, and Encapsulation options. | ||
SA Life | This list allows you to specify the period for which the IKE SA is valid using Unspecified, Seconds, Kbytes, or Both options.
| ||
|
| ||
|
| ||
|
| ||
|
| ||
Encapsulation Protocol | If selected, this check box indicates that encryption and authentication will be selected for this proposal. | ||
Encrypt Alg | This list allows you to specify encryption with DES or Triple DES options. | ||
|
| ||
|
| ||
This list allows you to specify authentication with MD5 or SHA-1 options. | |||
|
| ||
|
| ||
Encapsulation | This list allows you to specify encapsulation method with Tunnel or Transport options. | ||
|
| ||
|
|
To save your policy
The Security Policy Editor dialog box appears. Before your policy is implemented, you must save your policy settings.
Step 2 Click OK.
Figure 6-16 shows how this is displayed in the Security Policy Editor dialog box.

To configure digital certification on the gateway, perform the following steps:
To configure the gateway, perform the following tasks, as described in Table 6-11:
| Command | Purpose |
|---|---|
router> enable
| To enter privileged EXEC mode, enter the enable user EXEC command. |
router# configure terminal
Enter configuration commands, one per line. End with CNTL/Z.
| To enter global configuration mode, enter the configure privileged EXEC command. To configure the terminal attached at console port, enter the terminal keyword. |
router(config)# ip domain-name example.com
| To define a default domain name that the Cisco IOS software uses to complete unqualified host names, use the ip domain-name global configuration command. An unqualified host name is a host name without a dotted-decimal domain name. In this example, example.com is defined as the default domain name. |
router(config)# hostname hq_sanjose
| To specify or modify the host name for the network server, enter the hostname global configuration command. The host name is used in prompts and default configuration filenames. In this example, hq_sanjose is defined as the host name. The hq_sanjose host name replaces the default router host name. |
hq_sanjose(config)# ip name-server 192.168.1.1
| To specify the address of a name server to use for name and address resolution, enter the ip name-server global configuration command. In this example, the gateway is defined as the IP name server. The gateway's IP address is 192.168.1.1. |
To configure ISAKMP on the gateway, perform the following tasks, as described in Table 6-12:
| Command | Purpose |
|---|---|
hq_sanjose(config)# crypto isakmp policy 3
| To define an IKE policy, use the crypto isakmp policy global configuration command. This command invokes the ISAKMP policy configuration (config-isakmp) command mode. IKE policies define a set of parameters to be used during the IKE negotiation. In this example, the ISAKMP policy is assigned a priority of 3. |
hq_sanjose(config-isakmp)# encryption des
| To specify the encryption algorithm, use the encryption (IKE policy) ISAKMP policy configuration command. The options for encryption are the des and 3des keywords. DES is configured by default for minimum security and fastest processing. |
hq_sanjose(config-isakmp)# hash sha
| To specify the hash algorithm, use the hash (IKE policy) ISAKMP policy configuration command. IKE policies define a set of parameters to be used during IKE negotiation. The options for hashing are sha and md5 keywords. SHA is configured by default for maximum authentication with slower processing than MD5. |
hq_sanjose(config-isakmp)# authentication rsa-sig
| To specify the authentication method, use the authentication (IKE policy) ISAKMP policy configuration command. The options for authentication method are rsa-sig, rsa-encr, and pre-share keywords. To specify digital certificates as the authentication method, enter the rsa-sig keyword. |
hq_sanjose(config-isakmp)# exit
| To exit ISAKMP policy configuration (config-isakmp) command mode, enter the exit crypto transform configuration command. |
To configure IPSec on the gateway, perform the following tasks, as described in Table 6-13:
| Command | Purpose | ||
|---|---|---|---|
hq_sanjose(config)# crypto ipsec transform-set vpn-transform esp-des esp-md5-hmac
| To define a combination of security associations to occur during IPSec negotiations, enter the crypto ipsec transform-set global configuration command. This command invokes the crypto transform (cfg-crypto-trans) configuration mode. In this example, the transform set named vpn-transform is defined with two security algorithm keywords: esp-des and esp-md5-hmac.
| ||
hq_sanjose(cfg-crypto-trans)# mode tunnel
| (Optional) To specify encapsulation between the gateway and the VPN Client, enter the mode crypto transform configuration command. The mode command is only applicable to traffic whose source and destination addresses are the IPSec peer addresses; it is ignored for all other traffic. (All other traffic is in tunnel mode only.) The options for encapsulation are tunnel and transport keywords. Tunnel is configured by default for IPSec encapsulation. | ||
hq_sanjose(cfg-crypto-trans)# exit
| To exit crypto transform (cfg-crypto-trans) configuration mode, enter the exit crypto transform configuration command. |
To define a dynamic crypto map, perform the following tasks, as described in Table 6-14:
| Command | Purpose | ||
|---|---|---|---|
hq_sanjose(config)# crypto dynamic-map vpn-dynamic 1
| To define a dynamic crypto map entry, enter the crypto dynamic-map command. This command invokes the crypto map (config-crypto-map) configuration mode. In this example, the dynamic map name is vpn-dynamic, and the sequence number (or priority) is 1. | ||
hq_sanjose(config-crypto-map)# set transform-set vpn-transform
| To specify which transform sets are allowed for the crypto map entry, enter the set transform-set crypto map configuration command. In this example, the transform set previously defined in Configuring IPSec, vpn-transform is applied to the vpn-dynamic dynamic crypto map.
| ||
hq_sanjose(config-crypto-map)# set security-association lifetime seconds 2700
| (Optional) If you want the security associations for this crypto map to be negotiated using shorter IPSec SA lifetimes than the globally specified lifetimes, specify a key lifetime for the crypto map entry. Specify the IPSec lifetimes using one of the following keywords: seconds or kilobytes. In this example, the SA lifetime is 2700 seconds. | ||
hq_sanjose(config-crypto-map)# exit
| To exit crypto map (config-crypto-map) configuration mode, enter the exit crypto map configuration command. | ||
hq_sanjose(config)# crypto map vpnclient 1 ipsec-isakmp vpn-dynamic
| To add a dynamic crypto map set to a static crypto map set, use the crypto map global configuration command. The crypto map entry references the dynamic crypto map sets. Set the crypto map entries referencing dynamic maps to be the lowest priority entries in a crypto map set (that is, have the highest sequence numbers). In this example, the dynamic map vpn-dynamic is added to the crypto map vpnclient. The ipsec-isakmp keyword indicates IPSec and IKE negotiations are being configured. The crypto map vpnclient references the dynamic map vpn-dynamic and has a priority of 1 because this is the only crypto map used for this security policy. Otherwise, a higher priority number would have been assigned to this crypto map. | ||
hq_sanjose(config)# interface ethernet0/0
| To configure an interface, enter the interface global configuration command. This command invokes the interface (config-if) configuration mode. | ||
hq_sanjose(config-if)# ip address 10.1.1.1 255.255.255.0
| To indicate an IP address to the interface, enter the ip address interface configuration command. In this example, 10.1.1.1 is specified as the IP address of the Ethernet 0/0 interface. | ||
hq_sanjose(config-if)# crypto map vpnclient
| To apply a previously defined crypto map set to an interface, enter the crypto map interface configuration command. In this example, crypto map vpnclient is applied to outbound packets from Ethernet interface 0/0. | ||
hq_sanjose(config-if)# exit
| To exit interface (config-if) configuration mode, enter the exit interface configuration command. |
To enroll your certificate with a CA, perform the following tasks, as described in Table 6-15:
| Command | Purpose |
|---|---|
hq_sanjose(config)# crypto ca identity example.com
| To declare the CA your router should use, enter the crypto ca identity global configuration command. This command invokes the ca-identity (cfg-ca-id) configuration mode. In this example, example.com is defined as the domain name for which this certificate is requested. |
hq_sanjose(cfg-ca-id)# enrollment mode ra
| To indicate compatibility with the CA's Registration Authority (RA) system, enter the enrollment mode ra ca-identity configuration command. |
hq_sanjose(cfg-ca-id)# enrollment url http://ca-server
| To specify the CA's location where your router should send certificate requests by indicating the CA's enrollment URL, enter the enrollment url ca-identity configuration command. In this example, http://ca-server is specified as the CA server. |
hq_sanjose(cfg-ca-id)# query url http://ca-server
| To specify Lightweight Directory Access Protocol (LDAP) support, enter the query url ca-identity configuration command. This command is required if your CA supports both RA and LDAP. LDAP is a query protocol used when the router retrieves certificates and CRLs. The default query protocol is Certificate Enrollment Protocol (CEP). In this example, http://ca-server is specified as the LDAP server. |
hq_sanjose(cfg-ca-id)# crl optional
| To allow other peers' certificates to still be accepted by your router even if the appropriate Certificate Revocation List (CRL) is not accessible to your router, use the crl optional ca-identity configuration command. |
hq_sanjose(cfg-ca-id)# exit
| To exit ca-identity (cfg-ca-id) configuration mode, enter the exit ca-identity configuration command. |
To specify a public and private key, perform the following tasks, as described in Table 6-16:
| Command | Purpose | ||
|---|---|---|---|
hq_sanjose(config)# crypto key generate rsa usage-keys
mod 512 [signature key]
mod 512 [encryption key]
| To generate the public and the private keys, enter the crypto key generate rsa global configuration command. This command creates two key-pairs for RSA:
A key-pair refers to a public key and its corresponding secret key. If you do not specify the usage-keys keyword at the end of the command, the router will generate only one RSA key-pair and use it for both digital signatures and encryption. | ||
hq_sanjose(config)# crypto ca authenticate example.com
Certificate has the following attributes:
Fingerprint: 103FXXXX 9D64XXXX 0AE7XXXX 626AXXXX
% Do you accept this certificate? [yes/no]:yes
| To receive the public key and CA server certificate and authenticate the CA (by receiving the CA's certificate), use the crypto ca authenticate global configuration command. In this example, example.com is defined as the domain name for which this certificate is authenticated. At this point the router has a copy of the CA's certificate. In this example, yes is entered to accept the certificate. | ||
hq_sanjose(config)# crypto ca enroll example.com

Start certificate enrollment ..
Create a challenge password. You will need to verbally provide this password to the CA Administrator in order to revoke your certificate. For security reasons your password will not be saved in the configuration. Please make a proper note of it.

Password:cisco1234
Re-enter password:cisco1234

% The subject name in the certificate will be: hq_sanjose.example.com
% Include the router serial number in the subject name? [yes/no]: yes
% The serial number in the certificate will be: 0431XXXX
% Include an IP address in the subject name? [yes/no]: yes
Interface: ethernet0/0
Request certificate from CA? [yes/no]: yes
% Certificate request sent to Certificate Authority
% The certificate request fingerprint will be displayed.
% The 'show crypto ca certificate' command will also show the fingerprint.
Fingerprint:  C767XXXX 4721XXXX 0D1EXXXX C27EXXXX
| To send the gateway's public key and receive a signed certificate from the CA server, enter the crypto ca enroll global configuration command. In this example, example.com is defined as the domain name for which this certificate is received.
At this point, the enrollment request is sent to the CA and is pending for the CA administrator's approval. The router will be polling every 2 minutes for the availability of the certificate. In this example, cisco1234 is entered as the challenge password. Should you choose to revoke your certificate, the CA must be provided with this challenge password. In this example, hq_sanjose.example.com is entered as the name server and domain name to which this digital certificate applies. In this example, yes is entered to indicate the router serial number is to be included in the subject name. The serial number is not used by IPSec or IKE but may be used by the CA to either authenticate certificates or to later associate a certificate with a particular router In this example, yes is entered to indicate the IP address is to be included in the subject name. Normally, you would not include the IP address because the IP address binds the certificate more tightly to a specific entity. Also, if the router is moved, you would need to issue a new certificate. Finally, a router has multiple IP addresses, any of which might be used with IPSec. In this example, the ethernet 0/0 interface for the IP address specified is entered. This interface should correspond to the interface to which you apply your crypto map set. In this example, yes is entered to request the certificate. Wait until the router has retrieved the certificate. The router will display a message informing you that the certificate has been loaded. |
For more information on digital certification, refer to the "Digital Certification" section in "Case Study for Layer 3 Authentication and Encryption."
For more information on configuring Cisco IOS software commands, refer to the "Cisco IOS Software Documentation Set" section in the "Preface."
For more information SCEP, refer to the following URL:
http://www.cisco.com/warp/public/cc/cisco/mkt/security/tech/scep_wp.htm
![]()
![]()
![]()
![]()
![]()
![]()
![]()
![]()
Posted: Thu Jul 27 18:10:45 PDT 2000
Copyright 1989-2000©Cisco Systems Inc.