|
|

This chapter describes tasks you must perform before authorized users can manage DNS zones with the DNM Browser and use the DNM service to coordinate your DNS and DHCP servers. It contains the following sections:
This section describes how to use the CSM to start, stop, and restart the DNM service.
To configure the DNM Server to start automatically or to control access to the DNM Server, see Chapter 2, "Configuring Services with the Cisco Service Manager."
Step 1 Start the CSM.
Step 2 Choose DNM in the Available Services list.
Step 3 Click Start.
Step 1 Start the CSM.
Step 2 Choose DNM in the Available Services list.
Step 3 Click Stop.
Step 1 Start the CSM.
Step 2 Choose DNM in the Available Services list.
Step 3 Click Restart.
The DNM service provides three TCP services, each of which runs on a unique port. Table 4-1 describes these services and their default ports.
| Service | Description | Parameter |
|---|---|---|
| Zone transfer | Listens for and responds to inquiries about the status of a specific zone, and transfers the data for that zone.The default TCP port is 53, which is the default port for DNS zone transfers. | Nameserver-port |
| Domain name management | Listens for domain management commands from authorized users using DNM Browsers or configuring the Cisco DHCP/BootP server. The default TCP port is 704. | Port |
| Hostname server | Listens for and responds to Hostname Server (RFC953) requests to extract an RFC952 HOSTS.TXT file. The default TCP port is 101. | Hostname-server-port |
 | Caution Changing the zone transfer port may make zone transfer unusable by clients. Use the default port whenever possible. |
To change the DNM service ports:
Step 1 Start the CSM.
Step 2 Choose DNM in the Available Services list.
Step 3 Select the StartUp tab.
Step 4 Select the Parameters 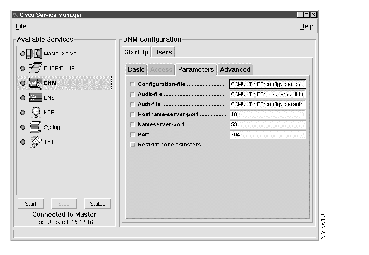
tab.
Step 5 To edit a port parameter, check the checkbox next to the parameter name and enter the port number.
For example, if you are running an authoritative DNS service on the same host as the DNM service, you must configure the DNM service to provide zone transfers on a port other than 53 (usually port 705) because the DNS service uses port 53. You must also configure the DNS service to receive zone transfers on port 705 (see the section titled "Establishing Authority" in Chapter 6, "Configuring the DNS Service"). For more information about choosing ports for DNM service, see Getting Started with Cisco DNS/DHCP Manager.
Step 6 Choose Save Configuration in the File menu.
Your changes take effect after you restart the Master Server.
By default, the DNM service transfers zone data to any DNS server that requests it. If you do not want your DNM Server to transfer zones to DNS Servers that are not authoritative for the zones, configure the DNM Server to restrict zone transfers.
To restrict zone transfers:
Step 1 Start the CSM.
Step 2 Choose DNM in the Available Services list.
Step 3 Select the StartUp tab.
Step 4 Select the Parameters tab.
Step 5 Check the Restrict-zone-transfers checkbox.
Step 6 Choose Save Configuration from the File menu.
Your changes take effect after you restart the Master Server.
The DNM service only accepts management commands from users who are registered in its user database.
This section describes how to:
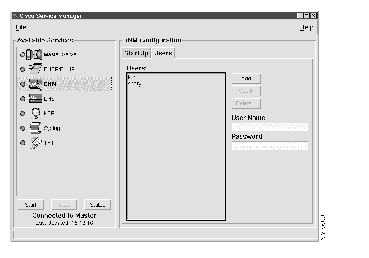
To add a new user entry:
Step 1 Start the CSM.
Step 2 Choose DNM in the Available Services list.
Step 4 Enter the new user's name in the User Name field.
Step 5 Enter the user's password in the Password field.
Step 6 Click Add.
Step 7 Choose Save Configuration from the File menu.
Step 1 Start the CSM.
Step 2 Choose DNM in the Available Services list.
Step 3 Select the Users tab.
Step 4 Select the user entry you want to change in the Users box.
Step 5 Change the user's User Name or Password as desired.
Step 6 Click Modify.
Step 7 Choose Save Configuration from the File menu.
To delete a user entry:
Step 1 Start the CSM.
Step 2 Choose DNM in the Available Services list.
Step 3 Select the Users tab.
Step 4 Select the user you want to delete in the Users box.
Step 5 Click Delete.
Step 6 Click Yes in the Confirmation dialog box.
Step 7 Choose Save Configuration from the File menu.
The DNM service modifies zones when authenticated users send domain management commands using DNM Browsers or when the Cisco DHCP/BootP service sends updated zone information. You can specify a file for logging zone changes.
To maintain a log of zone changes:
Step 1 Start the CSM.
Step 2 Choose DNM in the Available Services list.
Step 3 Select the StartUp tab.
Step 4 Select the Parameters tab.
Step 5 Check the Audit-file checkbox.
Step 6 Enter the pathname of the desired log file. (You must specify an absolute pathname.)
Step 7 Choose Save Configuration from the File menu.
Your changes take effect the when you restart the Master Server.
The DNM service database is maintained in two configuration files as listed in Table 4-2:
| This file | Contains |
|---|---|
| uber.dat | A database of all zones managed by the DNM Server. |
| uberauth.dat | A database of names and passwords for users authorized to manage zones on the DNM Server. |
You can specify a different configuration file for either database, and must specify an absolute pathname.
Step 1 Start the CSM.
Step 2 Choose DNM in the Available Services list.
Step 3 Select the StartUp tab.
Step 4 Select the Parameters tab.
Step 5 To change the zone database file, make sure the Configuration-file checkbox is checked, and enter the desired configuration file absolute pathname in the Configuration-file field.
Step 6 To change the user database file, make sure the Auth-file checkbox is checked, and enter the desired configuration file pathname in the Auth-file field.
Step 7 Choose Save Configuration from the File menu.
Your changes take effect when you restart the Master Server.
The dnm_import program is a command-line utility that imports zone files into the DNM Server. It can import a single zone file, if the file is specified using the -f option, or it can load multiple zones described by a BIND 4.9.5 named.boot file using the -b option.
To import a single zone file with dnm_import under Windows NT:
Step 1 Open a DOS window.
Step 2 Enter the command:
install_dir\MultiNet\dnmimp32 -u username -p password-h hostname -f filename -z zone
Where install_dir is the directory in which you installed the CDDM, username is the user name used to log in to the DNM Server, password is the password used to log in to the DNM Server, hostname is the host name of the host on which the DNM Server is running, filename is the full path and file name of the zone file you want to import, and zone is the default domain name for the zone file being imported.
To import a single zone file with dnm_import under UNIX:
Step 1 Log in as root.
Step 2 Enter the command:
install_dir/CSCOcddm/bin/dnm_import -u username -p password-h hostname -f filename -z zone
where install_dir is the directory in which you installed the CDDM, username is the user name used to log in to the DNM Server, password is the password used to log in to the DNM Server, hostname is the host name of the host on which the DNM Server is running, filename is the full path and file name of the zone file you want to import, and zone is the default domain name for the zone file being imported.
To import zone files described in a BIND 4.9.5 named.boot file under Windows NT:
Step 1 Open a DOS window.
Step 2 Enter the command:
install_dir\MultiNet\dnmimp32 -u username -p password-h hostname -b bootfile
where install_dir is the directory in which you installed the CDDM, username is the user name used to log in to the DNM Server, password is the password used to log in to the DNM Server, hostname is the host name of the host on which the DNM Server is running, and bootfile is the full path and file name of the BIND 4.9.5 named.boot file you want to use to extract zone information for importing multiple zone files.
To import zone files described in a BIND 4.9.5 named.boot file under UNIX:
Step 1 Log in as root.
Step 2 Enter the command:
install_dir/CSCOcddm/bin/dnm_import -u username -p password-h hostname -b bootfile
where install_dir is the directory in which you installed the CDDM, username is the user name used to log in to the DNM Server, password is the password used to log in to the DNM Server, hostname is the host name of the host on which the DNM Server is running, and bootfile is the full path and file name of the BIND 4.9.5 named.boot file you want to use to extract zone information for importing multiple zone files.
|
|