|
|

This chapter describes how to use the DNM Browser to manage DNS zone data. It includes the following sections:
Step 1 On Windows NT or Windows 95, choose DNM Browser from the Cisco Server Suite program group.
On UNIX platforms:
(a) Make sure your DISPLAY environment variable points to your X server.
(b) Execute the command installation_dir/CSCOcddm/bin/dnm_browser,
| Parameter | Description |
|---|---|
| -colormap new | DNM Browser installs a private colormap. This ensures that all colors requested by the DNM Browser display correctly. When this option is used, other applications may appear to have corrupted colors when the pointer focus is on the DNM Browser window. The inverse is also possible: The DNM Browser colors may appear corrupted if the pointer is in any other application. |
| -display display | DNM Browser displays itself on the X Window server that is running on the machine designated by the display variable. This will override any 'DISPLAY' environment variable. |
| -nosplash | DNM Browser does not display initial logo window upon startup. |
The DNM user authentication dialog appears (along with the main Browser 
window):
The Username field contains the default authenticated user name, if one exists.
Step 2 Enter your user name (if it is not already displayed in the dialog) and password. Click OK.
If you do not have a DNM user account, see Chapter 4, "Configuring the DNM Service."
Step 3 If the DNM Server field does not contain the name or IP address of the desired DNM Server, click the Change Server button. The Settings dialog box appears. For information about the DNM Server options in the dialog box, see "Changing DNM Browser Preferences."
Step 4 After the DNM Server authenticates you, it transfers its top-level zone, designated by a dot ("."), to the DNM Browser. The DNM Browser then displays the zone data in the main Browser 
window:
Step 5 You can now browse, add, and edit DNS records, or add new domains as described in the remainder of this chapter.
Step 6 To stop the DNM Browser, choose Exit from the File menu.
When you start the DNM Browser, you are prompted for a user name and password on the default DNM Server. If you choose not to connect to the default DNM Server, you can choose a specific DNM Server after starting the DNM Browser.
This section describes how to:
To connect to a DNM Server with the DNM Browser:
Step 1 Choose DNM Server... from the Options menu.
The Connection tab of the Settings window appears.
Step 2 Enter the IP address or host name of the desired DNM Server in the DNM Server field. Host names do not have to be fully qualified.
Step 3 If desired, enter a user name.
Step 4 Click Connect.
The DNM user authentication dialog appears with the new default DNM Server and user name. You can change the default without connecting to the DNM Server (see "Changing the Default DNM Server and User Name").
Step 5 Enter your DNM user password and click OK.
If you do not have a DNM user account, see Chapter 4, "Configuring the DNM Service."
Step 6 After the DNM Server authenticates you, it transfers its top-level zone (".") to the DNM Browser which displays the zone data in the main DNM Browser window.
You can now browse, edit DNS records, or add domains as described later in this chapter.
To change the default DNM Server or default user name:
Step 1 Choose DNM Server... from the Options menu.
The Connection tab of the Settings window appears.
Step 2 Enter the IP address or host name of the desired DNM Server in the DNM Server field. If you specify a host name, it does not have to be fully qualified.
Step 3 If desired, enter a user name.
Step 4 Click OK, or Apply to make these the default values.
The DNM Browser uses the new default DNM Server and user name when you start it.
When you start the DNM Browser, it provides an outline-style view of the domain name space starting with the root domain ("."). The browser obtains the root zone data via a zone transfer.
Note that not all zone data displayed by the DNM Browser is necessarily accessible via DNS. For example, even though your DNM Server can store data for the zone yoyodyne.com and your DNS name server requests zone transfers for yoyodyne.com, no host will ask your DNS server to resolve names in yoyodyne.com unless the server is advertised as a name server for yoyodyne.com.
To make your zone's data accessible via DNS, you must also establish your DNS server's authority for the zone. For information on configuring DNS servers, see the chapter titled "Configuring the DNS Service."
The DNM Browser's left-to-right, outline representation of the domain name space differs from the traditional "inverted tree" view of the domain name space presented in most DNS books, but offers the advantage of letting you view selected portions of the domain name space in different levels of detail by expanding (showing) and collapsing (hiding) domains with the mouse.
To expand a domain, double-click the domain's icon. For example, double-clicking the "com" icon expands the com 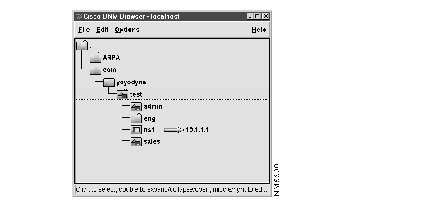
domain:
To collapse an expanded domain, double-click its icon again.
You can continue expanding domains to reveal domains lower in the domain name space. For example, to view the hosts in yoyodyne.com, double-click "com," then double-click "yoyodyne." The DNM Browser also provides a "find" function that lets you specify the name of a domain you want to edit (see "Editing Records").
After the DNM Browser receives a zone data transfer from the DNM Server, it stores the data locally. You can then collapse and expand the domain without causing additional zone transfers. The zone data remains cached until its "time-to-live" (TTL) expires. For details on changing the TTL, see "Adding, Modifying, and Deleting Records."
The DNM Browser lets you manage domains by modifying their DNS records. The icons in the main browser window indicate whether a domain contains other domains and the type of records in each domain. The DNM Browser provides an online legend of icons that you can open from the Help menu (see the following example).
DNM Browser icons give visual clues to the boundaries of zones, and the type of records that are available for the domains they contain. The icons are very useful for identifying sources of DNS problems. For example, if you add a new domain and several subdomains, the new domain must contain an SOA record or the DNM Server will not transfer its data when your DNS servers request it. It is easy to spot the red triangles that indicate SOA records. Similarly, it is easy to spot domains that contain no resource 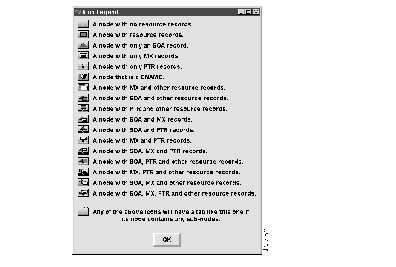
records.
To edit an existing domain's resource records:
Step 1 Open the desired domain's resource record window (see "Opening Domains").
Step 2 Add, modify, or delete records (see "Adding, Modifying, and Deleting Records").
Step 3 Apply or save the edited domains (see "Applying and Saving Edited Domains").
When you save your changes, the DNM Server increases the serial number for the zone containing the domain. Any DNS servers that are secondary for that zone will notice the new serial number at the refresh interval and request a zone transfer from the DNM Server.
There are four ways to open a domain for editing:
When you open a domain, a window named "Modify Resource Records for domain" appears. You can edit the records for the chosen domain in this window. For details, see "Adding, Modifying, and Deleting Records."
When you open a domain, a window named "Modify Resource Records for domain" 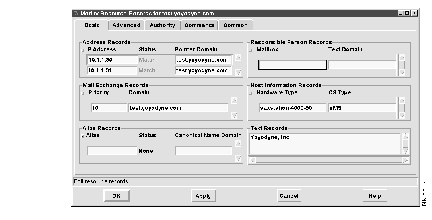
appears:
The DNM Browser organizes resource records in a set of five tabs. Table 5-1 describes each record type and the tab on which it is located.
To edit resource records, enter new data in the fields provided. Some areas of the Edit Resource Records window, such as the Alias Records area, do not display fields for adding data until you click the "+" button. To add records in multi-record areas, click the small "+" button in the top left of the record area; then enter the record data.
On some records types, you can double-click the field where the record data is entered, and the inverse record, if there is one, is displayed. You can see which records allow this by enabling point help. (See About This Guide for information on getting help.) Records on which you can double-click are identified in the status bar. These record types are also identified in Table 5-2.
| Tab | Record Type | Description [and Type of Data to Enter] |
|---|---|---|
| Basic | Alias Records | A list of canonical names (CNAMES) pointing to this domain. Double-clicking displays the inverse record if available. These records are created automatically when CNAME records are added. |
| IP Address Records | A host address [IP-address]. Double-clicking displays the inverse record if available. | |
| Mail Exchange (MB, MG, MINFO, MR and MX) | A mailbox domain name [domain-name], mail group member [domain-name], mailbox or mail list information [request-domain error-domain], mail rename domain name [domain-name], or a mail exchanger [domain name]. Double-clicking displays the inverse record if available. | |
| Responsible Person | Name of network administrator or user responsible for this domain or host. | |
| Host Information (HINFO) | Host information [CPU-type OS-type]. | |
| Text (TXT) | Arbitrary text. | |
| Advanced | Canonical Name Records (CNAME) | The canonical name for an alias [domain-name]. If you select Canonical Name Records, you cannot specify any other resource records. Double-clicking displays the inverse record if available. |
| Pointer (PTR) | A domain name pointer [domain-name]. Double-clicking displays the inverse record if available. | |
| Well Known Service (WKS) | A well known service description. | |
| Unrecognized | Data imported from zone files that contains non-standard records. | |
| Authority | Name Server (NS) | An authoritative name server [domain name]. |
| Start of Authority (SOA) | The start of a zone of authority [domain of originating host, domain address of maintainer, a serial number and the following parameters in seconds: refresh, retry, expire, and minimum time-to-live (see RFC-1035)].
This record contains a button labeled "Reset to Suggested Values." When this button is clicked, default values are entered in the various SOA record fields. | |
| Comments | Comment | An arbitrary description of the domain. |
| Common | Time to Live (TTL) | Duration for which DNS servers store this zone's data. |
At any time, you can apply your resource record changes or save them and close the resource record editor window.
If your changes include data that is incomplete or not valid, the DNM Browser prompts you to correct the errors. If your changes do not include any invalid or incomplete data, the DNM Server stores the modified domain and increases the serial number on the zone containing the domain. The new zone data will be available via DNS the next time a DNS server that is authoritative for the zone checks the zone's serial number and requests a zone transfer. Note that the interval at which DNS servers check zone serial numbers depends on the zone's SOA record refresh value.
The DNM Browser provides two ways to add new hosts, subdomains, and domains to the DNM Server:
To add a new host, subdomain, or domain:
Step 1 Choose Add... from the Edit menu.
The DNM Browser inserts the default domain name, if defined in the Settings dialog box, as the starting point for the new domain name.
Step 2 Enter the complete new host, subdomain, or domain name. For example, instead of entering just whorfin, enter whorfin.yoyodyne.com. If you specify a domain that is in a non-existent domain, the DNM Browser automatically creates the new domain and the new domain's parent domain.
Step 3 By default, the Modify records checkbox is enabled.
Step 4 Click OK. The DNM Browser adds an icon for the new domain.
If the Modify records checkbox is enabled, the new domain's resource record window opens as well. For information on editing domain resource records, see "Editing Records."
To create new domains from existing DNS zone files:
Step 1 Copy the zone files to your DNM Browser host.
Step 2 Choose Import Zone from the File menu.
The Import Zone Files dialog 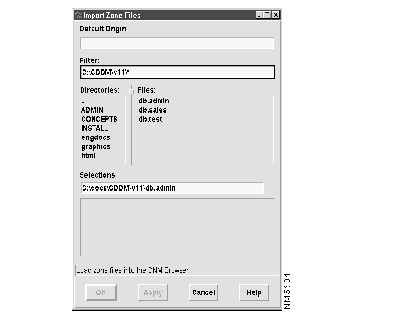
appears:
Step 3 If your zone file does not have an origin statement in it, enter the Default Origin in the Default Origin field.
If the zone file you are importing does not have an origin statement in it, then the origin entered in the Default Origin field is appended to every record in the zone file. For example, if you enter yoyodyne.com in the Default Origin field, then yoyodyne.com is appended to every record in the zone file, putting every record in the yoyodyne.com domain.
Step 4 Double-click a directory in the Directories list. This changes the current directory, and displays the files in that directory in the Files list. Change to the directory where the zone file(s) you want to import are located.
Step 5 In the Files list, click the zone file(s) you want to import. The file(s) appear in the lower Selections list.
Step 6 If you do not want to import a file that is shown in the lower Selections list, click that file, and it will move back into the Files list.
Step 7 When all of the files you want to import are shown in the lower Selections list, click OK.
 | Caution Do not load zone data into an existing domain unless you want to completely replace the existing domain in the DNM service. |
To delete a host, subdomain, or domain from the DNM Server:
Step 1 Browse through the domains to display the host, subdomain, or domain you want to delete.
Step 2 Select the one you want to delete.
Step 3 Choose Delete from the Edit menu.
If the domain contains subdomains ("child" domains), and the Confirm multiple item deletes option in the Settings dialog box is enabled, you are asked if you want to delete the domain and all its children.
Step 4 If prompted, confirm that you want to delete the domain and its children.
The DNM Browser provides a shortcut to the Edit menu. Click with the right mouse button the domain you want to delete. When the Edit pop-up menu appears, choose Delete.
Use the DNM Browser Rename function to change the name of individual domains.
To rename a host, subdomain, or domain:
Step 1 Browse through the domains to display the host, subdomain, or domain you want to rename.
Step 2 Select the host, subdomain, or domain you want to rename.
Step 3 Choose Rename from the Edit menu. The Rename dialog 
appears:
The DNM Browser automatically inserts the old name.
Step 4 Enter the new name.
Step 5 Click OK.
The DNM Browser provides a shortcut to the Edit menu. Click with the right mouse button the domain you want to rename. When the Edit pop-up menu appears, choose Rename.
Use the DNM Browser Reload Domain function to perform a zone transfer for the domain selected in the DNM Browser.
To reload a domain:
Step 1 Browse through the domains to display the domain you want to reload.
Step 2 Click the domain.
Step 3 Choose Reload... from the Edit menu.
The expanded domain is displayed in the Browser main window.
Use the DNM Browser Find Domain function to open the Modify Resource Record window and optionally display the domain in the main browser window.
To find a domain:
Step 1 Choose Find... from the Edit menu.
Step 2 If desired, click Display in Tree to display the domain in the browser main window.
Step 3 Click OK.
The Modify Resource Records window for the domain appears. If the Display in Tree checkbox is enabled, the domain is automatically highlighted in the main browser window.
Use the Cleanup Domain function to ensure the addition of pair records after you have edited entries.
To cleanup a domain:
Step 1 Choose a starting node in the tree displayed in the browser window.
Step 2 Choose Cleanup... from the Edit menu.
Step 3 The DNM Server recursively checks for pair records at the starting node and all sub-nodes. If there is no spouse/pair record, the DNM Server adds one.
For example, the spouse of an A record is a PTR record, and vice versa.
Step 4 The DNM Browser displays a message showing the number of records added.
The DNM Browser lets you export zone data in two formats:
To export a zone as a zone file:
Step 1 Choose Export Zone from the File menu.
The Export Zone Files dialog 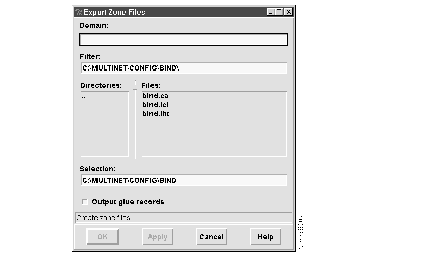
appears:
Step 2 Enter the domain of the zone you want to export in the Domain field.
Step 3 Double-click a directory in the Directories list. This changes the current directory, and displays the files in that directory in the Files list. Change to the directory where you want to export a zone file.
Step 4 In the Selection field, enter the name of the file to which you want to export a zone, or click an existing file in the Files list to overwrite that file.
Step 5 To include glue IP address records for name servers in delegated subzones, make sure the Output glue records checkbox is enabled.
A glue record is an "A" record used to glue the DNS tree together. A zone transfer of a root zone includes in the root zone the "A" records for the name servers in a subdomain of the root even though these records really belong in the subdomain. Such records that are returned out of place are called glue records. Glue records ensure that a lookup of a node in the domain can be resolved by the domain name server.
Step 6 When the file you want to export is shown in the Selection list, click OK.
The DNM Browser Export Zone and Import Zone functions let you copy and paste zones from one DNM Server to another.
Select the domain at the top of the zone you want to copy, then export the zone file. Connect to the DNM Server to which you want to paste the data and import the zone file.
To export a zone as a host table file:
Step 1 Choose Export Hosts from the File menu.
The Export Hosts Files dialog 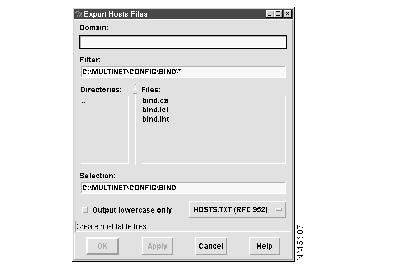
appears:
Step 2 Enter the domain name in the Domain field.
Step 3 Double-click a directory in the Directories list. This changes the current directory, and displays the files in that directory in the Files list. Change to the directory where the you want to export a host file.
Step 4 In the Files list, enter the name of the file to which you want to export hosts, or click an existing file to overwrite that file.
Step 5 Choose "HOSTS.TXT (RFC 952)" for an RFC952-compliant host table or "Unix /etc/hosts" for UNIX-style host table file format from the pop-up menu.
Step 6 To save names in only lowercase characters, enable the Output lowercase only checkbox. The default is to preserve the case as you typed it.
Step 7 Click OK.
The DNM Server lets multiple users modify zones at the same time with the following limitations:
DNM Server currently locked by user user_name at host_name on port port_number.
 | Caution If you are running the Cisco DHCP/BootP service, it will not be able to update the DNM Server while the DNM Server is locked. |
The DNM Browser lets you specify preferences for how it presents information and how it responds when you modify information. The Settings dialog box is shown 
below:
To modify DNM Browser preferences:
Step 1 Choose Settings... from the Options menu. The Settings dialog box appears. Preferences are organized in four tabs in the Settings window.
For descriptions of DNM Browser preferences, see Table 5-3.
Step 2 Edit the DNM Browser preferences as desired.
To save your preferences, click OK or Apply.
| Tab | Parameter | Description |
|---|---|---|
| Options | Require Responsible Person records | Whether the DNM Browser requires that you enter a responsible person record when adding new domains. Default: disabled. |
| Confirm individual item deletes | Whether the DNM Browser prompts you before letting you delete individual domains. Default: disabled. | |
| Confirm multiple item deletes | Whether the DNM Browser prompts you before letting you delete a group of domains. Default: enabled. | |
| Automatically maintain record pairs | Whether the DNM Server makes appropriate changes to a spouse record when a record changes. For example, the spouse of an A record is a PTR record, and vice versa. This also applies to the CNAME and fake *ANAME records. Default: enabled. | |
| Stop at zone boundaries (SOA) | Whether to stop at SOA records that are the zone boundaries when executing commands that operate on trees (for example, the Delete and Cleanup commands in the Edit menu). Default: disabled. | |
| Default Time Interval | The units (seconds, minutes, hours, days, or weeks) in which time entries in the Authority tab of the Edit Resource Records window are displayed. The default time interval is used for the SOA record entries of Refresh, Retry, Expire Time, and Minimum TTL (time-to-live). Default: seconds. | |
| Default Domain | Which domain to use for commands in the Edit menu if no domain is selected in the main Browser window. Default: (none). | |
| Appearance | Treat Delete key as Backspace | Whether the DNM Browser treats the Delete key as a Backspace key. Default: enabled. |
| Font | The font the DNM Browser uses to display all text. Default: (depends on the display). | |
| Connection | DNM Server | The IP address or fully qualified host name of the default DNM Server to which the DNM Browser connects when it starts. Default: localhost (the host on which the DNM Browser is running). |
| Username | The default user name the DNM Browser uses to log in to the default DNM Server. | |
| Server Lock Timeout | The length of time in minutes of inactivity before the DNM Browser unlocks the DNM Server if you have locked it using the Lock Server function. | |
| Records | Import domains with Canonical Name (CNAME) records | Whether the DNM Browser displays domains that contain only canonical names (aliases) for other domains. Default: enabled. |
| Import domains with Mail Exchange (MX) records | Whether the DNM Browser displays domains that contain only mail exchange (MX) records for other domains. Default: enabled. | |
| Import domains with Address (A or AAAA) records | Whether the DNM Browser displays domains that contain only IP address records. Default: enabled. |
|
|