|
|

This chapter describes the Cisco Service Manager. It contains the following sections:
The Cisco Service Manager (CSM) is a graphical utility that lets you easily start, stop, configure, and monitor services.
If you are running the CSM under Windows NT, double-click the CSM icon in the Cisco Server Suite program group to start the CSM, or select it from the Start menu under Windows NT version 4.0.
If you are running the CSM under UNIX, follow the procedure below to start the CSM:
Step 1 Log in as root (or equivalent).
Step 2 To start the CSM, enter the command:
installation_dir/CSCOcddm/bin/csm
where installation_dir is the directory where you installed the Cisco DNS/DHCP Manager or Cisco Server Suite 1000.
To change the CSM display, use one of the following parameters with the csm command:
To stop the CSM, choose Exit from the File menu.
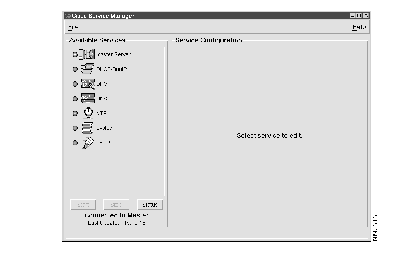
When you first start the CSM, a screen appears from which you are instructed to select a 
service:
A list of the services available to the CSM appears in the Available Services list. Next to the service name, a red or green circle appears indicating whether the service is running. A green circle indicates that the service is running, and red circle indicates a service is not running.
To select a service, click it. The tabs for the selected service appear in the Service Configuration box.
The option tabs for each service are described in the following list.
The CSM lets you start, stop, and restart services or configure services to start automatically. If a service is configured to start automatically, the Master Server starts the service whenever a request is received on the Master Server port.
Step 1 Start the CSM.
Step 2 Choose the service you want to start from the Available Services list.
Step 3 Click Start.
Step 1 Start the CSM.
Step 2 Choose the service you want to stop from the Available Services list.
Step 3 Click Stop.
Step 1 Start the CSM.
Step 2 Choose the service you want to stop and immediately restart from the Available Services list.
Step 3 Click Restart.
You can configure services to start automatically whenever the Master Server is started. To do so:
Step 1 Start the CSM.
Step 2 Choose the service you want to automatically start from the Available Services list.
Step 3 Select the StartUp tab.
Step 5 Choose AUTOMATIC in the Start pull-down menu.
Step 6 Choose Save Configuration from the File menu.
Your changes take effect after you restart the Master Server.
To control access to services, you can configure services to:
To limit access to specific networks or hosts:
Step 1 Start the CSM.
Step 2 Choose the service for which you want to limit access from the Available Services list.
Step 3 Select the StartUp tab.
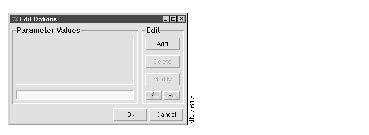
Step 5 You can specify individual hosts or networks, and you can specify whether connections from those hosts or networks should be accepted or rejected depending on the field in which you enter the addresses of the hosts or networks. Click the '...' button next to the field you want to modify.
The Edit Options dialog box 
appears:
Step 6 In the lower field of the Parameter Values group, enter the IP address and subnet mask (if the network or host uses a subnet mask) of the first network or host from which you want to accept connections. For each network or host, enter IP- or IP* followed by the IP address. IP- means that connections are accepted through any port. IP* means connections are only accepted through the privileged ports 0 through 1024.
For networks, the IP address consists of the network number, followed by 0 for the host portion. For example:
IP-161.44.0.0 or IP-161.44.128.0
To specify a subnet mask, use a slash (/) between the IP address and the subnet mask. For example:
IP-161.44.8.64/255.255.255.240
If you do not specify a subnet mask, the default subnet mask for your network is used.
Step 7 Click Add.
Your entry appears in the list box in the Parameter Values group.
Step 8 Repeat Steps 6 and 7 for each network or host from which you want to accept or reject connections.
Step 9 Click OK.
Step 10 If you specified hosts or networks from which to accept connections, choose TRUE from the RejectByDefault pull-down field if you want to specify that connections are accepted only from the networks or hosts you have specified.
Step 11 Choose Save Configuration from the File menu.
Your changes take effect after you restart the Master Server.
To specify the message sent to a host when a connection to the Master Server from that host is refused:
Step 1 Start the CSM.
Step 2 Choose the service from the Available Services list.
Step 3 Select the StartUp tab.
Step 4 Select the Access tab.
Step 5 Enter the message you want sent in the RejectMessage field.
Step 6 Choose Save Configuration from the File menu.
Your changes take effect after you restart the Master Server.
The CSM lets you specify whether to log connections to services. You can specify whether to log accepted connections, and whether to log refused connections.
If you choose to log connections, the connection messages are sent to the default log file. If the Cisco Syslog service is enabled, the default log file is MultiNet\log\info.log under Windows NT or CSCOcddm/log/info.log under UNIX, which is found in the directory in which you installed the CDDM or the Cisco Server Suite 1000.
To specify whether to log accepted connections to a service:
Step 1 Start the CSM.
Step 2 Choose the service from the Available Services list.
Step 3 Select the StartUp tab.
Step 4 Select the Access tab.
Step 5 Choose TRUE from the LogAccepts pull-down field if you want to log accepted connections.
Choose FALSE if you do not want to log accepted connections.
Step 6 Choose Save Configuration from the File menu.
Your changes take effect after you restart the Master Server.
To specify whether to log refused connections to a service:
Step 1 Start the CSM.
Step 2 Choose the service from the Available Services list.
Step 3 Select the StartUp tab.
Step 4 Select the Access tab.
Step 5 Choose TRUE from the LogRejects pull-down field if you want to log refused connections.
Choose FALSE if you do not want to log refused connections.
Step 6 Choose Save Configuration from the File menu.
Your changes take effect after you restart the Master Server.
The CSM lets you change basic information about services. You can change:
 | Caution Making careless changes to the program that executes a service will prevent the service from running. Do not change this field unless you are certain of what you are doing! |
To change the program file that executes the service:
Step 1 Start the CSM.
Step 2 Choose the service from the Available Services list.
Step 3 Select the StartUp tab.
Step 4 Select the Basic tab.
Step 5 Enter the path and filename of the new program in the Program field.
Step 6 Choose Save Configuration from the File menu.
Your changes take effect after you restart the Master Server.
To change the text description of a service:
Step 1 Start the CSM.
Step 2 Choose the service from the Available Services list.
Step 3 Select the StartUp tab.
Step 4 Select the Basic tab.
Step 5 Enter the new description in the Description field.
Step 6 Choose Save Configuration from the File menu.
Your changes take effect after you restart the Master Server.
|
|