|
|

This chapter describes provisioning line card cross connects and includes the following sections:
You can create time division multiplexing (TDM) cross connects on the following line interface modules:
The following list shows which line interface modules in a Cisco 6732 or Cisco 6705 work with specific INDLs:
| CARD | DSO INDL | FDL INDL | AAL5 INDL |
|---|---|---|---|
|
|
|
|
|
|
|
|
|
|
|
|
 |
Note You cannot start a cross connect from an ISDN-BRI/8 line card, an analog line card, or the V.35 port of a T1-2-V35 line card, but these cards can serve as the destination of a cross connect. (See Figure 9-1.) |
 |
Note TDM cross connects cannot be made within the same card. You must drag the cross connect line to a destination other than the originating card. (See Figure 9-2.) |
The following section describes how to create and delete internal TDM cross connects on the NE.
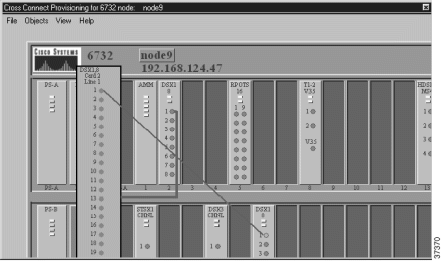
Step 2 Right-click the line and select Display Cross Connect from the pop-up menu. EMS launches an expanded view of the line card and line to be provisioned. (See Figure 9-1.)
If no line exists yet, right-click the LED on the icon of the card and select Display Cross Connect from the pop-up menu.

Step 3 Click and drag from the line icon in the expanded card view to the desired destination line. (See Figure 9-2.) If you are creating a cross connect from a DSX3-CHNL or STSX1-CHNL line card, you can use the pull-down field to select the DS1 to provision. (See Figure 9-3.)
After the visual cross connect is created, EMS launches the cross connect provisioning window. (See Figure 9-4.)

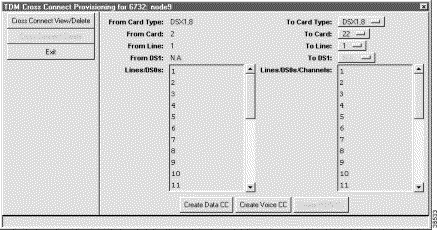
Step 4 Highlight the source DS0s in the Lines/DS0s list on the left side.
Step 5 The To Card Type, To Card, and To Line fields are set to the destination line selected in Step 3. You can change the destination card type, card, and line in the pull-down fields on the right side.
Step 6 Highlight the destination DS0s in the Lines/DS0s/Channels list on the right side.
Step 7 Click Create Data CC, Create Voice CC, or Create ISDN CC to create a data, voice, or ISDN cross connect. EMS confirms the completion of the cross connects with the text "cc" placed next to each successfully provisioned DS0.
Step 8 Click Exit to return to Cisco 6700 NodeView. All the provisioned cross connects are shown. (See Figure 9-5.)

Step 9 Right-click the expanded card display, and select End Cross Connect Display from the popup menu.
You can also use the cross connect provisioning screen to delete cross connects. You can initiate cross connect deletions from the NodeView with cross connects displayed, or from the cross connect provisioning window (select the Cross Connect Provisioning option).
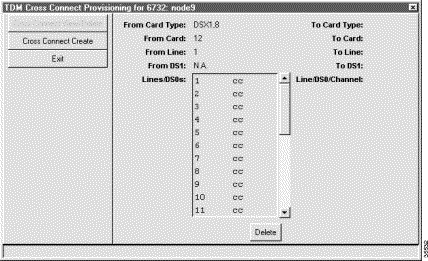
Step 2 From the Lines/DS0 list, highlight the cross connections to be deleted.
Step 3 Click Delete to remove the cross connections. EMS confirms the deletion by removing the "cc" text next to each line.
Step 2 Select End Cross Connect Display.
You can use the bulk DS1 cross connect procedure to cross connect entire DS1 lines within the NE.
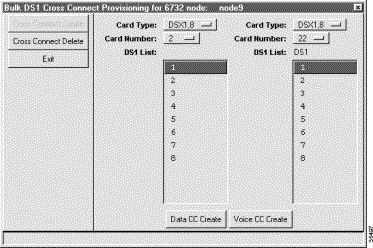
Step 2 Select the Card Type and Card Number for the cross connect source.
Step 3 Highlight the source DS1 lines in the DS1 List on the left side.
Step 4 Select the Card Type and Card Number for the cross connect destination.
Step 5 Highlight the destination DS1 lines in the DS1 List on the right side.
Step 6 Click Create Data CC or Create Voice CC to create a data or voice. EMS confirms the completion of the cross connects with the text "cc" placed next to each successfully provisioned DS1.
Step 7 Click Exit to return to the NodeView. All the provisioned cross connects are shown.
Step 2 Click Cross Connect Delete in the function bar. EMS displays the DS1 cross connect delete window. (See Figure 9-8.)
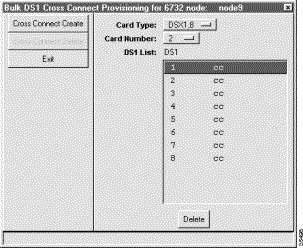
Step 3 From the DS1 List, highlight the cross connects to be deleted.
Step 4 Click Delete to remove the cross connections. EMS confirms the deletion by removing the "cc" text next to each line.
Inter node (remote) cross connects are made from one NE to another NE. Before you can create inter node cross connects, an inter node link must be established between the local and remote nodes. See "Inter Node Links" for more information on provisioning inter node links.
Step 2 Click and drag a line from the local node to the remote node. The line appears as a red arrow pointing to the remote node. (See Figure 9-9.)
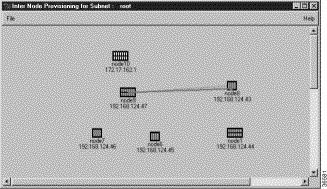
Step 3 EMS displays a path list window, indicating the path that will be used to communicate between the two nodes (Path ID) and the number of nodes that are included in the path (Node Count). (See Figure 9-10.)

Step 4 If more than one path ID appears in the path list, select the desired path between the local and remote node. Click each path ID to show the path (red arrow) in the inter node provisioning window.
Step 5 In the inter node provisioning window, double-click the red arrow. EMS launches the inter node cross connect display, showing the broadband line cards installed in each node. (See Figure 9-11.)
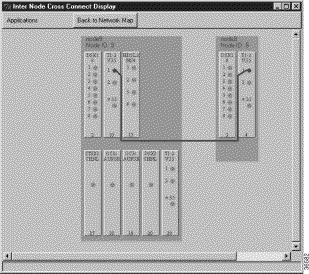
The blue line linking the two nodes is the inter node link. See "Inter Node Links" for more information on provisioning inter node links.
Step 6 Right-click the line icon on the local node, and select Start Inter Node Cross Connect from the popup menu. EMS launches the expanded (cross connect) line card view. (See Figure 9-12.)
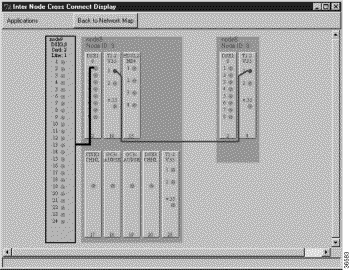
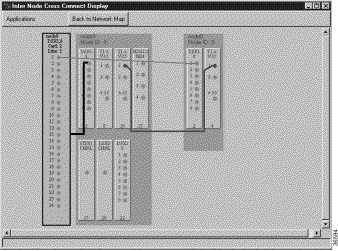
Step 7 Drag a line from the source DS0 to the destination line on the other NE. (See Figure 9-13.) After the visual line is drawn, EMS launches the inter node cross connect provisioning window. (See Figure 9-14.)
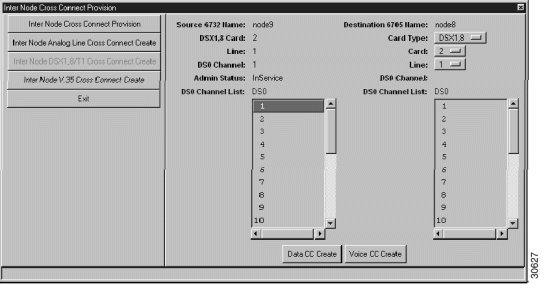
Step 8 In the DS0 Channel List on the left side, select the DS0 lines to be cross connected.
Step 9 Select the destination lines in the DS0 Channel List on the right side.
Step 10 Click Data CC Create or Voice CC Create to create a data or voice cross connection. EMS confirms the completion of the cross connects with the text "cc" placed next to each successfully provisioned line.
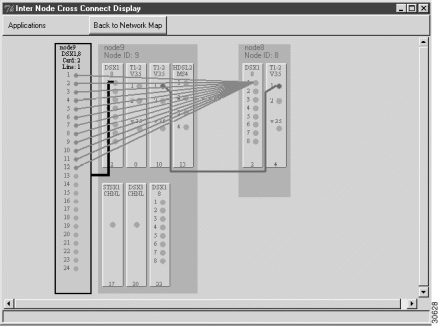
Step 11 Click Exit to return to the inter node cross connect and visually confirm the inter node cross connects. (See Figure 9-15.)
You can also use the inter node cross connect provisioning window to delete cross connects. You can initiate cross connect deletions from the NodeView with cross connects displayed, or from the inter node cross connect provisioning window (select the Inter Node Cross Connect Provision option).

Step 2 From the DS0 Channel List, select the cross connections to be deleted. Click Delete to remove the cross connections. EMS confirms the deletion by removing the "cc" text next to each line.
Step 2 Select End Cross Connect Display.
![]()
![]()
![]()
![]()
![]()
![]()
![]()
![]()
Posted: Mon Feb 5 13:01:39 PST 2001
All contents are Copyright © 1992--2001 Cisco Systems, Inc. All rights reserved.
Important Notices and Privacy Statement.