|
|

This chapter describes provisioning IP on the Cisco IAD1101 and includes the following sections:
EMS uses static IP routes to define paths through the Cisco IAD1101 and across the network. You can assign static IP routes to direct IP traffic on the Ethernet interface, and any T1 lines configured for IP (IP over Frame Relay or IP over PPP).
A static IP route consists of the following information:
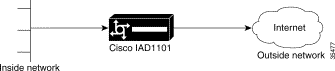
Figure 11-1 shows a sample network, with a Cisco IAD1101 connected to a router over a PPP link.
 |
Note The IP addresses used in this chapter are only for illustration. You must use your own IP addresses, based on your licensing. |
To assign a static route from the Cisco IAD1101 to Host A, over a T1 line, enter the following information:
Network Route:
Default Route:
Host Route:

To assign a static route from the Cisco IAD1101 to Host A, over Ethernet, enter the following information:
Network Route:
Default Route:
Host Route:
Step 2 From the function bar on the left, click the IP & Datalink Route Configuration button. EMS launches the data link route configuration window. (See Figure 11-4.)
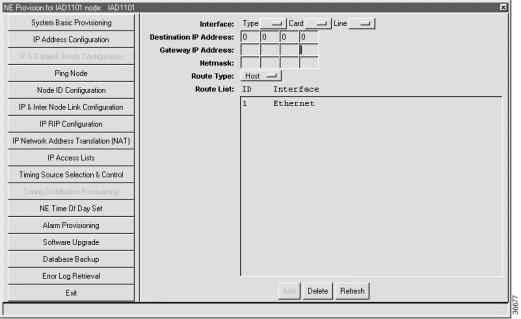
Step 3 Set the following parameters in the data link route configuration window:
Step 4 Click Add when finished.
Step 5 Click the Exit button (on the function bar) to return to the NodeView.
|
Note You can add as many routes as needed, but only one route can be the default route. |

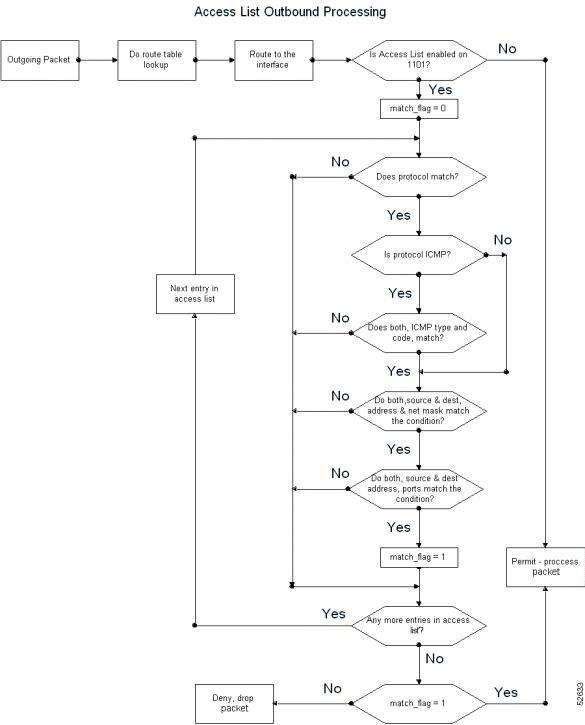
Access lists allow the Cisco IAD1101 to filter incoming or outgoing IP packets based on the following criteria:
|
Note UDP ports 161 and 162 are used for management and alarm traffic, respectively. |
To provision access lists on the NE, complete the following steps starting in the NE provisioning window:
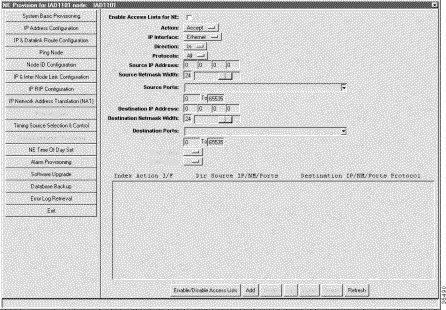
Step 2 Set the following fields to configure the access list:
Step 3 Click Add when finished.
Step 4 Repeat Step 2 and Step 3 to configure additional access lists. You can configure as many as 32 access lists.
Step 5 Click Enable/Disable Access Lists.
 |
Caution EMS rejects traffic on every interface that does not have an access list definition. Before you proceed, you must create at least one entry per interface to accept traffic, or the NE will reject all traffic on the unprovisioned interface, including management traffic. Be sure to enable the SNMP protocol in the access list, and provision an accept statement to allow packets in and out of the interface on UDP port 161. |
Step 6 Click Apply NE Enable to activate access lists.
|
Caution Enabling access lists might prevent user traffic from entering or exiting the NE, including management traffic. |


sun1 ------------------ 
r1 ------------------ 1101 ------------------ r2 ------------------ sun2
There are two ways to provision the access list to block a Telnet session from network 2 (200.200.200.0) to network 1 (10.0.0.0). Method 1 (see Figure 11-9) filters on the inbound interface, preventing the Cisco IAD1101 from routing the packet first, then having to possibly reject it later because of an access list condition. Method 2 (see Figure 11-10) sets up filtering on the outbound interface.
| reject either | out | 200.200.200.0/24/all | 10.0.0.0/8/23 | TCP |
|---|---|---|---|---|
accept 1 | in | 0.0.0.0/0/all | 0.0.0.0/0/all | all |
accept 1 | out | 0.0.0.0/0/all | 0.0.0.0/0/all | all |
accept either | in | 0.0.0.0/0/all | 0.0.0.0/0/all | all |
accept either | out | 0.0.0.0/0/all | 0.0.0.0/0/all | all |
| reject 1 | out | 200.200.200.0/24/all | 10.0.0.0/8/23 | TCP |
|---|---|---|---|---|
accept 1 | in | 0.0.0.0/0/all | 0.0.0.0/0/all | all |
accept 1 | out | 0.0.0.0/0/all | 0.0.0.0/0/all | all |
accept ether | in | 0.0.0.0/0/all | 0.0.0.0/0/all | all |
accept ether | out | 0.0.0.0/0/all | 0.0.0.0/0/all | all |
There are two ways to provision the access list to block a Telnet session from network 1 (10.0.0.0) to network 2 (200.200.200.0). Method 1 (see Figure 11-11) filters on the inbound interface, preventing the Cisco IAD1101 from routing the packet first, then having to possibly reject it later because of an access list condition. Method 2 (see Figure 11-12) sets up filtering on the outbound interface.
r
| reject either | in | 10.0.0.0/8/all | 200.200.200.0/24/23 | TCP |
|---|---|---|---|---|
accept 1 | in | 0.0.0.0/0/all | 0.0.0.0/0/all | all |
accept 1 | out | 0.0.0.0/0/all | 0.0.0.0/0/all | all |
accept either | in | 0.0.0.0/0/all | 0.0.0.0/0/all | all |
accept either | out | 0.0.0.0/0/all | 0.0.0.0/0/all | all |
| reject 1 | out | 10.0.0.0/8/all | 200.200.200.0/24/23 | TCP |
|---|---|---|---|---|
accept 1 | in | 0.0.0.0/0/all | 0.0.0.0/0/all | all |
accept 1 | out | 0.0.0.0/0/all | 0.0.0.0/0/all | all |
accept ether | in | 0.0.0.0/0/all | 0.0.0.0/0/all | all |
accept ether | out | 0.0.0.0/0/all | 0.0.0.0/0/all | all |
In the same sample network (see Figure 11-8), there are two ways to provision the access list to block an ftp session from network 2 (200.200.200.0) to network 1 (10.0.0.0). Method 1 (see Figure 11-13) filters on the inbound interface, preventing the Cisco IAD1101 from routing the packet first, then having to possibly reject it later because of an access list condition. Method 2 (see Figure 11-14) sets up filtering on the outbound interface.
r
| reject 1 | in | 200.200.200.0/24/all | 10.0.0.0/8/20 | TCP |
|---|---|---|---|---|
reject 1 | in | 200.200.200.0/24/all | 10.0.0.0/8/21 | TCP |
accept 1 | in | 0.0.0.0/0/all | 0.0.0.0/0/all | all |
accept 1 | out | 0.0.0.0/0/all | 0.0.0.0/0/all | all |
accept either | in | 0.0.0.0/0/all | 0.0.0.0/0/all | all |
accept either | out | 0.0.0.0/0/all | 0.0.0.0/0/all | all |
| reject ether | out | 200.200.200.0/24/all | 10.0.0.0/8/20 | TCP |
|---|---|---|---|---|
reject ether | out | 200.200.200.0/24/all | 10.0.0.0/8/21 | TCP |
accept 1 | in | 0.0.0.0/0/all | 0.0.0.0/0/all | all |
accept 1 | out | 0.0.0.0/0/all | 0.0.0.0/0/all | all |
accept ether | in | 0.0.0.0/0/all | 0.0.0.0/0/all | all |
accept ether | out | 0.0.0.0/0/all | 0.0.0.0/0/all | all |
There are two ways to provision the access list to block an ftp session from network 1 (10.0.0.0) to network 2 (200.200.200.0). Method 1 (see Figure 11-15) filters on the inbound interface, preventing the Cisco IAD1101 from routing the packet first, then having to possibly reject it later because of an access list condition. Method 2 (see Figure 11-16) sets up filtering on the outbound interface.
| reject either | in | 10.0.0.0/8/all | 200.200.200.0/24/20 | TCP |
|---|---|---|---|---|
reject either | in | 10.0.0.0/8/all | 200.200.200.0/24/21 | TCP |
accept 1 | in | 0.0.0.0/0/all | 0.0.0.0/0/all | all |
accept 1 | out | 0.0.0.0/0/all | 0.0.0.0/0/all | all |
accept either | in | 0.0.0.0/0/all | 0.0.0.0/0/all | all |
accept either | out | 0.0.0.0/0/all | 0.0.0.0/0/all | all |
| reject 1 | out | 10.0.0.0/8/all | 200.200.200.0/24/20 | TCP |
|---|---|---|---|---|
reject 1 | out | 10.0.0.0/8/all | 200.200.200.0/24/21 | TCP |
accept 1 | in | 0.0.0.0/0/all | 0.0.0.0/0/all | all |
accept 1 | out | 0.0.0.0/0/all | 0.0.0.0/0/all | all |
accept ether | in | 0.0.0.0/0/all | 0.0.0.0/0/all | all |
accept ether | out | 0.0.0.0/0/all | 0.0.0.0/0/all | all |
To accept only SNMP traffic to the Cisco IAD1101 from subnet 10.0.0./8, provision the access list as follows:
| accept either | in | 10.0.0.0/8/161 | 130.130.130.2/32/161 | UDP |
|---|---|---|---|---|
accept either | out | 130.130.130.2/32/161 | 10.0.0.0/8/161 | UDP |
Use the following buttons to modify or delete an access list.
|
Caution Changes made to an access list entry take place immediately. Cisco Systems recommends that you disable access lists for the NE before making changes. |
NAT enables private IP internetworks that use nonregistered IP addresses to connect to the Internet. NAT is configured on the router at the border of a stub domain (referred to as the inside network) and a public network such as the Internet (referred to as the outside network). NAT translates the internal local addresses to globally unique IP addresses before sending packets to the outside network.
Figure 11-17 shows an example of NAT configured on a Cisco IAD1101.
NAT offers two types of address translation, static and dynamic.
10.0.0.1 --> 11.0.0.5
10.0.0.2 --> 11.0.0.6
10.0.0.3 --> 11.0.0.7
10.0.0.1 --> 12.0.0.9
10.0.0.2 --> 12.0.0.9
10.0.0.3 --> 12.0.0.9
|
Note The IP addresses used in this chapter are only for illustration. You must use your own IP addresses, based on your licensing. |
The following conditions apply to NAT provisioned on the Cisco IAD1101:
|
Caution Enabling NAT might prevent user traffic from entering or exiting the Cisco IAD1101, including management traffic. |
Step 2 Set the following fields to configure the network address translation:
Step 3 Click Add when finished.
Step 4 Repeat Step 2 and Step 3 to configure additional NAT entries. You can configure as many as 8 NAT entries.
Step 5 Click Enable/Disable NAT to activate NAT.
|
Caution Enabling NAT might prevent user traffic from entering or exiting the Cisco IAD1101, including management traffic. |
Click a NAT entry in the list window, and use the following buttons to modify or delete a NAT entry:
|
Note If a dynamic NAT entry is in use, you must uncheck the Enable NAT for NE box before deleting the NAT entry. |
On a Cisco IAD1101 with a static or dynamic NAT translation, an outside host can still gain access to an inside (untranslated) host address. To block outside access to the inside network, create a static NAT that translates inbound addresses into a "dummy" address, then create an access list that filters out the dummy address. See "Access Lists" for access list information and procedures.
The following security procedure uses a "dummy" address, as previously described.
|
Note The IP addresses used in this chapter are only for illustration. You must use your own IP addresses, based on your licensing. |
Step 2 Create a dynamic NAT entry to prevent direct outside access to 10.0.0.0/8. Use 99.0.0.1 as the dummy address.
Step 3 Create an access list entry that rejects all inbound traffic with IP address 99.0.0.1:
|
Note On a Cisco IAD1101 with a Frame Relay link, but without a PPP link, RIP does not advertise the node IP address over the Frame Relay link. To gain access to the Cisco IAD1101 over the Frame Relay link, use the Frame Relay address (not the node address) as the address for the Cisco IAD1101. This is not needed when both Frame Relay and PPP links exist on the Cisco IAD1101. |
To provision RIP on the NE, complete the following steps starting in the NE provision window:

Step 2 Click Enable RIP for NE.
Step 3 In the IP Interfaces list, select the interfaces to be provisioned for RIP.
Step 4 Click Enable RIP.
Step 5 Select the Rx RIP Version—1, 2, or 1 or 2.
Step 6 Select the Tx RIP Version—None, 1, RIP1Compatible, or 2.
Step 7 Select the Authentication—None or Password.
Step 8 If password authentication is selected (RIPv2 only), enter the password in the Authentication Key field.
Step 9 Click Apply to provision RIP for the selected interfaces.
|
Note When you activate RIP on a Cisco IAD1101 interface, RIP advertises all directly-connected nodes over the interface. |
|
Note RIP1Compatible is a version of RIPv2 that can be processed by a node using RIPv1. |
EMS maintains statistics for all IP activity on the Cisco IAD1101, including routing tables, interface activity, and Layer 4 protocol statistics.
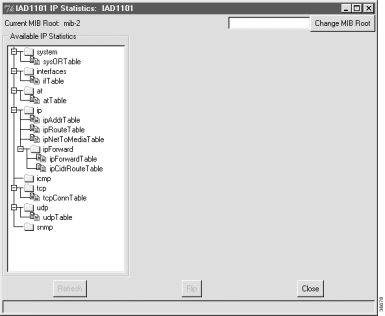
Step 2 Under Available IP Statistics, click the icon for the desired display. Statistic information appears in the a new frame on the right side of the window. Statistic information and descriptions can be found in RFC1213 (Management Information Base for Network Management of TCP/IP-based internets: MIB-II).
Step 3 Use the following buttons to alter the display:
Step 4 Click Close to close the display.
![]()
![]()
![]()
![]()
![]()
![]()
![]()
![]()
Posted: Mon Feb 5 13:06:57 PST 2001
All contents are Copyright © 1992--2001 Cisco Systems, Inc. All rights reserved.
Important Notices and Privacy Statement.