|
|

Table Of Contents
Using the Service Configuration Editor: Traffic Accounting and Reporting
Managing Transaction Usage RDRs
Managing Real-Time Subscriber Usage RDRs
Managing Real-Time Signaling RDRs
Using the Service Configuration Editor: Traffic Accounting and Reporting
This module explains how to work with usage counters and Raw Data Records (RDRs).
Traffic Accounting and Reporting is the second step in creating a Cisco Service Control Application for Broadband (SCA BB) service configuration.
•
Managing Transaction Usage RDRs
•
•
Managing Usage Counters
The SCA BB collects and maintains various network metrics (such as volume and number of sessions) per service. This accounting takes place per subscriber, per group of subscribers (package or group of packages), and for the entire link.
Service usage counters are used by the system to generate data about the total use of each service. A service can use either its own usage counters, or those of the parent service. For example, in the default service configuration the SMTP and POP3 services share the E-Mail service usage counters. The assignment of services to usage counters is determined by the service hierarchy. Editing Services explains how to configure the service hierarchy.
The SCA BB also collects and maintains various network metrics per package.
Package usage counters are used by the system to generate data about the total use of each package. A package can use either its own usage counters, or those of the parent package. The assignment of packages to usage counters is determined by the package hierarchy. How to Set Advanced Package Options explains how to configure the package hierarchy.
Managing RDR Settings
Service Control Engine (SCE) platforms generate and transmit Raw Data Records (RDRs) that contain information relevant to the service provider. These RDRs contain a wide variety of information and statistics, depending on the configuration of the system. The content and structure of each type of RDR is listed in the "Raw Data Records: Formats and Field Contents" chapter of the Cisco Service Control Application for Broadband Reference Guide .
•
•
The RDR Settings Dialog Box
The RDR Settings dialog box allows you to control the generation of RDRs for an entire service configuration. This dialog box contains seven tabs:
•
•
•
•
•
•
•
Note
Managing NetFlow Exports
•
You can export records per supported RDR type. The data in the following RDR types can be exported using NetFlow:
–
–
–
–
–
•
•
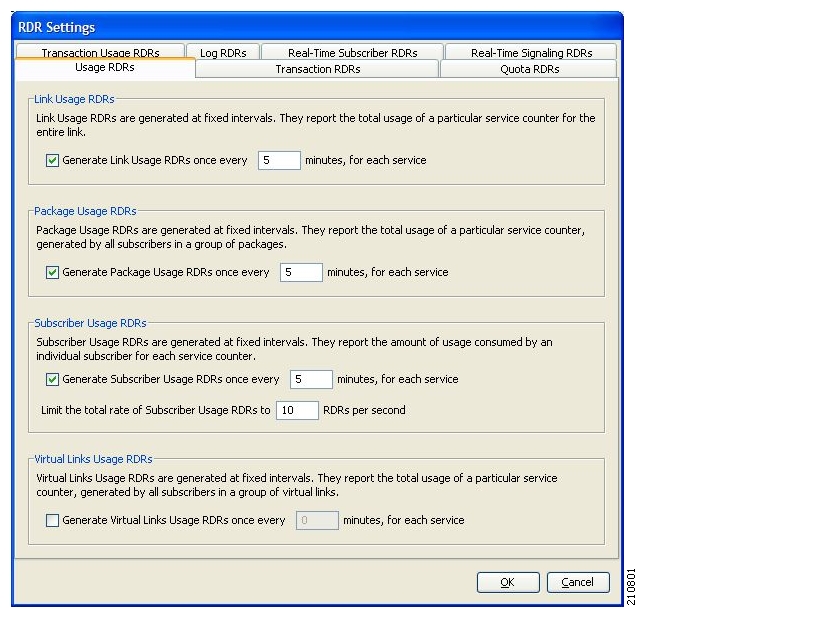
Managing Usage RDRs
The four types of Usage RDRs contain data about total usage of allservices included in a service usage counter:
•
•
•
•
You can enable or disable the generation of each type of Usage RDR, and set the generation interval for each type of Usage RDR. You can limit the generation rate of Subscriber Usage RDRs. This is advisable when there are a large number of subscribers.
By default, all four types of Usage RDRs are enabled. (Virtual Links Usage RDRs are enabled by default only if Virtual Links mode was enabled when you created the service configuration.)
Note
Step 1
The RDR Settings dialog box appears.
Figure 8-1
Step 2
To disable the generation of a selected type of Usage RDR, uncheck the appropriate Generate Usage RDRs check box.
Step 3
Step 4
Step 5
The RDR Settings dialog box closes.
The new configuration for the generation of Usage RDRs is saved.
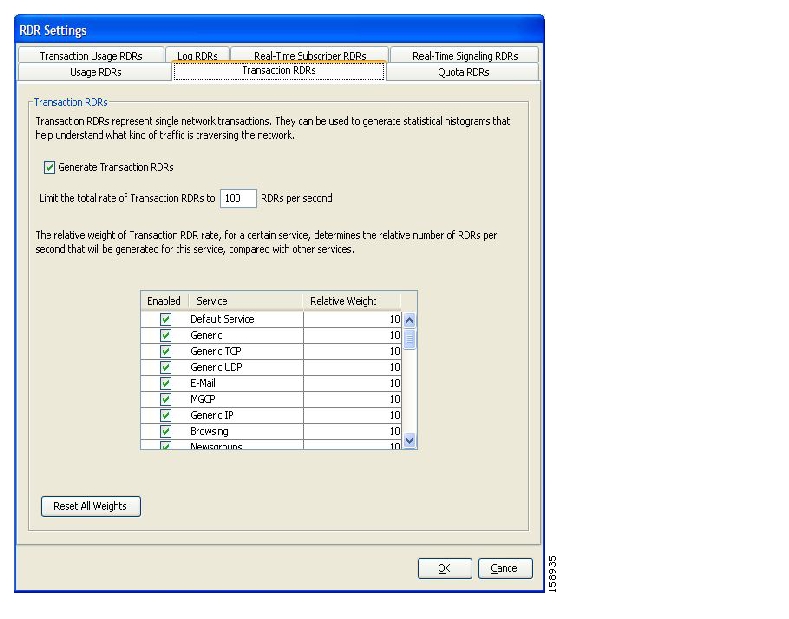
Managing Transaction RDRs
Each Transaction RDRs contains data about a single network transaction. The SCE platform can generate Transaction RDRs for selected service types. You can use these RDRs, for example, to generate statistical histograms that help understand the traffic traversing the network.
You can enable or disable the generation of Transaction RDRs, set the maximum number of Transaction RDRs generated per second, and select for which services these RDRs are generated. You can also assign a relative weight to each service. The relative weight determines the relative number of Transaction RDRs that will be generated for this service, compared to other services.
By default, at most 100 Transaction RDRs are generated per second, and all services are given the same weight.
Step 1
The RDR Settings dialog box appears.
Step 2
The Transaction RDRs tab opens.
Figure 8-2
Step 3
To disable the generation of Transaction RDRs, uncheck the Generate Transaction RDRs check box.
Step 4
Step 5
Step 6
Step 7
The RDR Settings dialog box closes.
The new configuration for the generation of Transaction RDRs is saved.
Managing Quota RDRs
Each Quota RDR contains data for a single subscriber. There are four types of Quota RDRs:
•
–
•
•
•
You can enable or disable the generation each type of Quota RDR and define the rate of generation of these RDRs.
•
•
By default, all Quota RDRs are disabled.
Step 1
The RDR Settings dialog box appears.
Step 2
The Quota RDRs tab opens.
Figure 8-3
Step 3
Step 4
Step 5
Step 6
Step 7
Step 8
Step 9
Step 10
The RDR Settings dialog box closes.
The new configuration for the generation of Quota RDRs is saved.
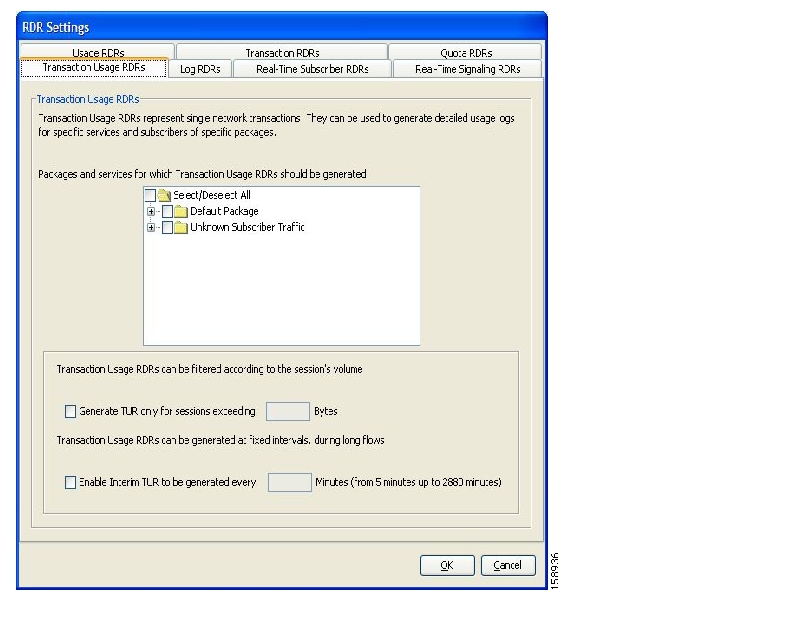
Managing Transaction Usage RDRs
Transaction Usage RDRs are generated for all transactions of selected packages or for selected services per package. Each Transaction Usage RDR contains data about a single network transaction. You can use these RDRs, for example, to build detailed usage logs for specific services and subscribers for transaction-based billing.
Generating and collecting an RDR for each transaction can compromise performance. Enable Transaction Usage RDR generation only for services and packages that must be monitored or controlled.
You can select the packages and services for which Transaction Usage RDRs are generated. The following RDRs will also be generated for these packages and services:
•
•
•
By default, no Transaction Usage RDRs are generated.
Note
Step 1
The RDR Settings dialog box appears.
Step 2
The Transaction Usage RDRs tab opens.
Figure 8-4
Step 3
The package expands to show all component services of the package; all services are checked.
Step 4
a.
b.
Step 5
a.
The Bytes field is enabled.
b.
Step 6
a.
The Minutes field is enabled.
b.
Step 7
The RDR Settings dialog box closes.
The new configuration for the generation of Transaction Usage RDRs is saved.
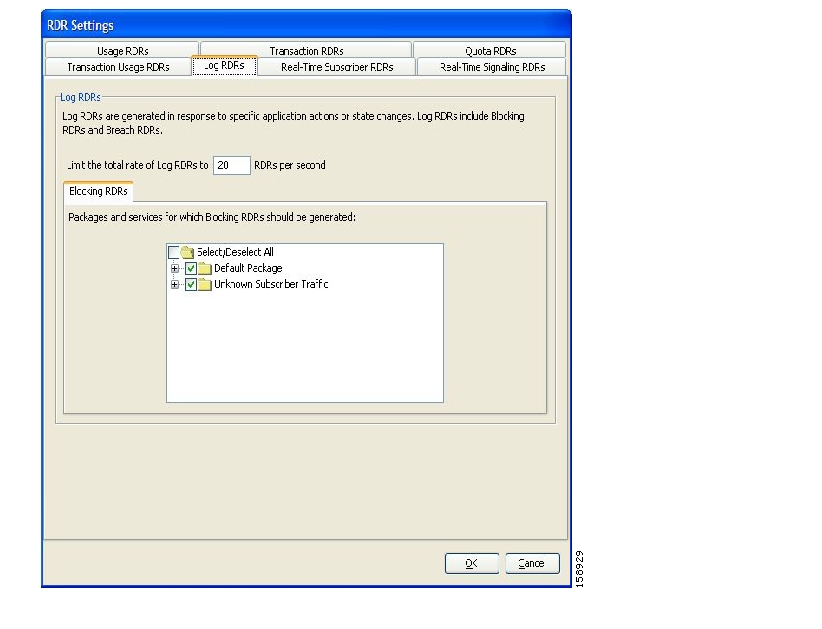
Managing Log RDRs
Log RDRs, which provide information about system events, are generated in response to specific actions or state changes. There are two types of Log RDRs:
•
•
You can set the maximum number of Log RDRs generated per second. You can select the packages and services for which Blocking RDRs are generated.
By default:
•
•
Note
Step 1
The RDR Settings dialog box appears.
Step 2
The Log RDRs tab opens.
Figure 8-5
Step 3
Step 4
The package expands to show all component services of the package; all the services are checked.
Step 5
a.
b.
Step 6
The RDR Settings dialog box closes.
The new configuration for the generation of Log RDRs is saved.
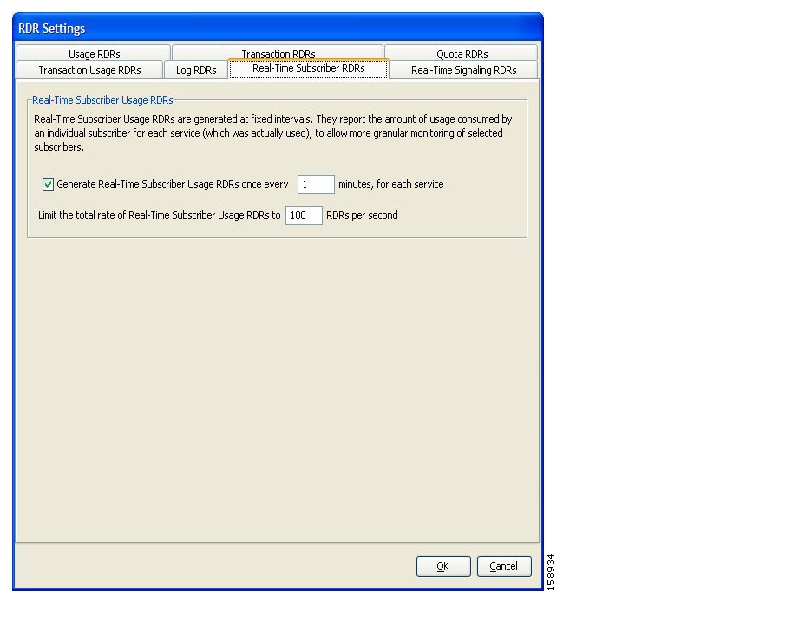
Managing Real-Time Subscriber Usage RDRs
Real-Time Subscriber Usage RDRs, which report subscriber usage, are generated for each individual subscriber for each service used, at specified intervals. These RDRs permit a more granular monitoring of selected subscribers when necessary.
For more information about selecting subscribers to be monitored, see Selecting Subscribers for Real-Time Usage Monitoring.
Generating and collecting Real-Time Subscriber Usage RDRs for many subscribers can compromise performance. Enable Real-Time Subscriber Usage RDR generation only for subscribers that must be monitored.
You can enable or disable the generation of Real-Time Subscriber Usage RDRs, set the generation interval for these RDRs, and set the maximum number generated per second.
By default, Real-Time Subscriber Usage RDRs:
•
•
•
Step 1
The RDR Settings dialog box appears.
Step 2
The Real-Time Subscriber RDRs tab opens.
Figure 8-6
Step 3
Step 4
Step 5
Step 6
The RDR Settings dialog box closes.
The new configuration for the generation of Real-Time Subscriber Usage RDRs is saved.
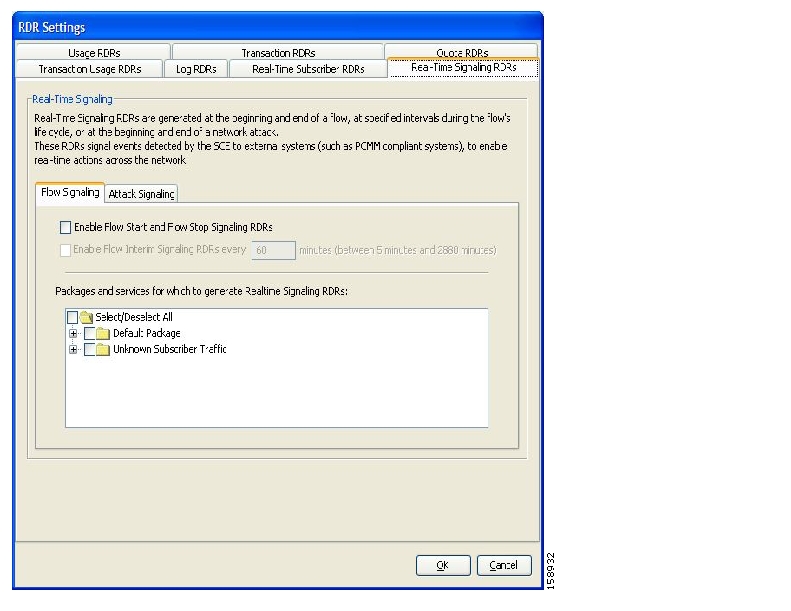
Managing Real-Time Signaling RDRs
Real-Time Signaling RDRs, which are generated at the beginning and end of a flow, at specified intervals after the beginning of the flow, and at the beginning and end of a network attack, can be used to signal external systems concerning events detected by the SCE platform, allowing real-time actions to be taken across the network.
There are two groups of Real-Time Signaling RDRs:
•
–
–
–
•
–
–
You can enable or disable the generation of Flow Signaling RDRs for selected packages, or for selected services per package. You can set the generation interval for Flow Interim Signaling RDRs, which can be generated only if Flow Start and Flow Stop Signaling RDRs are enabled.
You can enable or disable the generation of Attack Signaling RDRs for selected packages.
Note
By default, no Real-Time Signaling RDRs are generated.
Step 1
The RDR Settings dialog box appears.
Step 2
The Real-Time Signaling RDRs tab opens.
Figure 8-7
Step 3
Note
The Enable Flow Interim Signaling RDRs check box is enabled.
Step 4
The Enable Flow Interim Signaling RDRs field is enabled.
Step 5
Step 6
The package expands to show all component services of the package; all the services are checked.
Step 7
a.
b.
Step 8
a.
Figure 8-8
b.
Step 9
Step 10
The RDR Settings dialog box closes.
The new configuration for the generation of Real-Time Signaling RDRs is saved.
![]()
![]()
![]()
![]()
![]()
![]()
![]()
![]()
Posted: Wed May 30 12:32:38 PDT 2007
All contents are Copyright © 1992--2007 Cisco Systems, Inc. All rights reserved.
Important Notices and Privacy Statement.