|
|

Table Of Contents
Information About Managing DSS Files
Information About DSS File Components
Using the Signature Editor
This module describes the Signature Editor tool and how to use it to create and modify Dynamic Signature Script (DSS) files
The Signature Editor tool allows you to create and modify DSS files that can add and modify protocols and protocol signatures in the Cisco Service Control Application for Broadband (SCA BB), based on your knowledge of new network protocols that are not yet supported by SCA BB.
•
Information About Managing DSS Files
•
Information About Managing DSS Files
•
•
•
The DSS file components, and the creation and editing of DSS files, are explained in the following sections.
•
Information About DSS File Components
The DSS file components are displayed in the Script pane of the Signature Editor, in a tree structure. By selecting the appropriate node of the DSS component tree, you can define the properties associated with the node in the Property pane.
The DSS file components are described in the following sections.
•
•
•
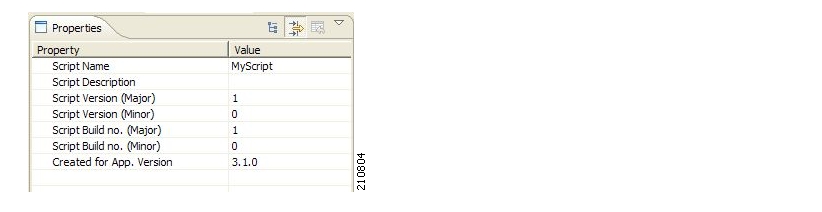
The DSS File
The DSS file name is the root node of the DSS file component tree.
When you select the root node, you can define the following properties for the DSS file:
•
•
•
•
•
•
•
The following screen capture shows the default values for the DSS file properties.
Figure 12-1
The DSS file contains a single protocol list.
DSS Protocol List
The protocol list has no properties to define. It contains all the protocols that are being added, modified, or enhanced.
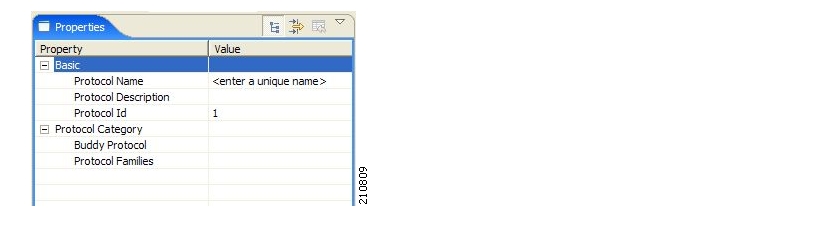
Information About DSS Protocols
When you select a Protocol node in the DSS file component tree, you can define the following properties of the protocol:
•
–
–
–
•
–
–
–
–
–
–
Associating a protocol with a protocol family allows reports about the family to include the new protocol.
The following screen capture shows the default values for the protocol properties.
Figure 12-2
Protocols contain signatures.
•
Setting Protocol Name and ID
A DSS can include two types of protocols:
•
•
Selecting a name and ID is different for the two cases:
•
•
The Buddy Protocol
To simplify the configuration of new protocols added by a DSS, the DSS may specify a Buddy Protocol for a new protocol. If, when importing a DSS to a service configuration, the application encounters service elements referring to the Buddy Protocol, it automatically duplicates the set of service elements that use the Buddy Protocol and replaces all references to the Buddy Protocol with references to the new protocol. The association of the new protocol to services will match that of the Buddy Protocol.
Information About DSS Signatures
A protocol may contain as many different signatures as necessary.
Four different types of signatures may be added to a protocol:
•
•
•
•
Each of the four signature types tests different conditions against the first payload packet of the flows.
These signature types and their conditions are described in the following subsections.
String Match Signatures and Payload Length Signatures can contain deep inspection clauses. A signature whose first payload packet conditions are met will accept a flow if the conditions of any of its deep inspection clauses are also met.
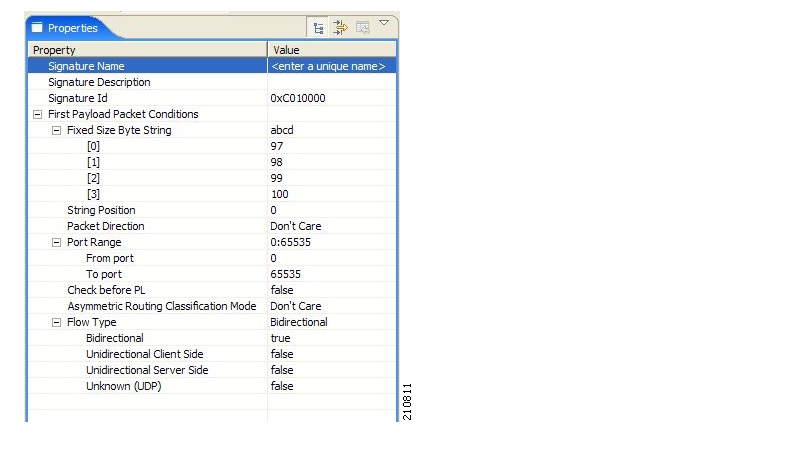
DSS String Match Signature
When you select a String Match Signature node in the DSS file component tree, you can define the following properties of the signature:
•
•
•
•
–
–
–
–
–
–
–
–
–
–
–
–
–
–
This field indicates whether to test the signature before or after the execution of the SCA BB built-in PL (Protocol Library) classification. Testing this signature before the execution of the built-in classification means that if the flow matches this signature, the PL classification will be skipped. If this field is set to "false", this signature will be tested only if the PL classification fails to identify any of its supported protocol signatures.
–
–
–
–
–
The flow type is specified by the next four fields:
–
–
–
–
Set Check before PL to true only if the signature identifies the protocol according to the first payload packet only. If the signature also uses a Deep Inspection Condition that looks into later packets, and the signature does not match the flow, the PL classification will not perform properly.
The following screen capture shows the default values for the String Match Signature properties.
Figure 12-3
A flow that matches the first payload packet conditions of a String Match Signature will then be compared against the deep inspection conditions of the signature (see DSS Deep Inspection Conditions ).
DSS Payload Length Signature
When you select a Payload Length Signature node in the DSS file component tree, you can define the following properties of the signature:
•
•
•
•
–
–
–
–
–
–
–
–
–
This field indicates whether to test the signature before or after the execution of the SCA BB built-in PL (Protocol Library) classification. Testing this signature before the execution of the built-in classification means that if the flow matches this signature, the PL classification will be skipped. If this field is set to "false", this signature will be tested only if the PL classification fails to identify any of its supported protocol signatures.
–
–
–
–
–
The flow type is specified by the next four fields:
–
–
–
–
Set Check before PL to true only if the signature identifies the protocol according to the first payload packet only. If the signature also uses a Deep Inspection Condition that looks into later packets, and the signature does not match the flow, the PL classification will not perform properly.
The following screen capture shows the default values for the Payload Length Signature properties.
Figure 12-4
A flow that matches the first payload packet conditions of a Payload Length Signature will then be compared against the deep inspection conditions of the signature (see DSS Deep Inspection Conditions ).
DSS HTTP User Agent Signature
When you select an HTTP User Agent Signature node in the DSS file component tree, you can define the following properties of the signature:
•
•
•
•
–
The following screen capture shows the default values for the HTTP User Agent signature properties.
Figure 12-5
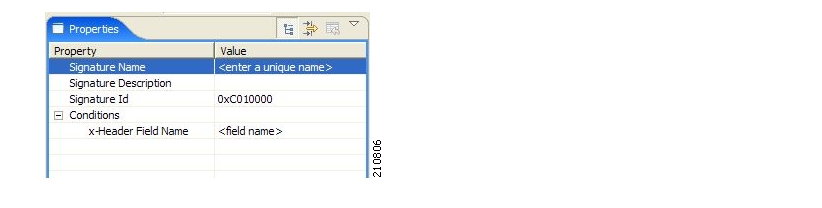
DSS HTTP x-Header Signature
When you select an HTTP x-Header Signature node in the DSS file component tree, you can define the following properties of the signature:
•
•
•
•
–
The following screen capture shows the default values for the DSS file properties.
Figure 12-6
DSS Deep Inspection Clauses
A deep inspection clause is a conjunctive clause of deep inspection conditions—a signature will accept a flow only if all conditions in a clause are met.
Note
After the first payload packet is accepted by the first payload packet conditions, the clause containing the condition with the lowest Packet Number is tested. The other conditions in this clause are checked in ascending Packet Number order. Thus, the Packet Number of any condition in a clause cannot be less than the largest Packet Number in the clause it succeeds.DSS Deep Inspection Conditions
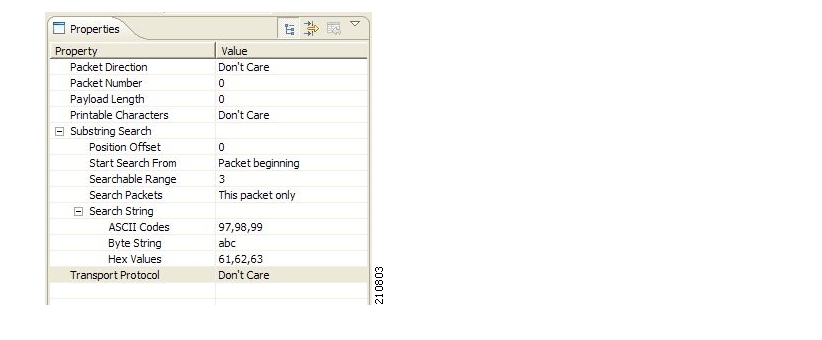
A deep inspection condition is a set of conditions that are checked against flows that pass the first payload packet conditions screening of String Match Signatures or Payload Length Signatures.
When you select a Deep Inspection Condition node in the DSS file component tree, you can define the following properties of the deep inspection condition:
•
•
•
•
•
–
–
–
–
–
–
–
–
–
–
–
–
–
–
•
–
–
–
The following screen capture shows the default values for the deep inspection condition properties.
Figure 12-7
The structure of deep inspection conditions is the same for String Match Signatures and Payload Length Signatures.
The Signature Editor Console
The Signature Editor writes log and error messages to the Signature Editor Console (in the Console view), when appropriate.
Creating DSS Files
If you have a DSS file open in the Signature Editor, save it before you create a new DSS file. All unsaved changes will be lost.
Step 1
( Create a New DSS File).
A DSS component tree containing a DSS File node, a Protocol List node, and a Protocol node, is displayed in the Script view. The default properties of the new DSS file are displayed in the Properties view.
Figure 12-8
Step 2
See The DSS File for an explanation of the properties.
Step 3
The protocol properties appear in the Properties view.
Step 4
See Information About DSS Protocols for an explanation of the properties.
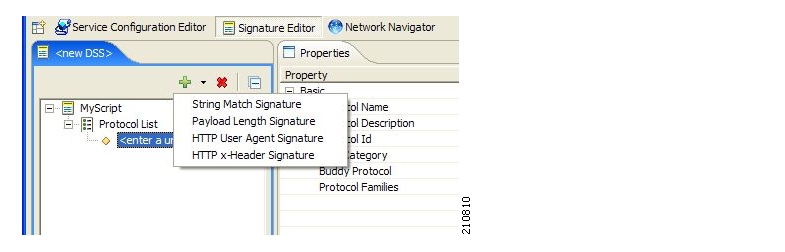
Step 5
button.
Figure 12-9
Step 6
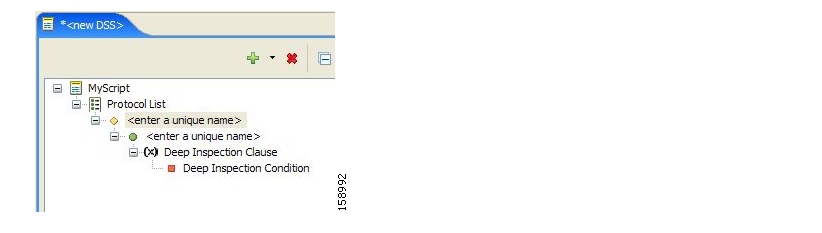
A Signature node is added under the Protocol node.
If you selected a String Match Signature or a Payload Length Signature, a Deep Inspection Clause node and a Deep Inspection Condition node are also added.
Figure 12-10
Step 7
The signature properties appear in the Properties view.
Step 8
See Information About DSS Signatures for an explanation of the properties.
Step 9
a.
The deep inspection condition properties appear in the Properties view.
b.
See DSS Deep Inspection Conditions for an explanation of the properties.
Step 10
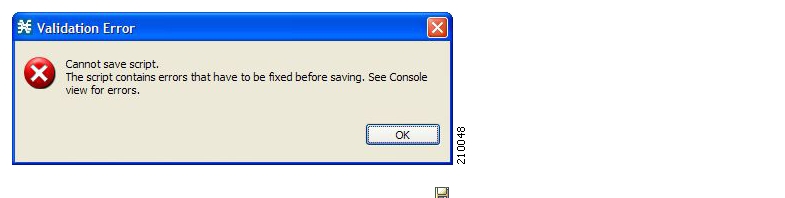
Step 11
•
Figure 12-11
Click OK, remove the duplication, and then click
( Save) again.
A Save As dialog box appears.
Step 12
Step 13
Step 14
The Save As dialog box closes.
The DSS file is saved.
Editing DSS Files
You can edit an existing DSS file, and add new protocols, or modify or delete existing protocols.
If you have a DSS file open in the Signature Editor, save it before you open a different DSS file. All unsaved changes will be lost.
Step 1
( Open a DSS File).
An Open dialog box appears.
Step 2
Step 3
The Open dialog box closes.
The DSS Component tree of the selected file is displayed in the Script view.
The DSS File node is selected, and the properties of the DSS file are displayed in the Properties view.
Step 4
See the subsections of Information About DSS File Components for an explanation of the properties of the different components.
Step 5
•
From the toolbar, click
The changes to the DSS file are saved.
•
–
A Save As dialog box appears.
–
–
–
The Save As dialog box closes.
The modified DSS file is saved with the new name.
Importing Signatures
You can import DSS files into the file you are currently editing.
Note
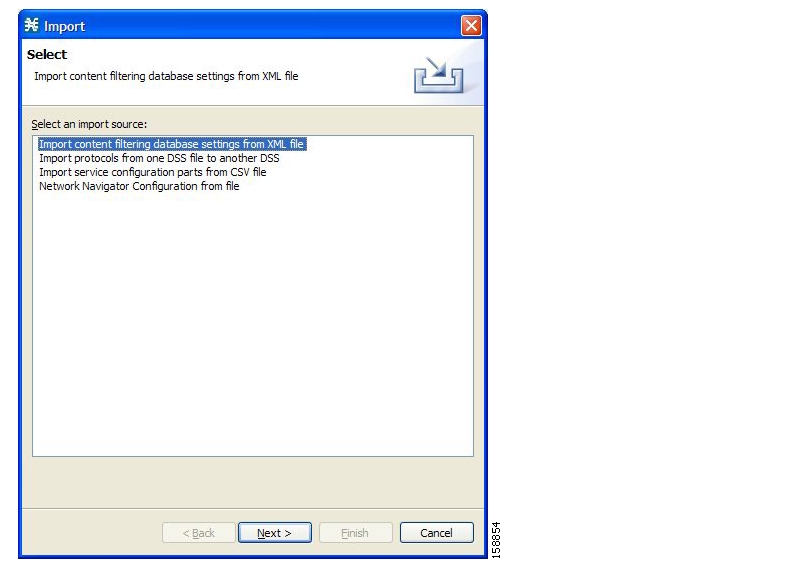
Step 1
The Import dialog box appears.
Figure 12-12
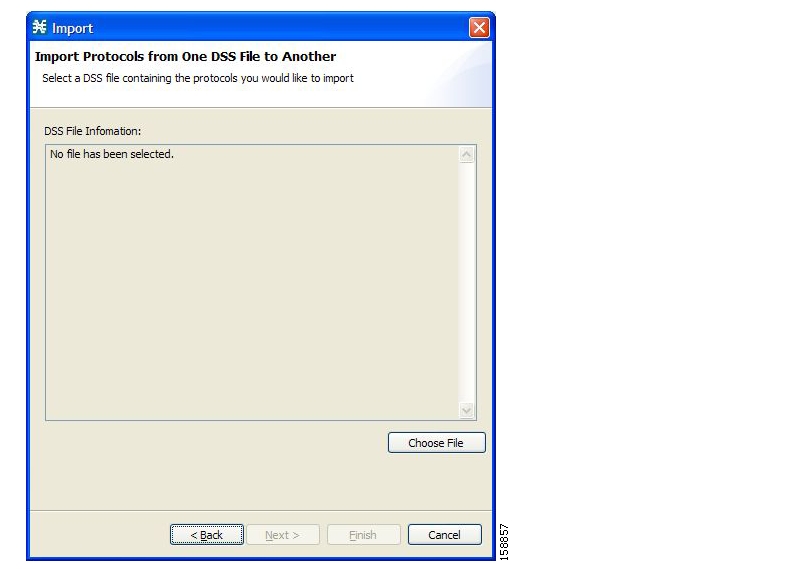
Step 2
Step 3
The second screen of the Import dialog box opens.
Figure 12-13
Step 4
An Open dialog box appears.
Step 5
Step 6
The Open dialog box closes.
Information about the DSS file that you have chosen is displayed in the DSS File Information area.
Figure 12-14
Step 7
The Import dialog box closes.
The content of the selected DSS file is imported into the Signature Editor.
![]()
![]()
![]()
![]()
![]()
![]()
![]()
![]()
Posted: Wed May 30 12:25:41 PDT 2007
All contents are Copyright © 1992--2007 Cisco Systems, Inc. All rights reserved.
Important Notices and Privacy Statement.