|
|

This chapter describes how to install network printers and configure the BBSM Web Printing utility. You must purchase and install the KeyView Pro software to support this feature. KeyView Pro is sold separately by most software vendors.
 |
Caution BBSM supports a limited set of local printers and network printers. BBSM Version 5.1 also supports the HP JetDirect print server for network printers. |
The normal order for installing and configuring the components for Web Printing is as follows:
1. Install KeyView Pro 6.5. (See the "Installing KeyView Pro 6.5 for Web Printing" section.)
2. By using WEBconfig, configure BBSM Web Printing.
3. Install or configure the default printer for each site.
Use the following steps to configure BBSM for web printing for each site and printer. (Note that the BBSM server must be properly configured before Web Printing can be configured.)
Step 2 Click the Sites button. The BBSM Sites web page appears.
Step 3 Note that if the Printing fields are grayed out, Key View Pro has not been installed, and you cannot configure web printing. (See Figure 3-4.)
Step 4 Use the navigation buttons to select the site you want to configure for web printing.
Step 5 In the Printing section, enter the desired information for each site, as shown below:
|
Caution Note that this printer name must match exactly the default printer name as it is defined in the Printers folder for web printing to work. |
b. Select the type of printer: Network Printer or Local Printer.
c. In the Price Per Page text box, enter the decimal number for the price of printing each page, such as .10 for 10 cents. If printing is free, leave this text box blank or enter 0.
d. In the Max Price Per Job text box, enter the decimal number for the maximum price per job. For example, enter 10.00 if the maximum price for a job is $10. If printing is free, leave this text box blank or enter 0.
e. In the Printer Account User ID field, enter the account user ID.
f. In the Printer Account Password field, enter the account password.
g. In the Please Confirm Password field, re-enter the password.
 |
Note For network printers, the user ID and the password must be valid for the server that has the printer connected to it. The printer account user ID should be different for each site. |
Step 7 When you have configured all sites and printers, click OK to close WEBconfig.
Step 8 Close the Printers window if it is open.
You can install a custom logo that users will see when they activate the BBSM Web Printing utility. Use the following procedure to add a custom logo.
Step 2 Name the logo file, as follows: hotel_logo.gif.
Step 3 Copy the file to this folder: c:\atcom\Print
As described previously, within the BBSM system, you can set up a printer for each site or you can associate a printer with more than one site. The two sections that follow describe how to install a printer. The first gives you a general procedure for installing a printer, and the second gives an example.
Most printers come with printer driver software that can install the printer for you automatically. Use these software instructions from the vendor to install either a local printer (plugged directly into the BBSM server) or a network printer. When you have installed the printer, set it to be the default printer.
If the printer cannot be automatically installed, use the procedure below as a general guide to installing the local printer.
|
Caution Before you start any printer installation, log on to BBSM with the printer account. |
Step 2 Choose Start > Settings > Printers > Add Printer.
Step 3 To clear the Welcome screen, click Next.
Step 4 Select Local printer and click Next.
Step 5 In the Available ports dialog box, check the printer port connection (USB port) and click Next.
Step 6 At the manufacturer and printer model dialog, do one of the following:
Step 7 In the Printer name text box, enter a unique name for the printer.
Step 8 To set this printer as the printer, click Yes for the Default printer attribute.
Step 9 Do one of the following:
Step 10 Verify that Yes is checked to print a test page, and then click Finish. The printer appears in the Printers window. Confirm that this printer is the default printer.
|
Caution Note that, for each site that has Web Printing enabled, the name entered in the BBSM Printer field on the Sites page in WEBconfig must match exactly the default printer name as it is defined in the Printers folder for web printing to work. |
Step 11 If you get a Files Needed prompt, insert the required disk(s) and click OK.
Step 12 If asked to reboot, click OK and reboot the server.
The following is an example of how to install a HP LaserJet 5 network printer using the HP JetDirect Print Server.
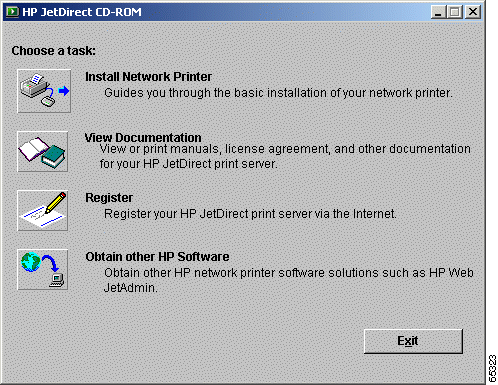
Step 2 Click Install Network Printer icon. The Welcome dialog box appears.
Step 3 Click Search from a list of available printers and click Next. When the search has finished, the Identify Printer dialog box appears.
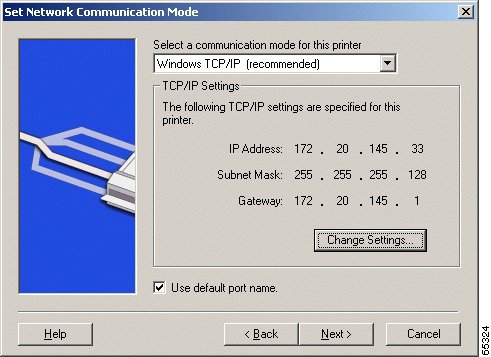
Step 4 Select the appropriate printer. Click Next. The Set Network Communication Mode dialog box appears. (See Figure 9-2.)
Step 5 Verify that the settings are correct. If necessary, click Change Settings and make the necessary changes.
Step 6 When the settings are correct, click Next. The Printer Drivers dialog box appears.
Step 7 From the Printer Drivers dialog box, select the appropriate printer and click Next. The Printer Name dialog box appears.
Step 8 Enter the name for your printer and click Next. The Printer Sharing dialog box appears.
Step 9 Do one of the following:
4. Leave the "Print a test page" box checked and click Finish.
Refer to your printer's documentation if you have any problems installing the printer.
Files cannot be printed directly from an application. To use this utility, save the document to be printed and close it. Then, use the Web Printing steps below to print the file.
|
Note You must close the file you intend to print before using Web Printing. |
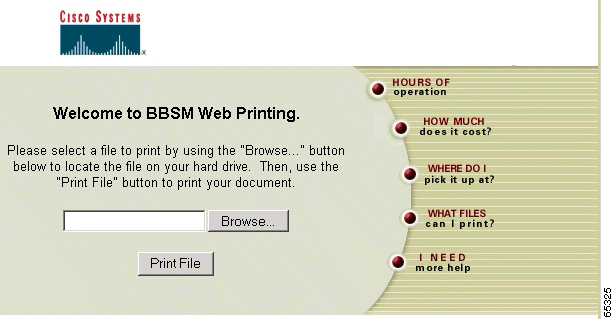
Step 2 In the separate BBSM window, click Print. The BBSM Web Printing page appears. (See Figure 9-3.)
Step 3 Click Browse... to navigate to the file to be printed or type the path and file name in the text box.
Step 4 Click Print File. A confirmation web page appears when the file has been sent to the Web Printing service. (See Figure 9-4.)
You can use BBSM Web Printing to print the file types described in the following tables. (See 9-1 through 9-7.)
Table 9-1 Web Printing Supported Document File Types
| File Type | Version |
|---|---|
|
|
Table 9-2 Web Printing Supported Double-Byte File Types
| File Type | Version |
|---|---|
| 1Japanese, Korean, Simplified and Traditional Chinese
2Japanese |
Table 9-3 Web Printing Supported Double-Byte File Types
| File Type | Version |
|---|---|
| 1Japanese, Korean, Simplified and Traditional Chinese
2Japanese |
Table 9-4 Web Printing Supported Spreadsheet File Types
| File Type | Version |
|---|---|
| 1Japanese, Korean, Simplified and Traditional Chinese
2Japanese |
Table 9-5 Web Printing Supported Presentation File Types
| File Type | Version |
|---|---|
Table 9-6 Web Printing Support Graphics File Types
| File Type | Version |
|---|---|
Microsoft |
|
Table 9-7 Web Printing Supported Compression, Encapsulation, Fax,
and Security File Types
| File Type | Version |
|---|---|
If you are trying to print a file that has a nonsupported file type, use this procedure to convert the file type to one that is supported.
Step 2 Choose File > Save As.
Step 3 From the Save As Type (or similarly named) drop-down menu, choose a format that BBSM Web Printing supports from the tables in "Supported Web Printing File Types" section.
Step 4 Verify that the file name now shows the proper new extension for the new file type.
Step 5 Click Save. BBSM Web Printing may still not be able to print the file properly. In this case, assure the end user that they will not charged.
Printer error messages are generated only when you are using printers that return error messages. Check the printer documentation to determine if your printer supports this feature. Note that printing can be time-consuming. For this reason, if users are printing a large file and want to print multiple copies, please have them wait a minute or two after the each job finishes.
If you are having trouble printing from BBSM Web Printing, error messages are placed in the Transaction History Report that can be accessed from the BBSM Reporting Pages option. (For more information, see the "Transaction History Report" section).
Table 9-8 Common Printer Error Messages
| Message | Probable Cause and Recommendations |
|---|---|
The is a general printing error message. It could be due to the printer's being out of paper, a paper jam, or the printer being offline. Check the printer. Usually when the problem is cleared up, the pages print out without the end user resending the file. If the problem persists, check the issues listed below to determine if one of them may be the problem. |
|
You may not have logged on by using the printer account to install the printer. Log on as the printer account and reinstall the printer for the site setting to be the default printer. |
|
Internet Explorer cannot open the Internet site http://server/ BBSMPrintResp.asp |
The downloaded file is not available. This could be due to your security or language settings or because the server was unable to retrieve the requested file. Tell the users this: The end user probably tried to print while the file to be printed was open in another application. (In the error message, the word server is replaced by the name of the BBSM server to which users are connected.) What the users should do: The end user should exit the application, disconnect from the BBSM system, and close the browser. Then they can try printing from BBSM Web Printing again according to the printing procedure. |
Tell the users this: The system is busy processing requests. What the users should do: The end user should wait a minute or two and then try to print the document again. |
|
The BBSM system cannot set the printer you assigned to the site as the default printer. The reason could be one of the following:
|
|
Tell the users this: The end user tried to print a file using the application's File > Print feature. Users cannot print files directly from an application unless they have connected a printer directly to their computers and installed the correct printer drivers. What the users should do: To print while using the BBSM Web Printing utility, users should exit their application and use the printing procedure. (Note that a technician might also see this message if the BBSM Web Printing was not installed correctly.) |
|
Tell the users this: The end user tried to print a file that does not exist, or they tried to print a type of file that BBSM Web Printing does not support. (The user is not charged in either case.)
What the users should do: The end user should try the following:
If none of the above techniques is helpful, offer the user a refund. |
|
We're Sorry! We were unable to print your file. Please try again later. |
Tell the users this: A printing error occurred. What the front desk staff should do: The front desk staff should check the log to determine what error code, if any, appeared. If the Error Code text is not visible, maximize the browser window.
Tip The printer's front panel often indicates the type of problem that has occurred. See your printer documentation for details. |
Occasionally, the printed output may not look correct. Table 9-9 lists some common problems and solutions.
Table 9-9 Common Printing Output Appearance Problems and Solutions
![]()
![]()
![]()
![]()
![]()
![]()
![]()
![]()
Posted: Fri Mar 7 14:53:44 PST 2003
All contents are Copyright © 1992--2002 Cisco Systems, Inc. All rights reserved.
Important Notices and Privacy Statement.