|
|

Reports of BBSM activities and functions can be viewed and printed on a site basis by using the Reporting Pages option under the Reports section of the BBSM Dashboard. The following are the reports you can select:
Use your Internet Explorer web browser to access the web pages to view or to print the available reports.
Use the following procedure to access the Reporting pages.
Step 2 Click Reporting Pages. The Reporting splash screen appears, followed by the BBSM Reporting web page. (You can click the splash screen to skip it.)
Step 3 To request a report, click an option from the top of the BBSM Reporting web page. (See Figure 7-1.)
Once a report web page appears, you can sort the report by clicking on the underlined item in the header (light purple) button for any column. Clicking the same heading again switches between ascending and descending order. The sorting capability applies to all reports.
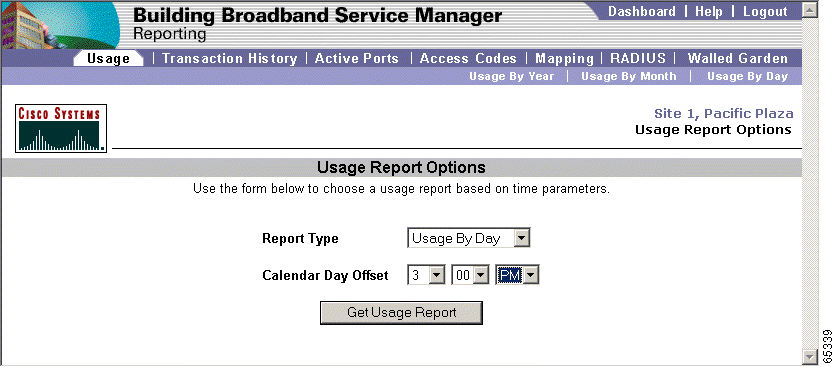
Usage reports allow authorized personnel to study the use of the Internet facilities at the site. Figure 7-2 shows an example of the Usage Report web page for a site.
You can request three different reports from the Usage web page.
Charges posted to a PMS often do not correspond to calendar day boundaries. For example, if a hotel sends its PMS data to its data processing department at 4 a.m. each day, the charges posted will include data from the previous day after 4 a.m. up to the current day at 4 a.m. The calendar day offset feature makes it easier to reconcile BBSM accounting records with PMS records. Using the calendar day offset features, you can also choose to align the day boundaries with the checkout time at a site.
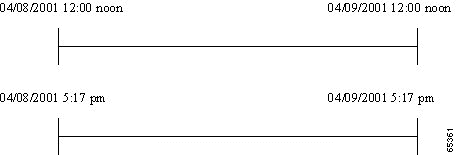
When requested, usage reports can provide reporting information for viewing by a calendar day offset. The calendar day offset can show data either from noon until noon or from a specified start time (24-hour period). Figure 7-3 shows an example of these two ways of displaying data as it occurs on 04/09/2001.
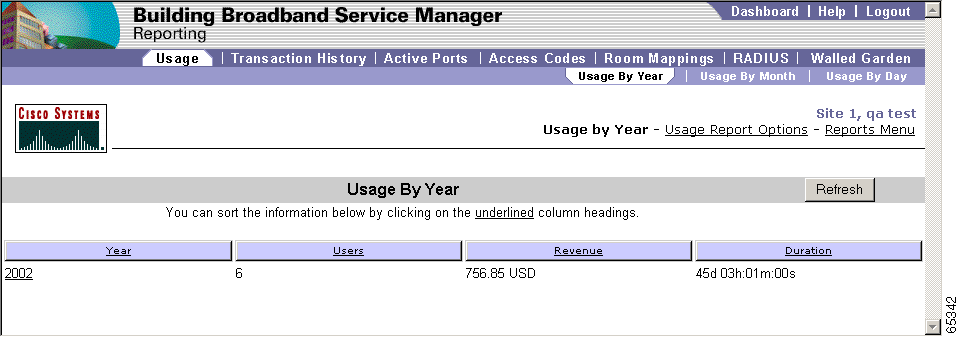
The Usage By Year report lists a yearly summary of usage activity. Use the following procedure to view the report.
Step 2 Click Usage. The Usage Report Options web page appears.
Step 3 To access the usage reports, choose one of these options:
The usage report appears. (Figure 7-4 shows an example Usage By Year usage report.)
Step 4 If desired, use the Calendar Day Offset option to indicate the boundary of a day for reporting purposes. Typically, you set this to match the billing cycle of a hotel PMS system.
Step 5 To view the report, click Get Usage Report.
The Usage by Month report lists the monthly activity for a specific year. Use the following procedure to view the report.
Step 2 Click Usage. The Usage Report Options web page appears.
Step 3 To access the usage reports, choose one of these options:
The usage report appears. (Figure 7-5 shows an example Usage By Month usage report.)
Step 4 If desired, use the Calendar Day Offset to indicate the boundary of a day for reporting purposes. Typically, you set this to match the billing cycle of a hotel PMS system.
Step 5 To view the report, click Get Usage Report.
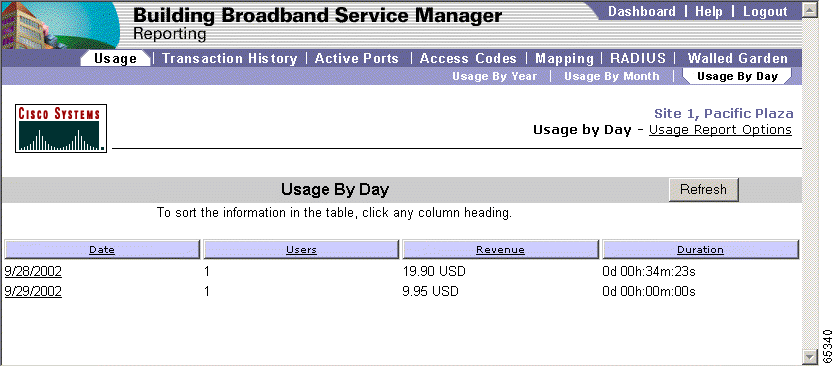
The Usage by Day report lists all the usage days for the specified month. Use the following procedure to view the Usage By Day report.
Step 2 Click Usage. The Usage Report Options web page appears.
Step 3 To access the usage reports, choose one of these options:
The usage report appears. (Figure 7-6 shows an example Usage By Day usage report.)
Step 4 If desired, use the Calendar Day Offset to indicate the boundary of a day for reporting purposes. Typically, you set this to match the billing cycle of a hotel PMS system.
Step 5 To view the report, click Get Usage Report.
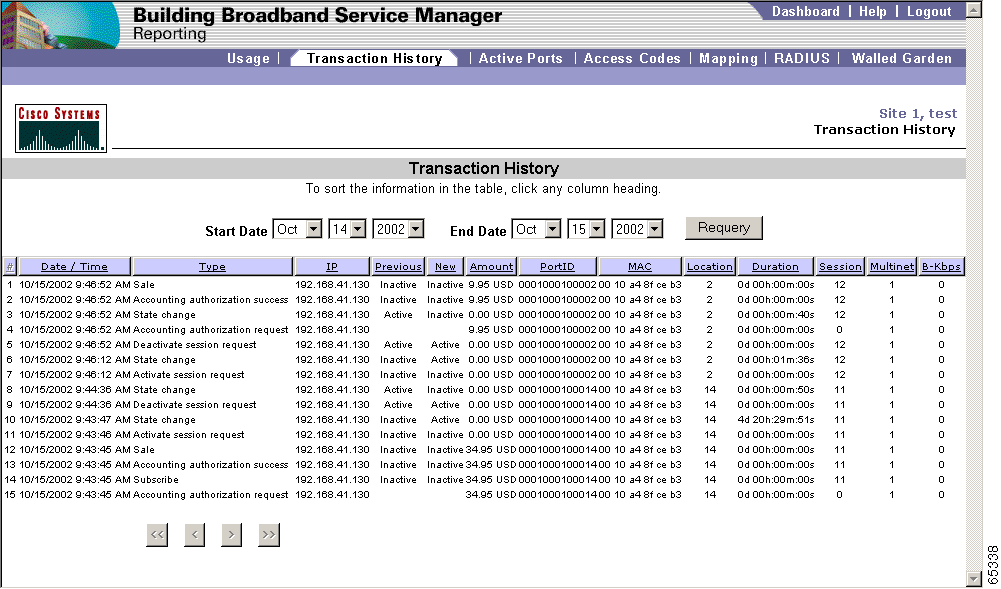
The Transaction History report lists one line per transaction showing the date/time, transaction type, IP address, previous status, new status, amount, port ID, MAC, room, duration, and bandwidth KBPS. shows an example of the report. Use the following procedure to view the report.
Step 2 Click Transaction History. The Transaction History web page appears. (See Figure 7-7.)
Step 3 From the Start Date drop-down menu, select the desired start date for the report.
Step 4 From the End Date drop-down menu, select the desired end date for the report.
Step 5 Click Requery to view the results.
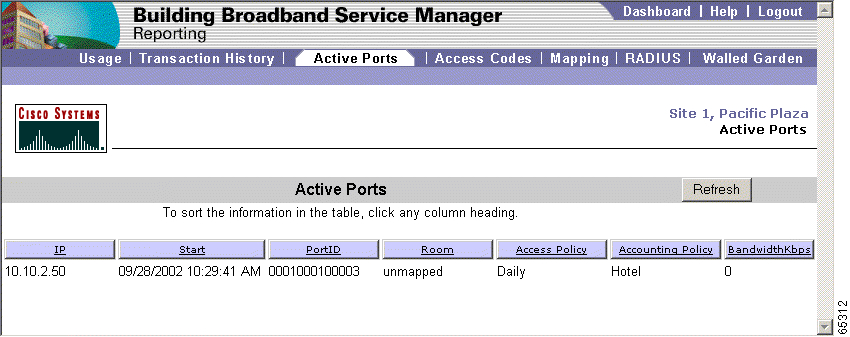
The Active Ports report shows the rooms that are connected to BBSM at the time the report is produced. Use the following procedure to view the Active Ports report.
Step 2 Click Active Ports. The Active Ports web page appears. (See Figure 7-8.)
Step 3 Click a column heading to sort the data in ascending or descending order.
Access Code reports list current, unused, and expired access codes. The following are the three access code report options:
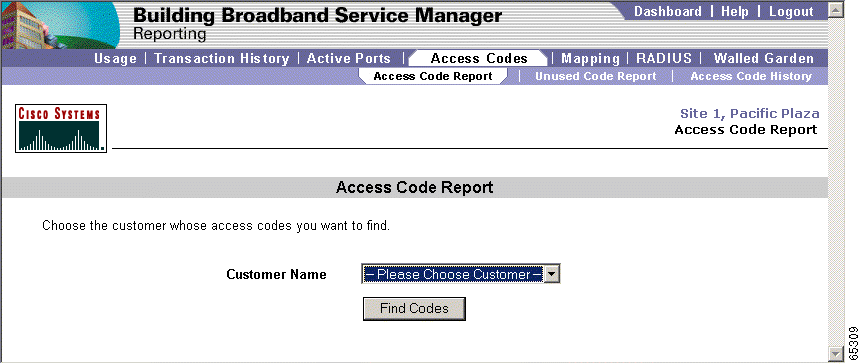
The Access Code report shows the current access codes assigned to a customer. Use the following procedure to view the Access Code report.
Step 2 Click Access Codes. The Access Code Report web page appears. (See Figure 7-9.)
Step 3 From the Customer Name drop-down menu, select the desired Customer Name.
Step 4 From the Codes Valid From drop-down menu, select the desired date.
Step 5 From the Codes Valid To drop-down menu, select the desired date.
Step 6 To view the report, click View Access Codes.
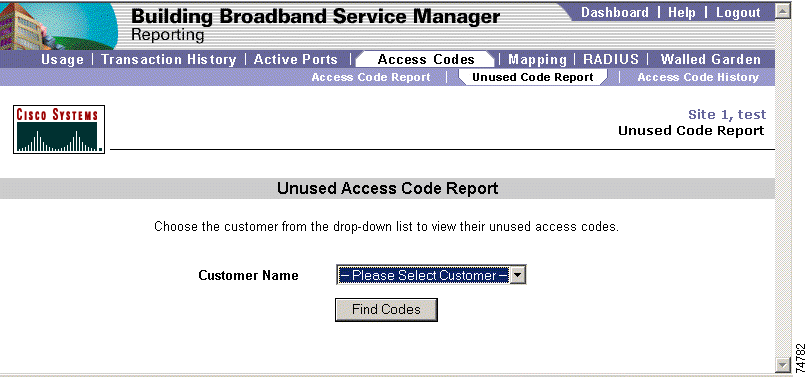
The Unused Code Report shows the unused access codes assigned to a customer. Use the following procedure to view the Unused Code report.
Step 2 Click Access Codes. The Access Code Report web page appears. (See Figure 7-9.)
Step 3 Click Unused Code Report. The Unused Code Report appears. (See Figure 7-10.)
Step 4 From the Select Customer Name drop-down menu, select the desired customer.
Step 5 To view the report, click Find Codes.
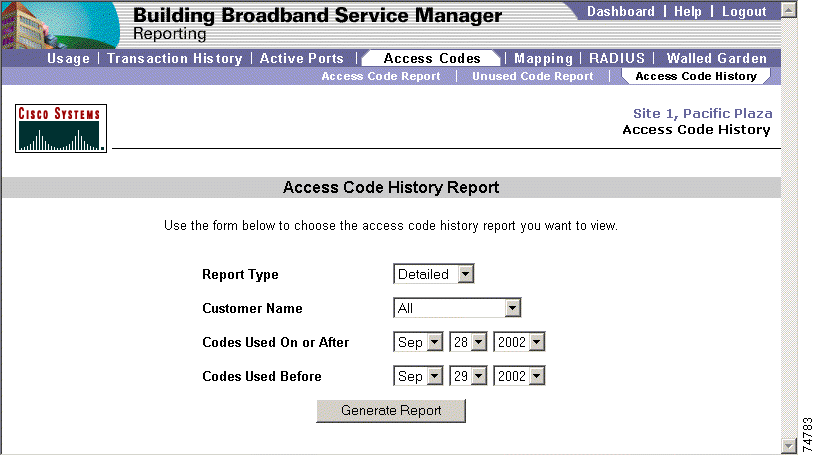
The Access Code History report shows the access codes that have expired. Use the following procedure to view the report.
Step 2 Click Access Codes. The Access Code Report web page appears. (See Figure 7-9.)
Step 3 Click Access Code History. The Access Code History web page appears. (See Figure 7-11.)
Step 4 From the Report Type drop-down menu, select the desired report type: Detailed or Summary.
Step 5 From the Customer Name drop-down menu, select the desired customer name.
Step 6 From the Codes Used On or After drop-down menu, select the start date.
Step 7 From the Codes Used Before drop-down menu, select the desired end date.
Step 8 To view the report, click Generate Report.
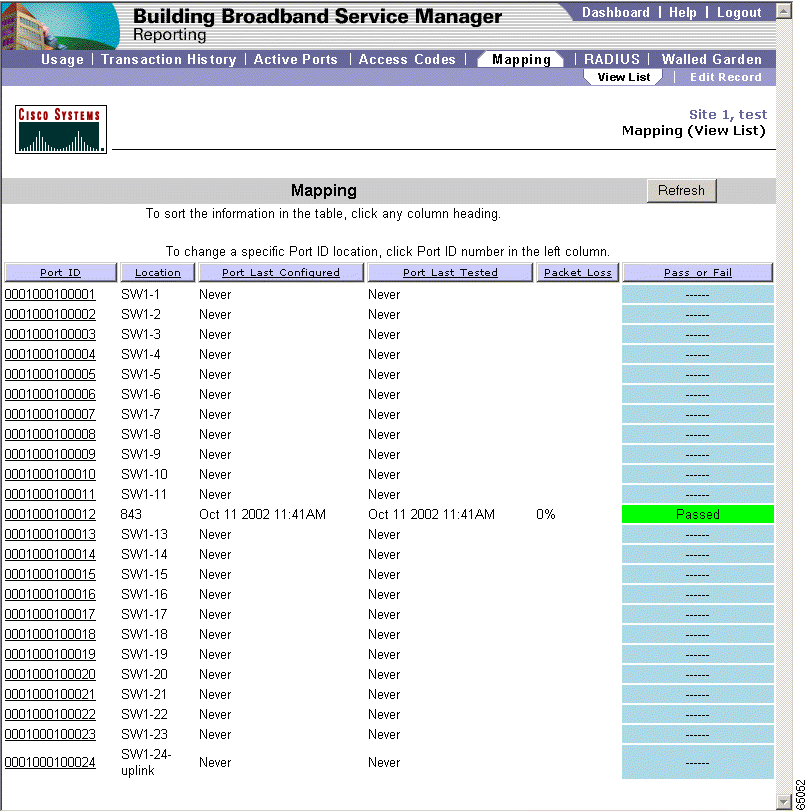
The Room Mappings report lists room numbers with their corresponding port numbers and port configuration information. There are two options available from the secondary navigation bar:
The View List option lists the room numbers and their associated port IDs. Use the following procedure to view the Room Mappings report.
Step 2 Click Room Mappings. The View List of the Room Mappings report web page appears. (See Figure 7-12.)
Step 3 To sort the data in ascending or descending order, click a column heading.
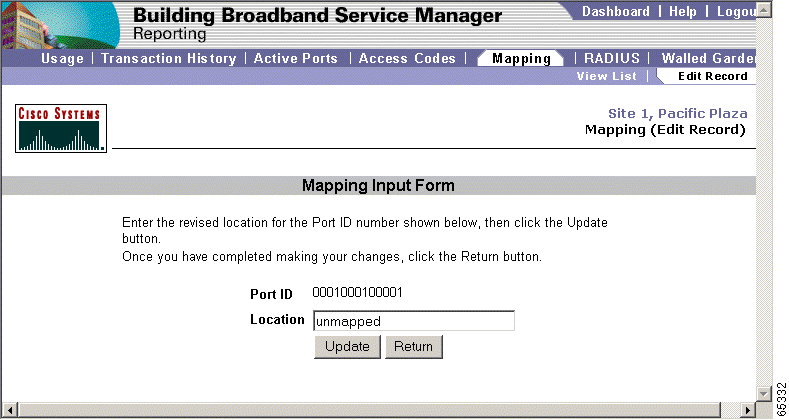
The Room Mappings Input Form allows you to edit data for an individual entry on the Room Mapping list. Note that administrator or operator privileges are required to view and use this form. Use the following procedure to edit the Room Mappings Input Form.
Step 2 Click Room Mappings. The View List of the Room Mappings report web page appears. (See Figure 7-12.)
Step 3 From the Room column, select a room number.
Step 4 Do one of the following.
The Room Mappings Input Form web page appears. (See Figure 7-13.)
Step 5 Enter changes as necessary.
Step 6 To save the changes, click Update.
Step 7 To return to the View List of the Room Mappings report, click Return.
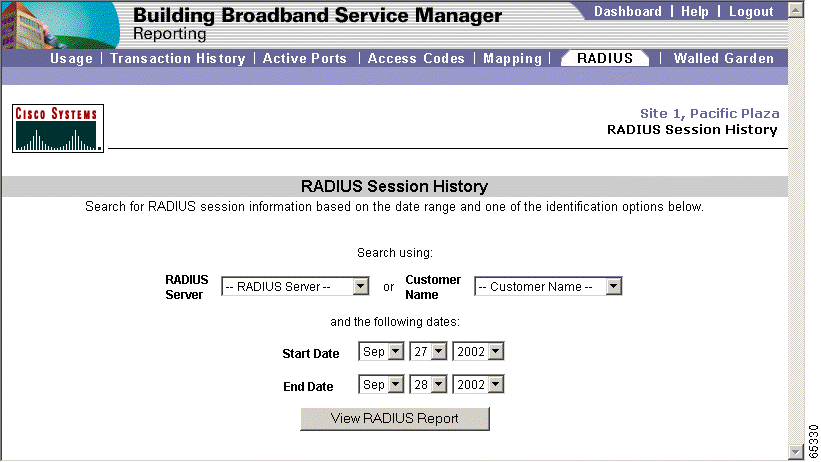
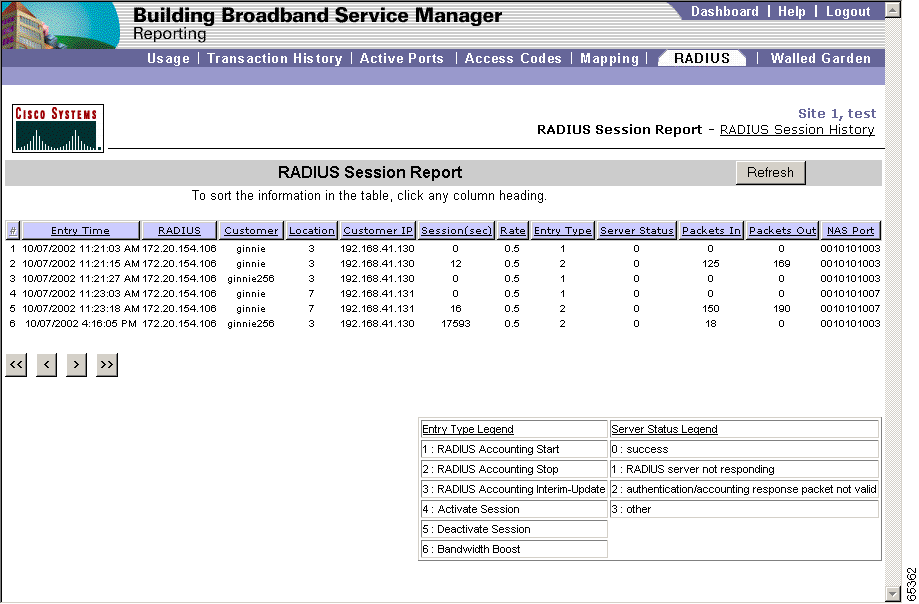
The RADIUS report provides a history of all RADIUS sessions based on either a particular RADIUS server or user. Use the following procedure to view the report.
Step 2 Click RADIUS. The RADIUS Session History web page appears. (See Figure 7-14.)
Step 3 From one of the following drop-down menus, select the desired search criteria:
Step 4 From the Start Date drop-down menu, select the desired report start date.
Step 5 From the End Date drop-down menu, select the desired report end date.
Step 6 Click View RADIUS Report. The RADIUS Session report appears. (See Figure 7-15.)
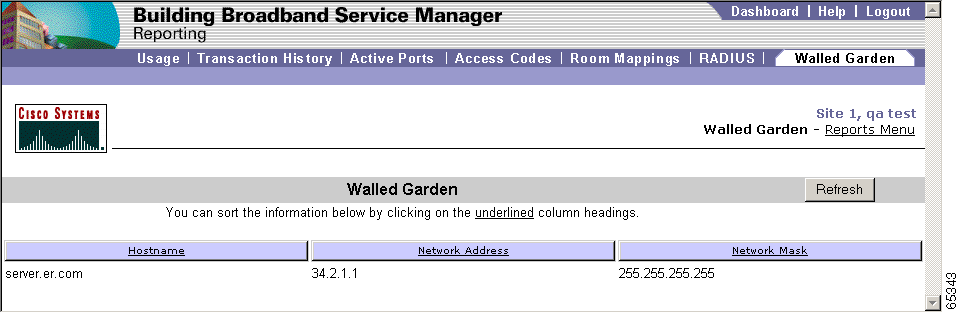
The Walled Garden report displays all of the current walled garden configurations that you created using the Walled Garden web page of WEBconfig. Figure 7-16 shows an example of the report.
Use the following procedure to view the Walled Garden report.
Step 2 Click Walled Garden. The Walled Garden report web page appears. (See Figure 7-1.)
Step 3 To sort the data in ascending or descending order, click a column heading.
![]()
![]()
![]()
![]()
![]()
![]()
![]()
![]()
Posted: Fri Mar 7 14:47:52 PST 2003
All contents are Copyright © 1992--2002 Cisco Systems, Inc. All rights reserved.
Important Notices and Privacy Statement.