|
|

Before you can begin configuring a BBSM server for your network, you must take several preliminary steps, and all network elements must be set up and configured. This chapter covers these critical steps. In addition, be sure to read the cautions below before proceeding.
 |
Caution Do not change the Windows 2000 computer name of your factory-installed BBSM appliance, because the BBSM MSDE database has the name embedded in the application. Changing the name will break the BBSM MSDE function, and you will begin to see SQL server errors being reported on your BBSM server. The only solution to this problem is to reinstall the server from scratch so that the MSDE database function is reinstalled. This problem is a Microsoft issue and not one that the Cisco software team can resolve. If you want a different computer name for your BBSM or BBSD server, you must purchase the CD version of the BBSM software and install the software on a clean Windows 2000 server that already has the desired computer name configured. |
|
Caution The BBSM password must match the SNMP Read/Write Community String password that is configured in the switch hardware. If the BBSM password does not match the switch community string (password), BBSM cannot communicate with the switch, and BBSM cannot locate the end users connected to the switch. Note that the switch password can only be changed by following the switch manufacturer's procedures. Refer to these configuration instructions to change this password. |
|
Caution If you use Netscape for your web browser, because of known compatibility issues with Netscape 4.7x and earlier, you must use Netscape 4.8 or higher for BBSM to work properly. |
|
Caution When using WEBconfig web pages, all active services are stopped when you click Update. This action commits configuration changes to the BBSM server. After the settings are updated, services automatically restart. To prevent disrupting end-user sessions, make changes only when there are no active sessions. The current number of active sessions is found on the server web page. |
Before configuring your BBSM server, be sure a live Internet access point is available at the server. Confirm the configuration of any switches or routers used to access the Internet.
|
Caution For security purposes, before attaching the BBSM to the Internet connection, be sure you have changed the default passwords. Refer to the Requires Immediate Attention Card for Cisco Building Broadband Service Manager Server. If you use a Cisco Building Broadband Service Director (BBSD) server to manage BBSM servers, you must change the BBSD account passwords located on each BBSM server. The BBSD Windows client password must match the BBSD MSDE client password. Be sure you use the same password for both BBSD accounts. Also, install all recommended service packs, patches, and security fixes before attaching the BBSM server to the Internet connection. |
Sites that need a network connection to a Property Management System (PMS) or have a printer attached to the site must use a BBSM site controller to manage those connections.
These are the minimum hardware requirements for the site controller PC:
 |
Note Before creating and configuring any additional sites in WEBconfig, make sure any BBSM network cabling, hardware, routers, switches, or stacks are attached to the new site. |
The site controller computer hardware must be capable of running Windows 2000 Professional and have the following equipment:
Before configuring the site controller you must do the following:
Configure the site controller with a static IP address in the management range that is specified on the Port IPs web page.
Step 2 Right-click Local Area Connection (NIC) and select Properties.
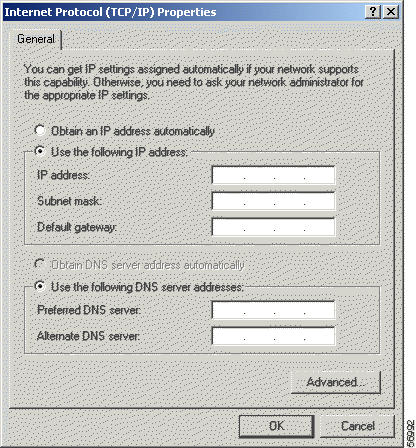
Step 3 Double-click the Internet Protocol component. The Internet Protocol (TCP/IP) Properties window opens. (See Figure 2-1.)
Step 4 Click Use the following IP address.
Step 5 Enter the IP address for your site controller.
Step 6 Enter the Subnet mask used by the internal adapter of your BBSM server.
Step 7 Enter the internal adapter IP address of the BBSM server as the Default gateway.
Step 8 Click OK.
Step 9 Choose Start > Programs > Command Prompt.
Step 10 At the command prompt, type ping xxx.xxx.xxx.xxx (where xxx.xxx.xxx.xxx is the internal adapter IP address for the BBSM server you entered as the gateway in Step 5).
Step 11 Press Enter.
Step 12 Type exit and press Enter to close the window.
Use this procedure to install the site controller software.
Step 2 Click Exit to close the BBSM Installation Wizard.
Step 3 From the CD-ROM drive, double-click the Athdmn folder.
Step 4 Double-click Setup.exe to open the site controller Installation Wizard.
Step 5 From the Welcome window, click Next. Wait while files are copied to the server.
Step 6 Select Yes, I want to Restart the Computer.
Step 7 When the Setup Complete dialog box appears, click Finish.
Step 8 Choose Start > Settings > Control Panel > Add/Remove Programs > Add/Remove Windows Components to install Message Queuing Services. Follow the Microsoft software program addition instructions.
The site controller is now ready for use with the BBSM system.
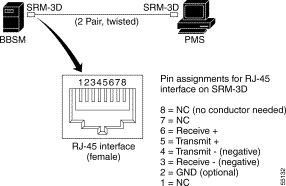
To connect a BBSM server or site controller to a serial port on the PMS, you need a null modem cable (modem cable that swaps transmit and receive lines) rather than a straight-through cable. Check with the hotel property PMS vendor to determine specific cabling requirements.
Use a short-haul modem if the distance between the BBSM server and the PMS is greater than 50 feet. As an example, the RAD SRM-3D short-haul modem has been used successfully with previous BBSM installations. (See Figure 2-3.)
The short-haul modem connects from the BBSM server to the PMS using a crossover cable. To have a good connection, make sure that Transmit+ on one modem connects to Receive + on the other modem, and Transmit - from the first modem connects to Receive - on the other modem.
Before you configure BBSM, make sure that the following tasks have been completed:
This section explains how to prepare the BBSM server by doing the following:
This section describes how to change the default passwords for the BBSM server. (See Table 2-1 for the default passwords.)
| Account | User Name | Password |
|---|---|---|
The Windows 2000 Administrator has full system permissions and rights, can alter any BBSM configuration setting, and has access to any option on the Dashboard. To keep your BBSM server secure, use the following procedure to change the default password "changeme" after you log on for the first time.
|
Note For customer-installed BBSM software, skip this procedure. The administrator password was created during installation. |
Step 2 Double-click Local Users and Groups.
Step 3 Double-click Users.
Step 4 Right-click Administrator.
Step 5 Select Set Password.
Step 6 Enter the new administrator password. The screen will show only asterisks.
Step 7 Enter the new password again in the Confirm password entry field and click OK.
Step 8 When The password has been changed window appears, click OK.
Step 9 Close the Computer Management window.
To change the MSDE passwords, type this command line at the command prompt:
|
Caution The BBSD Windows client password must match the BBSD MSDE client password. Be sure you use the same password for both BBSD accounts. |
Before beginning the basic configuration of your BBSM server, be sure to determine if any service packs or patches need to be installed. We recommend that you install all available service packs and patches to maximize the functionality of your BBSM server. For instructions on performing these installations, see "Installing Service Packs, Patches, and Upgrades (WEBpatch)."
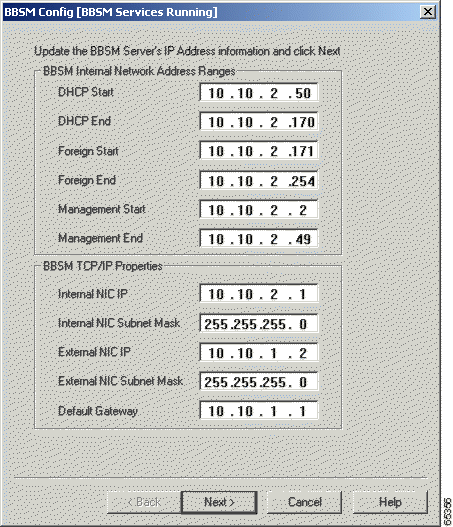
To ensure that BBSM functions properly, the correct TCP/IP settings must be in place. Because TCP/IP settings cannot be changed or updated from the BBSM web pages, use the Address Change Wizard to correct the IP addresses.
|
Caution If the TCP/IP properties are not correctly set, BBSM will not function properly. The external TCP/IP properties cannot be changed or updated in the Port IP Addresses web page. |
Step 2 If the BBSM server's IP address information is incorrect, enter the correct information.
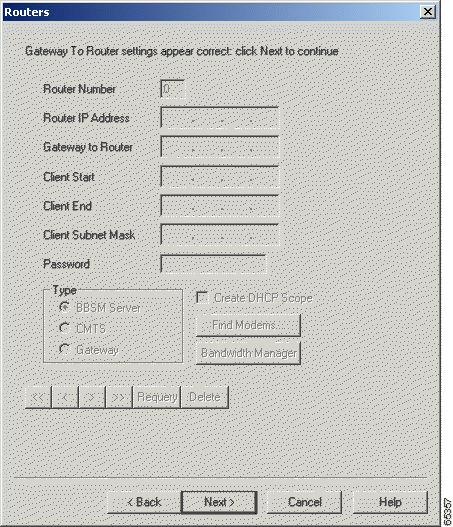
Step 3 Click Next. The Routers window appears. (See Figure 2-6.)
Step 4 If the Gateway To Router settings are incorrect, enter the correct settings.
Step 5 Click Next. The Switches window appears. (See Figure 2-7.)
Step 6 If the Stack IP Address is incorrect, enter the IP address. If necessary, click Defaults to access the default settings.
Step 7 Click Finish.
|
Note The server may prompt you to reboot after you click Finish. If it does, click the appropriate button to proceed. While the server is rebooting, you cannot access the BBSM server. |
Switch Discovery is a utility that locates switches connected to a bridged BBSM network, determines their type, and creates records for them in the BBSM database. This program only finds switches that are already connected to the network and have been properly configured with an IP address and the same SNMP read/write community string.
|
Caution Run the Switch Discovery Wizard only once at the beginning on an installation. Do not rerun it to find newly added switches, because running it again clears the existing data. Add any new switches manually and then remap the ports without clearing the existing port map. |
|
Note Switch Discovery is designed for a single-site, bridged configuration of a BBSM server. The Switch Discovery Wizard does not work with routed or mixed networks. |
Follow this procedure to run the Switch Discovery Wizard.
Step 2 Enter the site description and location.
|
Caution Do not check the PMS Billing check box. If you do, a charge of $9.95 will be applied to each room that is mapped. |
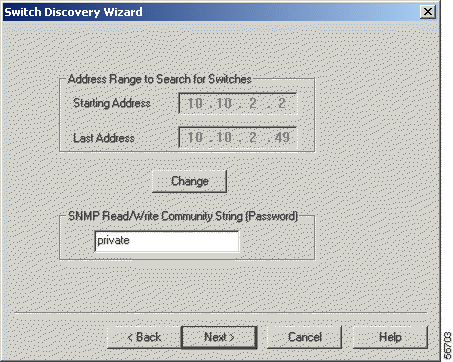
Step 3 Click Next. The Switch Discovery Wizard dialog box appears. (See Figure 2-9.)
Step 4 In the SNMP Read/Write Community String (Password) field, verify that the password is the same as the one used for the switch hardware. The password must be the same for all the switches.
Step 5 Click Change. A confirmation dialog box appears. (See Figure 2-10.)
Step 6 Click Yes to clear the message.
Step 7 Enter the correct address range. To speed the discovery process, enter the address of the last switch in the Last Address field.
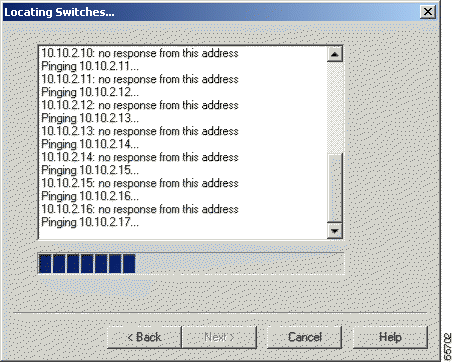
Step 8 Click Next. The Locating Switches dialog box appears. (See Figure 2-11.)
|
Note The Switch Discovery Wizard determines which ports are connected to uplink ports. This information is stored in the BBSM database. |
|
Note If you are using switches that use the same identifier name for different models, a dialog box opens. Select the model that you are using and click OK. |
Step 9 After all the switches are located, the utility enables the Next button. Click Next. The Generate Port Map screen appears. (See Figure 2-12.)
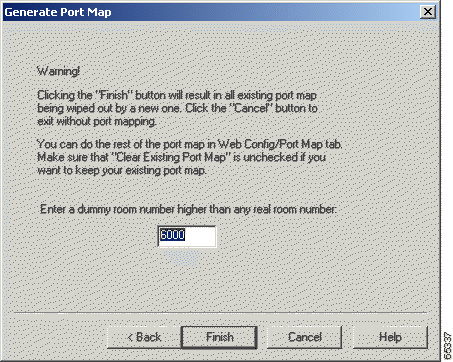
Step 10 Accept the default dummy room number (or enter a different number, such as a number larger than the highest room number). Click Finish. A completion dialog box appears. (See Figure 2-13.)
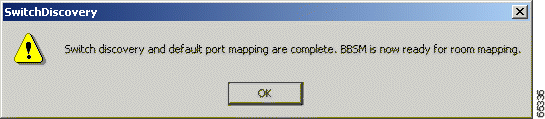
Step 11 Click OK. Windows Notepad opens, displaying a log of Switch Discovery activities.
Step 12 After reviewing the log, close the window.
KeyView Pro 6.5 software must be purchased and installed to enable web printing on the BBSM server. The software is available separately from most software vendors. Follow these steps to install KeyView Pro.
|
Note If you are not planning on using the Web Printing feature of BBSM, you can skip this procedure. |
Step 2 At the Install options window, click Install KeyView Pro.
Step 3 To bypass the Welcome screen, click Next.
Step 4 At the Software License Agreement window, read the license agreement and click Yes to accept and continue.
Step 5 At the Registration window, enter the KeyView Pro serial number, and click Next.
Step 6 At the Destination Path window, click Next to accept the default destination directory.
Step 7 From the Integration window, click Next.
Step 8 To ignore the Information message and continue the installation, click OK.
Step 9 Close the readme.txt file.
Step 10 Remove the KeyView Pro Installation CD from the CD-ROM drive.
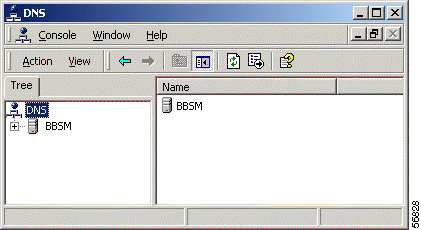
The Domain Name System (DNS) forwarding feature allows you to relay DNS requests to a remote DNS server on another network. Follow these steps to configure DNS forwarding.
|
Note You must obtain the IP address for your DNS servers from your ISP before you can perform the following procedure. |
Step 2 In either pane, right-click your BBSM server name.
Step 3 Click Properties. The BBSM Properties window appears.
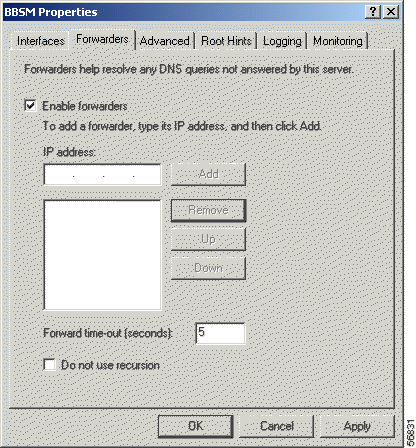
Step 4 Click the Forwarders tab.
Step 5 Check the Enable forwarders check box.
Step 6 In the IP address field, enter your Internet service provider's IP address in the IP address field, and click Add. Repeat this step for each DNS server IP address.
Step 7 Click OK.
Step 8 Close the DNS window.
Step 9 Restart your computer and log on as administrator with the proper password.
![]()
![]()
![]()
![]()
![]()
![]()
![]()
![]()
Posted: Fri Mar 7 14:38:00 PST 2003
All contents are Copyright © 1992--2002 Cisco Systems, Inc. All rights reserved.
Important Notices and Privacy Statement.