|
|

This chapter describes the basic steps for configuring the Content Router and the content routing agents.
After you physically install the Content Router hardware, configure the software by performing these tasks in the following order:
1. Collecting the Information Required for Initial Configuration
2. Initializing the Content Router Software
3. Configuring Direct or WCCP Mode
4. Configuring Domains on the Content Router
 |
Note See "Cisco Content Router Software, Release 1.0 Commands," for detailed information about many of the commands mentioned in this chapter. |
Step 2 Gather the following information for each domain you want the Content Router to support:
Step 3 Open a window for the Content Router console using your terminal emulation program and power on the Content Router.
When the Content Router begins booting, it sends messages to the console window. After the operating system boots, you are ready to initialize the basic software configuration.
Step 4 Proceed to the "Initializing the Content Router Software" section.
To initialize the Content Router basic configuration after the operating system has booted:
|
Note The Content Router does not display ***** (asterisks) while you are verifying your admin password. |
---- System Configuration Dialog ----
You may use Ctrl-D to abort Configuration Dialog at any prompt.
Would you like to enter the initial configuration? [yes]: yes

host name: boomerang

domain name: cisco.com

admin password: test

host IP address: 10.1.58.5

IP network mask: 255.255.255.0
gateway IP address: 10.1.58.1

DNS server: 172.16.2.132
Step 2 If the basic configuration is acceptable, enter yes. The Content Router indicates whether the configuration is accepted. At this point, the basic configuration is finished.
Use this configuration? [yes]: yes

>> Building configuration...
>> . . START - phase complete
Step 3 Proceed to the "Configuring Direct or WCCP Mode" section, and then continue to "Configuring Domains on the Content Router" section.
In performing the configuration tasks that follow, it may be useful to refer to Figure 6-1 for an example of a boomerang-configured network in direct mode, and Figure 6-2 for an example of a boomerang-configured network in WCCP mode.

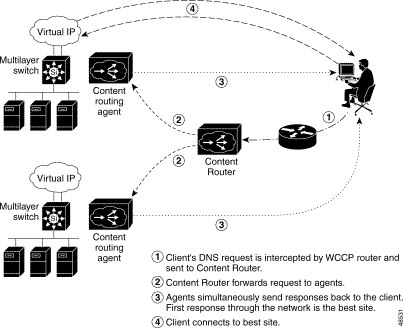
The Content Router can operate in either direct mode or Web Cache Communication Protocol (WCCP) mode. To operate in direct mode, which uses DNS Delegation Insertion, direct mode must be enabled on the Content Router. In direct mode, the Content Router acts as the authoritative DNS server for all domains configured on the Content Router. DNS Address requests are sent directly from a local DNS server to the Content Router. To operate in WCCP mode, which uses Edge Intercept Insertion, WCCP must be enabled on the Content Router as well as on a router in the path to the Content Router and the primary DNS server. This router must also be configured to send DNS Address requests to the Content Router.
For example, to make a Content Router with IP address 10.10.10.1 the DNS server for www.domain.com, you would add these DNS resource records:
www.domain.com	IN	NS	boomerang

boomerang	IN	A	10.10.10.1
Step 2 Use the boomerang dns enable command on the Content Router to specify direct mode.
Console (config)# boomerang dns enable direct-mode
In order to configure WCCP on a router, you must already be familiar with basic router configuration. If you are not familiar with basic router configuration, consult the Cisco IOS documentation supplied with the router. Detailed information for the router commands mentioned here is in the Cisco IOS documentation. Refer to "Web Cache Communication Protocol Version 2," for more information.
To configure a router to redirect DNS address requests to the Content Router:
Router(config)# ip wccp 50
You can confirm your settings using the following show commands on the router:
Step 4 Use the boomerang dns enable command on the Content Router to establish WCCP mode and configure the Content Router to accept redirected DNS address requests.
Console (config)# boomerang dns enable wccp-mode
Step 5 Enable WCCP and associate the Content Router with downstream routers. For example, if the router's IP address is 172.46.67.1, enter these commands:
Console (config)# wccp router-list 1 172.46.67.1

Console (config)# wccp boomerang router-list-num 1

Console (config)# wccp version 2
|
Note In WCCP mode, to disable the boomerang process temporarily, disable WCCP on the router instead of disabling the individual Content Routers. Do so by using the no ip wccp command on the router. |
On the Content Router, configure each domain you want the Content Router to support.
For each domain, perform the following steps:
Console (config)# boomerang dns domain www.foo.com
After entering this command you are in boomerang configuration mode, where you can configure the specified domain.
Step 2 Use the key keyword command to establish a keyword that will be used to encrypt data sent between the Content Router and each content routing agent. For example, if you wanted to use MySecret as the keyword, enter:
Console (config-boomerang)# key MySecret
|
Note You need to use the key command to enter this same keyword on each agent when you configure the agents for this domain. See "Configuring the Content Routing Agents" section. You can use a unique keyword for each domain. |
Step 3 Use the origin-server ip-address command to specify the "last chance" response server for the domain. For example, if the origin server is located at IP address 10.10.10.5, enter:
Console (config-boomerang)# origin-server 10.10.10.5
|
Note You must use the origin-server command when you configure the Content Router in direct mode. In WCCP mode, if all content is supplied through push technology from the origin server to the content server, then it is not necessary to use the origin-server command. However, the origin-server command is necessary in WCCP mode if the content servers will pull the content from the origin server. |
Step 4 Use the client ip-address command to specify the IP addresses of each content routing agent. For example:
Console (config-boomerang)# client 192.10.33.2 nickname NewYork

Console (config-boomerang)# client 149.10.10.21 nickname SanFrancisco
|
Note Additional Content Router configuration command options are available for many of these commands. See the "Boomerang Configuration Commands" section of Appendix B for complete command syntax listings. |
Proceed to the "Configuring the Content Routing Agents" section.
To configure each agent for each domain that it supports, perform the following steps on each system you use as an agent.
First, prepare the agent for configuration:
Step 2 In global configuration mode, enter the following command:
Console(config)# http proxy outgoing exclude enable
Step 3 Enter the following command:
Console(config)# http proxy incoming 80
Step 4 Enter the following command:
Console(config)# boomerang dns enable
Next, perform the following steps for each of the domains you associated the agent with when you configured domains on the Content Router:
Console (config)# boomerang dns domain www.foo.com
After entering this command you are in boomerang configuration mode, where you can configure this domain on the agent.
Step 2 Use the key keyword command to configure the same keyword on the agent that you configured on the Content Router. For example, if MySecret is the key entered on the Content Router for this domain, enter:
Console (config-boomerang)# key MySecret
Step 3 If the agent is not serving or caching the Web content, use the content-server ip-address command to point to the external content source. For example:
Console (config-boomerang)# content-server 10.4.23.10
|
Note For more information about all of the boomerang commands for the agents, including command options and additional commands, refer to the documentation supplied with the software that is running on the agent. |
Once you have configured the Content Router and the content routing agents, check to ensure that the Content Router is working properly.
The one-way delay to the agents is shown in milliseconds. If the agent is repeatedly unreachable, the word "unknown" is displayed instead of a number.
Step 2 From a machine on a network near an agent, start a Web browser and open various Web pages within the configured domain. Access some pages more than once to ensure that some pages are in the cache. If the agent is a Cache Engine, use the show boomerang domain command on the agent. There should be a nonzero value for "Total bytes served." For example:
newyork# show boomerang www.download.cisco.com

DNS packets with unknown domain	0

HTTP hostname requests dropped		0


Domain www.download.cisco.com

    Content server	172.29.249.234

    Origin server	172.29.249.205

    DNS A record requests		4

    Dropped (server down)		0

    Dropped (CPU busy)		0

    Security failures		0

    Cache hit bytes	4713

    Cache miss bytes	1571

    Total bytes served	6284
![]()
![]()
![]()
![]()
![]()
![]()
![]()
![]()
Posted: Fri Dec 29 10:15:41 PST 2000
Copyright 1989-2000©Cisco Systems Inc.