|
|

This chapter provides procedures for performing the common tasks encountered during the initial provisioning and operation of a VNS network. It includes the following sections:
To properly configure and provision a VNS network, you must do a good deal of planning before hand. For a typical VNS network installation, you will probably:
The rest of this planning section will use a simple VNS network to illustrate the process.
Figure 8-1 illustrates a simple network consisting of four IGX switches. Each IGX switch has one PBX attached to it. In reality, there would typically be more than one PBX attached to each node.

Only a single VNS will be added to the topology of Figure 8-1. The VNS has been connected to IGX switch 1-1 as shown in Figure 8-2. (Sometimes the node, IGX or IPX switch, to which the VNS is directly attached is referred to as the "master node". The single VNS is responsible for the nodes (IGX switch 1-1, 1-2, 2-1, and 2-2) in its area. (When there is only a single VNS area, the configuration is much simpler. There do not have to be frame-relay connections between VNS's.) Figure 8-2 also points out the UNI (user-to-network interfaces) and Voice Ports that will have to be configured for this VNS network.
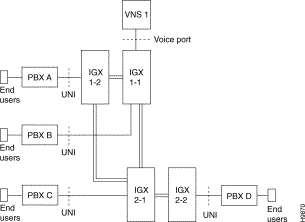
Table 8-1 lists some of the information that you should note about the VNS. The VNS information will be used in the provisioning, especially in the VNS Information, More VNS Info and Redundancy Information, and Nodes Information menus.
| VNS Name | VNS IP Address | Node Name | Node IP Address | Peer IP Address |
|---|---|---|---|---|
VNS 1 | 200.1.2.3 | IGX1-1 | 200.1.2.4 | Not used here |
Note 1: The VNS and Node IP addresses are only used for example. Your IP addresses should be consistent with the IP addresses of your network and must be assigned by your network administrator. Note 2: The peer IP address, not used in this example, is the IP address of the redundant (standby) VNS in a redundant pair. | ||||
Identify all the adjacent pairs of VNS's in the network. In this release, all the VNS's are connected through a full-mesh network. For each pair of VNS's, you should note the VNS hostname, the Voice Port Id (node.slot.port notation) of the Node's Frame Relay Port to which it is attached. Remember for each pair of VNS's, one side of this connection will be configured as U-SPNNI and the other will be N-SPNNI. You should also note the local and remote DLCIs for this connection which you configure with the Local Adjacency Information menu.
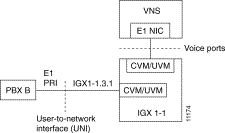
There is a user-to-network interface (UNI) for each PBX in the VNS network. A UNI port is identified by standard Cisco node.slot.port notation for the CVM or UVM (or CDP for the IPX switch) on the node to which the PBX is connected. Figure 8-3 illustrates this notation for the UNI port between PBX B and IGX switch 1-1 in the sample VNS network shown in Figure 8-3. Table 8-2 lists the UNI notation for the other UNI ports in our sample VNS network. Table 8-3 lists the IDs for the Voice Ports, i.e., the interface between the VNS's E1 NIC cards and the node.
This information will be used in the Cards Information, Ports Information, and More VNS and Redundancy Information menus.
| UNI Ports | Node ID. |
|---|---|
PBX A | IGX 1-2.4.1 |
PBX B | IGX 1-1.3.1 |
PBX C | IGX 2-1.4.1 |
PBX D | IGX 2-2.4.1 |
| Voice Port | Node ID. |
|---|---|
Voice Port 1 | IGX 1-1.4.1 |
Voice Port 2 | Not used in this example |
Note: There are two E1 NICs in each VNS. Each E1 NIC will be connected to a different CVM or UVM (or CDP in an IPX switch) port. When only one E1 NIC is needed, you should connect Voice Port 1. | |
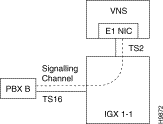
There will be a signaling channel from each PBX (i.e., UNI port) to the VNS which is responsible for it. Figure 8-4 illustrates this UNI to VNS signaling channel for PBX 2 in the sample VNS network shown in Figure 8-2. The PBX to IGX switch connection is a channelized E1 connection, and timeslot (TS) 16 is typically used as the signaling channel at the UNI interface. (For CAS signaling as described in Appendix I, the signaling channel is DS0 25.) At the Voice Port interface, i.e., the connection between the node and VNS's E1 NIC, the timeslot is user assigned. Any of the E1 NIC's 30 timeslots can be assigned for this side of the signaling channel. Each timeslot of the channelized E1 connection (i.e., E1 NIC to node's CVM or CDP) can only be used for one PBX, i.e., PRI interface.
Table 8-4 lists the UNI signaling channel information for each of the PBX's (i.e., UNI ports) in the sample VNS network of Figure 8-2. This information is used primarily in the Ports Information menu.
| UNI Ports | UNI Channel | VNS Channel | First Channel for User Signaling | Last Channel for User Signaling | Channel Allocation |
|---|---|---|---|---|---|
PBX A | 16 | 1 | 1 | 30 | QSIG or DPNSS |
PBX B | 16 | 2 | 1 | 30 | QSIG or DPNSS |
PBX C | 16 | 3 | 1 | 30 | QSIG or DPNSS |
PBX D | 16 | 4 | 1 | 30 | QSIG or DPNSS |
To set up a numbering plan, you have to assign addresses (i.e., E.164 telephone numbers) to every UNI port in the VNS network. Table 8-5 lists the addresses for the UNI ports in our sample VNS network shown in Figure 8-2. This information is used primarily to complete the Address Information menu. Each UNI port address can be up to 40 digits long.
| UNI Ports | Port ID | Address (E.164 number) |
|---|---|---|
PBX A | IGX 1-2.4.1 | xxxxxxxxxxxxxx |
PBX B | IGX 1-1.3.1 | xxxxxxxxxxxxxx |
PBX C | IGX 2-1.4.1 | xxxxxxxxxxxxxx |
PBX D | IGX 2-2.4.1 | xxxxxxxxxxxxxx |
You can assign network prefixes to a VNS area to help organize the numbering plan for the VNS network. Table 8-6 provides address prefix information for our sample VNS network shown in Figure 8-2. This information is used primarily in the Network Prefixes Information menu. Address Prefixes, which can be up to 30 digits long, are typically used to identify a VNS area.
| VNS Area | Address Prefix |
|---|---|
VNS 1 | xxxxxxxxxxxxxxxx |
Finally for each voice port you can specifying the Address Screening and Transformation Information that would go in Table 8-7. This information is used in the Address Screening Information and Transformation Rules Information menus.
| UNI Port ID | Address Screening | Address Transformation |
|---|---|---|
Node.slot.port | xxxxxxxxxxxxxxxx | xxxxxxxxxxxxxxxx |
Node.slot.port | xxxxxxxxxxxxxxxx | xxxxxxxxxxxxxxxx |
Node.slot.port | xxxxxxxxxxxxxxxx | xxxxxxxxxxxxxxxx |
After you have planned your VNS network, installed the necessary nodes (IGX/IPX switches), and installed and connected the VNS's, you are almost ready to use the VNS Configuration Interface to provision the network. First, however, you must "Up" the ports, lines, and trunks that comprise the VNS network. "Up-ing" ports, lines, and trunks is done through the Cisco wide-area switch's command line interface with the same commands that are used in all Cisco WAN switching networks. Details about these commands and procedures are described in the Cisco IPX Reference, the Cisco IGX 8400 Series Reference and the Cisco WAN Switching Command Reference publications. In addition, the Cisco WAN Switching System Overview provides detailed information about the way various Cisco WAN switching networks are interconnected and operated.
In a VNS network, provisioning consists of:
The VNS Configuration Interface is used to provision the VNS network. During provisioning, the VNS Configuration Interface menus must be completed in four sequential operations:
1. Configure the domain
2. Configure UNI or PBX addressing
3. Configure multiple domains
4. Configure Preferred D-Channel Routes
You should have read Chapter 7, Understanding the VNS Configuration Interface, before you use the menus to configure and provision the VNS and VNS network. As described in Chapter 7, certain fields of one menu must be completed before subsequent menus can be completed. These fields are linked between menus. In other words, the VNS Configuration Interface menus must be completed in the described order.
To configure the domain, complete these menus in the following order:
1. Nodes Information---Complete this menu for each node in the VNS's area. (See Nodes Information.)
2. Cards Information---Complete this menu for each CDP/CVM card in the Cisco IGX/IPX wide-area switch. (See Cards Information.)
3. VNS Information---Complete this menu for each VNS in your network. (See VNS Information.)
4. More DNS Info and Redundancy Information---Complete this menu for each redundant pair of VNS's in your network. The menu has to be completed for both the first and second VNS's. (See More VNS Info and Redundancy Information.)
When you install redundant pair of VNSs, you first configure the domain for the active VNS, then restart the standby VNS to trigger a bulk database update. To configure redundant VNSs, follow these steps:
Step 1 Configure the domain for the active VNS:
Step 2 Bring up the standby VNS to initiate a bulk update of the database.
To configure UNI or PBX addressing, complete these menus in the following order:
1. Ports Information---Complete this menu for each UNI Port (i.e., PBX interface) in the VNS's area. (See Port Information.)
2. Screening Type Information---Complete this menu for each UNI Port in your VNS network. (See Screening Type Information.)
3. Address Information---Complete this menu for each UNI Port in the VNS's area. (See Address Information.)
4. Address Screening Information---Complete this menu for each UNI Port in your VNS network. (See Address Screening Information.)
5. Transformation Rules Information---Complete this menu for each UNI Port in your VNS network. (See Transformation Rules Information.)
6. Multihome Port Configurations---Complete this menu for each pair of UNI Ports which you want to multihome. (See Multihome Port Configurations.)
7. Multihome Policy Configurations---Complete this menu for each UNI Port which has multiple multihoming policies configured for it. (See Multihome Policy Configurations.)
To configure multiple domains, complete these menus in the following order.
1. Local Adjacency Information---Complete this menu for each SPNNI frame-relay PVC between the VNSs in your network. (See Local Adjacency Information.)
2. Network Prefixes Information---Complete this menu for each VNS in your network. (See Network Prefixes Information.)
3. Network Adjacency Information---This menu is not used. (See Network Adjacency Information.)
These menus, Local Adjacency Information, Network Prefixes Information, and Network Adjacency Information do not have to be completed if there is only a single VNS area in your network.
You must complete these menus for each VNS (or VNS area) in your network. Within a VNS area, you must complete a menu for each node and each UNI port.
In a multidomain VNS network, there must a SPNNI connection between each VNS domain. This connection must be built from both ends of the connection. For instance, in a two domain network, the connection must be built from domain 1 and domain 2. In other words, the Local Adjacency Information menu must be completed at domain 1 and at domain 2.
For example, if vnslab1 was connected vnsigx1 and controlled domain 1, and vnslab2 was connected to vnsigx2 and controlled domain 2, you will have to create Local Adjacency records at both vnslab1 and vnslab2. Some of the fields on these coordinated records are counterparts, as shown in the following example:
At vnslab1 (domain 1), you complete a Local Adjacency menu making sure the following fields have been completed correctly and point to vnslab2:
At vnslab2 (domain 2), you complete a Local Adjacency menu making sure the following fields have been completed correctly and point to vnslab1:
If this example, a type of global addressing scheme is used to used to identify the VNS domains. Each VNS controlling a domain (or service area) will be assigned a DLCI. Thus, vnslab1 (domain 1) is assigned DLCI 101 and vnslab2 (domain 2) is assigned DLCI 102. If a 3rd domain is added, it would be assigned DLCI 102. (DCLIs 101 to 113 are reserved on the VNS's Frame Relay card as described in Chapter 6 in the section Modifying the Default Range of VNS DLCIs.) Since there can be as many as 14 domains in a network, this makes it easier to keep track of the SPNNI connections between domains.
To configure preferred D channel routes, complete the following menus.
1. Local Adjacency Preferred Route Information--Complete this menu for each Frame Relay PVC between adjacent VNS's for which you wish to specify a particular route through the Cisco WAN switching network. (See Local Adjacency Preferred Route Information.)
2. Port Preferred Route Information--Complete this menu for each UNI port for which you want to configure a preferred route through the Cisco WAN switching network to the VNS.
The configuration database that is created with the VNS Configuration Interface is stored on the VNS's hard disk in a structured format. The VNS provides commands for saving this database file in a flat-file format which can be FTPed to another platform, such as a SV+ Workstation, as a backup or archive file in case the current database is corrupted. (Note that the VNS Configuration and Restore procedure is not the same as the StrataView Plus Config Save and Restore feature.) This backup database can then be restored on the VNS.
 | Caution Database corruption that occurs on a power failure can be corrected only by restoring the database from a backup. The database checksum feature will only detect such a failure; it can not prevent or recover from it. Therefore, you should perform database backups on a regular basis. |
To save the VNS configuration data base, follow these steps:
Step 1 From the StrataView Plus Workstation (or other platform that has IP connectivity to the VNS), telnet to the VNS and log in as root or with your UNIX password.
Step 2 Execute the VNS backup command:
or for remote host:
Where /server/path/ is the path and directory where you are going to be storing the backup (or archive) file. And backup-database-filename.a is what your are naming the file. Use a dot a (.a) extension to indicate that it is an archive file. Write permissions should exist on the remote host.
To restore the VNS configuration data base from an archived file, follow these steps:
Step 1 From the StrataView Plus Workstation (or other platform that has IP connectivity to the VNS), telnet to the VNS and log in as root or with your UNIX password.
Step 2 Execute the VNS restore command:
or for a remote host:
Where /server/path/ is the path and directory from which you are restoring the backup (or archive) file. And backup-database-filename.a is the name of the file that you previously backed up and are not restoring to the VNS.
During the operation of a VNS network, the following tasks are commonly repeated:
When adding a PBX to a VNS network, the following parameters will have to be entered on the VNS Configuration Interface menus:
When removing a PBX (i.e., Voice Port) from a VNS network, the following parameters will have to be deleted through the VNS Configuration Interface menus:
To configure specific Cause Codes for a PBX type, refer to the section Cause Code Mapping in Chapter 7.
When adding a VNS to the network, the following parameters will have to be entered on the VNS Configuration Interface menus:
When removing a VNS from the network, the following parameter will have to be deleted through the VNS Configuration Interface menus:
When adding a redundant VNS, use the VNS configuration interface to:
Note that you can not delete a standby VNS while it is In Service.
When adding an end user (i.e., an address) to a UNI port, the following parameters will have to be entered on the VNS Configuration Interface menus:
When removing an End User (i.e., an address) from a UNI port, the following parameters will have to be deleted through the VNS Configuration Interface menus:
When adding an Address Prefix to a VNS, the following parameters will have to be entered through the VNS Configuration Interface menus:
When deleting an Address Prefix from a VNS, the following parameters will have to be deleted through the VNS Configuration Interface menus:
|
|