|
|

This chapter describes the ESP Configuration Interface, also known as the command line interface (CLI), that is used to configure and provision the ESP and ATM or Frame Relay SVC services. This chapter is divided into the following sections:
The bulk of this chapter lists and describes the various ESP Configuration Interface menus and screens. The final section, Parameter Ranges and Defaults, contains Table 7-1 which lists the menus with user-configurable parameters and their default settings.
The Configuration Interface can be run from a terminal (or PC running terminal emulation software) which is directly connected to the ESP, or from a telnet session.
To start the Configuration Interface, follow these steps:
Step 2 Log in as apsuser using your ESP user password.
Step 3 The ESP Configuration Interface will start, bringing up the Main Menu shown in Figure 7-1.
There can be up to 8 ESP Configuration Interfaces running simultaneously.
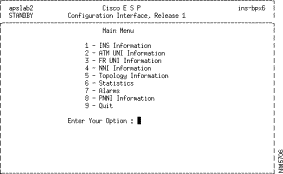
As shown in Figure 7-1, ESP Configuration screens consist of a title bar and a menu area. In the left-hand corner of the title bar, the configured name of this ESP is displayed (shown here as apslab2) and the current Administrative Role (ACTIVE, STANDBY, or STANDALONE, shown here as STANDBY). In the right-hand corner of the title bar, the name of the BPX to which this ESP is attached is displayed (shown here as ins-bpx6). The title bar appears on each ESP Configuration Interface screen. The menu area will contain various menu and screen information.
The ESP Configuration Interface is a series of inter-linked menus, which are used to view and configure various configuration and provisioning parameters for ATM and Frame Relay SVCs and IISP or PNNI routing protocols. All uses of the Configuration Interface start with the Main Menu shown in Figure 7-1. The Main Menu has nine options:
1. INS (ESP) Information leads to the series of menus used to configure the ESP, including its Operational Role and State, Administrative Role and State, Billing Information, and the Node and Shelf Lists. The ESP Information menus also contain the option to download ESP software from the StrataView Plus (SV+) Workstation.
2. ATM UNI Information leads to the series of menus used for adding or deleting ATM User-to-Network (UNI) ports. The ATM UNI port parameters include Protocol Version, Administration State, Operational State, Signaling PVC, Port Addresses and Prefixes, Billing parameters, and Incoming and Outgoing screen policies and addresses.
3. FR (Frame Relay) UNI Information leads to the series of menus used for adding or deleting Frame Relay User-to-Network (UNI) ports. The Frame Relay UNI port parameters include Protocol Version, Administration State, Operational State, Signaling PVC, Port Addresses, Billing parameters, and Incoming and Outgoing screen policies and addresses.
4. NNI Information leads to a series of menus used configure the Network to Network trunks in a BPX Service Node network. The NNI parameters include Port ID, Protocol Version, Administrative State, Operational State, Signaling PVC, NNI Role, and Link Weight. Note that there are different NNI parameters configured for IISP and PNNI trunks.
5. Topology Information provides a series of menus used to add and delete ESP pairs. The ESP pairs are listed along with the weight of the link between them.
6. Statistics are not available in this release.
7. Alarms are not available in this release.
8. PNNI Information leads to a series of menus used to configure the Private Network to Network Interface (PNNI) protocol. These menus include PNNI Parameters, Route Agent Parameters, AvCR (Available Cell Rate) Parameters, and Node ID.
9. Quit exits the ESP Configuration Interface and returns to the UNIX login.
Each option is identified with an index number (for example, 1. ESP Information); you select that option by typing the index number. There is no need to press the Enter key. Each option leads to subsequent menus and screens. A menu is used to configure parameters, while a screen is used to display parameters. In some cases, a Configuration Interface menu is identical to a screen, but the displayed fields cannot be modified. Some menus have a combination of fields some are user-changeable and some are not. Fields which are not user-changeable will be identified as read-only in this chapter.
These menus or screens normally have a list of fields followed by the configured or default parameter or data; for example:
ESP Name: apssvc1Where ESP Name: is the field, and apssvc1 is the configured data. You can move the cursor from field to field with the Tab or Enter keys. The cursor skips over read-only fields, which typically provide status information and are not user configurable. When the cursor is resting in a field on a menu, you can enter a value or parameter or text string in the field, then press Enter. Many fields, for which there is a list of options can be entered as index number. A help line at the bottom of the menu indicates what each acceptable index numbers represents. After you enter the index number and press Enter, a textual description of the choice will appear in the field. Other fields, such as ESP Name, are entered as text strings. The help line at the bottom of the menu will also indicate what the text fields represent.
The following line appears at the bottom of every menu:
Press `c' to commit and `d' to discardWhen you have completed all the fields for the menu, the cursor will rest on this line. If you want to save the data you have entered, press `c' and you will commit the menu. It is now a record. If you do not want to save the data you have entered, press `d' and you will discard the data. You can re-complete this menu until you are satisfied that you have entered everything correctly. Pressing any key other than `c' or `d' will take you to the first field of the menu.
Some menus are lists, such as Node List or Shelf List. On these lists, you can scroll through the items with the up or down arrow keys until the cursor rests on the list item you want to select. Then press Enter to select that item. For faster scrolling, you can use the F1 (Next Page) and F2 (Previous Page) function keys.
The menus or screens also list the Function keys which are active at that time. Pressing the listed Function key will open up another menu or take you back to a previous menu.
The following sections describe all of the Configuration Interface Main Menu options in detail.
The CLI will not accept out of range values or index numbers. When you enter index numbers which are not supported or values that are not within a fields valid range, the Configuration Interface will respond with an error message, such as:
Error in Address. Press `a' if you want

to abort

Press any key to continue
These error messages are typically self-explanatory, and the record will not get committed until you rectify it.
When you select option 1, ESP Information, the ESP Information menu, shown in Figure 7-2, appears. This menu is used to configure the ESP, and connect it to its redundant peer.
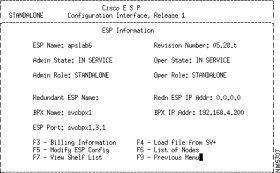
This menu contains the following fields:
The ESP Information menu provides several options which are accessed with the following function keys:
From the ESP Information menu, the F3 key will access the Billing Information menu, shown in Figure 7-3. This menu allows you to display the current billing parameters and to modify their parameters for the entire BPX Service Node. (Note that there is also Billing Information that is configurable on a per-UNI port basis. This UNI Port Billing Information is described in ATM UNI Port Billing Configuration.)
You press F5 when you want to modify the current billing parameters for the BPX Service Node.
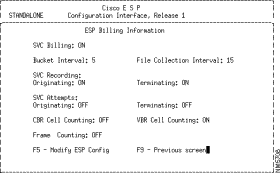
The ESP Billing Information menu includes the following fields:
From the ESP Information menu, the F4 key accesses the Download File from SV+ option, shown in Figure 7-4. This option allows you to download either the ESP binary file (the executable ESP application software) or a configuration file (that is the ESP configuration that has been stored on the SV Plus Workstation) to the ESP. The ESP binary will load into a partition of the ESP from where it can be run. The downloaded software will not replace the existing software until the ESP is reset.
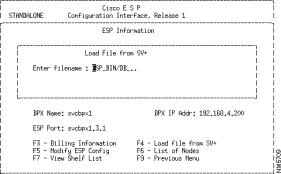
Typically the ESP should be taken Out of Service before you download either the ESP software or the ESP configuration file from the SV Plus Workstation.
The Modify ESP Config (Configuration) option is allows you to change the values for an already configured ESP. The menu is similar to the ESP Information menu shown in Figure 7-2.
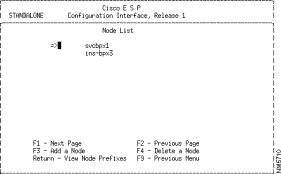
From the ESP Information menu, the F6 key accesses the List of Nodes menu, shown in Figure 7-5. This menu is only used for IISP networks. This menu provides a list of all the BPX Service Nodes in the network. There can be a maximum of 32 nodes listed.
The up and down arrow keys will move the cursor up and down the node list. When the list expands to more than one page, the F1 - Next Page and F2 - Previous Page keys toggle between pages.
If you want to see a list of node prefixes, move the cursor to a specific node (for example, bpxsvc1) and press Return. The Node Prefixes list shown in Figure 7-7 appears.
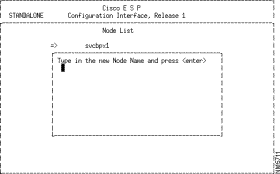
By pressing the F3 key from the Node List screen, you can Add a Node to the list with the menu shown in Figure 7-6. It is possible to add a maximum of 5 nodes at a single time.
Remember, for PNNI networks, you do not have to manually enter nodes in the list; PNNI automatically finds all the nodes in the network.
The Node Prefixes for the BPX attached to this ESP are not available. The first node in the list is the BPX attached to this ESP.

You will only see Node Prefixes for IISP networks.
The F3 —Add a Node Prefix key opens the Add a Node Prefix menu shown in Figure 7-8. This menu allows you to assign a prefix to a node which will accelerate the processing required to find a route to the node. When the ESP is searching for a route to an address at that node, it will only have to match the prefix (13 bytes) instead of the full 20 byte address. Naturally all ATM addresses on the node must have the same 13 byte prefix. You can also enter a Node Prefix that is less than 13 bytes.

From the ESP Information menu, the F7 key accesses the View Shelf menu, shown in Figure 7-9. The Shelf List screen lists all the AXIS shelves attached to this BPX Service Node. The F3 key allows you to add a shelf to this list with the menu shown in Figure 7-10. The arrow keys move you up and down the list. The F1 (Next Page) and F2 (Previous Page) move you back and forth between pages when the list has expanded to multiple screens. There can be a maximum of 10 shelves in the list.


The Add a New Shelf menu contains the following fields:
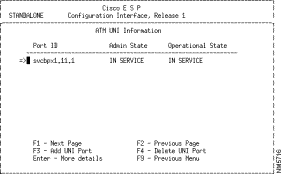
Option 2 on the ESP main menu accesses a UNI Information menu, shown in Figure 7-11. The UNI Information menu displays a list of UNI ports on this BPX Service Node. The UNI ports are listed by their Port Ids (Node.slot.port) and their current Administrative and Operational States.
You can add or delete UNI ports from the BPX Service Node provisioning with the F3 and F4 keys from this menu. The F3 key leads to the Add UNI Port menu shown in Figure 7-12.
Pressing the Enter key presents More Information about a selected UNI port as shown in Figure 7-13.
From the main UNI Information screen, you can use the F3 key to access the Add a UNI port menu, shown in Figure 7-12. This menu is similar to the More UNI Information menu, however, it also allows you to configure the various UNI port parameters and provides on-screen information about the various fields that must be completed to add an UNI port to the BPX Service Node.
You can only change UNI Port parameters when the port is Out of Service. (For Frame Relay UNI port parameters see the section, Frame Relay UNI Information.)

The Add a UNI Port menu contains the following fields:
After you have completed all the UNI port parameters, you either commit them by entering `c' or discard them by entering `d'.
Once an ATM UNI port record has been configured and committed with the Add an UNI Port option, it will appear in the in the ATM UNI Formation list as shown in Figure 7-11. Selecting an ATM UNI port in this list and pressing Enter (Enter - More Details) brings up the More UNI Information screen shown in Figure 7-13. This screen is a record of the parameters that were configured with the Add UNI Port menu with the addition of a series of function keys that provide a means of configuring other parameters relevant to this ATM UNI port.

The More ATM UNI Information screen presents the following parameters:
The More UNI Information also responds to the following function keys:
F1 - View Port Addresses
F2 - View Incoming called numbers
F3 - View Address Prefixes
F4- View Outgoing calling numbers
F5 - Modify UNI Info
F6- - View Billing Configuration
F9 - Previous Menu
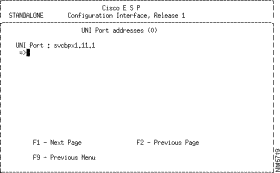
From the More UNI Information screen, the F1 key leads to the View Port Address menu which is shown in Figure 7-14. This screen lists the type of UNI Port address (for example, NSAP_164) then lists the address. For 20-byte ATM addresses, the bytes are shown separated by colons.
This menu also lists the number of UNI Port Addresses which have been configured in the parenthesis. The number of configured UNI port addresses is listed in parenthesis at the top of the screen.
If ILMI address registration has been Disabled on the UNI Information menu for this port, you will not be able to enter address prefixes. Without ILMI address registration, you will have to enter a full 20-byte address.
With ILMI address registration Enabled, you must enter the 13-byte prefix.
From the More UNI Information screen, the F2 key leads to the UNI Incoming Called Party #s screen. This screen, shown in Figure 7-15, is used to display and to add or delete UNI Ingress Port Screen Addresses. This screen lists the UNI Port ID (for example, bpxsvc1.3.1) and all the Ingress Screen Addresses that have been provisioned. The number of UNI Incoming called party numbers that have been configured is listed in parenthesis at the top of the screen. The configured Incoming Called Party screening policy is also listed.

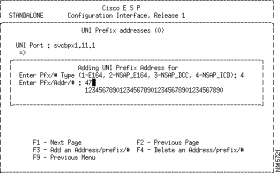
To add an Ingress Screen Address, press the F3 key, and the Add an Address/prefix menu shown in Figure 7-16 appears. This menu allows you to enter an index number for the type of UNI port address prefix:
Then provides a line for you to enter the new address as shown in Figure 7-16. Depending on the type of address, the first two bytes may be automatically assigned. The number of digits that can be entered is also dependent on the type of address being added. E.164 addresses can be up to 15 digits. Other address formats can accept up to 40 digits, which equals the 20 byte address.
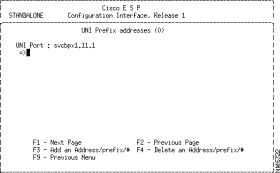
From the More UNI Information screen, the F3 key leads to the View Address Prefixes menu shown in Figure 7-17. This menu lists the Address Prefixes configured for this UNI port, and it also allows you to add or delete a UNI port address/prefix. If ILMI address registration has not been entered, you will not be able to add a UNI prefix address. The number of configured UNI Prefix addresses is listed in the parenthesis.
The F3 key leads to Add an Address/Prefix menu shown in Figure 7-17.
The Add an Address/Prefix menu allows you to enter the ATM address type as an index number:
The menu then provides a line for you to enter the new address as shown in Figure 7-16.
When an out of value number is entered in one of the address formats, the Configuration Interface will not accept it. You will be prompted with message to press a to abort. Pressing a returns you to the next higher level. Pressing any other key, allows you to re-enter the address on the current menu.
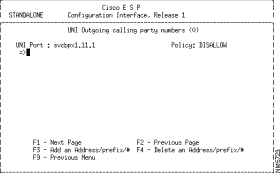
From the More UNI Information screen, the F4 key leads to the View UNI Outgoing Calling Party #s menu shown in Figure 7-18. This menu list the Egress Screen addresses that have been configured, and also allows you to add or delete other addresses from the Outgoing Calling Party Screen list.
From the Viewing Egress Screen Address menu, the F3 key opens the Adding an Egress Screen Address menu shown Figure 7-19. The Add an Egress Address menu allows you to enter the ATM address type as an index number:
The menu then provides a line for you to enter the new address as shown in Figure 7-19.

From the More UNI Information screen, the F6 key opens the UNI Billing menu shown in Figure 7-20. This menu allows you to view and configure the UNI port billing parameters on a per- UNI-port basis. These parameters work in conjunction with the Billing parameters set on a per-BPX Service Node basis described in the BPX Service Node Billing Information Menu section. The per-UNI-port billing parameters will override the parameters that were set on a per-Node basis for this UNI port.
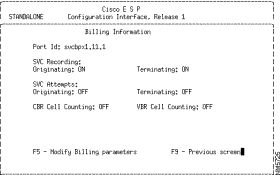
This menu contains the following fields:
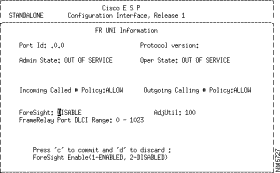
From the ESP Configuration Interface Main Menu, option 3, FR UNI Information, accesses the Frame Relay UNI Information menu. This menu, shown in Figure 7-21, lists the Frame Relay UNI ports that have been configured with the ESP Configuration Interface. As shown, this screen lists the configured Frame Relay (FR) UNI Port IDs, along with their current Admin State and Operational State. You can select a UNI port in the list and press Enter to see how it has been configured.
The F3 function key accesses the menu for adding a Frame Relay UNI and the F4 key allows you to Delete a Frame Relay UNI port. Frame Relay UNI ports cannot be deleted while they are In Service.

When you are adding a Frame Relay (FR) UNI port, by pressing F3 from FR UNI Information menu, the Frame Relay UNI Information menu, shown in Figure 7-22, appears.
This menu contains the following fields:
After a Frame Relay UNI Port has been configured with the Add FR UNI Port option, it will appear in the list of ports on the FR UNI Information menu shown in Figure 7-21. When you select one the Frame Relay ports from this list and press Enter (Enter - More Details), the Frame Relay UNI More Details Information screen, shown in Figure 7-23, appears. This screen lists all the parameters that were configured with the Add a Frame Relay Port menu with the addition of a series of function keys that lead to menus for configuring other parameters relevant to a Frame Relay UNI port.
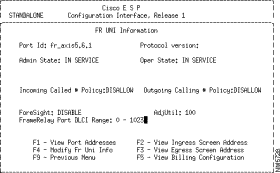
These function keys and the subsequent menus are:
This menu, shown in Figure 7-24, lists the port addresses that have been configured for this Frame Relay UNI port. The BPX Service Node supports Frame Relay addresses in native E.164 format, as was described in Chapter 3.
The F3 key allows you to enter (or add) and address to the list. Native E.164 addresses are entered as numbers, much like a telephone number, and can be up to 15 digits long. The F4 key allows you to delete a configured E.164 address from the list.

This menu, shown in Figure 7-25, for viewing or configuring the Incoming Called Number screening list for this Frame Relay UNI port. It also indicates whether the Incoming Called Party # screening policy for this Frame Relay UNI port has been configured as Allowed or Disallowed.
The F3 key allows you to add an E.164 address to the list, and the F4 allows you to delete an address from the list.

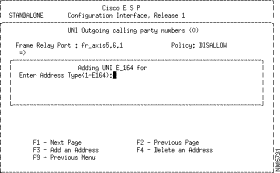
This menu, shown in Figure 7-26, is used to view or add E.164 addresses to the UNI Outgoing calling party number list. It also indicates whether the Outgoing Calling Party # screening policy for this Frame Relay UNI port has been configured as Allowed or Disallowed.
The F3 key allows you to add an E.164 number to the Outgoing Calling Party list and by bringing up the menu box shown in Figure 7-26. The F4 key allows you to delete an E.164 number from the list.
This menu, shown in Figure 7-27, is used for viewing and configuring the Frame Relay UNI port billing parameters. (These parameters are identical to those of the ATM UNI Billing menu shown in Figure 7-20, with the exception that there are no CBR or VBR Cell Counting fields and there is a Frame Counting field which can be turned On or Off.)
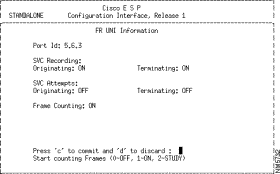
This menu contains the following fields:
Option 3 from the ESP's Configuration Interface main menu opens the NNI Information menu, shown in Figure 7-28. This menu lists the NNI connections from this BPX Service Node, including their Administrative and Operational States.
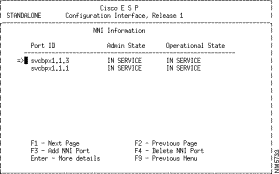
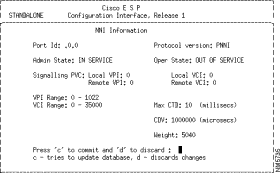
From this NNI Information menu, the F3 key opens the Add NNI Port menu shown in Figure 7-29. This menu allows you to configure the NNI trunk. The NNI parameters differ between IISP (see Figure 7-28) and PNNI (see Figure 7-30) trunks.

For IISP trunks, the menu contains the following fields:
Figure 7-30 is the Add NNI menu for PNNI trunks. This menu is similar to the IISP menu, without NNI Role and Neighboring ESP fields. This menu also has two fields that are not on the IISP NNI menu:
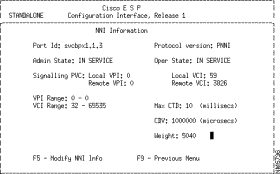
From the NNI Information Menu (see Figure 7-28) the Enter key brings up the More NNI Information menu, shown in Figure 7-31. This menu is nearly identical to the Add NNI menus, however, it is for displaying the NNI fields that have previously been configured, and has different options on the bottom of the screen. The F5 key allows you to modify the parameters displayed on this menu.
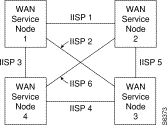
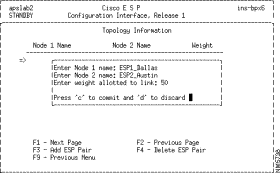
Option 4 from the main menu accesses the Topology Information screen shown in Figure 7-32. This menu is only applicable to IISP links in the network.This menu lists all the ESPs that are connected and the weight assigned to each link. This menu also allows you to add or delete ESP pairs from the database.
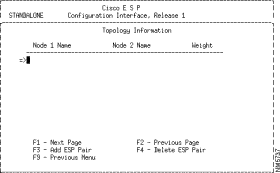
Figure 7-33 illustrates a simple IISP network. This is a full mesh IISP network, that is every IISP link between service nodes has to be configured and assigned a weight. In this figure, there are four BPX Service Nodes and six IISP links. If we were configuring the network from BPX Service Node 1, we would configure the three links that terminate on BPX Service Node 1 (IISP 1, 2, and 3) with the NNI Information Menus. BPX Service Node 1 has three Neighboring ESPs (BPX Service Node 2, BPX Service Node 3, and Service 4). There would have to be three Add NNI menus completed. Each would list one of the IISP links between Neighboring ESPs. In this simple network, there are 3 IISP links that do not terminate on BPX Service Node 1. These links would be configured with the Add INS Pair option of the Topology Information menu. For instance, one pair would link BPX Service Node 2 and BPX Service Node 3 (IISP 5), another pair would list BPX Service Node 4 and BPX Service Node 3 (IISP 4), and the third would list BPX Service Node 2 and BPX Service Node 4 (IISP 6). Each of these IISP links between the INS pairs would also be assigned a weight.
The F3 key brings up the Add ESP Pair menu shown in Figure 7-34. As shown, this menu, prompts you to provide the name of each ESP in the pair, and the weight assigned to the link between them.
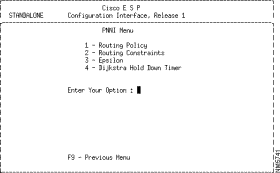
Option 5 from the main menu presents the PNNI Menu shown in Figure 7-35. This leads to four series of menus which are used to provision PNNI for the network.

From this menu, you choose one of the listed options:
1. PNNI Parameters to configure PTSE (PNNI Topology State Elements) and Hello protocol parameters.
2. Route Agent Parameters to configure routing policy, constraints, Epsilon, and Dijkstra Holddown Timer parameters.
3. AvCR Parameters to configure AvCR Proportional Multiplier and AvCR Minimum Threshold.
4. Node ID to configure the PNNI node ID.
The PNNI parameters menu, shown in Figure 7-36, is used to configure PNNI Topology State Elements (PTSEs) and Hello protocol parameters. As shown each of these parameters is a timer of some sort that is configured with a value. The value is actually a factor (that is a multiplier). For some fields, there is also a quantity listed in parenthesis, such as (100ms). The quantity is multiplied by the value to give the configured parameter. For instance for PTSE Holddown, the value is 10, the quantity is 100 milliseconds, so the configured value would be 10 x 100ms or 1000ms (1 second).

On this menu, you enter the appropriate index number to configure one the following parameters:
1. PTSE Holddown is a timer which assures that the PTSEs are not re-originated too frequently. The range is 1 - 999999 units, and the default is 1 second (10 x 100 milliseconds).
2. Hello Holddown is a timer which assures that Hello packets are not transmitted too frequently. The range is 1 - 999999 units, and the default is 1 second (10 x 100 milliseconds).
3. Hello Interval is the time, in seconds, which specifies the interval between Hello packets, in the absence of event-triggered Hellos. The range is 0 - 999999, and the default is 15 seconds.
4. Hello Inactivity Factor is the amount of time, in seconds, between Hellos that the node sends out over a link, in the absence of event-triggered Hellos. In other words, it is the number of Hello Intervals the PNNI protocol allows to pass without receiving a Hello before the link is declared down. The range is 0 - 999999, and the default is 5.
5. PTSE Refresh Interval is the time in seconds between reoriginations of a self-originated PTSE in the absence of triggered updates. A PNNI node will reoriginate PTSEs at this rate in order to prevent flushing of these PTSEs by other nodes. The range is 0 - 999999, and the default is 1800 seconds.
6. PTSE Lifetime Factor is used to calculate the initial lifetime of self-originated PTSEs. The initial lifetime is set to the product of the PTSE Refresh Interval and the PTSE Lifetime Factor. The range is 1 - 11 units, and the default is 2 (2 x 100%=200%).
7. PTSE Retransmit Interval is the interval at which unacknowledged PTSEs will be retransmitted. A PTSE will be retransmitted every PTSE Retransmission Interval seconds unless explicitly acknowledged through receipt of either a) an Acknowledgment Packet specifying the PTSE instance, or b) the same instance of a more recent instance of the PTSE by flooding. The range is 0 - 999999, and the default is 5 seconds.
8. PTSE Delayed Acknowledgment is the minimum number of seconds between transmissions of delayed PTSE acknowledgment packets. The range is 0 -999999, and the default is 1 second (10 x 100 milliseconds).
The Route Agent Parameters menu, shown in Figure 7-37, leads to four subsequent menus:
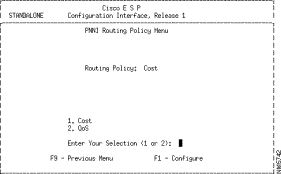
The PNNI Routing Policy Menu, shown in Figure 7-38, allows you to choose either Cost or Quality of Service (QoS) as the routing policy. If cost based routing is chosen, then the routing constraint is Administrative Weight (AW); otherwise, the routing constraints are based on delay. The default is Delay based.
The Routing Constraints menu is shown in Figure 7-39. This menu allows you to configure various route parameters which PNNI will consider during its calculations.

On this menu, you enter the appropriate option number to configure one of the parameters:
1. Max Route AW (Administrative Weight) is a value assigned to indicate the relative desirability of using a link or node. It is a dimensionless number. It is additive and can be aggregated during path selection in Dijkstra calculations, and in particular, if set to 1 on every link, the accumulated value becomes hop counts. There is a single AW configured per trunk for all service classes. The range is 5040 to 1000000000, and the default is 5040.
2. Max Route CTD (Cell Transfer Delay) which is the sum of the fixed delay across the link or node and CDV (Cell Delay Variation), measured in microseconds. Max Route is statically configured on per-trunk basis, based on average queueing and transit delay. The range is 1 - 200 milliseconds, and the default is 10 milliseconds.
3. Max Route CDV (Cell Delay Variation) is the difference between the average CTD and max CTD measured in microseconds. It is additive and can be accumulated during path selection in Dijkstra calculations. CDV is statically configured on a per-trunk basis, based on average queuing and transit delay. Use one for all supported service classes. The range is 1 - 200 milliseconds, and default is 100 milliseconds.
The Epsilon menu, shown in Figure 7-40, allows you to configure the Epsilon in a range of 1 - 20. Epsilon is a metric used in the Dijkstra calculations. Paths are considered as equal cost if the difference between their accumulated values on a specific metric is less than or equal to the configured Epsilon. Otherwise, one path is considered as more optimal and is selected.

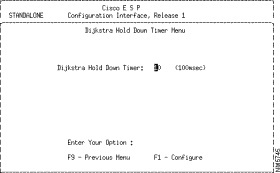
The Dijkstra Hold Down Timer menu, shown in Figure 7-41, allows you to configure the Dijkstra Holddown Timer. Dijkstra is an algorithm that is used to calculate shortest path routes based on given link and nodal states. Shortest path routes describe the shortest paths from the local BPX Service Node to all other BPX Service Nodes for a given constraint.
The AvCR (Available Cell Rate) menu, shown in Figure 7-42, allows you to configure Available Cell Rate parameters.
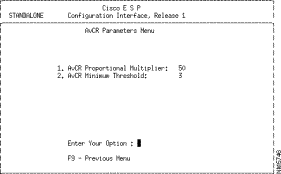
From this menu, you enter the appropriate index number to configure the following parameters:
1. AvCR Proportional Multiplier. The range is 1 - 99, and the default is 50. This is the percentage of the last advertised Available Cell Rate such that a change within the range AvCR + or - (AvCr *AvCR_PM/100) is not considered significant
2. AvCR Minimum Threshold. The range is 1 - 99, and the default is 3. This is the percentage of maxCR such that changes in AvCr of less than the amount form the last advertised value are never considered significant, even when the rule for AvCR_PM would indicate that the change was significant.
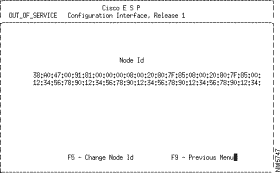
The Node ID menu, shown in Figure 7-43, allows you to display or configure the Node ID for the PNNI protocol. The Node ID is associated with a specific ATM end point address and is used as the source address within PNNI messages. The Node ID consists of 22 bytes, that is the first line of the Node ID shown below. The first byte (38) corresponds to the level indicator (38 hex equals 56, the PNNI peer group level in this release of the BPX Service Node), followed by a byte value of A0 hex (decimal 160). The remaining 20 bytes are the BPX Service Node's default ATM NSAP, which was described in Chapter 2 in the section BPX Service Node Default NSAP Address. The first 7 bytes of this default address (47:00:91:81:00:00:00) are fixed. They are followed by a 6-byte MAC address. The MAC address will be unique to each BPX Service Node and is shown here as 08:00:20:80:7F:85. This MAC address is repeated in PNNI Node ID then followed a selector of 00, the last byte.
lists all the parameters in the ESP Configuration Interface, along with their ranges and defaults. The table lists each relevant menu in the left column. The right column lists the parameter, the applicable range, and the default in bold text. Only those menus that have user-changeable fields are listed; therefore, screens, such as Topology Information, which list configured parameters or items are not included in this table. Fields which are described as read-only display information but are not user-configurable.
| Menu | Field, Range, and Default |
|---|---|
ESP Information | ESP Name: 12-character text string |
ESP | SVC Billing: On or Off |
Shelf Information | ESP Name: read-only current ESP's name |
Add an | Port ID: Node.shelf.slot.port |
ATM UNI | Port ID: Node.shelf.slot.port |
Add a Frame Relay | Port ID: Node.shelf.slot.port |
Frame Relay UNI | Port ID: Node.shelf.slot.port |
Add NNI | Port ID: Node.shelf.slot.port |
Add NNI | Port ID: Node.shelf.slot.port |
PNNI Parameters | PTSE Holddown: 1 - 999999, 10 x 100 ms = 1 second |
PNNI | Routing Policy: Cost or QoS |
PNNI Routing Constraints | Max Route AW: 5040 - 1000000000, 5040 |
PNNI Epsilon | Epsilon: 0 - 20: 20 |
PNNI Dijkstra Holddown Timer | Dijkstra Hold Down Timer: 5 - 600, 10 milliseconds |
PNNI | AvCR Proportional Multiplier: 1 - 99, 50 |
![]()
![]()
![]()
![]()
![]()
![]()
![]()
![]()
Posted: Fri Jan 19 20:26:47 PST 2001
All contents are Copyright © 1992--2001 Cisco Systems, Inc. All rights reserved.
Important Notices and Privacy Statement.