|
|

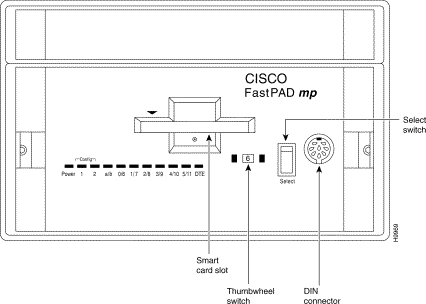
The FastPADmp is a stand-alone product that can be rack-mounted. It is based on two cards (motherboard and daughterboard), a front panel and rear panel.
The FastPADmp provides 12 lines (L0-L11). It can handle lines up to T1 if DTE and
1 Mb/s if DCE.
The front panel is composed of:
Figure 2-1 shows the FastPADmp front panel. The LEDs are listed and described in Table 2-1.
During normal operation, front panel LEDs indications are as listed in Table 2-1 if the thumbwheel is not on "F."
| LED | State | Indication |
|---|---|---|
Power | Off Red/green flashing fast
Red/green flashing slowly Green Red | Unit is powered off. If other LEDs are on, configuration program is selected. If no other LEDs are on, module number is selected. Boot status downloading of the operational program. FastPAD powered on and operational. FastPAD powered on, test phase or watchdog is activated. |
1 | Off On—orange Flashing | Off = Default Configuration is selected. On = User Configuration is selected. SmartCard configuration is selected. |
2 | Off On—green Flashing | Default Configuration is being used. User Configuration is being used. SmartCard configuration is selected. |
a/b | Off (30 seconds) On—orange (30 seconds) Flashing | Remaining LEDs pertain to lines L0-L5. Remaining LEDs pertain to lines L6-L11. Remaining LEDs indicate module number. |
0/6 1/7 2/8 3/9 4/10 5/11 |
On—Green
Off | Indicators for lines 0-5 or 6-11 as indicated by LED a/b.
Line in service.
Line not in service. |
DTE | Off On—Orange Flashing Flashing brightly | Line selected for DCE V.28 interface. Line selected for DTE V.28 interface. Line selected for DCE, no V.28. Line selected for DTE, no V.28. |
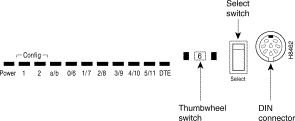
The select switch is used to activate the functions selected with the thumbwheel described below.
The thumbwheel switch lets you perform the following functions:
The thumbwheel switch is equipped with two buttons that rotate the switch. The switch selection is displayed in the window between the buttons. (See Table 2-2.)
| Display | Selects |
|---|---|
0 | Line 0 |
1 | Line 1 |
2 | Line 2 |
3 | Line 3 |
4 | Line 4 |
5 | Line 5 |
6 | Line 6 |
7 | Line 7 |
8 | Line 8 |
9 | Line 9 |
10 | Line 10 |
11 | Line 11 |
C | not used |
D | Line Reset |
E | SW Restart1 |
F | HW Reset |
| 1Has different options. |
To display line status (the line status will be displayed for 30 seconds):
Step 2 Press the Select switch.
Table 2-3 describes status messages of LEDs. Refer to the appendix "Control Signals" for ITU-T abbreviations. The status indication depends on the configuration.
| LED | State | Indication | FR | ISDN |
|---|---|---|---|---|
1 | On Off | X.25 level 1 communication established X.25 level 1 communication not established | FR ok FR ok
| ISDN ok ISDN ok |
2 | On Off | X.25 level 2 communication established X.25 level 2 communication not established | L2 ok signaling L2 ok signaling | |
a/b | On Off | X.25 level 3 communication established X.25 level 3 communication not established | 1st. PLL 1st. PLL | |
0/6 | On Off | CCITT Signal 105 active (RTS) CCITT Signal 105 not active |
Status level 1
F1 to F8
| |
1/7 | On Off | CCITT Signal 106 active (CTS) CCITT Signal 106 not active | ||
2/8 | On Off | CCITT Signal 107 active (DSR) CCITT Signal 107 not active | ||
3/9 | On Off | CCITT Signal 108 active (DTR) CCITT Signal 108 not active | ||
4/10 | On Off | CCITT Signal 109 active (DCD) CCITT Signal 109 not active |
| |
5/11 | On Off | CCITT Signal 142 active (TI) CCITT Signal 142 not active | ||
DTE | Off On—orange Flashing Flashing brightly | Line selected for DCE, V.28 interface. Line selected for DTE, V.28 interface. Line selected for DCE, no V.28. Line selected for DTE, no V.28. |
An ISDN TE can be in eight different states (F1-F8):
F1—Inactive, no power
F2—Detection of power
F3—Inactivation, following detection
F4—Waiting for a signal
F5—Input identification
F6—Synchronization
F7—Activation, Data Transfer phase
F8—Frame locking lost
These states are displayed in Binary-Coded Decimal (BCD) on LEDs 3/9 (MSB) to 0/6 (LSB). Table 2-4 summarizes different combinations.
| B-D LED | LSB = 1 0/6 | 2 1/7 | 4 2/8 | MSB = 8 3/9 |
|---|---|---|---|---|
States |
|
|
|
|
F1 | · |
|
|
|
F2 |
| · |
|
|
F3 | · | · |
|
|
F4 |
|
| · |
|
F5 | · |
| · |
|
F6 |
| · | · |
|
F7 | · | · | · |
|
F8 |
|
|
| · |
Signal activity on front panel LEDs is listed in Table 2-5.
| DTE | DCE | |||
|---|---|---|---|---|
Incoming signals | 106, 107, 109, 142 | 105, 108 | ||
Off on the front panel if: Lit on the front panel if: | Not monitored or monitored and open. Monitored and closed. | Not monitored or monitored and open. Monitored and closed. | ||
Outgoing signals Off on the front panel if: Lit on the front panel if: | 105 | 108 | 105, 107, 142 | 109 |
Bit 2 of p26 = 0 | Bit 2 of p26 = 0 | Not sent on the interface. Sent on the interface. | Bit 2 of p26 = 0 Bit 2 of p26 = 1 | |
Incoming signals | 106, 107, 109, 142 | 105, 108 | ||
Table 2-6 and Table 2-7 illustrate signal activity on the front panel during network management.
| DTE | DCE | |||
|---|---|---|---|---|
Incoming signals Off on the front panel if: Lit on the front panel if: | 106, 107, 109 | 142 | 105, 108 | |
Always | Open | Always | ||
Outgoing signals Off on the front panel if: Lit on the front panel if: | 105 | 108 | 105, 107, 142 | 109 |
Bit 2 of p26 = 0 Bit 2 of p26 = 1 | Not sent on the interface. Sent on the interface | Not sent on the interface. Sent on the interface. | Bit 2 of p26 = 0 Bit 2 of p26 = 1 | |
| DTE | DCE | ||||
|---|---|---|---|---|---|
Incoming Signals Off on the front panel if: Lit on the front panel if: | 106, 109 | 106 | 142 | 105, 108 | |
Always. Never. | OpenB ClosedB | OpenB Closed | AlwaysB Never | ||
Outgoing Signals Off on the front panel if: Lit on the front panel if: | 105 | 108 | 105, 107, 142 | 109 | |
Bit 2 of p26 = 0 Bit 2 of p26 = 1 | Not sent on the interface. Sent on the interface | Not sent on the interface. Sent on the interface. | Bit 2 of p26 = 0 Bit 2 of p26 = 1 | ||
Resetting a line clears any virtual circuits on the line, flushes any data associated with the line, and resets line signals. To reset a selected line:
Step 2 Press the Select switch.
Step 3 Rotate the thumbwheel until the desired line number is displayed.
Step 4 Press the Select switch.
See Figure 2-2.
Restarting the system software re-initializes all software functions without executing system autotests. The recovery time is about 30 seconds. To reset system software:
Step 2 Press the Select switch.
After pressing the Select switch, software restart is carried out. There is a small window of time, about five seconds per setting, during which YOU CAN:
See Figure 2-2.
Select "E" on the thumbwheel and confirm with the Select switch.
There is a window of time of about five seconds during which you can set the thumbwheel switch to the desired number (8, 9, 10 or 11). When the Power LED is flashing (RED/GREEN) and other LEDs are lit (this happens during the five-second window), you confirm your choice with the select Switch. (See Table 2-8.)
| Thumbwheel switch | Restart Configuration |
|---|---|
E + 8 | Copy the default configuration into the user configuration and restart with this configuration and operating system. |
E + 9 | Copy the SmartCard configuration into the user configuration and restart with the operating system. |
E + 10 | Start up with the operating system and default configuration. |
E + 11 | Start up with the operating system and the previous user configuration. |
C | Start up with boot program (reserved). |
Choose your desired option (8, 9, 10, 11) by setting the thumbwheel at the correct position.
Step 2 Power LED flashes RED/GREEN and other LEDs are lit.
The time window is approximately five seconds.
Step 3 Confirm your selection in Step 2 with the Select switch.
Table 2-9 lists LED activity as a result of each thumbwheel selection.
| LED | Power | 1 | 2 | a/b | |
|---|---|---|---|---|---|
E + 8 | Stage 1 Stage 2 Stage 3 | GREEN | ON | OFF | FLASHING FAST |
GREEN | OFF | GREEN |
| ||
GREEN | ORANGE | GREEN |
| ||
E + 9 |
| GREEN | ORANGE FLASHING | GREEN FLASHING |
|
E + 10 |
| GREEN | OFF | OFF |
|
E + 11 |
| GREEN | ORANGE | GREEN |
|
Default If Problem |
| GREEN | ORANGE | OFF | FLASHING SLOWLY |
The time window is approximately five seconds.
Step 2 Power LED flashes RED/GREEN and other LEDs are lit. Choose the module number by setting the Thumbwheel switch.
The time window is approximately five seconds.
Step 3 Power LED flashes RED/GREEN and other LEDs are off. Press the Select switch to validate your choice.
The time window is approximately five seconds.
See Table 2-10.
| Thumbwheel | Module No. | 11 0/6 | 2 1/7 | 4 2/8 | 8 3/9 |
|---|---|---|---|---|---|
0 | 0 |
|
|
|
|
1 | 1 | · |
|
|
|
2 | 2 |
| · |
|
|
| 1Coded in binary-coded decimal on LEDs. |
Resetting the hardware runs the complete set of hardware start-up autotests, and re-starts the unit with operational software and the user configuration. Recovery time is about 2 ms. To reset the hardware:
Step 2 Press the Select switch.
Refer to the section "DIN Connector" in the chapter "Overview."
Refer to the section "mp, mp12 and mprxx SmartCard" in the chapter "Overview."
The FastPAD mp is designed around a motherboard called MPB (Medium Processor Board) and a daughterboard called MTB (Memory and Transputer Board). (See Figure 2-3.) In the case of the FastPADmp, there is no transputer on the MTB. Thus, an mp is always a single node (one in stand-alone, of course, or up to three different nodes if rack-mounted).
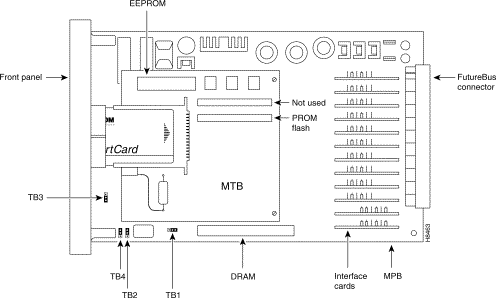
The jumper settings for the MPB are listed in Table 2-11.
| Jumper | Default setting |
|---|---|
TB1 | Position A (reserved) |
TB2 | Position NOT LWD (reserved) |
TB3 | Position NOT ABORT (reserved) |
TB4 | Authorizes a reset of hardware (Thumbwheel set to "F", front panel "Select" button depressed) |
This section describes the FastPADmp rear panel connectors and power supply.
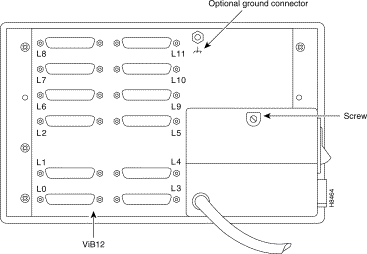
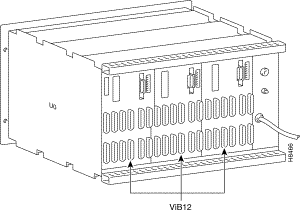
The FastPADmp rear panel or ViB12 board has twelve DB-25 Pin female connectors for twelve lines numbered from (L0 - L11). Figure 2-4 illustrates the ViB12.
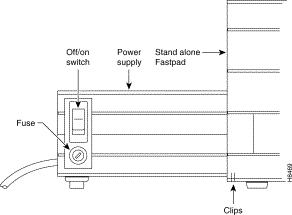
All stand-alone FastPADmp devices include a power supply on the rear panel of the module. Stand-alone power supplies have an on/off switch and a fuse. Rack-mounted models receive power from a power supply built into the rack.
The power supply is attached to the ViB12 board by a screw (see Figure 2-4) and two clips (see Figure 2-5). See the appendix "Specifications" for specifications.
There is one box containing the mp module.
You need an Allen wrench, which is supplied with the equipment. Before starting, check power compatibility.
Step 2 Remove the mp from the case. The front panel and the processor board are one piece.
Step 3 Set the interface card and jumpers according to your needs. (Refer to the chapter "Interface Cards.")
Step 4 Reinsert the mp into the case.
Step 5 Insert the Smartcard in the module front panel opening.
Step 6 Screw in the Allen screw.
Step 7 Turn ON the power switch.
Step 8 Wait for the autotest, approximately two minutes.
Step 9 The equipment is operational in default configuration:
| Power | 1 | 2 |
|---|---|---|
Green | Orange | Green |
Step 10 Use a terminal connected to the front panel (OPALE cable) or on port 5 to access the configuration function. Refer to the configuration manual for details.
An mp can be rack-mounted on a shelf. A shelf can house up to three mp modules. (See Figure 2-6.) Since an mp has no transputer, these three mp modules are independent and function as three different nodes. They have three different configurations.
Step 2 The rear panel of the shelf consists of three ViB12 boards (same as for a stand-alone).
Step 3 Set the interface card on the mp according to your needs.
Step 4 Insert the mp module.
Step 5 The physical position of the mp module within the shelf is marked on the label located on the module front panel.
![]()
![]()
![]()
![]()
![]()
![]()
![]()
![]()
Posted: Thu Jan 25 13:35:37 PST 2001
All contents are Copyright © 1992--2001 Cisco Systems, Inc. All rights reserved.
Important Notices and Privacy Statement.