|
|

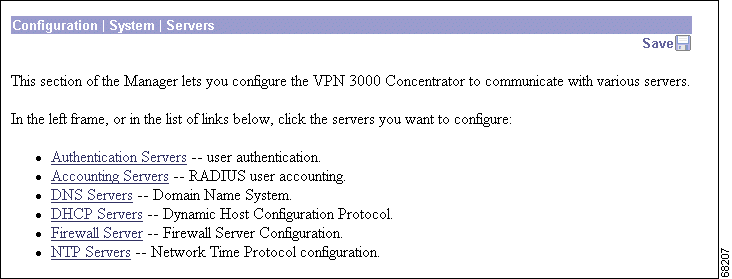
Configuring servers means identifying them to the VPN 3000 Concentrator so it can communicate with them correctly. These servers provide user authentication and accounting functions, convert host names to IP addresses, assign client IP addresses, and synchronize the system with network time. The VPN Concentrator functions as a client of these servers.
This section of the Manager lets you configure the VPN Concentrator to communicate with servers for various functions.
You can also configure the VPN Concentrator internal authentication server here if you have not already done so during Quick Configuration.
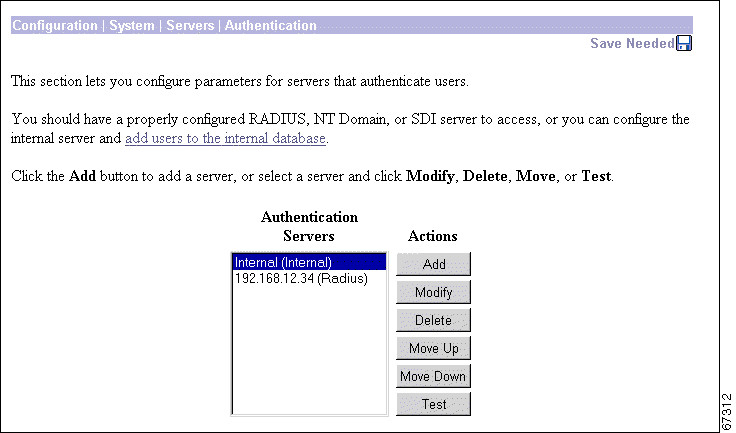
This section lets you configure the VPN Concentrator internal server and external RADIUS, NT Domain, and SDI servers for authenticating users. To create and use a VPN, you must configure at least one authentication server type; there must be at least one method of authenticating users.
If you check Use Address from Authentication Server on the Configuration | System | Address Management | Assignment screen, you must configure an authentication server here.
You must also configure servers here that correspond to the settings for Authentication method on the IPSec Parameters tab on the Configuration | User Management | Base Group and Group screens. For example, if you specify RADIUS authentication under IPSec for the base group, you must configure at least one RADIUS authentication server here. And in this example, the first RADIUS server is considered the primary server, the second RADIUS server is backup, etc.; any other server types are ignored.
Before you configure an external server here, be sure that the external server you reference is itself properly configured and that you know how to access it (IP address or host name, TCP/UDP port, secret/password, etc.). The VPN Concentrator functions as the client of these servers.
The Cisco VPN 3000 Series Concentrator software CD-ROM provides a link to an evaluation copy of the Cisco Secure ACS RADIUS Server software on the Cisco Web server.
After you have configured an external authentication server, you can also test it. Testing sends a username and password to the server to determine that the VPN Concentrator is communicating properly with it, and that the server properly authenticates valid users and rejects invalid users.
If you configure the internal authentication server, you can add users to the internal database by clicking the highlighted link, which takes you to the Configuration | User Management | Users screen. To configure the internal server, you just add at least one user or group to the internal database.
If you configure IPSec on the Quick Configuration | Protocols screen, the VPN Concentrator automatically configures the internal authentication server. The internal server is also the default selection on the Quick Configuration | Authentication screen.
You can configure and prioritize up to 10 authentication servers here. The first server of a given type is the primary server for that type, and the rest are backup servers in case the primary is inoperative. After you configure authentication server(s), you assign them to groups and users; see "User Management," for information about configuring groups and users to use authentication servers.
The VPN Concentrator handles authentication differently for PPTP clients and the Cisco VPN Client.
The Authentication Servers list shows the configured servers, in priority order. Each entry shows the server identifier and type, for example: 192.168.12.34 (Radius). If no servers have been configured, the list shows --Empty--. The first server of each type is the primary, the rest are backup.
To configure a new user-authentication server, click Add. The Manager opens the Configuration | System | Servers | Authentication | Add screen.
To modify a configured user authentication server, select the server from the list and click Modify. The Manager opens the Configuration | System | Servers | Authentication | Modify screen. The internal server has no configurable parameters, therefore there is no Modify screen. If you select the internal server and click Modify, the Manager displays an error message.
To remove a configured user authentication server, select the server from the list and click Delete.
 |
Note There is no confirmation or undo, except for the Internal Server (see the Configuration | System | Servers | Authentication | Delete screen). |
The Manager refreshes the screen and shows the remaining entries in the Authentication Servers list.
|
Note If you delete a server, users authenticated by that server will no longer be able to access the VPN unless another configured server can authenticate them. |
To change the priority order for configured servers, select the entry from the list and click Move [Up Arrow] or Move [Down Arrow]. The Manager refreshes the screen and shows the reordered Authentication Servers list.
To test a configured external user authentication server, select the server from the list and click Test. The Manager opens the Configuration | System | Servers | Authentication | Test screen. There is no need to test the internal server, and trying to do so returns an error message.
The Manager immediately includes your changes in the active configuration. To save the active configuration and make it the boot configuration, click the Save Needed icon at the top of the Manager window.
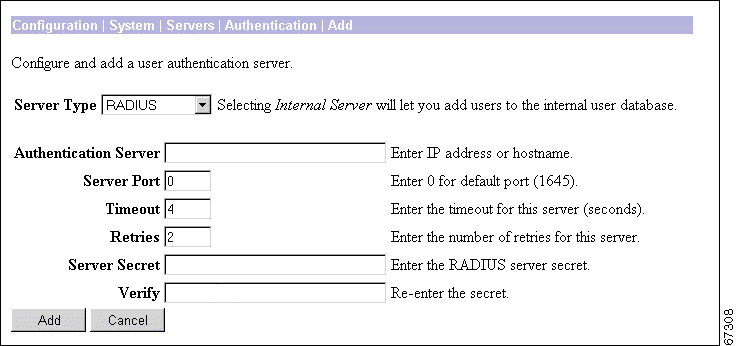
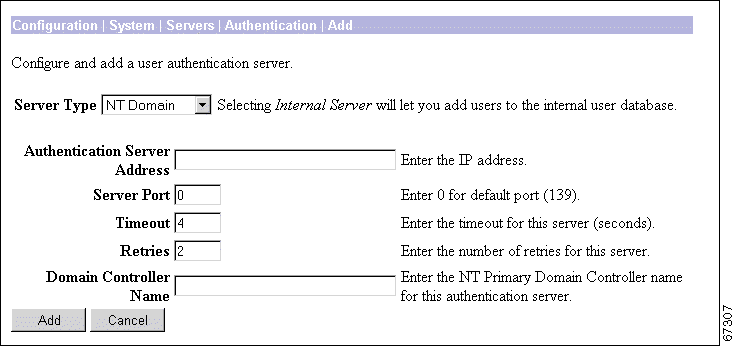
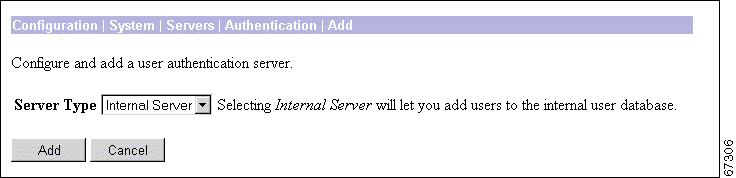
Click the Server Type drop-down menu button and select the type of server. The screen and its configurable fields change depending on the server type. Choices are:
Find your selected server type:
Configure these parameters for a RADIUS (Remote Authentication Dial-In User Service) authentication server.
Most RADIUS servers do not support MSCHAP Version 1 or 2 user authentication. If you plan to use a RADIUS server that does not support MSCHAP, you must configure the base group's PPTP Authentication Protocols to PAP and/or CHAP only. By doing this, you have no data encryption and possibly no password encryption.
CiscoSecure ACS for Windows Release 2.5 and higher supports MSCHAP V.1.
To use encryption with PPTP, your RADIUS server must support MSCHAP authentication and the return attribute MSCHAP-MPPE-Keys. Some examples of RADIUS servers that support MSCHAP-MPPE-Keys are:
Enter the IP address or host name of the RADIUS authentication server, for example: 192.168.12.34. The maximum number of characters is 32. (If you have configured a DNS server, you can enter a host name in this field; otherwise, enter an IP address.)
Enter the UDP port number by which you access the server. Enter 0 (the default) to have the system supply the default port number, 1645.
|
Note The latest RFC states that RADIUS should be on UDP port number 1812, so you might need to change this default value to 1812. |
Enter the time in seconds to wait after sending a query to the server and receiving no response, before trying again. The minimum time is 1 second. The default time is 4 seconds. The maximum time is 30 seconds.
Enter the number of times to retry sending a query to the server after the timeout period. If there is still no response after this number of retries, the VPN Concentrator declares this server inoperative and uses the next RADIUS authentication server in the list. The minimum number of retries is 0. The default number is 2. The maximum number is 10.
Enter the RADIUS server secret (also called the shared secret), for example: C8z077f. The maximum field length is 64 characters. The field shows only asterisks.
Re-enter the RADIUS server secret to verify it. The field shows only asterisks.
To add the new server to the list of configured user authentication servers, click Add. Or to apply your changes to the configured server, click Apply. Both actions include your entries in the active configuration. The Manager returns to the Configuration | System | Servers | Authentication screen. Any new server appears at the bottom of the Authentication Servers list.
To save the active configuration and make it the boot configuration, click the Save Needed icon at the top of the Manager window.
To discard your entries, click Cancel. The Manager returns to the Configuration | System | Servers | Authentication screen, and the Authentication Servers list is unchanged.
Configure these parameters for a Windows NT Domain authentication server.
Enter the IP address of the NT Domain authentication server, for example: 192.168.12.34. Use dotted decimal notation.
Enter the TCP port number by which you access the server. Enter 0 (the default) to have the system supply the default port number, 139.
Enter the time in seconds to wait after sending a query to the server and receiving no response, before trying again. The minimum time is 1 second. The default time is 4 seconds. The maximum time is 30 seconds.
Enter the number of times to retry sending a query to the server after the timeout period. If there is still no response after this number of retries, the VPN Concentrator declares this server inoperative and uses the next NT Domain authentication server in the list. The minimum is number of retries is 0. The default number of retries is 2. The maximum number of retries is 10.
Enter the NT Primary Domain Controller host name for this server, for example: PDC01. The maximum host name length is 16 characters. You must enter this name, and it must be the correct host name for the server for which you entered the IP address in Authentication Server Address; if it is incorrect, authentication will fail.
To add the new server to the list of configured user authentication servers, click Add. Or to apply your changes to the configured server, click Apply. Both actions include your entries in the active configuration. The Manager returns to the Configuration | System | Servers | Authentication screen. Any new server appears at the bottom of the Authentication Servers list.
To save the active configuration and make it the boot configuration, click the Save Needed icon at the top of the Manager window.
To discard your entries, click Cancel. The Manager returns to the Configuration | System | Servers | Authentication screen, and the Authentication Servers list is unchanged.
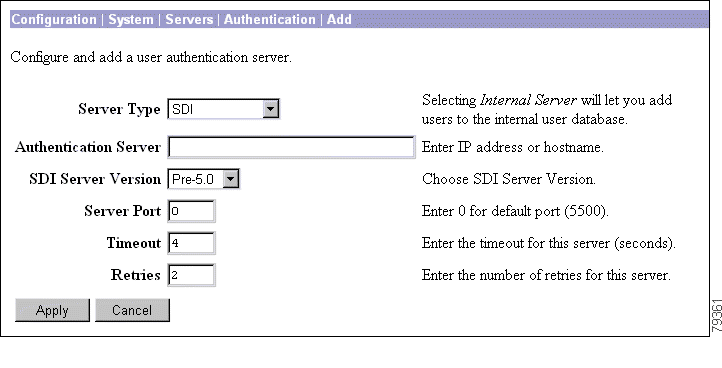
Configure these parameters for an RSA Security Inc. SecurID authentication server.
VPN Concentrator software version 3.6 supports both version 5.0 and versions prior to SDI 5.0.
SDI versions prior to 5.0 use the concept of an SDI master and an SDI slave server which share a single node secret file (SECURID). On the VPN Concentrator you can configure one pre-5.0 SDI master server and one SDI slave server globally, and one SDI master and one SDI slave server per each group.
SDI version 5.0 uses the concepts of an SDI primary and SDI replica servers. A primary and its replicas share a single node secret file. On the VPN Concentrator you can configure one SDI 5.0 server globally, and one per each group.
A version 5.0 SDI server that you configure on the VPN Concentrator can be either the primary or any one of the replicas. See the section below, "SDI Primary and Replica Servers" for information about how the SDI agent selects servers to authenticate users.
You can have one SDI primary server, and up to 10 replicas; use the SDI documentation for configuration instructions. The primary and all the replicas can authenticate users. Each primary and its replicas share a single node secret file. The node secret file has its name based on the hexadecimal value of the ACE/Server IP address with .sdi appended. SDI servers that you configure here apply globally. You can also configure SDI servers on a group basis (see Configuration| User Management | Groups, and click Add/Modify Auth Servers.
SDI version 5.0 uses a two-step process to prevent an intruder from capturing information from an RSA SecurID authentication request and using it to authenticate to another server. The Agent first sends a lock request to the SecurID server before sending the user authentication request. The server locks the username, preventing another (replica) server from accepting it. This means that the same user cannot authenticate to two VPN Concentrators using the same authentication servers simultaneously. After a successful username lock, the VPN Concentrator sends the passcode.
The VPN Concentator obtains the server list when the first user authenticates to the configured server, which can be either a primary or a replica. The VPN Concentrator then assigns priorities to each of the servers on the list, and subsequent server selection derives at random from those assigned priorities. The highest priority servers have a higher likelihood of being selected.
Enter the IP address or host name of the SDI authentication server, for example: 192.168.12.34. The maximum host name length is 32 characters. (If you have configured a DNS server, you can enter a host name in this field; otherwise, enter an IP address.)
Use the drop-down menu to select the SDI server version you are using, pre-5.0 or 5.0.
Enter the UDP port number by which you access the server. Enter 0 (the default) to have the system supply the default port number, 5500.
Enter the time in seconds to wait after sending a query to the server and receiving no response, before trying again. The minimum value is 1 second. The default value is 4 seconds. The maximum value is 30 seconds.
Enter the number of times to retry sending a query to the server after the timeout period. If there is still no response after this number of retries, the VPN Concentrator declares this server inoperative and uses the next SDI authentication server in the list. The minimum number of retries is 0. The default number of retries is 2. The maximum number is 10.
To add the new server to the list of configured user authentication servers, click Add. Or to apply your changes to the configured server, click Apply. Both actions include your entries in the active configuration. The Manager returns to the Configuration | System | Servers | Authentication screen. Any new server appears at the bottom of the Authentication Servers list.
To save the active configuration and make it the boot configuration, click the Save Needed icon at the top of the Manager window.
To discard your entries, click Cancel. The Manager returns to the Configuration | System | Servers | Authentication screen, and the Authentication Servers list is unchanged.
The VPN Concentrator internal authentication server lets you enter a maximum of 100 groups and users (combined) in its database. To do so, see the Configuration | User Management screens, or click the highlighted link on the Configuration | System | Servers | Authentication screen.
The internal server has no configurable parameters, therefore there is no Modify screen. If you select the internal server and click Modify on the Configuration | System | Servers | Authentication screen, the Manager displays an error message.
You can configure only one instance of the internal server.
To add the internal server to the list of configured user authentication servers, and to include the entry in the active configuration, click Add. The Manager returns to the Configuration | System | Servers | Authentication screen. The new server appears at the bottom of the Authentication Servers list.
To save the active configuration and make it the boot configuration, click the Save Needed icon at the top of the Manager window.
To discard your entry, click Cancel. The Manager returns to the Configuration | System | Servers | Authentication screen, and the Authentication Servers list is unchanged.
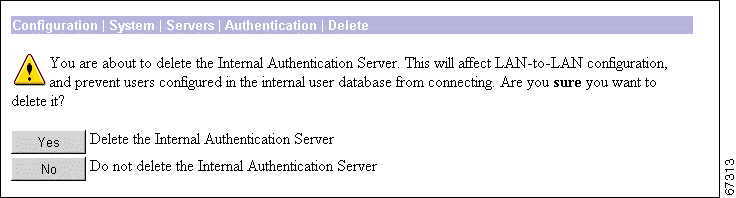
This screen asks you to confirm your decision to delete the internal authentication server. Deleting it prevents IPSec LAN-to-LAN connections, since they depend on internally configured groups for IPSec SA negotiations. Deleting it also prevents connections by all users that are configured in the internal user database.
|
Note We strongly recommend that you not delete the internal authentication server. |
To delete the internal authentication server, click Yes.
|
Note There is no undo. |
The Manager returns to the Configuration | System | Servers | Authentication screen and shows the remaining entries in the Authentication Servers list.
To not delete the internal authentication server, click No. The Manager returns to the Configuration | System | Servers | Authentication screen, and the Authentication Servers list is unchanged.
The Manager immediately includes your changes in the active configuration. To save the active configuration and make it the boot configuration, click the Save Needed icon at the top of the Manager window.
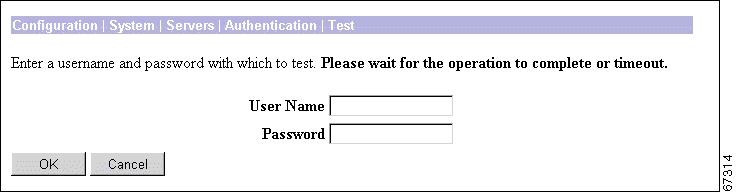
This screen lets you test a configured external user authentication server to determine that:
To test connectivity and valid authentication, enter the username for a valid user who has been configured on the authentication server. The maximum username length is 32 characters. Entries are case-sensitive.
To test connectivity and authentication rejection, enter a username that is invalid on the authentication server.
Enter the password for the username. Maximum 32 characters, case-sensitive. The field displays only asterisks.
To send the username and password to the chosen authentication server, click OK. The authentication and response process takes a few seconds. The Manager displays a Success or Error screen.
To cancel the test and discard your entries, click Cancel. The Manager returns to the Configuration | System | Servers | Authentication screen.
If the VPN Concentrator communicates correctly with the authentication server, and the server correctly authenticates a valid user, the Manager displays a Success screen.
To return to the Configuration | System | Servers | Authentication | Test screen, click Continue. You can then test authentication for another username.
To return to the Configuration | System | Servers | Authentication screen, or any other screen, click the desired title in the left frame (Manager table of contents).
If the VPN Concentrator communicates correctly with the authentication server, and the server correctly rejects an invalid user, the Manager displays an Authentication Rejected Error screen.
To return to the Configuration | System | Servers | Authentication | Test screen, click Retry the operation.
To go to the main VPN Concentrator Manager screen, click Go to main menu.
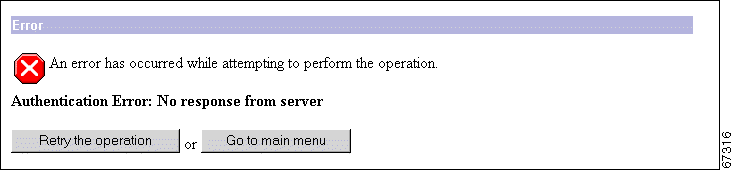
If the VPN Concentrator cannot communicate with the authentication server, the Manager displays an Authentication Error screen. Error messages include:
The server might be improperly configured or out of service, the network might be down or clogged, etc. Check the server configuration parameters, be sure the server is operating, check the network connections, etc.
To return to the Configuration | System | Servers | Authentication | Test screen, click Retry the operation.
To go to the main VPN Concentrator Manager screen, click Go to main menu.
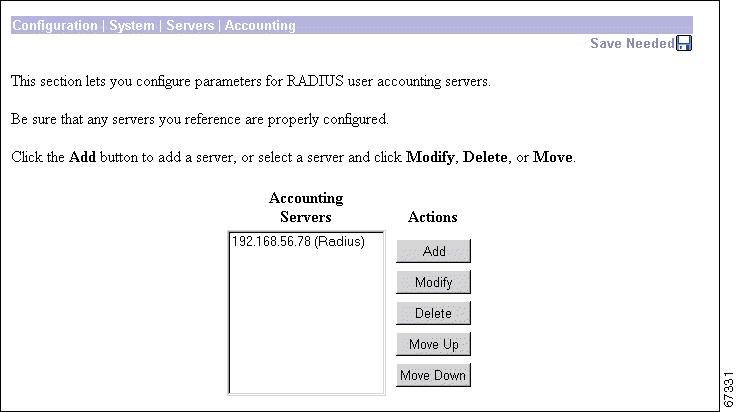
This section lets you configure external RADIUS user accounting servers, which collect data on user connect time, packets transmitted, etc., under the VPN tunneling protocols: PPTP, L2TP, and IPSec.
You can configure and prioritize up to ten accounting servers. The first server is the primary, and the rest are backup servers in case the primary is inoperative.
Before you configure an accounting server here, be sure that the server you reference is itself properly configured and that you know how to access it (IP address or host name, UDP port, server secret, etc.). The VPN Concentrator functions as the client of these servers.
The VPN Concentrator communicates with RADIUS accounting servers per RFC 2139 and currently includes the attributes in Table 5-1 in the accounting start and stop records. These attributes might change.
The Accounting Servers list shows the configured servers, in priority order. Each entry shows the server identifier and type, for example: 192.168.12.34 (Radius). If no servers have been configured, the list shows --Empty--. The first server is the primary, the rest are backup.
To configure a new user accounting server, click Add. The Manager opens the Configuration | System | Servers | Accounting | Add screen.
To modify a configured user accounting server, select the server from the list and click Modify. The Manager opens the Configuration | System | Servers | Accounting | Modify screen.
To remove a configured user authentication server, select the server from the list and click Delete.
|
Note There is no confirmation or undo. |
The Manager refreshes the screen and shows the remaining entries in the Accounting Servers list.
To change the priority order for configured servers, select the entry from the list and click Move [Up Arrow] or Move [Down Arrow]. The Manager refreshes the screen and shows the reordered Accounting Servers list.
The Manager immediately includes your changes in the active configuration. To save the active configuration and make it the boot configuration, click the Save Needed icon at the top of the Manager window.
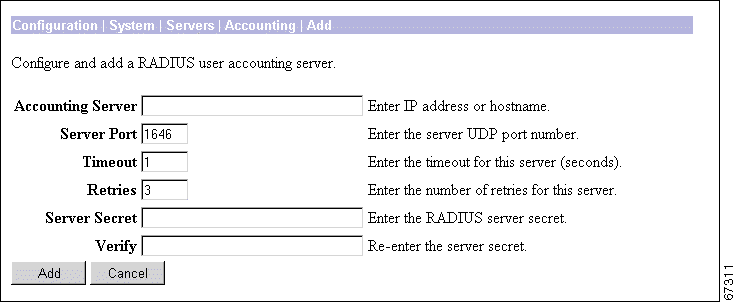
Enter the IP address or host name of the RADIUS accounting server, for example: 192.168.12.34. (If you have configured a DNS server, you can enter a host name in this field; otherwise, enter an IP address.)
Enter the UDP port number by which you access the accounting server. The default is 1646.
|
Note The latest RFC states that RADIUS accounting servers should be on UDP port number 1813, so you might need to change this default value to 1813. |
Enter the time, in seconds, to wait after sending a query to the accounting server and receiving no response, before trying again. The minimum is time 1 second. The default time is 1 second. The maximum time is 30 seconds.
Enter the number of times to retry sending a query to the accounting server after the timeout period. If there is still no response after this number of retries, the system declares this server inoperative and uses the next accounting server in the list. The minimum number of retries is 0. The default number of retries is 3. The maximum number of retries is 10.
Enter the server secret (also called the shared secret), for example: C8z077f. The field shows only asterisks.
Re-enter the server secret to verify it. The field shows only asterisks.
To add this server to the list of configured user accounting servers, click Add. Or, to apply your changes to this user accounting server, click Apply. Both actions include your entry in the active configuration. The Manager returns to the Configuration | System | Servers | Accounting screen. Any new server appears at the bottom of the Accounting Servers list.
To save the active configuration and make it the boot configuration, click the Save Needed icon at the top of the Manager window.
To discard your entries, click Cancel. The Manager returns to the Configuration | System | Servers | Accounting screen, and the Accounting Servers list is unchanged.
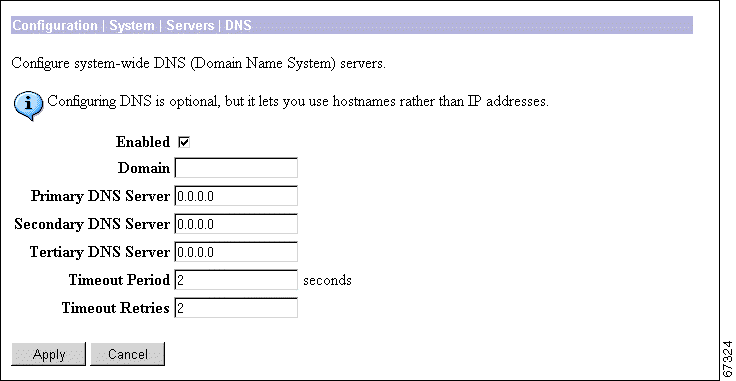
This screen lets you configure system-wide Domain Name System (DNS) servers. DNS servers convert domain names to IP addresses. Configuring DNS servers here lets you enter host names (for example, mail01.cisco.com) rather than IP addresses as you configure and manage the VPN Concentrator.
You can configure up to three DNS servers that the system queries in order.
To use DNS functions, check the Enabled check box (the default). To disable DNS, uncheck the box.
Enter the name of the registered domain in which the VPN Concentrator is located, for example: cisco.com. The maximum name length is 48 characters. This entry is sometimes called the domain name suffix or sub-domain. The DNS system within the VPN Concentrator automatically appends this domain name to host names before sending them to a DNS server for resolution.
Enter the IP address of the primary DNS server, using dotted decimal notation, for example: 192.168.12.34. Be sure this entry is correct to avoid DNS resolution delays.
Enter the IP address of the secondary (first backup) DNS server, using dotted decimal notation. If the primary DNS server does not respond to a query within the Timeout Period specified, the system queries this server.
Enter the IP address of the tertiary (second backup) DNS server, using dotted decimal notation. If the secondary DNS server does not respond to a query within the Timeout Period specified, the system queries this server.
Enter the initial time in seconds to wait for a response to a DNS query before sending the query to the next server. The minimum time is 1 second. The default time is 2 seconds. The maximum time is 30 seconds. The time doubles with each retry cycle through the list of servers.
Enter the number of times to retry sending a DNS query to the configured servers, in order. In other words, this is the number of times to cycle through the list of servers before returning an error. The minimum number of retries is 0. The default number of retries is 2. The maximum number of retries is 10.
To apply your settings for DNS servers and include the settings in the active configuration, click Apply. The Manager returns to the Configuration | System | Servers screen.
To save the active configuration and make it the boot configuration, click the Save Needed icon at the top of the Manager window.
To discard your settings, click Cancel. The Manager returns to the Configuration | System | Servers screen.
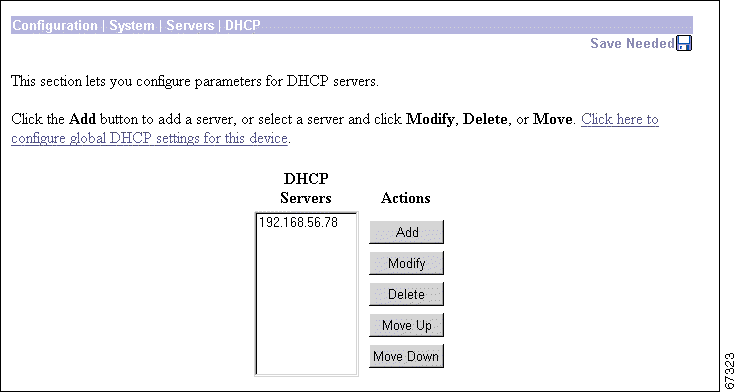
This section of the Manager lets you configure support for Dynamic Host Configuration Protocol (DHCP) servers that assign IP addresses to clients as a VPN tunnel is established.
If you check Use DHCP on the Configuration | System | Address Management | Assignment screen, you must configure at least one DHCP server here. You should also configure global DHCP parameters on the Configuration | System | IP Routing | DHCP screen; click the highlighted link to go there. The DHCP system within the VPN Concentrator is enabled by default on that screen.
You can configure and prioritize up to three DHCP servers. The first server is the primary, and the rest are backup servers in case the primary is inoperative.
The DHCP Servers list shows the configured servers, in priority order. Each entry shows the server identifier, which can be an IP address or a host name, for example: 192.168.12.34. If no servers have been configured, the list shows --Empty--. The first server is the primary, the rest are backup.
To configure a new DHCP server, click Add. The Manager opens the Configuration | System | Servers | DHCP | Add screen.
To modify a configured DHCP server, select the server from the list and click Modify. The Manager opens the Configuration | System | Servers | DHCP | Modify screen.
To remove a configured DHCP server, select the server from the list and click Delete.
|
Note There is no confirmation or undo. |
The Manager refreshes the screen and shows the remaining entries in the DHCP Servers list.
|
Note If you delete a DHCP server, any IP addresses obtained from that server will eventually time out, and the associated sessions will terminate. |
To change the priority order for configured servers, select the entry from the list and click Move [Up Arrow] or Move [Down Arrow]. The Manager refreshes the screen and shows the reordered DHCP Servers list.
The Manager immediately includes your changes in the active configuration. To save the active configuration and make it the boot configuration, click the Save Needed icon at the top of the Manager window.
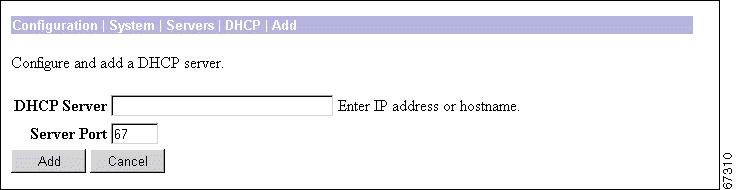
Enter the IP address or host name of the DHCP server, for example: 192.168.12.34. (If you have configured a DNS server, you can enter a host name in this field; otherwise, enter an IP address.)
Enter the UDP port number by which you access the DHCP server. The default UDP port number is 67.
To add this server to the list of configured DHCP servers, click Add. Or, to apply your changes to this DHCP server, click Apply. Both actions include your entry in the active configuration. The Manager returns to the Configuration | System | Servers | DHCP screen. Any new server appears at the bottom of the DHCP Servers list.
To save the active configuration and make it the boot configuration, click the Save Needed icon at the top of the Manager window.
To discard your entries, click Cancel. The Manager returns to the Configuration | System | Servers | DHCP screen, and the DHCP Servers list is unchanged.
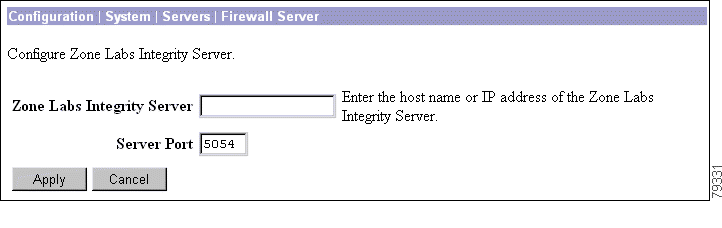
If any remote users in any of the groups configured on the VPN Concentrator are receiving their firewall policy from a Zone Labs Integrity Server, specify the host name or IP address of the server here. (See the "Client FW Parameters Tab" under Configuration | User Management | Base Group or Configuration | User Management | Groups | Add or Modify for more information on configuring groups to use a firewall server.) You can configure only one server.
Enter the host name or the IP address of the Zone Labs Integrity Server from which remote users on this VPN Concentrator derive their firewall policy.
Assign a port for the VPN Concentrator to use to communicate with the firewall server. The default port is 5054.
To include your entry in the active configuration, click Apply. The Manager returns to the Configuration | System | Server screen.
To save the active configuration and make it the boot configuration, click the Save Needed icon at the top of the Manager window.
To discard your entry, click Cancel. The Manager returns to the Configuration | System | Server screen and the server configuration is unchanged.
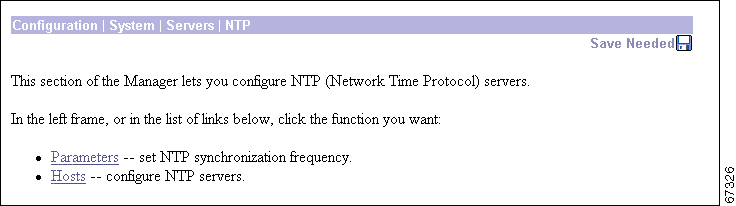
This section of the Manager lets you configure NTP (Network Time Protocol) servers that the VPN Concentrator queries to synchronize with network time.
Clocks in many computers tend to drift a few seconds per day. Exact time synchronization is important for systems on a network so that protocol timestamps and events are accurate. Digital certificates, for example, carry a timestamp that determines a time frame for their validity. An inaccurate time or date could prevent connection.
To make the NTP function operational, you must configure at least one NTP server (host). You can configure up to 10 NTP servers. The VPN Concentrator queries all of them and synchronizes its system clock with the derived network time.
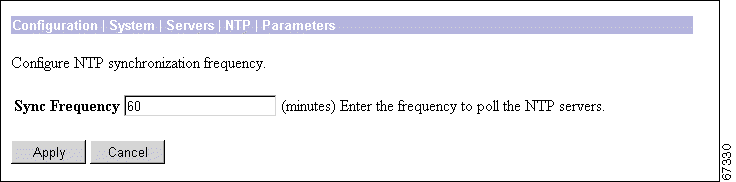
This Manager screen lets you configure the NTP synchronization frequency parameter. This parameter specifies how often the VPN Concentrator queries NTP servers to synchronize its clock with network time.
Enter the synchronization frequency in minutes. The minimum is frequency is 0 minutes, which disables the NTP function. The default frequency is 60 minutes. The maximum frequency is 10080 minutes (1 week).
To apply your NTP parameter setting and include the setting in the active configuration, click Apply. The Manager returns to the Configuration | System | Servers | NTP screen.
To save the active configuration and make it the boot configuration, click the Save Needed icon at the top of the Manager window.
To discard your settings, click Cancel. The Manager returns to the Configuration | System | Servers | NTP screen.
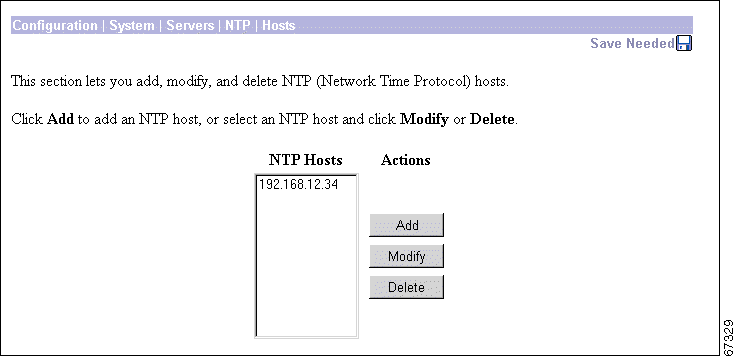
This section of the Manager lets you add, modify, and delete NTP hosts (servers).
To make the NTP function operational, you must configure at least one NTP host. You can configure a maximum of 10 hosts. The VPN Concentrator queries all configured hosts and derives the correct network time from their responses.
The NTP Hosts list shows the configured servers. Each entry shows the server identifier, which can be an IP address or a host name, for example: 192.168.12.34. If no servers have been configured, the list shows --Empty--.
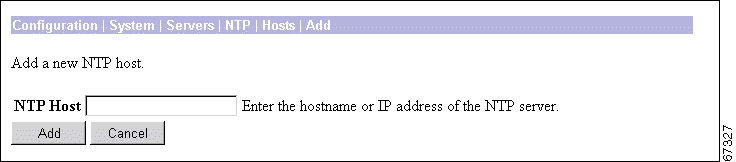
To configure a new NTP host (server), click Add. The Manager opens the Configuration | System | Servers | NTP | Hosts | Add screen.
To modify a configured NTP host, select the host from the list and click Modify. The Manager opens the Configuration | System | Servers | NTP | Hosts | Modify screen.
To remove a configured NTP host, select the host from the list and click Delete.
|
Note There is no confirmation or undo. |
The Manager refreshes the screen and shows the remaining entries in the NTP Hosts list.
The Manager immediately includes your changes in the active configuration. To save the active configuration and make it the boot configuration, click the Save Needed icon at the top of the Manager window.
Enter the IP address or host name of the NTP host (server), for example: 192.168.12.34. (If you have configured a DNS server, you can enter a host name in this field; otherwise, enter an IP address.)
To add this host to the list of configured NTP hosts, click Add. Or, to apply your changes to a configured NTP host, click Apply. Both actions include your entry in the active configuration. The Manager returns to the Configuration | System | Servers | NTP | Hosts screen. Any new host appears at the bottom of the NTP Hosts list.
To save the active configuration and make it the boot configuration, click the Save Needed icon at the top of the Manager window.
To discard your entry, click Cancel. The Manager returns to the Configuration | System | Servers | NTP | Hosts screen, and the NTP Hosts list is unchanged.
![]()
![]()
![]()
![]()
![]()
![]()
![]()
![]()
Posted: Fri Apr 18 18:13:47 PDT 2003
All contents are Copyright © 1992--2002 Cisco Systems, Inc. All rights reserved.
Important Notices and Privacy Statement.