|
|

IP addresses make internetwork connections possible. They are like telephone numbers: both the sender and receiver must have an assigned number in order to connect. But with VPNs, there are actually two sets of addresses: the first set connects client and server on the public network; and once that connection is made, the second set connects client and server through the VPN tunnel.
In VPN Concentrator address management, we are dealing with the second set of IP addresses: those private IP addresses that connect a client with a resource on the private network, through the tunnel, and let the client function as if it were directly connected to the private network. Furthermore, we are dealing only with the private IP addresses that get assigned to clients. The IP addresses assigned to other resources on your private network are part of your network administration responsibilities, not part of VPN Concentrator management.
Therefore, when we discuss IP addresses here, we mean those IP addresses available in your private network addressing scheme, that let the client function as a tunnel endpoint.
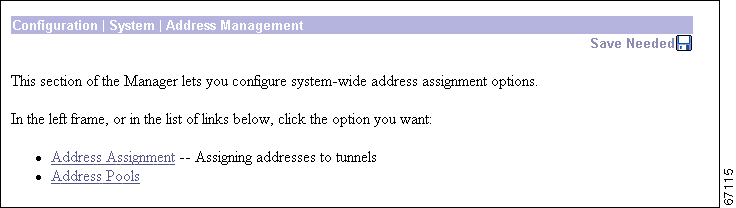
This section of the VPN 3000 Concentrator Series Manager lets you configure options for assigning addresses to clients as a tunnel is established. A client must have an IP address to function as a tunnel endpoint.
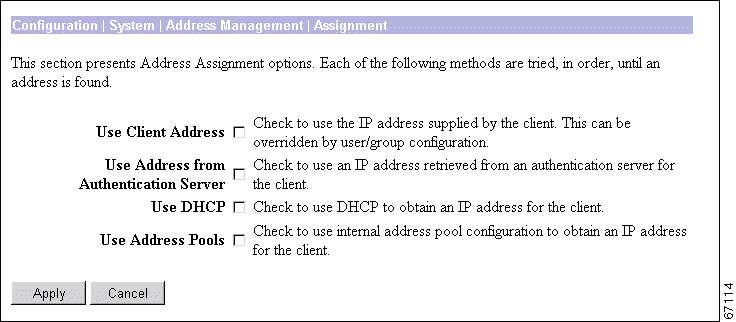
This screen lets you select prioritized methods for assigning IP addresses to clients as a tunnel is established. The VPN Concentrator tries the selected methods in the order listed until it finds a valid IP address to assign. You must select at least one method; you can select any and all methods. There are no default methods.
If you assign addresses from a non-local subnet, you must add routes for those subnets pointing to the VPN Concentrator on your internal routers.
Check the Use Client Address check box to let the client specify its own IP address. For maximum security, we recommend that you control IP address assignment and not use client-specified IP addresses. Do not check only this box if you are using IPSec, since IPSec does not allow client-specified IP addresses.
Make sure the setting here is consistent with the setting for Use Client Address on the PPTP/L2TP Parameters tab on the Configuration | User Management | Base Group screen. A different Use Client Address setting for specific groups and users overrides the setting here and on the base group screen. See the Configuration | User Management screens.
Check the Use Address from Authentication Server check box to assign IP addresses retrieved from an authentication server on a per-user basis. If you are using an authentication server (external or internal) that has IP addresses configured, we recommend using this method.
Check this box if you enter an IP Address and Subnet Mask on the Identity Parameters tab on the Configuration | User Management | Users | Add or Modify screens (which means you are using the internal authentication server).
Check the Use DHCP check box to obtain IP addresses from a DHCP (Dynamic Host Configuration Protocol) server.
If you use DHCP, configure the server on the Configuration | System | Servers | DHCP and Configuration | System | IP Routing | DHCP screens.
Check the Use Address Pools check box to have the VPN Concentrator assign IP addresses from an internally configured pool. Internally configured address pools are the easiest method of address pool assignment to configure.
If you use this method, configure the IP address pools on the Configuration | System | Address Management | Pools screens.
To include your settings in the active configuration, click Apply. The Manager returns to the Configuration | Address Management screen.
To save the active configuration and make it the boot configuration, click the Save Needed icon at the top of the Manager window.
To discard your settings or changes, click Cancel. The Manager returns to the Configuration | Address Management screen.
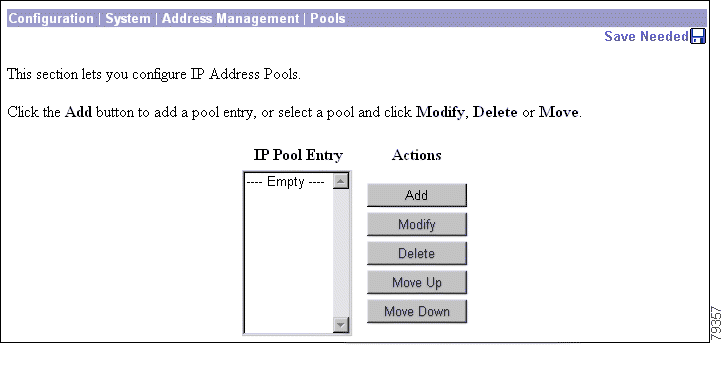
This section of the Manager lets you configure IP address pools from which the VPN Concentrator assigns addresses to clients. If you check Use Address Pools on the Configuration | System | Address Management | Assignment screen, you must configure at least one address pool. The IP addresses in the pools must not be assigned to other network resources.
The IP Pool Entry list shows each configured address pool as an address range, for example: 10.10.147.100 to 10.10.147.177. If no pools have been configured, the list shows --Empty--. The pools are listed in the order they are configured. The system uses these pools in the order listed: if all addresses in the first pool have been assigned, it uses the next pool, and so on.
If you assign addresses from a non-local subnet, we suggest that you add pools that fall on subnet boundaries in order to make adding routes for these networks easier.
To configure a new IP address pool, click Add. The Manager opens the Configuration | System | Address Management | Pools | Add screen.
To modify an IP address pool that has been configured, select the pool from the list and click Modify. The Manager opens the Configuration | System | Address Management | Pools | Modify screen.
To delete an IP address pool that has been configured, select the pool from the list and click Delete. There is no confirmation or undo. The Manager refreshes the screen and shows the remaining pools in the list.
The Manager immediately includes your changes in the active configuration. To save the active configuration and make it the boot configuration, click the Save Needed icon at the top of the Manager window.
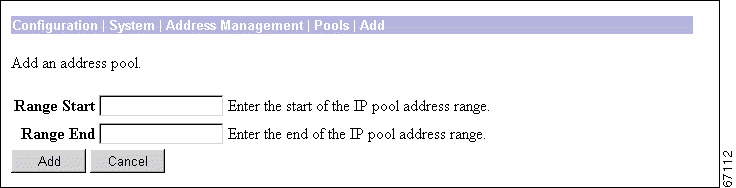
The IP addresses in the pool range must not be assigned to other network resources.
Enter the first IP address available in this pool. Use dotted decimal notation, for example: 10.10.147.100.
Enter the last IP address available in this pool. Use dotted decimal notation, for example: 10.10.147.177.
To add this IP address pool to the list of configured pools, click Add. Or to apply your changes to this IP address pool, click Apply. Both actions include your entry in the active configuration. The Manager returns to the Configuration | System | Address Management | Pools screen. Any new pool appears at the end of the IP Pool Entry list.
To save the active configuration and make it the boot configuration, click the Save Needed icon at the top of the Manager window.
To discard your entries, click Cancel. The Manager returns to the Configuration | System | Address Management | Pools screen, and the IP Pool Entry list is unchanged.
![]()
![]()
![]()
![]()
![]()
![]()
![]()
![]()
Posted: Fri Apr 18 18:02:06 PDT 2003
All contents are Copyright © 1992--2002 Cisco Systems, Inc. All rights reserved.
Important Notices and Privacy Statement.