|
|

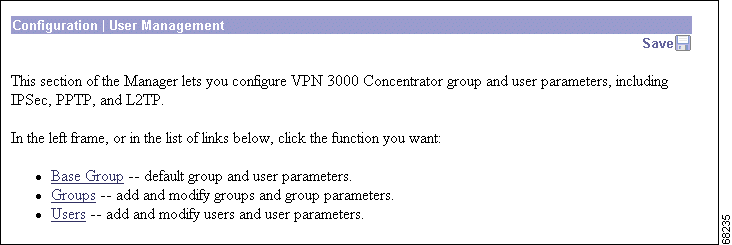
Groups and users are core concepts in managing the security of VPNs and in configuring the VPN Concentrator. Groups and users have attributes, configured via parameters, that determine their access to and use of the VPN. Users are members of groups, and groups are members of the base group. If you do not assign a user to a particular group, that user is by default a member of the base group. This section of the Manager lets you configure those parameters.
Groups simplify system management. To streamline the configuration task, the VPN Concentrator provides a base group that you configure first. The base-group parameters are those that are most likely to be common across all groups and users. As you configure a group, you can simply specify that it "inherit" parameters from the base group; and a user can also "inherit" parameters from a group. Thus you can quickly configure authentication for large numbers of users.
Of course, if you decide to grant identical rights to all VPN users, then you do not need to configure specific groups. But VPNs are seldom managed that way. For example, you might allow a Finance group to access one part of a private network, a Customer Support group to access another part, and an MIS group to access other parts. Further, you might allow specific users within MIS to access systems that other MIS users cannot access.
You can configure detailed parameters for groups and users on the VPN Concentrator internal authentication server. External RADIUS authentication servers also can return group and user parameters that match those on the VPN Concentrator; other authentication servers do not; they can, however, authenticate users. The Cisco software CD-ROM includes a copy of the Cisco Secure ACS RADIUS server.
The VPN Concentrator internal authentication server is adequate for a small user base. The maximum number of groups and users (combined) that you can configure in the internal server depends on your VPN Concentrator model. (See Table 14-1.) For larger numbers of users, we recommend using the internal server to configure groups (and perhaps a few users) and using a RADIUS server to authenticate the users.
Table 14-1 Maximum Number of Groups and Users for the Internal Authentication Server
| VPN Concentrator Model | Maximum Number of Groups and Users (Combined) |
|---|---|
The VPN Concentrator checks authentication parameters in this order:
If you use a non-RADIUS server, only the IPSec tunnel-group or base-group parameters apply to users.
Some additional points to note:
For PPTP and L2TP authentication protocols, you can allow specific groups and users to use fewer protocols than the base group, but not more.
For all other parameters, groups' and users' rights can be greater than the base group. For example, you can give a specific user 24-hour access to the VPN, but give the base group access during business hours only.
We recommend that you define groups when planning your VPN, and that you configure groups and users on the VPN Concentrator in this order:
Before configuring groups and users, you should configure:
This section of the Manager lets you configure base-group, group, and individual user parameters. These parameters determine access and use of the VPN Concentrator.
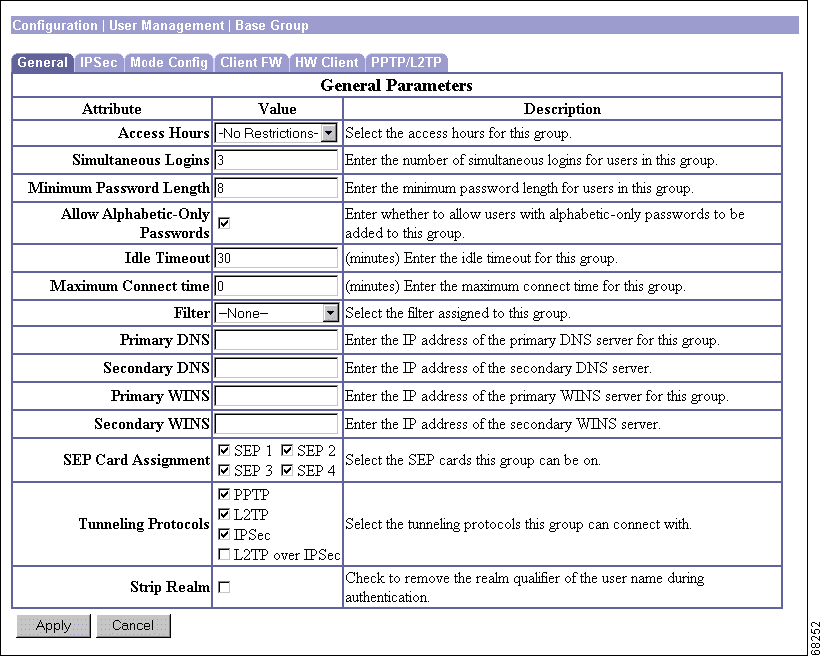
This Manager screen lets you configure the default, or base-group, parameters. Base-group parameters are those that are most likely to be common across all groups and users, and they streamline the configuration task. Groups can "inherit" parameters from this base group, and users can "inherit" parameters from their group or the base group. You can override these parameters as you configure groups and users. Users who are not members of a group are, by default, members of the base group.
On this screen, you configure the following kinds of parameters:
Before configuring these parameters, you should configure:
This screen includes three tabbed sections. Click each tab to display its parameters. As you move from tab to tab, the Manager retains your settings. When you have finished setting parameters on all tabbed sections, click Apply or Cancel.
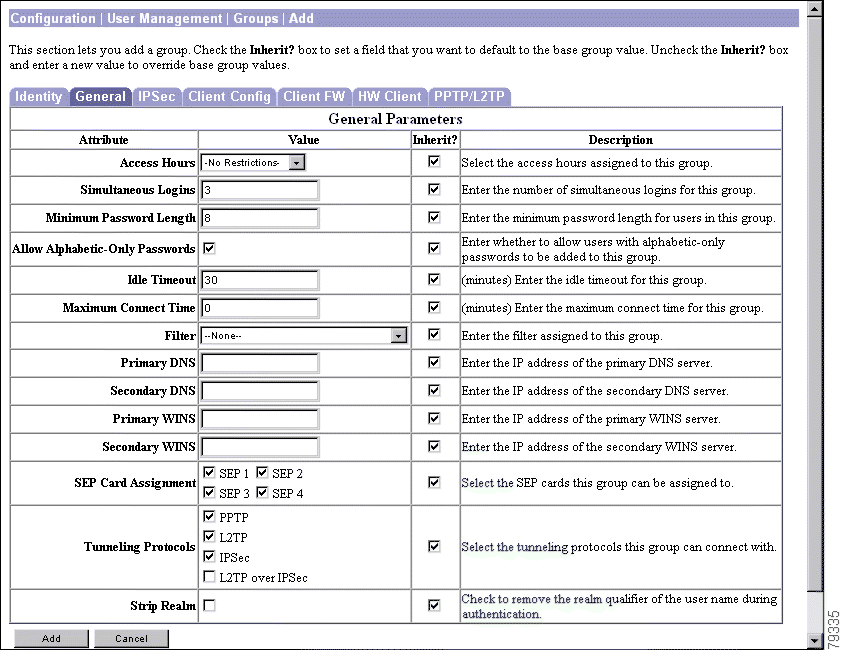
This tab lets you configure general security, access, performance, and protocol parameters that apply to the base group.
Click the Access Hours drop-down menu button and select the named hours when remote-access users can access the VPN Concentrator. Configure access hours on the Configuration | Policy Management | Access Hours screen. Default entries are:
Additional named access hours that you have configured also appear on the list.
Enter the number of simultaneous logins permitted for a single internal user. The minimum is 0, which disables login and prevents user access; default is 3. While there is no maximum limit, allowing several could compromise security and affect performance.
Enter the minimum number of characters for user passwords. The minimum is 1, the default is 8, and the maximum is 32. For security purposes, we strongly recommend 8 or higher.
Check the Allow Alphabetic-Only Passwords check box to allow user passwords with alphabetic characters only (the default). This option applies only to users who are configured in and authenticated by the VPN Concentrator internal authentication server. To protect security, we strongly recommend that you not allow such passwords. Require passwords to be a mix of alphabetic characters, numbers, and symbols, such as 648e&9G#.
Enter the idle timeout period in minutes. If there is no communication activity on a user connection in this period, the system terminates the connection. The minimum is 1 minute, the default is 30 minutes, and the maximum is 2147483647 minutes (over 4000 years). To disable timeout and allow an unlimited idle period, enter 0.
 |
Note This parameter does not apply to individual users as they authenticate to the remote network. The idle timeout value set in the Hardware Client tab of the Configuration | User Management | Base Group or/Groups | Add/Modify screen is the timeout value that applies. |
Enter the maximum user connection time in minutes. At the end of this time, the system terminates the connection. The minimum is 1 minute, and the maximum is 2147483647 minutes (over 4000 years). To allow unlimited connection time, enter 0 (the default).
Filters consist of rules that determine whether to allow or reject tunneled data packets coming through the VPN Concentrator, based on criteria such as source address, destination address, and protocol. Cisco supplies three default filters, which you can modify. To configure filters and rules, see the Configuration | Policy Management | Traffic Management screens.
Click the Filter drop-down menu button and select the base-group filter:
Additional filters that you have configured also appear on the list.
Enter the IP address, in dotted decimal notation, of the primary DNS server for base-group users. The system sends this address to the client as the first DNS server to use for resolving host names. If the base group doesn't use DNS, leave this field blank. See the Note on DNS and WINS entries section under Configuration | User Management | Groups | Add or Modify (Internal).
Enter the IP address, in dotted decimal notation, of the secondary DNS server for base-group users. The system sends this address to the client as the second DNS server to use for resolving host names.
Enter the IP address, in dotted decimal notation, of the primary WINS server for base-group users. The system sends this address to the client as the first WINS server to use for resolving host names under Windows NT. If the base group does not use WINS, leave this field blank. (See the Note on DNS and WINS entries on on).
Enter the IP address, in dotted decimal notation, of the secondary WINS server for base-group users. The system sends this address to the client as the second WINS server to use for resolving host names under Windows NT.
The VPN Concentrator can contain up to four SEP (Scalable Encryption Processing) modules that handle encryption functions, which are compute-intensive. Two SEP modules handle a number of sessions (users) up to the system maximum. The system maximum is 1000 sessions for the VPN Concentrator 3080 and 5000 sessions for the VPN Concentrator 3060. Two additional modules can provide automatic failover for the first two. This parameter lets you configure the load on each SEP module.
Check the SEP Card Assignment check box to assign the load to a given SEP module. By default, all boxes are checked, and we recommend that you keep the default. If your system does not have a given SEP module, the parameter is ignored.
Check the desired Tunneling Protocols check boxes to select the VPN tunneling protocols that user clients can use. Configure parameters on the IPSec or PPTP/L2TP tabs as appropriate. Clients can use only the selected protocols.
You cannot check both IPSec and L2TP over IPsec. The IPSec parameters differ for these two protocols, and you cannot configure the base group for both.
|
Note If no protocol is selected, no user clients can access or use the VPN. |
Check the Strip Realm check box to remove the realm qualifier of the user name during authentication. If you check this Strip Realm box, authentication is based on the username alone. Otherwise, authentication is based on the full username@realm string. You must check this box if your server is unable to parse delimiters.
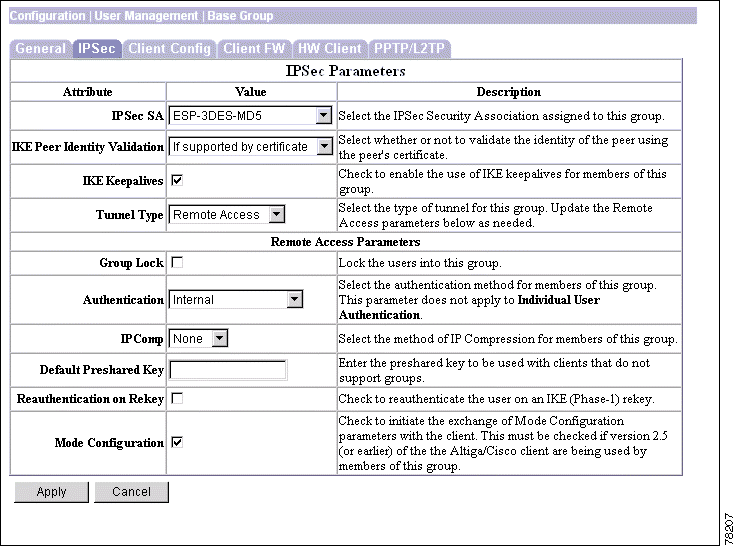
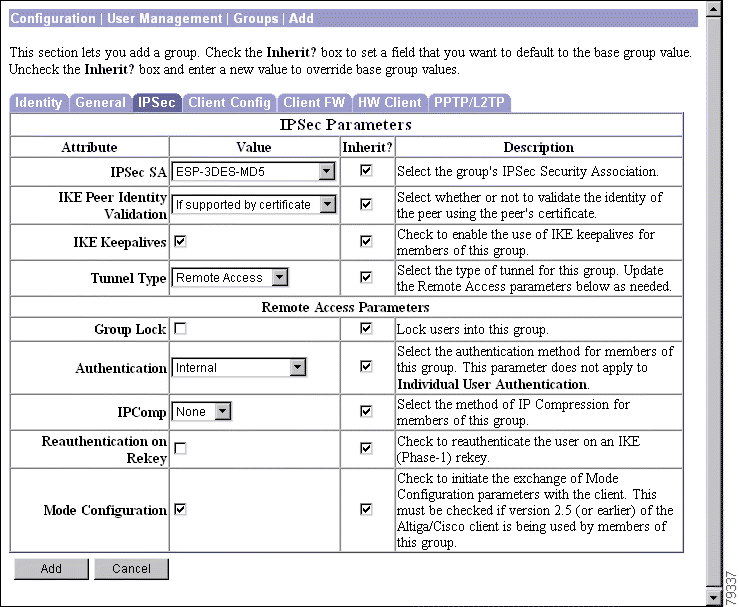
This tab lets you configure IP Security Protocol parameters that apply to the base group. If you checked IPSec or L2TP over IPSec under Tunneling Protocols on the General Parameters tab, configure this section.
Click the IPSec SA drop-down menu button and select the IPSec Security Association (SA) assigned to IPSec clients. During tunnel establishment, the client and server negotiate a Security Association that governs authentication, encryption, encapsulation, key management, etc. You configure IPSec Security Associations on the Configuration | Policy Management | Traffic Management | Security Associations screens.
To use IPSec with remote-access clients, you must assign an SA. With IPSec LAN-to-LAN connections, the system ignores this selection and uses parameters from the Configuration | System | Tunneling Protocols | IPSec LAN-to-LAN screens.
The VPN Concentrator supplies these default selections:
Additional SAs that you have configured also appear on the list.
Click the IKE Peer Identity Validation drop-down menu button, and select the type of peer identity validation.
|
Note This option applies only to tunnel negotiations based on certificates. |
During IKE tunnel establishment, the peer provides its identity: either an IP address, a fully qualified domain name (FQDN), or a distinguished name (DN). It also presents a certificate, which contains none, some, or all of these fields. If IKE peer identity validation is enabled, the VPN Concentrator compares the peer's identity to the like field in the certificate to see if the information matches. If the information matches, then the peer's identity is validated and the VPN Concentrator establishes the tunnel. If the information does not match, the VPN Concentrator drops the tunnel. This feature provides an additional level of security.
IKE Peer Identity Validation can be useful for binding a peer to a particular IP address or domain name. For example, if the IP address that the peer provided as an identification during tunnel establishment does not match the IP address in its certificate, the VPN Concentrator fails to validate the peer and drops the tunnel.
Ideally all the VPN Concentrator peers are configured to provide matching types of identity and certificate fields. In this case, enabling Peer Identity Validation ensures that the VPN Concentrator checks the validity of every peer, and only validated peers connect. But in actuality, some peers might not be configured to provide this data. The peer provides a certificate, but that certificate might not contain any of the matching fields required for an identity check. (For example, the peer might provide an IP address for its identity and its certificate might contain only a distinguished name.) If a peer does not provide sufficient information for the VPN Concentrator to check its identity, there are two possibilities: the VPN Concentrator either establishes the session or drops it. If you want the VPN Concentrator to drop sessions of peers that do no provide sufficient information to perform an identity check, choose Required. If you want the VPN Concentrator to establish sessions for peers that do not provide sufficient identity information to perform a check, select If supported by Certificate.
Check the IKE Keepalives check box to enable IKE keepalives. (IKE keepalives is enabled by default.) This feature lets the VPN Concentrator monitor the continued presence of a remote peer and to report its own presence to that peer. If the peer becomes unresponsive, the VPN Concentrator removes the connection. Enabling IKE keepalives prevents hung connections when the IKE peer loses connectivity.
There are various forms of IKE keepalives. For this feature to work, both the VPN Concentrator and its remote peer must support a common form. This feature works with the following peers:
Non-Cisco VPN clients do not support IKE keepalives.
If you are configuring a group of mixed peers, and some of those peers support IKE keepalives and others do not, enable IKE keepalives for the entire group. The feature does not affect the peers that do not support it.
If you disable IKE keepalives, connections with unresponsive peers remain active until they time out, so we recommend you keep your idle timeout short. To change your idle timeout, see the Configuration | User Management | Groups | Add screen, General tab.
|
Note To reduce connectivity costs, disable IKE keepalives if this group includes any clients connecting via ISDN lines. ISDN connections normally disconnect if idle, but the IKE keepalives mechanism prevents connections from idling and therefore from disconnecting. |
|
Note If you have a LAN-to-LAN configuration using IKE main mode, make sure the two peers have the same IKE keepalives configuration: both must have IKE keepalives enabled or both must have it disabled. |
Click the Tunnel Type drop-down menu button and select the type of IPSec tunnel that clients use:
These base-group parameters apply to remote-access IPSec client connections only. If you select Remote Access for Tunnel Type, configure these parameters.
Check the Group Lock check box to restrict users to remote access through this group only. The IPSec client connects to the VPN Concentrator via a group name and password, and then the system authenticates a user via a username and password. If this box is unchecked (the default), the system authenticates a user without regard to the user's assigned group.
Whenever a VPN software or VPN 3002 hardware client attempts a tunneled connection to a network behind a VPN Concentrator, that client is authenticated by means of a username and password. This authentication occurs when the tunnel initiates.
Click the Authentication drop-down menu button and select the authentication method (authentication server type) to use with this group's remote-access IPSec clients. Both VPN Clients and VPN 3002 hardware clients authenticate on the first server of the type you configure.
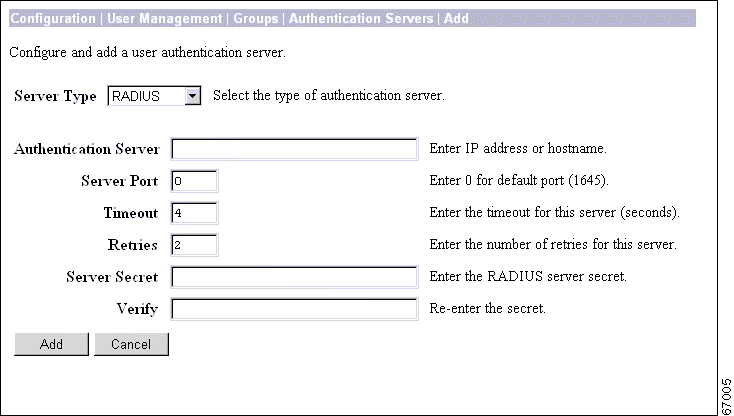
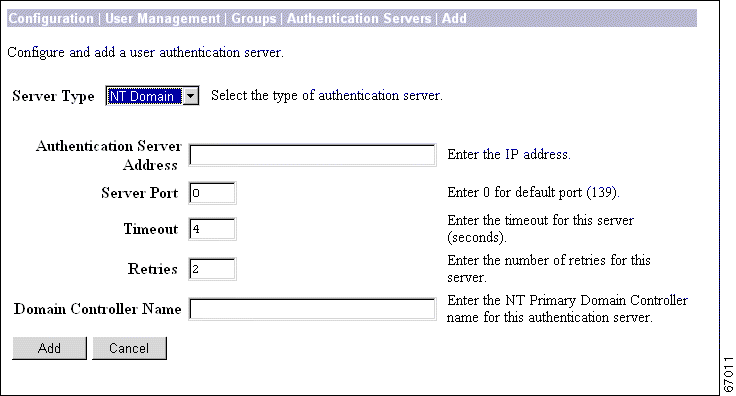
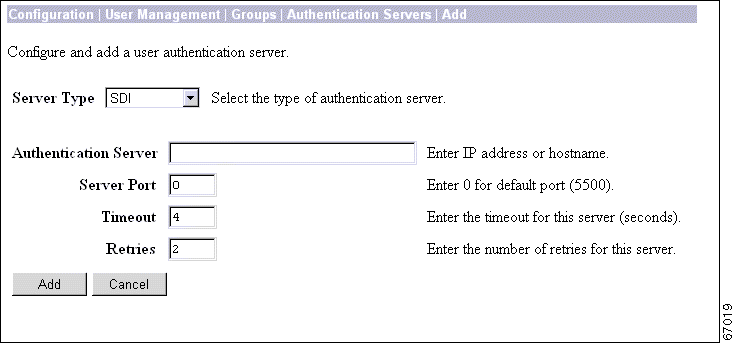
This selection identifies the authentication method, not the specific server. Configure authentication servers on the Configuration | System | Servers | Authentication screens or Configuration | User Management | Groups | Authentication Servers screens.
For the VPN 3002, this selection applies to authentication using a saved username and password and to interactive hardware client authentication. Individual users behind the VPN 3002 authenticate according to the priority order of all authentication servers configured, regardless of type. For more information on the different ways in which a VPN 3002 can authenticate, see the section, "HW Client Parameters Tab."
|
Note To configure user-based authentication for Cisco VPN Clients, choose an Authentication method,
then follow the additional steps outlined under Configuration | System | Tunneling Protocols | IPSec | IKE Proposals | Add, Modify, or Copy. |
Selecting any authentication method (other than None) enables ISAKMP Extended Authentication, also known as XAUTH.
Enabling RADIUS with Expiry allows the VPN Concentrator to use MS-CHAP-v2 when authenticating an IPSec client to an external RADIUS server. That RADIUS server must support both MS-CHAP-v2 and the Microsoft Vendor Specific Attributes. Refer to the documentation for your RADIUS server to verify that it supports these capabilities.
Because of the use of MS-CHAP-v2, when you enable RADIUS with Expiry on the VPN Concentrator, the VPN Concentrator can provide enhanced login failure messages to the VPN Client describing specific error conditions. These conditions are:
If all members of this group are remote dial-in users connecting with modems, enabling data compression might speed up their data transmission rates. Data compression shrinks data by replacing repeating information with symbols that use less space. Click the IPComp drop-down menu button to enable data compression using IPComp.
 |
Caution Data compression increases the memory requirement and CPU utilization for each user session and consequently decreases the overall throughput of the VPN Concentrator. For this reason, we recommend that you enable data compression only if every member of the group is a remote user connecting with a modem. If any members of the group connect via broadband, do not enable data compression for the group. Instead, divide the group into two groups, one for modem users and the other for broadband users. Enable data compression only for the group of modem users. |
Enter the preshared secret. Use a minimum of four and a maximum of 32 alphanumeric characters.
This option allows the following VPN clients to connect to the VPN Concentrator:
Check the Reauthentication on Rekey check box to enable reauthentication, or uncheck the box to disable it.
The VPN Concentrator prompts the user to enter an ID and password during Phase 1 IKE negotiations. If you enable reauthentication, the VPN Concentrator also prompts for user authentication whenever a rekey occurs. Reauthentication provides additional security.
Check the Mode Configuration check box to use Mode Configuration with IPSec clients (also known as the ISAKMP Configuration Method or Configuration Transaction). This option exchanges configuration parameters with the client while negotiating Security Associations. If you check this box, configure the desired Mode Configuration Parameters; otherwise, ignore them. The box is checked by default.
To use split tunneling, you must check this box.
If you checked L2TP over IPSec under Tunneling Protocols, do not check this box.
|
Note IPSec uses Mode Configuration to pass all configuration parameters to a client: IP address, DNS and WINS addresses, etc. You must check this box to use Mode Configuration. Otherwise, those parameters—even if configured with entries—are not passed to the client. |
These base-group parameters apply to IPSec clients.
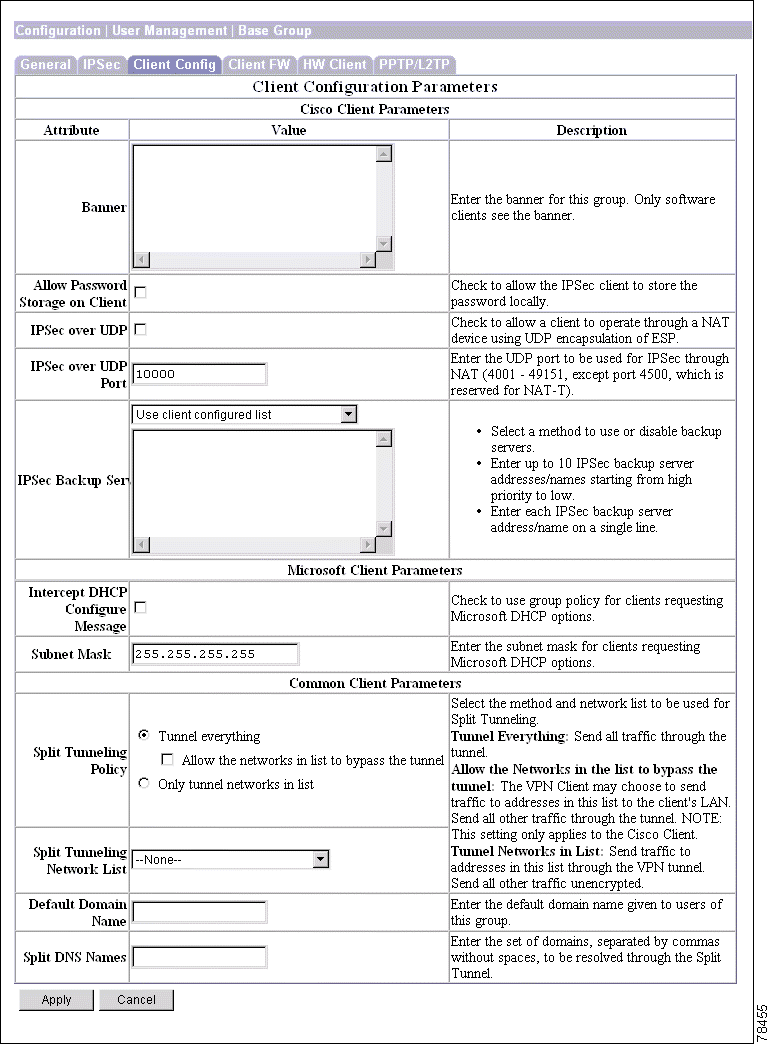
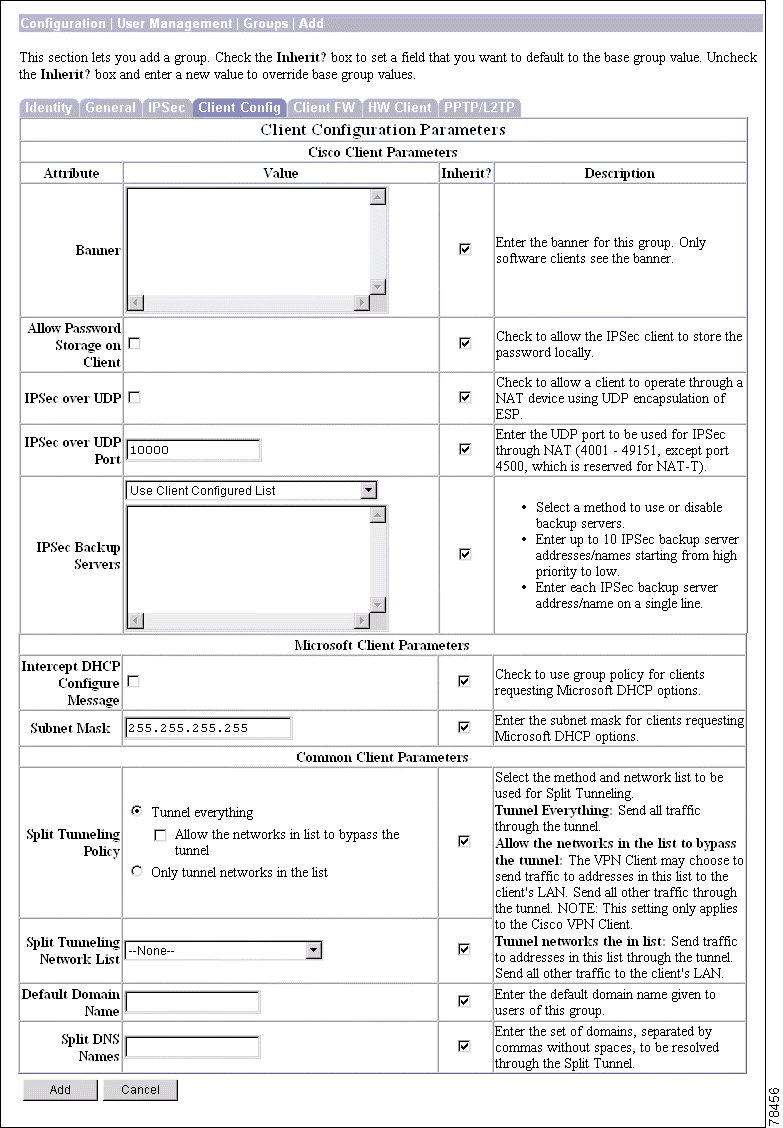
Enter the banner, or welcome text, that this group's IPSec clients see when they log in. The maximum length is 510 characters. You can use any characters, including newline (the Enter key, which counts as two characters).
Check the Allow Password Storage on Client check box to allow IPSec clients to store their login passwords on their local client systems. If you do not allow password storage (the default), IPSec users must enter their password each time they seek access to the VPN. For maximum security, we recommend that you not allow password storage.
This parameter has no bearing on interactive hardware client authentication or individual user authentication for a VPN 3002.
Check the IPSec over UDP check box to allow the Cisco VPN Client (IPSec client) or VPN 3002 hardware client to connect to the VPN Concentrator via UDP through a firewall or router using NAT. The box is unchecked by default. See the following discussion.
Enter the UDP port number to use on the VPN Concentrator if you allow IPSec through NAT. Enter a number in the range 4001 through 49151; default is 10000.
IPSec over UDP, sometimes called IPSec through NAT, lets you use the Cisco VPN Client or VPN 3002 hardware client to connect to the VPN Concentrator via UDP through a firewall or router that is running NAT. This feature is proprietary, it applies only to remote-access connections, and it requires Mode Configuration. Using this feature might slightly degrade system performance.
Enabling this feature creates runtime filter rules that forward UDP traffic for the configured port even if other filter rules on the interface drop UDP traffic. These runtime rules exist only while there is an active IPSec through NAT session. The system passes inbound traffic to IPSec for decryption and unencapsulation, and then passes it to the destination. The system passes outbound traffic to IPSec for encryption and encapsulation, applies a UDP header, and forwards it.
You can configure more than one group with this feature enabled, and each group can use a different port number. Port numbers must be in the 4001 through 49151 range, which is a subset of the IANA Registered Ports range.
The Cisco VPN Client must also be configured to use this feature (it is configured to use it by default). The VPN Client Connection Status dialog box indicates if the feature is being used. Refer to the VPN Client User Guide.
The VPN 3002 hardware client does not require configuration to use IPSec through NAT.
The Administration | Sessions and Monitoring | Sessions screens indicate if a session is using IPSec through NAT, and the Detail screens show the UDP port.
|
Note The following restrictions apply to multiple simultaneous connections using IPSec over UDP: |
Multiple simultaneous connections from VPN Client or VPN 3002 hardware client users behind a PAT (Port Address Translation) device can work, but only if the PAT device assigns a unique source port for each simultaneous user.
Some PAT devices use UDP source port = 500 for all IKE sessions, even if there are multiple sessions. This allows only one session at a time; the second connection brought up from behind this type of PAT device causes the first session to be torn down. (This is unrelated to whether or not a PAT device supports "ESP" PAT, or if you are using the IPSec UDP functionality.)
Therefore, for multiple simultaneous IPSec over UDP connections, use a PAT device that maps each additional session to use unique UDP source ports. Alternatively, connect additional users to different destination VPN Concentrators.
IPSec backup servers let a VPN 3002 Hardware Client connect to the central site when its primary central-site VPN Concentrator is unavailable. You configure backup servers for a VPN 3002 either on the VPN 3002, or on a group basis at the primary central-site VPN Concentrator. If you configure backup servers on the central-site VPN Concentrator, that VPN Concentrator pushes the backup server policy to the VPN 3002 hardware clients in the group.
By default the policy is to use the backup server list configured on the VPN 3002. Alternatively, the VPN Concentrator can push a policy that supplies a list of backup servers in order of priority (replacing the backup server list on the VPN 3002 if one is configured), or it can disable the feature and clear the backup server list on the VPN 3002 if one is configured.
Figure 14-5 illustrates how the backup server feature works.
XYZ corporation has large sites in three cities: San Jose, California; Austin, Texas; and Boston, Massachusetts. They just opened a regional sales office in Fargo, North Dakota. To provide access to the corporate network from Fargo, they use a VPN 3002 that connects to a VPN 3080 in San Jose (1). If the VPN 3002 is unable to contact the corporate network, Fargo cannot place orders. However, the IPSec backup server feature lets the VPN 3002 connect to one of several other sites, in this case using Austin (2) and Boston (3) as backup servers, in that order.
The VPN 3002 in Fargo first attempts to reach San Jose. If the initial IKE packet for that connection (1) times out (8 seconds), the VPN 3002 tries to connect to Austin (2). Should this negotiation also time out, the VPN 3002 tries to connect to Boston (3). These attempts continue until the VPN 3002 has tried all servers on its backup server list, to a maximum of 10.
Be aware of the following characteristics of the backup server feature:
You can configure the backup server feature from the primary VPN Concentrator or the VPN 3002. From the VPN Concentrator, configure backup servers on either of the Configuration | User Management | Base Group or Groups | Mode Configuration screens. On the VPN 3002, configure backup servers on the Configuration | System | Tunneling Protocols | IPSec screen.
The list you configure on the VPN 3002 applies only if the option, Use Client Configured List, is set in the IPSec Backup Servers parameter. To set this parameter, go to the Mode Configuration tab of the Configuration | User Management | Groups | Add/Modify screen for the primary VPN Concentrator to which the VPN 3002 connects.
|
Note The group name, user name, and passwords that you configure for the VPN 3002 must be identical for the primary VPN Concentrator and all backup servers. Also, if you require interactive hardware client authentication and/or individual user authentication for the VPN 3002 on the primary VPN Concentrator, be sure to configure it on backup servers as well. See the HW Client Parameters Tab for more information. |
To configure backup servers on the primary central-site VPN Concentrator, accept the default, Use list below in the IPSec Backup Servers drop down menu.
Enter either the IP addresses or the hostnames of the VPN Concentrators that are to be backup servers. The IP address is the IP address of the VPN Concentrator public interface.
|
Note If you are using hostnames, it is wise to have backup DNS and WINS servers on a separate network from that of the primary DNS and WINS servers. Otherwise, if clients behind the VPN 3002 obtain DNS and WINS information from the VPN 3002 through DHCP, and the connection to the primary server is lost, and the backup servers have different DNS and WINS information, clients cannot be updated until the DHCP lease expires. Further, if you use hostnames and the DNS server is unavailable, significant delays can occur. |
You can enter up to 10 backup servers, in order of highest to lowest priority. Enter each backup server on a single line, using the Enter or Return key for each new line.
Should there be a backup server list already configured on the VPN 3002, this list on the central-site VPN Concentrator replaces it, and becomes the list of backup servers on the VPN 3002 hardware client.
If you change the configuration of backup servers, or delete a backup server during an active session between a VPN 3002 and a backup server, the session continues without adopting that change. New settings take effect in the next new session.
To configure backup servers on the VPN 3002, accept the default, Use client configured list in the IPSec Backup Servers drop-down menu. You then configure backup servers in the VPN 3002 Configuration | System | Tunneling Protocols | IPSec screen. Refer to the Tunneling chapter in the VPN 3002 Hardware Client User Reference for instructions.
To disable the backup server feature, select Disable and clear client configured list in the IPSec Backup Servers drop-down menu. If you disable the feature from the primary VPN Concentrator, the feature is disabled and the list of backup servers configured on the VPN 3002, if there is one, is cleared.
DHCP Intercept lets Microsoft XP clients implement split-tunneling with a VPN Concentrator. The VPN Concentrator replies directly to the Microsoft Windows XP client DHCP Inform message, providing that client with the subnet mask, domain name, and classless static routes for the tunnel IP address. For Windows clients prior to XP, DHCP Intercept provides the domain name and subnet mask. This is useful in environments in which using a DHCP server is not advantageous.
|
Note A Microsoft XP anomaly results in the corruption of domain names if split tunnel options exceed 255 bytes. The VPN Concentrator limits the number of routes it sends to 27-40 routes, with the number of routes dependent on the classes of the routes, to avoid this problem. |
Check the box to enable DHCP Intercept.
Enter the subnet mask for clients requesting Microsoft DHCP options.
Split tunneling lets an IPSec client conditionally direct packets over an IPSec tunnel in encrypted form, or to a network interface in cleartext form. Packets not bound for destinations on the other side of the IPSec tunnel do not have to be encrypted, sent across the tunnel, decrypted, and then routed to a final destination. Split tunneling thus eases the processing load, simplifies traffic management, and speeds up untunneled traffic.
|
Note To implement split tunneling for Microsoft XP clients, you must meet several conditions: - Set the Split Tunneling Policy to "Only tunnel networks in list." - Configure network lists and default domain names in the Common Client Parameters section of this screen. - Change the default setting on the client PC's Internet Protocol (TCP/IP) Properties window. The path is Control Panel > Network Connections > VPN > VPN Properties > Networking > Internet Protocol (TCP/IP) > Select Properties > Internet Protocol (TCP/IP) Properties window. Select Advanced and uncheck the box. |
|
Note If you enable both split tunneling and individual user authentication for a VPN 3002, users must authenticate only when sending traffic bound for destinations on the other side of the IPSec tunnel. |
Split tunneling is primarily a traffic management feature, not a security feature. In fact, for optimum security, we recommend that you not enable split tunneling. However, since only the VPN Concentrator—and not the IPSec client—can enable split tunneling, you can control implementation here and thus protect security. Split tunneling is disabled by default on both the VPN Concentrator and the client. You enable and configure the feature on the VPN Concentrator, and then the VPN Concentrator uses Mode Configuration to push it to, and enable it on, the IPSec client.
Split tunneling applies only to single-user remote-access IPSec tunnels, not to LAN-to-LAN connections.
The default split tunneling policy is Tunnel Everything. Tunnel Everything disables split tunneling. When Tunnel Everything is configured, all traffic from remote clients in this group travels over the secure IPSec tunnel in encrypted form. No traffic goes in the clear or to any other destination than the VPN Concentrator. Remote users in this group reach internet networks through the corporate network and do not have access to local networks.
If users in this group need access to local networks, choose Allow Networks in List to Bypass Tunnel. This option allows you to define a list of networks to which traffic goes in the clear. This feature is useful for remote users who want to access devices on their local network, such as printers, while they are connected to the corporate network through a tunnel.
To configure the Allow Networks in List to Bypass Tunnel option, choose VPN Client Local LAN from the Split Tunnel Network List menu. The VPN Client Local LAN option allows all users in the group to access all devices on their local networks. If you want to restrict users' access to particular devices on their local network, you need to know the addresses of the local devices the remote users in this group want to access. Create a network list of these addresses, then choose that network list from the Split Tunneling Network List menu. You can apply only one network list to a group, but one network list can contain up to 10 network entries. (See the Configuration | Policy Management | Traffic Management | Network Lists screens for more information on creating network lists.) You also must enable Local LAN Access on the VPN Client. See the VPN Client Administrator Guide for more details.
|
Note The Allow Networks in List to Bypass Tunnel option allows remote users to access only devices that are located on the same network interface as the tunnel. If a remote user's local LAN is located on a different network interface than the tunnel, the user cannot access it. |
To allow remote users to access internet networks without tunneling through the corporate network, enable split tunneling. To enable split tunneling, choose Only Tunnel Networks in List. To configure this option, create a network list of addresses to tunnel. Then select this network list from the Split Tunneling Network List menu. Data to all other addresses is sent in the clear and routed by the remote user's internet service provider.
We recommend that you keep the base-group default, and that you enable and configure the split tunneling policy selectively for each group.
Click the drop-down menu button and select the split tunneling address list to use with this group's remote-access IPSec clients.
Both the Allow Networks in List to Bypass Tunnel option and the Only Tunnel Networks in List option make split tunneling decisions on the basis of a network list, which is a list of addresses on the private network. But the network list functions differently in each configuration.
In an Allow Networks in List to Bypass Tunnel configuration, The IPSec client uses the network list as an exclusion list: a list of addresses to which traffic should be sent in the clear. All other traffic is routed over the IPSec tunnel.
In an Only Tunnel Networks in List configuration, the IPSec client uses the network list as an inclusion list: a list of networks for which traffic should be sent over the IPSec tunnel. The IPSec client establishes an IPSec Security Association (SA) for each network specified in the list. Outbound packets with destination addresses that match one of the SAs are sent over the tunnel; everything else is sent as clear text to the locally connected network.
Enter the default domain name that the VPN Concentrator passes to the IPSec client, for the client's TCP/IP stack to append to DNS queries that omit the domain field. This domain name applies only to tunneled packets. For example, if this entry is xyzcorp.com, a DNS query for mail becomes mail.xyzcorp.com. The maximum name length is 255 characters. The Manager checks the domain name for valid syntax.
Split DNS lets an internal DNS server resolve a list of centrally-defined Local Domain Names, while ISP-assigned DNS servers resolve all other DNS requests. It is used in split-tunneling connections; the internal DNS server resolves the domain names for traffic through the tunnel, and the ISP-assigned DNS servers resolve DNS requests that travel in the clear to the Internet.
Split DNS is not supported on Microsoft clients.
Enter each domain name to be resolved by the internal server. Use commas but no spaces to separate the names.
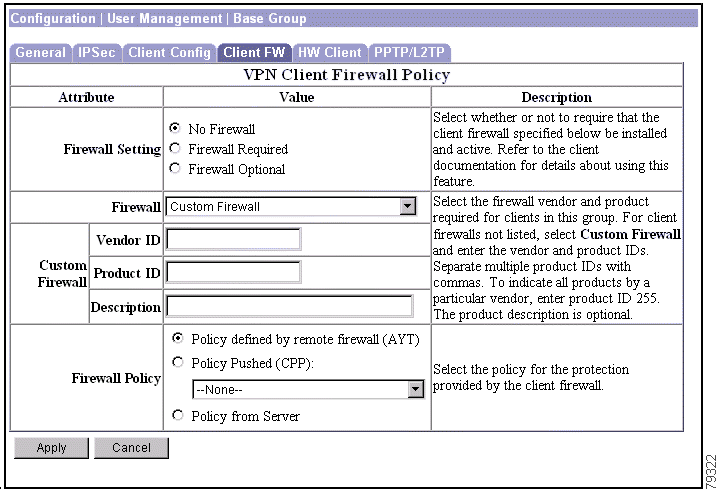
This tab lets you configure firewall parameters for VPN Clients.
|
Note Only VPN Clients running Microsoft Windows can use these firewall features. They are presently not available to hardware clients or other (non-Windows) software clients. |
A firewall isolates and protects a computer from the Internet by inspecting each inbound and outbound individual packet of data to determine whether to allow or drop it. Firewalls provide extra security if remote users in a group have split tunneling configured. In this case, the firewall protects the user's PC, and thereby the corporate network, from intrusions by way of the Internet or the user's local LAN.
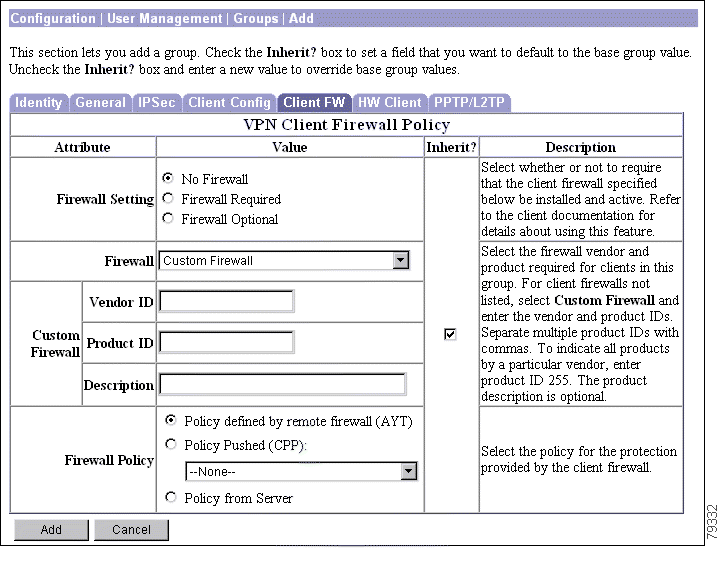
Remote users connecting to the VPN Concentrator with the VPN Client can choose from three possible firewall options.
In the first scenario, a remote user has a personal firewall installed on the PC. The VPN Client enforces firewall policy defined on the local firewall, and it monitors that firewall to make sure it is running. If the firewall stops running, the VPN Client drops the connection to the VPN Concentrator. (This firewall enforcement mechanism is called Are You There (AYT), because the VPN Client monitors the firewall by sending it periodic "are you there?" messages; if no reply comes, the VPN Client knows the firewall is down and terminates its connection to the VPN Concentrator.) The network administrator might configure these PC firewalls originally, but with this approach, each user can customize his or her own configuration.
In the second scenario, you might prefer to enforce a centralized firewall policy for personal firewalls on VPN Client PCs. A common example would be to block Internet traffic to remote PCs in a group using split tunneling. This approach protects the PCs, and therefore the central site, from intrusions from the Internet while tunnels are established. This firewall scenario is called push policy or Central Protection Policy (CPP). On the VPN Concentrator, you create a set of traffic management rules to enforce on the VPN Client, associate those rules with a filter, and designate that filter as the firewall policy. The VPN Concentrator pushes this policy down to the VPN Client. The VPN Client then in turn passes the policy to the local firewall, which enforces it.
A third scenario is to use a separate firewall server—the Zone Labs Integrity Server (IS)—to secure remote PCs on Windows platforms. The IS maintains policies for remote VPN Client PCs and monitors the PCs to ensure policy enforcement. The IS also communicates with the VPN Concentrator to allow and terminate connections, exchange session and user information, and report status information. For more details on how the VPN Concentrator interacts with the VPN Client, personal firewalls, and the Zone Labs Integrity Server, see the VPN Client Administrator Guide. For information on configuring the Zone Labs Integrity Server, refer to Zone Labs' documentation.
By default, no firewall is required for remote users in this group. If you want users in this group to be firewall-protected, choose either the Firewall Required or Firewall Optional setting.
If you choose Firewall Required, all users in this group must use the designated firewall. The VPN Concentrator drops any session that attempts to connect without the designated, supported firewall installed and running. In this case, the VPN Concentrator notifies the VPN Client that its firewall configuration does not match.
If you have remote users in this group who do not yet have firewall capacity, choose Firewall Optional. The Firewall Optional setting allows all the users in the group to connect. Those who have a firewall can use it; users that connect without a firewall receive a warning message. This setting is useful if you are creating a group in which some users have firewall support and others do not—for example, you may have a group that is in gradual transition, in which some members have set up firewall capacity and others have not yet done so.
Click the radio button to select a firewall setting:
|
Note If you require a firewall for a group, make sure the group does not include any clients other than Windows VPN Clients. Any other clients in the group (including VPN 3002 Hardware Clients) will be unable to connect. |
Choose a firewall for the users in this group. Keep in mind when choosing that the firewall you designate correlates with the firewall policies available. The specific firewall you configure determines which firewall policy options are supported. (See Table 14-3 for details.)
Click the drop-down menu button, and select the type of firewall required for users in this group.
|
Note You do not need to use the Custom option for Release 3.5. Currently, all supported firewalls are covered by the other Firewall menu options. |
On the VPN Concentrator, you can configure a custom firewall. Currently there are no supported firewall configurations that you can not choose from the menu on the VPN Concentrator. This feature is mainly for future use. Nevertheless, the following table lists the vendor codes and products that are currently supported.
Enter a single vendor code; enter one or more product codes.
The VPN Concentrator can support any firewall that the VPN Client supports. Refer to the VPN Client Administrator Guide for the latest list of supported clients.
Enter the vendor code for the firewall(s) that remote users in this group are using. Enter only one vendor.
Enter the product code or codes for the firewall(s) that remote users in this group are using. To indicate any supported product, enter 255. Separate multiple codes with commas. Indicate code ranges with hyphens, for example: 4-20.
Enter a description (optional) for the custom firewall.
Depending on which firewall you configured, certain Firewall Policy options are available. (See Table 14-3.)
Table 14-3 Firewall Policy Options Available for Each Firewall
| Firewall | Policy Defined by Remote Firewall |
Policy Pushed | Policy from Server |
|---|---|---|---|
Choose the source for the VPN Client firewall policy.
If the VPN Client also has a local firewall, the policy pushed from the VPN Concentrator works with the policy of the local firewall. Any packet that is blocked by the rules of either firewall is dropped.
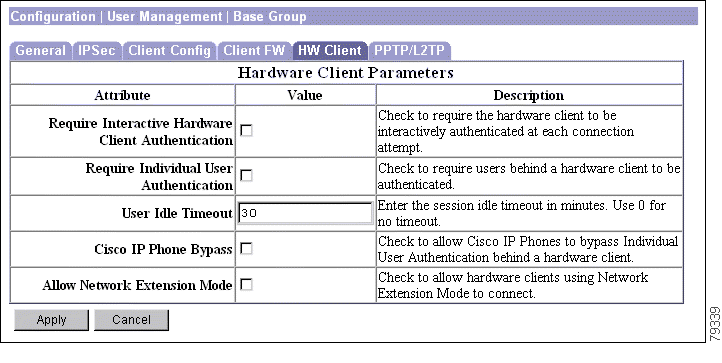
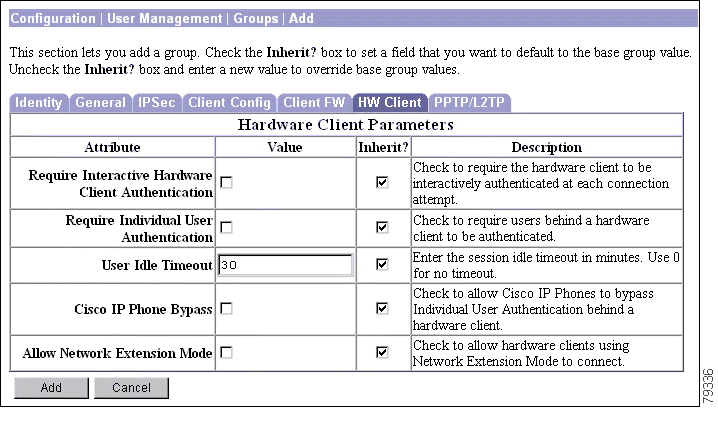
The Hardware Client Parameters tab lets you configure interactive hardware client authentication and individual user authentication for the base group. You can enable either feature, both features together, or neither. By default, interactive hardware client authentication and individual user authentication are disabled.
Check the Require Interactive Hardware Client Authentication check box to enable interactive authentication for the VPN 3002.
Check the Require Individual User Authentication box to enable individual user authentication.
Enter the idle timeout period in minutes. If there is no communication activity on a user connection in this period, the system terminates the connection. The minimum is 1 minute, the default is 30 minutes, and the maximum is 2147483647 minutes (over 4000 years). To disable timeout and allow an unlimited idle period, enter 0.
Check the Cisco IP Phone Bypass box to allow IP phones to bypass the interactive individual user authentication processes. Interactive hardware client authentication remains in effect if you have enabled it.
This feature lets you restrict the use of network extension mode on the VPN 3002. Check the box to allow VPN 3002s to use network extension mode.
|
Note If you disallow network extension mode, the default setting, the VPN 3002 can connect to this VPN Concentrator in PAT mode only. If you disallow network extension mode here, be careful that all VPN 3002s in the group are configured for PAT mode. If a VPN 3002 is configured to use network extension mode and the VPN Concentrator to which it connects disallows network extension mode, the VPN 3002 will attempt to connect every 4 seconds, and every attempt will be rejected; this is the equivalent of denial of service attack. |
Interactive hardware client authentication provides the central site with additional security by requiring the VPN 3002 to authenticate with a username and password that you enter manually each time the VPN 3002 initiates a tunnel. With this feature enabled the VPN 3002 does not have a saved username and password. When you enter the username and password, the VPN 3002 sends these credentials to the VPN Concentrator to which it connects. The VPN Concentrator facilitates authentication, on either the internal or an external authentication server. If the username and password are valid, the tunnel is established.
You configure interactive hardware client authentication in Hardware Client tab of the Configuration | User Management | Groups screen on the VPN Concentrator at the central site, which then pushes the policy to the VPN 3002.
You specify the type of authentication server in the IPSec tab of the Configuration | User Management | Groups screen on the VPN Concentrator. The VPN 3002 authenticates on the first server of that type that you configure in the Configuration | System | Servers | Authentication screen or Configuration | User Management | Groups | Authentication Servers screen. If the VPN 3002 cannot reach that server, it authenticates on the next server of that type in the list of authentication servers.
When you enable interactive hardware client authentication for a group, the VPN Concentrator pushes that policy to the VPN 3002s in the group. If you have previously set a username and password on the VPN 3002, the software deletes them from the configuration file. When you try to connect, the software prompts you for a username and password.
If, on the VPN Concentrator, you subsequently disable interactive hardware authentication for the group, it is enabled locally on the VPN 3002s, and the software continues to prompt for a username and password. This lets the VPN 3002 connect, even though it lacks a saved username and password, and the VPN Concentrator has disabled interactive hardware client authentication.
If you subsequently configure a username and password (in the VPN 3002 Configuration | System | Tunneling Protocols | IPSec screen), the feature is disable, and the prompt no longer displays. The VPN 3002 connects to the VPN Concentrator using the saved username and password.
Individual user authentication protects the central site from access by unauthorized persons on the same LAN as the VPN 3002.
When you enable individual user authentication, each user that connects through a VPN 3002 must open a web browser and manually enter a valid username and password to access the network behind the VPN Concentrator, even though the tunnel already exists.
|
Note You cannot use the command-line interface to log in if user authentication is enabled. You must use a browser. |
Individual users authenticate according to the order of authentication servers that you configure for a group. To configure authentication servers for individual user authentication, see the sections, Configuration | User Management | Base Group/Groups | Authentication Servers | Add/Modify.
Table 14-4 summarizes how authentication of the VPN 3002 works by default, and how it works with interactive hardware client authentication and individual user authentication enabled. Be aware that you can use both interactive hardware client authentication or individual user authentication simultaneously, or either one and not the other.
Table 14-4 Authenticating the VPN 3002 Hardware Client and Users
When you configure a VPN 3002, you assign it to a group on the VPN Concentrator to which it connects. This is the tunnel group to which the VPN 3002 belongs. The attributes of the tunnel group determine how the VPN 3002 authenticates.
For purposes of authentication, you can associate users behind the VPN 3002 with a group other than the tunnel group. You accomplish this by embedding a different group name within the username. To embed this second group name, you configure and use a delimiter, (@, #, or !) that associates the second group with the user. The format to use is username<delimiter>groupname, for example, UserA@bluegroup.
When you embed a groupname within a username:
|
Note The VPN 3002 always gets settings for interactive hardware client authentication from the tunnel group, not the embedded group. |
Table 14-5 summarizes how UserA, UserB, and UserC connect to the central site through a VPN 3002.
Table 14-5 Example: How Authentication Servers Work Using Embedded Groups
To configure and use a group delimiter, follow these steps.
Step 2 In the General tab of the Configuration | User Management | Groups | Add/Modify screen, check the Strip Realm box to remove the group name embedded in the username during authentication.
To use a second group for individual user authentication, enter the username with the embedded group in the form username<delimiter>groupname in the username field in one of these screens:
Be sure to configure any backup servers for the VPN 3002 with the same values as the primary VPN Concentrator for interactive hardware client authentication and individual user authentication. For information about configuring backup servers, see the section, Client Configuration Parameters Tab, earlier in this chapter.
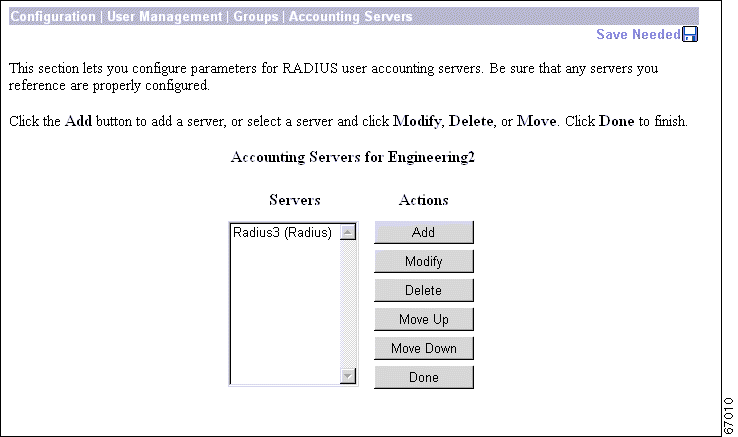
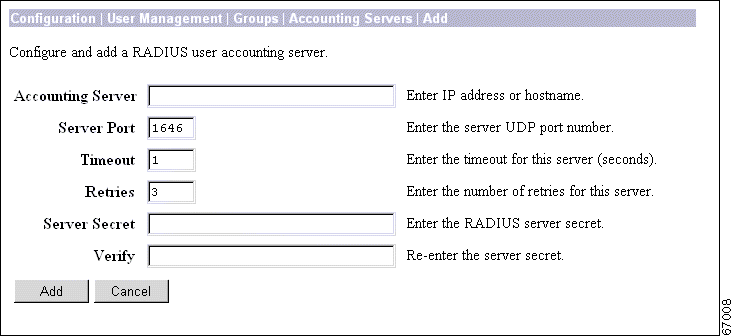
If a VPN 3002 authenticates to a VPN Concentrator, and you have enabled accounting, the VPN Concentrator notifies the RADIUS accounting server when the VPN 3002 logs on and off. It also keeps track of individual users. See the section, Configuration | System | Servers | Accounting of this book.
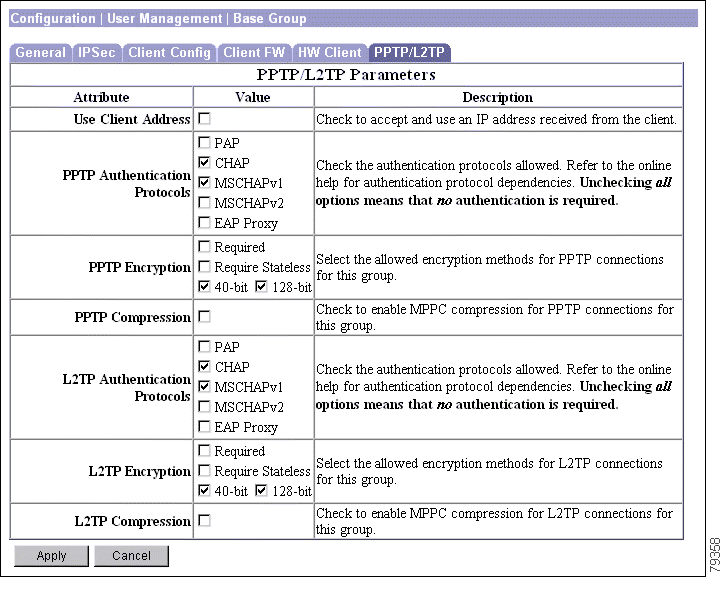
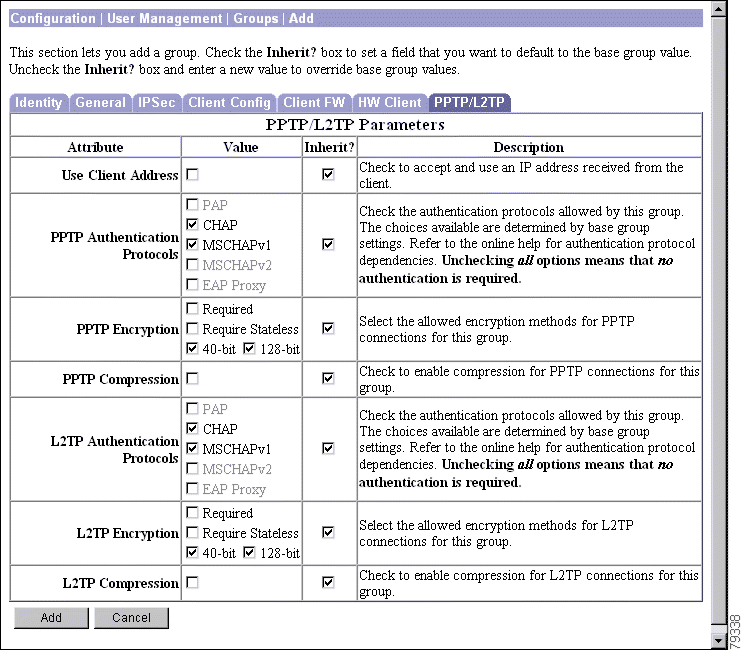
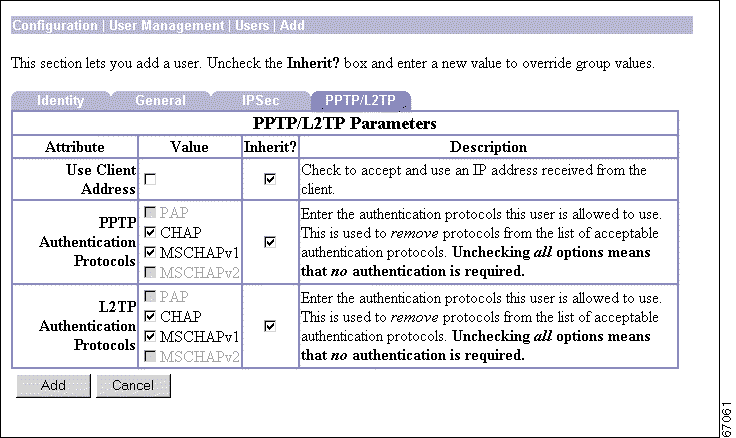
This tab lets you configure PPTP and L2TP parameters that apply to the base group. During tunnel establishment, the client and server negotiate access and usage based on these parameters. Only clients that meet these criteria are allowed access. If you checked PPTP, L2TP, or L2TP over IPSec under Tunneling Protocols on the General Parameters tab, configure these parameters.
Check the Use Client Address check box to accept and use an IP address that the client supplies. A client must have an IP address to function as a tunnel endpoint; but for maximum security, we recommend that you control IP address assignment and that you do not allow client-supplied IP addresses (the default).
Make sure the setting here is consistent with the setting for Use Client Address on the Configuration | System | Address Management | Assignment screen.
Check the PPTP Authentication Protocols check boxes for the authentication protocols that PPTP clients can use. To establish and use a VPN tunnel, users should be authenticated in accordance with a protocol.
|
Caution Unchecking all authentication options means that no authentication is required. That is, PPTP users can connect with no authentication. This configuration is allowed so you can test connections, but it is not secure. |
These choices specify the allowable authentication protocols in order from least secure to most secure.
Check the PPTP Encryption check boxes for the data encryption options that apply to PPTP clients.
If all members of this group are remote dial-in users connecting with modems, enabling data compression might speed up their data transmission rates. Data compression shrinks data by replacing repeating information with symbols that use less space. Check the box to enable data compression for PPTP. PPTP data compression uses the Microsoft Point to Point Compression (MPPC) protocol.
|
Note MPPC data compression increases the memory requirement and CPU utilization for each user session. Consequently, using data compression reduces the overall throughput of the VPN Concentrator and lowers the maximum number of sessions your VPN Concentrator can support. We recommend you enable data compression only if every member of the group is a remote user connecting with a modem. If any members of the group connect via broadband, do not enable data compression for the group. Instead, divide the group into two groups, one for modem users and the other for broadband users. Enable data compression only for the group of modem users. |
|
Note PPTP data compression is only supported for clients that use stateless encryption. |
Check the L2TP Authentication Protocols check boxes for the authentication protocols that L2TP clients can use. To establish and use a VPN tunnel, users should be authenticated in accordance with a protocol.
|
Caution Unchecking all authentication options means that no authentication is required. That is, L2TP users can connect with no authentication. This configuration is allowed so you can test connections, but it is not secure. |
These choices specify the allowable authentication protocols in order from least secure to most secure.
Check the L2TP Encryption check boxes for the data encryption options that apply to L2TP clients.
If all members of this group are remote dial-in users connecting with modems, enabling data compression might speed up their data transmission rates. Data compression shrinks data by replacing repeating information with symbols that use less space. Check the L2TP Compression check box to enable data compression for L2TP. L2TP data compression uses the Microsoft Point to Point Compression (MPPC) protocol.
|
Note MPPC data compression increases the memory requirement and CPU utilization for each user session. Consequently, using data compression reduces the overall throughput of the VPN Concentrator and lowers the maximum number of sessions your VPN Concentrator can support. We recommend you enable data compression only if every member of the group is a remote user connecting with a modem. If any members of the group connect via broadband, do not enable data compression for the group. Instead, divide the group into two groups, one for modem users and the other for broadband users. Enable data compression only for the group of modem users. |
|
Note L2TP data compression is only supported for clients that use stateless encryption. |
When you finish setting base-group parameters on all tabs, click Apply at the bottom of the screen to include your settings in the active configuration. The Manager returns to the Configuration | User Management screen.
To save the active configuration and make it the boot configuration, click the Save Needed icon at the top of the Manager window.
To discard your settings, click Cancel. The Manager returns to the Configuration | User Management screen.
This section of the Manager lets you configure access and usage parameters for specific groups. A group is a collection of users treated as a single entity. Groups inherit parameters from the base group.
For information on groups and users, see the section: User Management
Configuring internal groups in this section means configuring them on the VPN Concentrator internal authentication server. The system automatically configures the internal server when you add the first internal group.
Configuring external groups means configuring them on an external authentication server such as RADIUS.
The Current Groups list shows configured groups in alphabetical order, and if they are internal or external. If no groups have been configured, the list shows --Empty--.
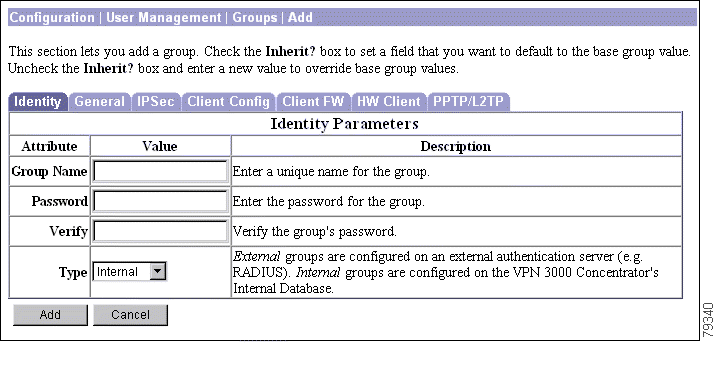
To configure and add a new group, click Add Group. The Manager opens the Configuration | User Management | Groups | Add screen.
To modify parameters for a group that has been configured, select the group from the list and click Modify Group. The Manager opens the appropriate internal or external Configuration | User Management | Groups | Modify screen.
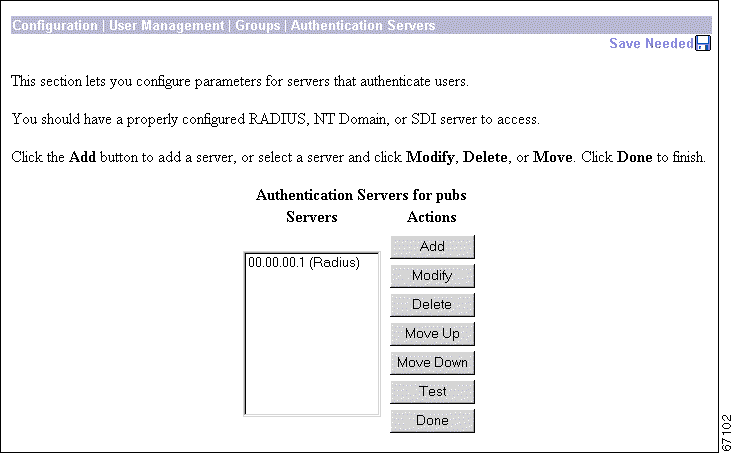
To modify authentication server parameters, select the group from the list and click Modify Auth. Servers. The Manager opens the Configuration | User Management | Groups | Authentication Servers screen.
To modify accounting server parameters, select the group from the list and click Modify Acct. Servers. The Manager opens the Configuration | User Management | Groups | Accounting Servers screen.
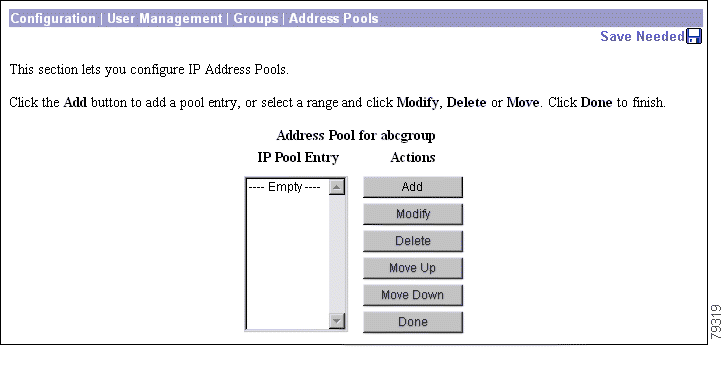
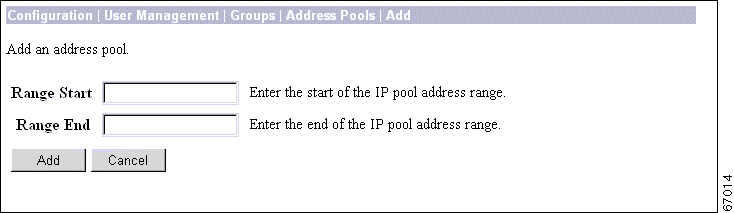
To modify address pools, select the group from the list and click Modify Address Pools. The Manager opens the Configuration | User Management | Groups | Address Pools screen.
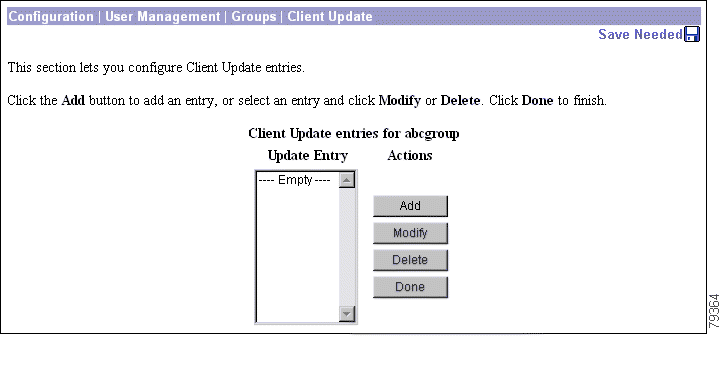
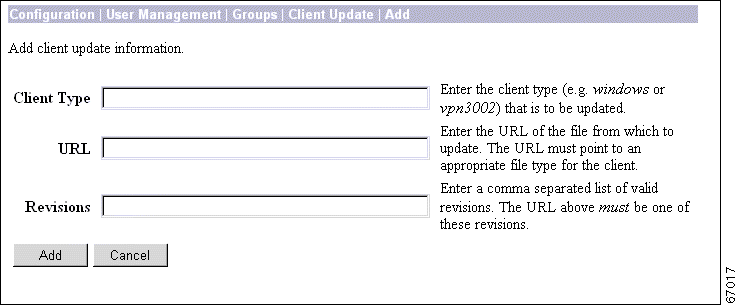
To modify client update entries, select the group from the list and click Modify Client Update. The Manager opens the Configuration | User Management | Groups | Client Update screen.
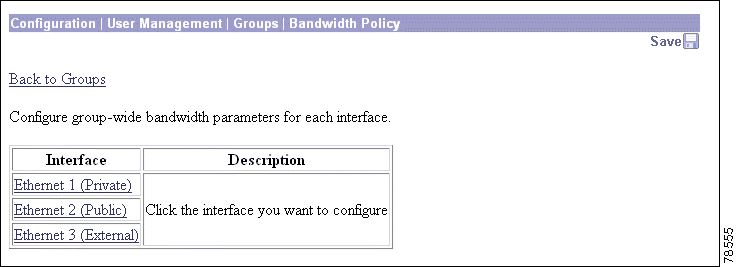
To assign a bandwidth management policy, select the group from the list and click Assign Bandwidth Policy. The Manager opens the Configuration | User Management | Groups | Bandwidth Policy screen.
To remove a group that has been configured, select the group from the list and click Delete Group.
|
Note There is no confirmation or undo. However, deleting a group that has certificate group matching rules defined for it also deletes these rules. In this case, the VPN Concentrator displays a warning message asking you to confirm that you really want to delete the group. |
The Manager refreshes the screen and shows the remaining groups in the list. When you delete a group, all its members revert to the base group. Deleting a group, however, does not delete the user profiles of the members.
You cannot delete a group that is configured as part of a LAN-to-LAN connection. See the Configuration | System | Tunneling Protocols | IPSec LAN-to-LAN | Add | Done screen.
The Manager immediately includes your changes in the active configuration. To save the active configuration and make it the boot configuration, click the Save Needed icon at the top of the Manager window.
For many of these parameters, you can simply specify that the group "inherit" parameters from the base group, which you should configure first. You can also override the base-group parameters as you configure groups. See the Configuration | User Management | Base Group screen.
On this screen, you configure the following kinds of parameters:
This screen includes four tabbed sections. Click each tab to display its parameters. As you move from tab to tab, the Manager retains your settings. When you have finished setting parameters on all tabbed sections, click Add/Apply or Cancel.
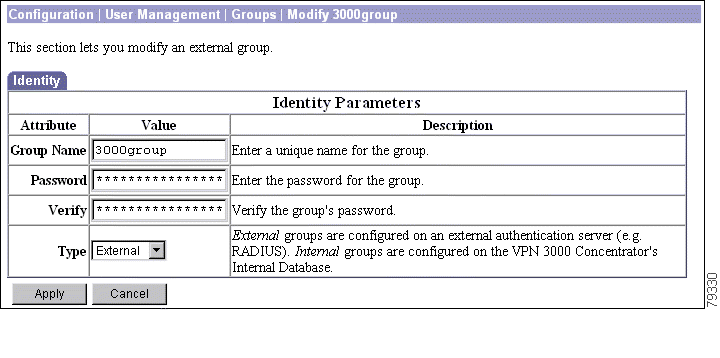
This tab lets you configure the name, password, and authentication server type for this group.
Enter a unique name for this specific group. The name cannot match any existing user or group name. (If you are using an external authentication server, see the note about naming on.)
The maximum name length is 64 characters. Entries are case-sensitive. Changing a group name automatically updates the group name for all users in the group.
If you are setting up a group for remote access users connecting with digital certificates, first find out the value of the Organizational Unit (OU) field of the user's identity certificate. (Ask your certificate administrator for this information.) The group name you assign must match this value exactly. If some users in the group have different OU values, set up a different group for each of these users.
If the Group Name field configured here and the OU field of the user's identity certificate do not match, when the user attempts to connect, the VPN Concentrator considers the user to be a member of the base group. The base group parameter definitions might be configured differently than the user wants or expects. If the base group does not support digital certificates, the connection fails.
See the note about configuring the RADIUS Class attribute under "Configuration | User Management | Groups".
Enter a unique password for this group. The minimum password length is 4 characters. The maximum is 32 characters. Entries are case-sensitive. The field displays only asterisks.
Re-enter the group password to verify it. The field displays only asterisks.
Click the Type drop-down menu button and select the authentication server type (authentication method) for this group:
This tab lets you configure general security, access, performance, and tunneling protocol parameters that apply to this internally configured group.
|
Note The setting of the Inherit? check box takes priority over an entry in a Value field. Examine this box before continuing and be sure its setting reflects your intent. |
Click the Access Hours drop-down menu button and select the named hours when this group's remote-access users can access the VPN Concentrator. Configure access hours on the Configuration | Policy Management | Access Hours screen. Default entries are:
Additional named access hours that you have configured also appear on the list.
Enter the number of simultaneous logins permitted for a single internal user in this group. The minimum is 0, which disables login and prevents user access. While there is no maximum limit, allowing several could compromise security and affect performance.
Enter the minimum number of characters for this group's user passwords. The minimum is 1, and the maximum is 32. To protect security, we strongly recommend 8 or higher.
Check the Allow Alphabetic-Only Passwords check box to allow this group's user passwords with alphabetic characters only. This option applies only to users who are configured in and authenticated by the VPN Concentrator internal authentication server. To protect security, we strongly recommend that you not allow such passwords. Require passwords to be a mix of alphabetic characters, numbers, and symbols, such as 648e&9G#.
Enter the group's idle timeout period in minutes. If there is no communication activity on a user connection in this period, the system terminates the connection. The minimum is 1, and the maximum is 2147483647 minutes (over 4000 years). To disable timeout and allow an unlimited idle period, enter 0.
Enter the group's maximum user connection time in minutes. At the end of this time, the system terminates the connection. The minimum is 1, and the maximum is 2147483647 minutes (over 4000 years). To allow unlimited connection time, enter 0.
Filters consist of rules that determine whether to allow or reject tunneled data packets coming through the VPN Concentrator, based on criteria such as source address, destination address, and protocol. Cisco supplies three default filters, which you can modify. To configure filters and rules, see the Configuration | Policy Management | Traffic Management screens.
Click the Filter drop-down menu button and select the filter to apply to this group's users:
Additional filters that you have configured also appear on the list.
If the base group uses DNS or WINS, and:
If the base group does not use DNS or WINS, and:
Enter the IP address, in dotted decimal notation, of the primary DNS server for this group's users. The system sends this address to the client as the first DNS server to use for resolving host names. See the preceding note.
Enter the IP address, in dotted decimal notation, of the secondary DNS server for this group's users. The system sends this address to the client as the second DNS server to use for resolving host names. See the preceding note.
Enter the IP address, in dotted decimal notation, of the primary WINS server for this group's users. The system sends this address to the client as the first WINS server to use for resolving host names under Windows NT. See the preceding note.
Enter the IP address, in dotted decimal notation, of the secondary WINS server for this group's users. The system sends this address to the client as the second WINS server to use for resolving host names under Windows NT. See the preceding note.
The VPN Concentrator can contain up to four SEP (Scalable Encryption Processing) modules that handle encryption functions, which are compute-intensive. Two SEP modules handle up to 5000 sessions (users)—the system maximum. Two additional modules can provide automatic failover for the first two. This parameter lets you configure the load on each SEP module.
Check the SEP Card Assignment check box to assign this group's load to a given SEP module. If your system does not have a given SEP module, the parameter is ignored.
Check the desired Tunneling Protocols check boxes to select the VPN tunneling protocols that this group's user clients can use. Configure parameters on the IPSec or PPTP/L2TP tabs as appropriate. Clients can use only the selected protocols.
You cannot check both IPSec and L2TP over IPsec. The IPSec parameters differ for these two protocols, and you cannot configure a single group for both.
|
Note If no protocol is selected, none of the client users in this group can access or use the VPN. |
Check the Strip Realm check box to remove the realm qualifier of the user name during authentication. If you check this Strip Realm box, authentication is based on the username alone. Otherwise, authentication is based on the full username@realm string. You must check this box if your server is unable to parse delimiters.
This tab lets you configure IP Security Protocol parameters that apply to this internally configured group. If you checked IPSec or L2TP over IPSec under Tunneling Protocols on the General Parameters tab, configure this section.
|
Note The setting of the Inherit? check box takes priority over an entry in a Value field. Examine this box before continuing and be sure its setting reflects your intent. |
Click the IPSec SA drop-down menu button and select the IPSec Security Association (SA) assigned to this group's IPSec clients. During tunnel establishment, the client and server negotiate a Security Association that governs authentication, encryption, encapsulation, key management, etc. You configure IPSec Security Associations on the Configuration | Policy Management | Traffic Management | Security Associations screens.
To use IPSec with remote-access clients, you must assign an SA. With IPSec LAN-to-LAN connections, the system ignores this selection and uses parameters from the Configuration | System | Tunneling Protocols | IPSec LAN-to-LAN screens.
The VPN Concentrator supplies these default selections:
Additional SAs that you have configured also appear on the list.
Click the IKE Peer Identity Validation drop-down menu button, and choose the type of peer identity validation.
|
Note This option applies only to tunnel negotiations based on certificates. |
During IKE tunnel establishment, the peer provides its identity: either an IP address, a fully qualified domain name (FQDN), or a distinguished name (DN). It also presents a certificate, which contains none, some, or all of these fields. If IKE peer identity validation is enabled, the VPN Concentrator compares the peer's identity to the like field in the certificate to see if the information matches. If the information matches, then the peer's identity is validated and the VPN Concentrator establishes the tunnel. If the information does not match, the VPN Concentrator drops the tunnel. This feature provides additional security.
IKE peer identity validation can be useful for binding a peer to a particular IP address or domain name. For example, if the IP address that the peer provided as an identification during tunnel establishment does not match the IP address in its certificate, the VPN Concentrator fails to validate the peer and drops the tunnel.
Ideally all VPN Concentrator peers are configured to provide matching types of identity and certificate fields. In this case, enabling peer identity validation ensures that the VPN Concentrator checks the validity of every peer, and only validated peers connect. But in actuality, some peers might not be configured to provide this data. Some peers might provide certificates that do not contain any of the matching fields required for an identity check. If a peer does not provide sufficient information for the VPN Concentrator to check its identity, there are two possibilities: the VPN Concentrator either establishes the session or drops it. If you want the VPN Concentrator to drop sessions of peers that do not provide sufficient information to perform an identity check, choose Required. If you want the VPN Concentrator to establish sessions for peers that do not provide sufficient identity information to perform a check, select If supported by Certificate.
Check the IKE Keepalives check box to enable IKE keepalives. (IKE keepalives is enabled by default.) This feature lets the VPN Concentrator monitor the continued presence of a remote peer and to report its own presence to that peer. If the peer becomes unresponsive, the VPN Concentrator removes the connection. Enabling IKE keepalives prevents hung connections when the IKE peer loses connectivity.
There are various forms of IKE keepalives. For this feature to work, both the VPN Concentrator and its remote peer must support a common form. This feature works with the following peers:
Non-Cisco VPN clients do not support IKE keepalives.
If you are configuring a group of mixed peers, and some of those peers support IKE keepalives and others do not, enable IKE keepalives for the entire group. The feature does not affect the peers that do not support it.
If you disable IKE keepalives, connections with unresponsive peers remain active until they time out, so we recommend you keep your idle timeout short. To change your idle timeout, see the Configuration | User Management | Groups | Add screen, General tab.
|
Note To reduce connectivity costs, disable IKE keepalives if this group includes any clients connecting via ISDN lines. ISDN connections normally disconnect if idle, but the IKE keepalives mechanism prevents connections from idling and therefore from disconnecting. |
|
Note If you have a LAN-to-LAN configuration using IKE main mode, make sure the two peers have the same IKE keepalives configuration: both must have IKE keepalives enabled or both must have it disabled. |
Click the Tunnel Type drop-down menu button and select the type of IPSec tunnel that this group's clients use:
These group parameters apply to remote-access IPSec client connections only. If you select Remote Access for Tunnel Type, configure these parameters.
Check the Group Lock check box to restrict users to remote access through this group only. The IPSec client connects to the VPN Concentrator via a group name and password, and then the system authenticates a user via a username and password. If this box is unchecked, the system authenticates a user without regard to the user's assigned group.
Whenever a VPN software or VPN 3002 hardware client attempts a tunneled connection to a network behind a VPN Concentrator, that client is authenticated by means of a username and password. This authentication occurs when the tunnel initiates, and is the authentication type for interactive hardware client authentication for the VPN 3002. This parameter does not apply to individual user authentication for the VPN 3002.
Click the Authentication drop-down menu button and select the user authentication method (authentication server type) to use with this group's remote-access IPSec clients. Both VPN Clients and VPN 3002 hardware clients authenticate on the first server of the type you configure.
This selection identifies the authentication method, not the specific server. Configure authentication servers on the Configuration | System | Servers | Authentication screens or Configuration | User Management | Groups | Authentication Servers screens.
For the VPN 3002, this selection applies to authentication using a saved username and password and to interactive hardware client authentication. Individual users behind the VPN 3002 authenticate according to the priority order of all authentication servers configured, regardless of type. For more information on the different ways in which a VPN 3002 can authenticate, see the section, "HW Client Parameters Tab."
|
Note To configure user-based authentication for Cisco VPN Clients, choose an Authentication option, then follow the additional steps outlined under Configuration | System | Tunneling Protocols | IPSec | IKE Proposals | Add, Modify, or Copy. You do this in all cases, regardless of whether you enable interactive hardware client authentication or individual user authentication. |
Selecting any authentication method (other than None) enables ISAKMP Extended Authentication, also known as XAUTH.
If all members of this group are remote dial-in users connecting with modems, enabling data compression might speed up their data transmission rates. Data compression shrinks data by replacing repeating information with symbols that use less space. Click the IPComp drop-down menu button to enable data compression using IPComp.
|
Note Data compression increases the memory requirement and CPU utilization for each user session and consequently decreases the overall throughput of the VPN Concentrator. For this reason, we recommend you enable data compression only if every member of the group is a remote user connecting with a modem. If any members of the group connect via broadband, do not enable data compression for the group. Instead, divide the group into two groups, one for modem users and the other for broadband users. Enable data compression only for the group of modem users. |
Check the Reauthentication on Rekey check box to enable reauthentication, or uncheck it to disable it.
The VPN Concentrator prompts the user to enter an ID and password during Phase 1 IKE negotiations. If you enable reauthentication, the VPN Concentrator also prompts for user authentication whenever a rekey occurs. Reauthentication provides additional security.
If the configured rekey interval is very short, users might find the repeated authorization requests inconvenient. In this case, disable reauthentication. (To check your VPN Concentrator's configured rekey interval, see the Lifetime Measurement, Data Lifetime, and Time Lifetime fields on the Configuration | System | Tunneling Protocols | IPSec | IKE Proposals | Add or Modify screen.)
Check the Mode Configuration check box to use Mode Configuration with this group's IPSec clients (also known as the ISAKMP Configuration Method or Configuration Transaction). This option exchanges configuration parameters with the client while negotiating Security Associations. If you check this box, configure the desired Mode Configuration Parameters; otherwise, ignore them.
To use split tunneling, you must check this box.
If you checked L2TP over IPSec under Tunneling Protocols, do not check this box.
|
Note IPSec uses Mode Configuration to pass all configuration parameters to a client: IP address, DNS and WINS addresses, etc. You must check this box to use Mode Configuration. Otherwise, those parameters—even if configured with entries—are not passed to the client. |
These parameters apply to this group's IPSec clients. It has three sections: one for parameters specific to Cisco clients, one for Microsoft clients, and a third for common client parameters.
Enter the banner, or welcome text, that this group's IPSec clients see when they log in. The maximum length is 510 characters. You can use any characters, including newline (the Enter key, which counts as two characters).
Check the Allow Password Storage on Client check box to allow this group's IPSec clients to store their login passwords on their local client systems. If you do not allow password storage, IPSec users must enter their password each time they seek access to the VPN. For maximum security, we recommend that you not allow password storage.
This parameter has no bearing on interactive hardware client authentication or individual user authentication for a VPN 3002.
Check the IPSec over UDP check box to allow the Cisco VPN Client (IPSec client) or VPN 3002 to connect to the VPN Concentrator via UDP through a firewall or router using NAT.
Enter the UDP port number to use if you allow IPSec over UDP. Enter a number in the range 4001 through 49151. The default value is 10000.
See the discussion About IPSec over UDP under Configuration | User Management | Base Group.
IPSec backup servers enable a VPN 3002 Hardware Client to connect to the central site when its primary central-site VPN Concentrator is unavailable. You configure backup servers for a VPN 3002, either on the VPN 3002 or on a group basis at the central-site Concentrator. If you configure backup servers on the central-site VPN Concentrator, that VPN Concentrator pushes the backup server policy to the VPN 3002 hardware clients in the group. The default policy is to use the backup server list configured on the VPN 3002.
Alternatively, the VPN Concentrator can push a policy that supplies a list of backup servers in order of priority (replacing the backup server list on the VPN 3002 if one is configured), or it can disable the feature and clear the backup server list on the VPN 3002.
See the "IPSec Backup Servers" of this chapter for an illustrated explanation of how the backup server feature works.
|
Note The group name, user name, and passwords that you configure for the VPN 3002 must be identical for the primary VPN Concentrator and all backup servers. Also, if you require interactive hardware client authentication and/or individual user authentication for the VPN 3002, be sure to configure it on backup servers as well. See the HW Client Parameters Tab for more information. |
To configure backup servers on the primary central-site VPN Concentrator, accept the default, Use list below, in the IPSec Backup Servers drop down menu.
Enter either the IP addresses or the hostnames of the VPN Concentrators that are to be backup servers. The IP address is the IP address of the VPN Concentrator public interface.
|
Note If you are using hostnames, it is wise to have backup DNS and WINS servers on a separate network from that of the primary DNS and WINS servers. Otherwise, if clients behind the VPN 3002 obtain DNS and WINS information from the VPN 3002 through DHCP, and the connection to the primary server is lost, and the backup servers have different DNS and WINS information, clients cannot be updated until the DHCP lease expires. Further, if you use hostnames and the DNS server is unavailable, significant delays can occur. |
You can enter up to 10 backup servers, in order of highest to lowest priority. Enter each backup server on a single line, using the Enter or Return key for each new line.
Should there be a backup server list already configured on the VPN 3002, this list on the central-site VPN Concentrator replaces it, and becomes the list of backup servers on the VPN 3002 hardware client.
If you change the configuration of backup servers, or delete a backup server during an active session between a VPN 3002 and a backup server, the session continues without adopting that change. New settings take effect in the next new session.
To configure backup servers on the VPN 3002, accept the default, Use client configured list in the IPSec Backup Servers drop-down menu. You then configure backup servers in the VPN 3002 Configuration | System | Tunneling Protocols | IPSec screen. Refer to the Tunneling chapter in the VPN 3002 Hardware Client User Reference for instructions.
To disable the backup server feature, select Disable and clear client configured list in the IPSec Backup Servers drop-down menu. If you disable the feature from the primary VPN Concentrator, the feature is disabled and the list of backup servers configured on the VPN 3002, if there is one, is cleared.
DHCP Intercept lets Microsoft XP clients implement split-tunneling with a VPN Concentrator. The VPN Concentrator replies directly to the Microsoft Windows XP client DHCP Inform message, providing that client with the subnet mask, domain name, and classless static routes for the tunnel IP address. This is useful in environments in which using a DHCP server is not advantageous.
|
Note A Microsoft XP anomaly results in the corruption of domain names if split tunnel options exceed 255 bytes. The VPN Concentrator limits the number of routes it sends to 27-40 routes, with the number of routes dependent on the classes of the routes, to avoid this problem. |
Check the box to enable DHCP Intercept.
Enter the subnet mask for clients requesting Microsoft DHCP options.
|
Note To implement split tunneling for Microsoft XP clients, you must also configure network lists and default domain names in the Common Client Parameters section of this screen. |
Split tunneling lets an IPSec client conditionally direct packets over an IPSec tunnel in encrypted form, or to a network interface in cleartext form. Packets not bound for destinations on the other side of the IPSec tunnel do not have to be encrypted, sent across the tunnel, decrypted, and then routed to a final destination. Split tunneling thus eases the processing load, simplifies traffic management, and speeds up untunneled traffic.
|
Note If you enable both split tunneling and individual user authentication for a VPN 3002, users must authenticate only when sending traffic bound for destinations on the other side of the IPSec tunnel. |
Split tunneling is primarily a traffic management feature, not a security feature. In fact, for optimum security, we recommend that you not enable split tunneling. However, since only the VPN Concentrator—and not the IPSec client—can enable split tunneling, you can control implementation here and thus protect security. Split tunneling is disabled by default on both the VPN Concentrator and the client. You enable and configure the feature on the VPN Concentrator, and then the VPN Concentrator uses Mode Configuration to push it to, and enable it on, the IPSec client.
Split tunneling applies only to single-user remote-access IPSec tunnels, not to LAN-to-LAN connections.
The default split tunneling policy is Tunnel Everything. Tunnel Everything disables split tunneling. When Tunnel Everything is configured, all traffic from remote clients in this group travels over the secure IPSec tunnel in encrypted form. No traffic goes in the clear or to any other destination than the VPN Concentrator. Remote users in this group reach internet networks through the corporate network and do not have access to local networks.
If users in this group need access to local networks, choose Allow Networks in List to Bypass Tunnel. This option allows you to define a list of networks to which traffic goes in the clear. This feature is useful for remote users who want to access devices on their local network, such as printers, while they are connected to the corporate network through a tunnel.
To configure the Allow Networks in List to Bypass Tunnel option, choose VPN Client Local LAN from the Split Tunnel Network List menu. The VPN Client Local LAN option allows all users in the group to access all devices on their local networks. If you want to restrict users' access to particular devices on their local network, you need to know the addresses of the local devices the remote users in this group want to access. Create a network list of these addresses, then choose that network list from the Split Tunneling Network List menu. You can apply only one network list to a group, but one network list can contain up to 10 network entries. (See the Configuration | Policy Management | Traffic Management | Network Lists screens for more information on creating network lists.) You also must enable Local LAN Access on the VPN Client. See the VPN Client Administrator Guide for more details.
|
Note The Allow Networks in List to Bypass Tunnel option allows remote users to access only devices that are located on the same network interface as the tunnel. If a remote user's local LAN is located on a different network interface than the tunnel, the user cannot access it. |
To allow remote users to access internet networks without tunneling through the corporate network, enable split tunneling. To enable split tunneling, choose Only Tunnel Networks in List. To configure this option, create a network list of addresses to tunnel. Then select this network list from the Split Tunneling Network List menu. Data to all other addresses is sent in the clear and routed by the remote user's internet service provider.
We recommend that you keep the base-group default, and that you enable and configure the split tunneling policy selectively for each group.
Click the drop-down menu button and select the split tunneling address list to use with this group's remote-access IPSec clients.
Both the Allow Networks in List to Bypass Tunnel option and the Only Tunnel Networks in List option make split tunneling decisions on the basis of a network list, which is a list of addresses on the private network. But the network list functions differently in each configuration.
In an Allow Networks in List to Bypass Tunnel configuration, The IPSec client uses the network list as an exclusion list: a list of addresses to which traffic should be sent in the clear. All other traffic is routed over the IPSec tunnel.
In an Only Tunnel Networks in List configuration, the IPSec client uses the network list as an inclusion list: a list of networks for which traffic should be sent over the IPSec tunnel. The IPSec client establishes an IPSec Security Association (SA) for each network specified in the list. Outbound packets with destination addresses that match one of the SAs are sent over the tunnel; everything else is sent as clear text to the locally connected network.
Enter the default domain name that the VPN Concentrator passes to the IPSec client, for the client's TCP/IP stack to append to DNS queries that omit the domain field. This domain name applies only to tunneled packets. For example, if this entry is xyzcorp.com, a DNS query for mail becomes mail.xyzcorp.com. The maximum name length is 255 characters. The Manager checks the domain name for valid syntax.
Split DNS lets an internal DNS server resolve a list of centrally-defined Local Domain Names, while ISP-assigned DNS servers resolve all other DNS requests. It is used in split-tunneling connections; the internal DNS server resolves the domain names for traffic through the tunnel, and the ISP-assigned DNS servers resolve DNS requests that travel in the clear to the Internet.
Enter each domain name to be resolved by the internal server. Use commas but no spaces to separate the names.
This tab lets you configure firewall parameters for VPN Clients.
|
Note Only VPN Clients running Microsoft Windows can use these firewall features. They are not presently available to hardware clients or other (non-Windows) software clients. |
A firewall isolates and protects a computer from the Internet by inspecting each inbound and outbound individual packet of data to determine whether to allow or drop it. Firewalls provide extra security if remote users in a group have split tunneling configured. In this case, the firewall protects the user's PC, and thereby the corporate network, from intrusions by way of the Internet or the user's local LAN.
Remote users connecting to the VPN Concentrator with the VPN Client can choose from two possible firewall options.
In the first scenario, a remote user has a personal firewall installed on the PC. The VPN Client enforces firewall policy defined on the local firewall, and it monitors that firewall to make sure it is running. If the firewall stops running, the VPN Client drops the connection to the VPN Concentrator. (This firewall enforcement mechanism is called Are You There (AYT), because the VPN Client monitors the firewall by sending it periodic "are you there?" messages; if no reply comes, the VPN Client knows the firewall is down and terminates its connection to the VPN Concentrator.) The network administrator might configure these PC firewalls originally, but with this approach, each user can customize his or her own configuration.
In the second scenario, you might prefer to enforce a centralized firewall policy for personal firewalls on VPN Client PCs. A common example would be to block Internet traffic to remote PCs in a group using split tunneling. This approach protects the PCs, and therefore the central site, from intrusions from the Internet while tunnels are established. This firewall scenario is called push policy or Central Protection Policy (CPP). On the VPN Concentrator, you create a set of traffic management rules to enforce on the VPN Client, associate those rules with a filter, and designate that filter as the firewall policy. The VPN Concentrator pushes this policy down to the VPN Client. The VPN Client then in turn passes the policy to the local firewall, which enforces it.
A third scenario is to use a separate firewall server—the Zone Labs Integrity Server (IS)—to secure remote PCs on Windows platforms. The IS maintains policies for remote VPN Client PCs and monitors the PCs to ensure policy enforcement. The IS also communicates with the VPN Concentrator to allow and terminate connections, exchange session and user information, and report status information. For more details on how the VPN Concentrator interacts with the VPN Client, personal firewalls, and the Zone Labs Integrity Server, see the VPN Client Administrator Guide. For information on configuring the Zone Labs Integrity Server, refer to Zone Labs' documentation.
|
Note The setting of the Inherit? check box takes priority over an entry in a Value field. Examine this box before continuing and be sure its setting reflects your intent. |
By default, no firewall is required for remote users in this group. If you want users in this group to be firewall-protected, choose either the Firewall Required or Firewall Optional setting.
If you choose Firewall Required, all users in this group must use the designated firewall. The VPN Concentrator drops any session that attempts to connect without the designated, supported firewall installed and running. In this case, the VPN Concentrator notifies the VPN Client that its firewall configuration does not match.
If you have remote users in this group who do not yet have firewall capacity, choose Firewall Optional. The Firewall Optional setting allows all the users in the group to connect. Those who have a firewall can use it; users that connect without a firewall receive a warning message. This setting is useful if you are creating a group in which some users have firewall support and others do not—for example, you may have a group that is in gradual transition, in which some members have set up firewall capacity and others have not yet done so.
Click the radio button to select a firewall setting:
|
Note If you require a firewall for a group, make sure the group does not include any clients other than Windows VPN Clients. Any other clients in the group (including VPN 3002 Hardware Clients) will be unable to connect. |
Choose a firewall for the users in this group. Keep in mind when choosing that the firewall you designate correlates with the firewall policies available. The specific firewall you configure determines which firewall policy options are supported. (See Table 14-7 for details.)
Click the drop-down menu button, and select the type of firewall required for users in this group.
|
Note You do not need to use the Custom option for Release 3.5. Currently, all supported firewalls are covered by the other Firewall menu options. |
On the VPN Concentrator, you can configure a custom firewall. Currently there are no supported firewall configurations that you can not choose from the menu on the VPN Concentrator. This feature is mainly for future use. Nevertheless, the following table lists the vendor codes and products that are currently supported.
Enter a single vendor code; enter one or more product codes.
The VPN Concentrator can support any firewall that the VPN Client supports. Refer to the VPN Client Administrator Guide for the latest list of supported clients.
Enter the vendor code for the firewall(s) that remote users in this group are using. Enter only one vendor.
Enter the product code or codes for the firewall(s) that remote users in this group are using. To indicate any supported product, enter 255. Separate multiple codes with commas. Indicate code ranges with hyphens, for example: 4-20.
Enter a description (optional) for the custom firewall.
Depending on which firewall you configured, certain Firewall Policy options are available. (See Table 14-7.)
Table 14-7 Firewall Policy Options Available for Each Firewall
| Firewall | Policy Defined by Remote Firewall |
Policy Pushed | Policy from Server |
|---|---|---|---|
Choose the source for the VPN Client firewall policy.
If the VPN Client also has a local firewall, the policy pushed from the VPN Concentrator works with the policy of the local firewall. Any packet that is blocked by the rules of either firewall is dropped.
This tab lets you configure interactive hardware client authentication and individual user authentication for the group. You can enable either feature, both features together, or neither. By default, interactive hardware client authentication and individual user authentication are disabled.
Check the Require Interactive Hardware Client Authentication check box to enable interactive authentication for the VPN 3002.
Check the Require Individual User Authentication check box to enable individual user authentication.
Enter the idle timeout period in minutes. If there is no communication activity on a user connection in this period, the system terminates the connection. The minimum is 1 minute, the default is 30 minutes, and the maximum is 2147483647 minutes (over 4000 years). To disable timeout and allow an unlimited idle period, enter 0.
Check the Cisco IP Phone Bypass check box to allow IP phones to bypass the interactive individual user authentication processes. Interactive hardware client authentication remains in effect if you have enabled it.
This feature lets you restrict the use of network extension mode on the VPN 3002. Check the box to allow hardware clients in the group to use network extension mode.
|
Note If you disallow network extension mode, the default setting, the VPN 3002 can connect to this VPN Concentrator in PAT mode only. If you disallow network extension mode here, be careful that all VPN 3002s in the group are configured for PAT mode. If a VPN 3002 is configured to use network extension mode and the VPN Concentrator to which it connects disallows network extension mode, the VPN 3002 will attempt to connect every 4 seconds, and every attempt will be rejected; this is the equivalent of denial of service attack. |
Interactive hardware client authentication provides the central site with additional security by requiring the VPN 3002 to authenticate with a username and password that you enter manually each time the VPN 3002 initiates a tunnel. With this feature enabled the VPN 3002 does not have a saved username and password. When you enter the username and password, the VPN 3002 sends these credentials to the VPN Concentrator to which it connects. The VPN Concentrator facilitates authentication, on either the internal or an external authentication server. If the username and password are valid, the tunnel is established.
You configure interactive hardware client authentication in Hardware Client tab of the Configuration | User Management | Groups screen on the VPN Concentrator at the central site, which then pushes the policy to the VPN 3002.
You specify the type of authentication server in the IPSec tab of the Configuration | User Management | Groups screen on the VPN Concentrator. The VPN 3002 authenticates on the first server of that type that you configure in the Configuration | System | Servers | Authentication screen or Configuration | User Management | Groups | Authentication Servers screen. If the VPN 3002 cannot reach that server, it authenticates on the next server of that type in the list of authentication servers.
When you enable interactive hardware client authentication for a group, the VPN Concentrator pushes that policy to the VPN 3002s in the group. If you have previously set a username and password on the VPN 3002, the software deletes them from the configuration file. When you try to connect, the software prompts you for a username and password.
If, on the VPN Concentrator, you subsequently disable interactive hardware authentication for the group, it is enabled locally on the VPN 3002s, and the software continues to prompt for a username and password. This lets the VPN 3002 connect, even though it lacks a saved username and password, and the VPN Concentrator has disabled interactive hardware client authentication.
If you subsequently configure a username and password (in the VPN 3002 Configuration | System | Tunneling Protocols | IPSec screen), the feature is disable, and the prompt no longer displays. The VPN 3002 connects to the VPN Concentrator using the saved username and password.
Individual user authentication protects the central site from access by unauthorized persons on the same LAN as the VPN 3002.
When you enable individual user authentication, each user that connects through a VPN 3002 must open a web browser and manually enter a valid username and password to access the network behind the VPN Concentrator, even though the tunnel already exists.
|
Note You cannot use the command-line interface to log in if user authentication is enabled. You must use a browser. |
Individual users authenticate according to the order of authentication servers that you configure for a group. To configure authentication servers for individual user authentication, see the sections, Configuration | User Management | Base Group/Groups | Authentication Servers | Add/Modify.
Table 14-8 summarizes how authentication of the VPN 3002 works by default, and how it works with interactive hardware client authentication and individual user authentication enabled. Be aware that you can use both interactive hardware client authentication or individual user authentication simultaneously, or either one and not the other.
Table 14-8 Authenticating the VPN 3002 Hardware Client and Users
When you configure a VPN 3002, you assign it to a group on the VPN Concentrator to which it connects. This is the tunnel group to which the VPN 3002 belongs. The attributes of the tunnel group determine how the VPN 3002 authenticates.
For purposes of authentication, you can associate users behind the VPN 3002 with a group other than the tunnel group. You accomplish this by embedding a second, different group name within the username. To embed this second group name, you configure and use a delimiter, (@, #, or !) that associates the second group with the user. The format to use is username<delimiter>groupname, for example, UserA@bluegroup.
When you embed a groupname within a username:
|
Note The VPN 3002 always gets settings for interactive hardware client authentication from the tunnel group, not the embedded group. |
Table 14-9 summarizes how UserA, UserB, and UserC connect to the central site through a VPN 3002.
Table 14-9 Example: How Authentication Servers Work Using Embedded Groups
To configure and use a group delimiter, follow these steps.
Step 2 In the General tab of the Configuration | User Management | Groups | Add/Modify screen, check the Strip Realm box to remove the group name embedded in the username during authentication.
To use a second group for individual user authentication, enter the username with the embedded group in the form username<delimiter>groupname in the username field in one of these screens:
Be sure to configure any backup servers for the VPN 3002 with the same values as the primary VPN Concentrator for interactive hardware client authentication and individual user authentication. For information about configuring backup servers, see the section, Client Configuration Parameters Tab, earlier in this chapter.
If a VPN 3002 authenticates to a VPN Concentrator, and you have enabled accounting, the VPN Concentrator notifies the RADIUS accounting server when the VPN 3002 logs on and off. It also keeps track of individual users. See the section, Configuration | System | Servers | Accounting of this book
This section of the screen lets you configure PPTP and L2TP parameters that apply to this internally configured group. During tunnel establishment, the client and server negotiate access and usage based on these parameters. Only clients that meet these criteria are allowed access. If you checked PPTP, L2TP, or L2TP over IPSec under Tunneling Protocols on the General Parameters tab, configure these parameters.
|
Note The setting of the Inherit? check box takes priority over an entry in a Value field. Examine this box before continuing and be sure its setting reflects your intent. |
Check the Use Client Address check box to accept and use an IP address that this group's client supplies. A client must have an IP address to function as a tunnel endpoint; but for maximum security, we recommend that you control IP address assignment and not allow client-specified IP addresses.
Make sure the setting here is consistent with the setting for Use Client Address on the Configuration | System | Address Management | Assignment screen.
Check the PPTP Authentication Protocols check boxes for the authentication protocols that this group's PPTP clients can use. To establish and use a VPN tunnel, users should be authenticated in accordance with some protocol.
|
Caution Unchecking all authentication options means that no authentication is required. That is, PPTP users can connect with no authentication. This configuration is allowed so you can test connections, but it is not secure. |
These choices specify the allowable authentication protocols in order, from least secure to most secure.
You can allow a group to use fewer protocols than the base group, but not more. You cannot allow a grayed-out protocol.
Check the PPTP Encryption check boxes for the data encryption options that apply to the PPTP clients of this group.
|
Note The U.S. government restricts the distribution of 128-bit encryption software. |
If all members of this group are remote dial-in users connecting with modems, enabling data compression might speed up their data transmission rates. Data compression shrinks data by replacing repeating information with symbols that use less space. Check the PPTP Compression check box to enable data compression for PPTP. PPTP data compression uses the Microsoft Point to Point Compression (MPPC) protocol.
|
Note MPPC data compression increases the memory requirement and CPU utilization for each user session. Consequently, using data compression reduces the overall throughput of the VPN Concentrator and lowers the maximum number of sessions your VPN Concentrator can support. We recommend you enable data compression only if every member of the group is a remote user connecting with a modem. If any members of the group connect via broadband, do not enable data compression for the group. Instead, divide the group into two groups, one for modem users and the other for broadband users. Enable data compression only for the group of modem users. |
|
Note PPTP data compression is only supported for clients that use stateless encryption. |
Check the L2TP Authentication Protocols check boxes for the authentication protocols that this group's L2TP clients can use. To establish and use a VPN tunnel, users should be authenticated in accordance with a protocol.
|
Caution Unchecking all authentication options means that no authentication is required. That is, L2TP users can connect with no authentication. This configuration is allowed so you can test connections, but it is not secure. |
These choices specify the allowable authentication protocols in order from least secure to most secure.
You can allow a group to use fewer protocols than the base group, but not more. You cannot allow a grayed-out protocol.
Check the L2TP Encryption check boxes for the data encryption options that apply to this group's L2TP clients.
If all members of this group are remote dial-in users connecting with modems, enabling data compression might speed up their data transmission rates. Data compression shrinks data by replacing repeating information with symbols that use less space. Check the L2TP Compression check box to enable data compression for L2TP. L2TP data compression uses the Microsoft Point to Point Compression (MPPC) protocol.
|
Note MPPC data compression increases the memory requirement and CPU utilization for each user session. Consequently, using data compression reduces the overall throughput of the VPN Concentrator and lowers the maximum number of sessions your VPN Concentrator can support. We recommend you enable data compression only if every member of the group is a remote user connecting with a modem. If any members of the group connect via broadband, do not enable data compression for the group. Instead, divide the group into two groups, one for modem users and the other for broadband users. Enable data compression only for the group of modem users. |
|
Note L2TP data compression is only supported for clients that use stateless encryption. |
When you finish setting or changing parameters on all tabs, click Add or Apply at the bottom of the screen to Add this specific group to the list of configured groups, or to Apply your changes. Both actions include your settings in the active configuration. The Manager returns to the Configuration | User Management | Groups screen. Any new groups appear in alphabetical order in the Current Groups list.
To save the active configuration and make it the boot configuration, click the Save Needed icon at the top of the Manager window.
To discard your settings, click the Cancel button. The Manager returns to the Configuration | User Management | Groups screen, and the Current Groups list is unchanged.
This screen lets you change identity parameters for an external group that you have previously configured. The screen title identifies the group you are modifying.
Enter a unique name for this specific group. You can edit this field as desired. The maximum name length is 64 characters. Entries are case-sensitive. Changing a group name automatically updates the group name for all users in the group.
See the note about configuring the RADIUS Class attribute under "Configuration | User Management | Groups".
Enter a unique password for this group. The minimum password length is 4 characters. The maximum length is 32 characters. Entries are case-sensitive. The field displays only asterisks.
Re-enter the group password to verify it. The field displays only asterisks.
Click the Type drop-down menu button and select the authentication server type for the group:
When you finish changing these parameters, click Apply to include your settings in the active configuration. The Manager returns to the Configuration | User Management | Groups screen and refreshes the Current Groups list. However, if you change group type to Internal, the Manager displays the Configuration | User Management | Groups | Modify (Internal) screen so you can configure all the parameters.
To save the active configuration and make it the boot configuration, click the Save Needed icon at the top of the Manager window.
To discard your changes, click Cancel. The Manager returns to the Configuration | User Management | Groups screen, and the Current Groups list is unchanged.
This screen lets you add, modify, delete, or change the priority order of authentication servers for a group. You can add external RADIUS, NT Domain and SDI servers for authenticating users. To add an internal server, go to the Configuration | System | Servers | Authentication screen. For further information about internal servers, see "Configuration | System | Servers | Authentication".
If individual user authentication is enabled, the authentication servers you configure for the group here are used in the order of priority you set here. If you do not configure an external authentication server here, individual user authentication uses the internal authentication server on the VPN Concentrator.
Before you configure an external server, be sure that the external server you reference is itself properly configured and that you know how to access it (IP address or host name, TCP/UDP port, secret/password, etc.). The VPN Concentrator functions as the client of these servers.
You can configure and prioritize up to 10 authentication servers. The first server of a given type is the primary server for that type, and the rest are backup servers in case the primary is inoperative. If no authentication servers area configured for the group, the Global authentication server list applies.
The servers list shows the configured authentication servers, in priority order. Each entry shows the server identifier and type, by IP address or by host name, for example: 192.168.12.34 (RADIUS). If no servers have been configured the list shows --Empty--. The first server of each type is the primary, the rest are backup.
To configure and add a new authentication server, click Add. The Manager opens the Configuration | User Management | Groups | Authentication Servers | Add screen.
To modify parameters for an authentication server that has been configured, select the server from the list and click Modify. The Manager opens the Configuration | User Management | Groups | Authentication Servers | Modify screen.
To remove a server that has been configured, select the server from the list and click Delete.
|
Note There is no confirmation or undo. |
The Manager refreshes the screen and shows the remaining servers in the list. When you delete a server, any clients with no other authentication server configured use the server configured for the base group.
To change the priority order for an authentication server click Move Up or Move Down to move it up or down on the list of servers configured for this group.
To test a configured external user authentication server, select the server from the list and click Test. The Manager opens the Configuration | System | Servers | Authentication | Test screen. There is no need to test the internal server, and trying to do so returns an error message.
When you are finished configuring authentication servers, click Done. This action includes your settings in the active configuration. The Manager returns to the Configuration | User Management | Groups screen.
To save the active configuration and make it the boot configuration, click the Save Needed icon at the top of the Manager window.
Click the drop-down menu button and select the Server Type. The screen and its available fields change depending on the Server Type. Choices are:
Find your selected Server Type.
Configure these parameters for a RADIUS authentication server.
Enter the IP address or host name of the RADIUS authentication server, for example: 192.168.12.34. The maximum length is 32 characters. (If you have configured a DNS server, you can enter a host name in this field; otherwise, enter an IP address. For maximum security, use an IP address.)
Enter the UDP port number by which you access the server. Enter 0 (the default) to have the system supply the default port number, 1645.
|
Note The latest RFC states that RADIUS should be on UDP port number 1812, so you might need to change this default value to 1812. |
Enter the time in seconds to wait after sending a query to the server and receiving no response, before trying again. The minimum time is 1 second. The default is 4 seconds. The maximum is 30 seconds.
Enter the number of times to retry sending a query to the server after the timeout period. If there is still no response after this number of retries, the VPN Concentrator declares this server inoperative and uses the next RADIUS authentication server in the list. The minimum number of retries is 0. The default is 2. The maximum is 10.
Enter the RADIUS server secret (also called the shared secret), for example: C8z077f. The maximum length is 64 characters. The field shows only asterisks.
Re-enter the RADIUS server secret to verify it. The field shows only asterisks.
To add the new server to the list of configured user authentication servers, click Add. Or to apply your changes to the configured server, click Apply. Both actions include your entries in the active configuration. The Manager returns to the Configuration | User Management | Groups | Authentication Servers screen. Any new server appears at the bottom of the Authentication Servers list.
To save the active configuration and make it the boot configuration, click the Save Needed icon at the top of the Manager window.
To discard your entries, click Cancel. The Manager returns to the Configuration | System | Servers | Authentication screen, and the Authentication Servers list is unchanged.
Configure these parameters for a Windows NT Domain authentication server.
Enter the IP address of the NT Domain authentication server, for example: 192.168.12.34. Use dotted decimal notation.
Enter the TCP port number by which you access the server. Enter 0 (the default) to have the system supply the default port number, 139.
Enter the time in seconds to wait after sending a query to the server and receiving no response, before trying again. The minimum time is 1 second. The default time is 4 seconds. The maximum time is 30 seconds.
Enter the number of times to retry sending a query to the server after the timeout period. If there is still no response after this number of retries, the VPN Concentrator declares this server inoperative and uses the next NT Domain authentication server in the list. The minimum number of retries is 0. The default number is 2. The maximum number is 10.
Enter the NT Primary Domain Controller host name for this server, for example: PDC01. The maximum host name length is 16 characters. You must enter this name, and it must be the correct host name for the server for which you entered the IP Address in Authentication Server Address; if it is incorrect, authentication fails.
To add the new server to the list of configured user authentication servers, click Add. Or to apply your changes to the configured server, click Apply. Both actions include your entries in the active configuration. The Manager returns to the Configuration | User Management | Groups | Authentication Servers screen. Any new server appears at the bottom of the Authentication Servers list.
To save the active configuration and make it the boot configuration, click the Save Needed icon at the top of the Manager window.
To discard your entries, click Cancel. The Manager returns to the Configuration | System | Servers | Authentication screen, and the Authentication Servers list is unchanged.
Configure these parameters for an RSA Security Inc. SecurID authentication server.
VPN Concentrator software version 3.6 supports both versions prior to SDI 5.0 and version 5.0.
Configure these parameters for an RSA Security Inc. SecurID authentication server.
VPN Concentrator software version 3.6 supports both version 5.0 and versions prior to SDI 5.0.
SDI versions prior to 5.0 use the concept of an SDI master and an SDI slave server which share a single node secret file (SECURID). On the VPN Concentrator you can configure one pre-5.0 SDI master server and one SDI slave server globally, and one SDI master and one SDI slave server per each group.
SDI version 5.0 uses the concepts of an SDI primary and SDI replica servers. A primary and its replicas share a single node secret file. On the VPN Concentrator you can configure one SDI 5.0 server globally, and one per each group.
A version 5.0 SDI server that you configure on the VPN Concentrator can be either the primary or any one of the replicas. See the section below, "SDI Primary and Replica Servers" for information about how the SDI agent selects servers to authenticate users.
You can have one SDI primary server, and up to 10 replicas; use the SDI documentation for configuration instructions. The primary and all the replicas can authenticate users. Each primary and its replicas share a single node secret file. The node secret file has its name based on the hexadecimal value of the ACE/Server IP address with .sdi appended. SDI servers that you configure here apply to this group.
SDI version 5.0 uses a two-step process to prevent an intruder from capturing information from an RSA SecurID authentication request and using it to authenticate to another server. The Agent first sends a lock request to the SecurID server before sending the user authentication request. The server locks the username, preventing another (replica) server from accepting it. This means that the same user cannot authenticate to two VPN Concentrators using the same authentication servers simultaneously. After a successful username lock, the VPN Concentrator sends the passcode.
The VPN Concentrator obtains the server list when the first user authenticates to the configured server, which can be either a primary or a replica. The VPN Concentrator then assigns priorities to each of the servers on the list, and subsequent server selection derives at random from those assigned priorities. The highest priority servers have a higher likelihood of being selected.
SDI version 5.0 uses a two-step process to prevent an intruder from capturing information from an RSA SecurID authentication request and using it to authenticate to another server. The Agent first sends a lock request to the SecurID server before sending the user passcode. The server locks the username, preventing another (replica) server from accepting it. This means that the same user cannot authenticate to two VPN Concentrators using the same authentication servers simultaneously.
Enter the IP address or host name of the SDI authentication server, for example: 192.168.12.34. The maximum number of characters is 32. (If you have configured a DNS server, you can enter a host name in this field; otherwise, enter an IP address.)
Enter the UDP port number by which you access the server. Enter 0 (the default) to have the system supply the default port number, 5500.
Enter the time in seconds to wait after sending a query to the server and receiving no response, before trying again. The minimum time is 1 second. The default is 4 seconds. The maximum is 30 seconds.
Enter the number of times to retry sending a query to the server after the timeout period. If there is still no response after this number of retries, the VPN Concentrator declares this server inoperative and uses the next SDI authentication server in the list. The minimum number of retries is 0. The default is 2. The maximum is 10.
To add the new server to the list of configured user authentication servers, click Add. Or to apply your changes to the configured server, click Apply. Both actions include your entries in the active configuration. The Manager returns to the Configuration | User Management | Groups | Authentication Servers screen. Any new server appears at the bottom of the Authentication Servers list.
To save the active configuration and make it the boot configuration, click the Save Needed icon at the top of the Manager window.
To discard your entries, click Cancel. The Manager returns to the Configuration | System | Servers | Authentication screen, and the Authentication Servers list is unchanged.
This screen let you test a configured external user authentication server to determine that:
To test connectivity and valid authentication, enter the username for a valid user who has been configured on the authentication server. The maximum username length is 64 characters. Entries are case-sensitive.
To test connectivity and authentication rejection, enter a username that is invalid on the authentication server.
Enter the password for the username. The maximum password length is 32 characters. Entries are case-sensitive. The field displays only asterisks.
To send the username and password to the selected authentication server, click OK. The authentication and response process takes a few seconds. The Manager displays a Success or Error screen.
To cancel the test and discard your entries, click Cancel. The Manager returns to the Configuration | User Management | Groups | Authentication Servers screen.
If the VPN Concentrator communicates correctly with the authentication server, and the server correctly authenticates a valid user, the Manager displays a Success screen.
To return to the Configuration | User Management | Groups | Authentication Servers | Test screen, click Continue. You can then test authentication for another username.
To return to the Configuration | User Management | Groups | Authentication Servers screen, or any other screen, click the desired title in the left frame (the Manager table of contents).
If the VPN Concentrator communicates correctly with the authentication server, and the server correctly rejects an invalid user, the Manager displays an Authentication Rejected Error screen.
To return to the Configuration | User Management | Groups | Authentication Servers | Test screen, click Retry the operation.
To go to the main VPN Concentrator Manager screen, click Go to main menu.
If the VPN Concentrator cannot communicate with the authentication server, the Manager displays an Authentication Error screen. Error messages include:
The server might be improperly configured or out of service, the network might be down or clogged, etc. Check the server configuration parameters, be sure the server is operating, check the network connections, etc.
To return to the Configuration | User Management | Groups | Authentication Servers | Test screen, click Retry the operation.
To go to the main VPN Concentrator Manager screen, click Go to main menu.
This screen lets you add, modify, delete, or move external RADIUS accounting servers for a group. Accounting servers collect data on user connect time, packets transmitted, etc., under the VPN tunneling protocols: PPTP, L2TP, and IPSec. For more information on RADIUS accounting servers, see "Configuration | System | Servers | Accounting".
You can configure and prioritize up to 10 accounting servers. The first server is the primary, and the rest are backup servers in case the primary is inoperative. If no accounting servers are configured for a group, the Global accounting server list applies.
Before you configure an accounting server here, be sure that the server you reference is itself properly configured and that you know how to access it (IP address or host name, UDP port, server secret, etc.). The VPN Concentrator functions as the client of these servers.
The Servers list shows the configured servers, in priority order. Each entry shows the server identifier and type, for example: 192.168.12.34 (Radius). If no servers have been configured, the list shows --Empty--. The first server is the primary, the rest are backup.
To configure and add a new accounting server, click Add. The Manager opens the Configuration | User Management | Groups | Accounting Servers | Add screen.
To modify parameters for an accounting server that has been configured, select the server from the list and click Modify. The Manager opens the Configuration | User Management | Groups | Accounting Servers | Modify screen.
To remove a server that has been configured, select the server from the list and click Delete.
|
Note There is no confirmation or undo. |
The Manager refreshes the screen and shows the remaining servers in the list. When you delete a server, any clients with no other accounting server configured use the server configured for the base group.
To change the priority order for an accounting server click Move Up or Move Down to move it up or down on the list of servers configured for this group.
When you are finished configuring accounting servers, click Done. This action includes your settings in the active configuration. The Manager returns to the Configuration | User Management | Groups screen.
To save the active configuration and make it the boot configuration, click the Save Needed icon at the top of the Manager window.
This section lets you add or modify RADIUS accounting servers for a group.
Enter the IP address or host name of the RADIUS accounting server, for example: 192.168.12.34. (If you have configured a DNS server, you can enter a host name in this field; otherwise, enter an IP address.)
Enter the UDP port number by which you access the accounting server. The default port number is 1646.
|
Note The latest RFC states that RADIUS accounting servers should be on UDP port number 1813, so you might need to change this default value to 1813. |
Enter the time in seconds to wait after sending a query to the accounting server and receiving no response, before trying again. The minimum time is 1 second. The default time is 1 second. The maximum time is 30 seconds.
Enter the number of times to retry sending a query to the accounting server after the timeout period. If there is still no response after this number of retries, the system declares this server inoperative and uses the next accounting server in the list. The minimum number of retries is 0. The default is 3. The maximum is 10.
Enter the server secret (also called the shared secret), for example: C8z077f. The field shows only asterisks.
Re-enter the server secret to verify it. The field shows only asterisks.
To add this server to the list of configured user accounting servers, click Add. Or, to apply your changes to this user accounting server, click Apply. Both actions include your entry in the active configuration. The Manager returns to the Configuration | User Management | Groups | Accounting Servers screen. Any new server appears at the bottom of the Accounting Servers list.
To save the active configuration and make it the boot configuration, click the Save Needed icon at the top of the Manager window.
To discard your entries, click Cancel. The Manager returns to the Configuration | User Management | Groups | Accounting Servers screen, and the Accounting Servers list is unchanged.
This screen lets you configure IP address pools from which the VPN Concentrator assigns addresses to clients on a per-group basis. If no address pools are defined for a group, the globally defined address pools apply.
The IP Pool Entry list shows the configured address pools for the group, in priority order. Each entry show the range of IP addresses. If no address pools have been configured, the list shows --Empty--.
To configure and add a new address pool, click Add. The Manager opens the Configuration | User Management | Groups | Address Pools | Add screen.
To modify an address pool that has been configured, select the pool entry from the list and click Modify. The Manager opens the Configuration | User Management | Groups | Address Pools | Modify screen.
To remove an address pool that has been configured, select the pool from the list and click Delete.When you are finished configuring address pools, click Done. This action includes your settings in the active configuration. The Manager returns to the Configuration | User Management | Groups screen.
To change the priority order for an address pool, click Move Up or Move Down to move it up or down on the list of address pools configured for this group.
To save the active configuration and make it the boot configuration, click the Save Needed icon at the top of the Manager window.
The IP addresses in the pool range must not be assigned to other network resources.
Enter the first IP address available in this pool. Use dotted decimal notation, for example: 10.10.147.100.
Enter the last IP address available in this pool. Use dotted decimal notation, for example: 10.10.147.177.
To add this IP address pool to the list of configured pools, click Add. Or to apply your changes to this IP address pool, click Apply. Both actions include your entry in the active configuration. The Manager returns to the Configuration | User Management | Groups | Address Pools screen. Any new pool appears at the end of the IP Pool Entry list.
To save the active configuration and make it the boot configuration, click the Save Needed icon at the top of the Manager window.
To discard your entries, click Cancel. The Manager returns to the Configuration | User Management | Groups | Address Pools screen, and the IP Pool Entry list is unchanged.
This screen lets you configure client update entries.
The VPN Concentrator can automate the process of updating client software. The feature applies to the VPN Client and to the VPN 3002 hardware client as follows. When configured
The Update Entry list displays configured client update entries.
To configure and add a new client update entry, click Add. The Manager opens the Configuration | User Management | Groups | Client Update | Add screen.
To modify an address pool that has been configured, select the entry from the list and click Modify. The Manager opens the Configuration | User Management | Groups | Client Update | Modify screen.
To remove an client update entry that has been configured, select the entry from the list and click Delete.When you are finished configuring client update entries, click Done. This action includes your settings in the active configuration. The Manager returns to the Configuration | User Management | Groups screen.
To save the active configuration and make it the boot configuration, click the Save Needed icon at the top of the Manager window.
These screens let you configure client update parameters.
Enter the client type you want to update.
The entry must be exact, including case and spacing.
|
Note The VPN Concentrator sends a separate notification message for each entry in a Client Update list. Therefore your client update entries must not overlap. For example, the value Windows includes all Windows platforms, and the value WinNT includes Windows NT 4.0, Windows 2000 and Windows XP platforms. So you would not include both Windows and WinNT. |
Enter the URL for the software/firmware image. This URL must point to a file appropriate for this client.
http://10.10.99.70/vpnclient-win-3.5.Rel-k9.exe
The directory is optional. You need the port number only if you use ports other than 80 for http or 443 for https.
tftp://10.10.99.70/vpn3002-3.5.Rel-k9.bin
Enter a comma separated list of software or firmware images appropriate for this client. The following caveats apply:
If the client is already running a software version on the list, it does not need a software update. If the client is not running a software version on the list, an update is in order.
To add this client update entry to the list of configured update entries, click Add. Or, to apply your changes, click Apply. Both actions include your entry in the active configuration. The Manager returns to the Configuration | User Management | Groups | Client Update screen. Any new entry appears at the bottom of the Update Entries list.
To save the active configuration and make it the boot configuration, click the Save Needed icon at the top of the Manager window.
To discard your entries, click Cancel. The Manager returns to the Configuration | User Management | Groups | Client Update screen, and the Update Entries list is unchanged.
Click the interface on which you want to configure Bandwidth Management for this group.
To apply a bandwidth policy to a group on an interface, bandwidth management must be enabled on that interface. If you choose an interface on which bandwidth management is disabled, this warning appears.(See Figure 14-33.) You must enable bandwidth management on the interface before you can continue.
If you choose an interface on which bandwidth management is enabled, the Configuration | User Management | Groups | Bandwidth Policy | Interfaces screen appears. (See Figure 14-4.)
This screen lets you apply a group-wide bandwidth policy.
To configure bandwidth policy for interfaces, use the Bandwidth tab on the Configuration | Interfaces | Ethernet 1 2 3 screen.
Before you can apply a bandwidth policy to a group, you must first:
Select a bandwidth policy for the group for this interface. If you do not want to apply a Bandwidth Management policy here, then select None.
Enter a value for the minimum bandwidth to reserve for this group and select a unit of measurement:
The default value of Bandwidth Aggregation is 0. The default unit of measurement is bps. If you want the group to share in the available bandwidth on the interface, enter 0.
This section of the Manager lets you configure access, usage, and authentication parameters for users. Users inherit parameters from the specific group to which they belong.
Configuring users in this section means configuring them in the VPN Concentrator internal authentication server. If you have not configured the internal authentication server, this screen displays a notice that includes a link to the Configuration | System | Servers | Authentication screen. The system also automatically configures the internal server when you add the first user.
See the discussion of groups and users in the User Management section at the beginning of this chapter. Remember:
The Current Users list shows configured users in alphabetical order. If no users have been configured, the list shows --Empty--.
To configure a new user, click Add. The Manager opens the Configuration | User Management | Users | Add screen.
To modify a user that has been configured, select the user from the list and click Modify. The Manager opens the Configuration | User Management | Users | Modify screen.
To remove a user that has been configured, select the user from the list and click Delete.
|
Note There is no confirmation or undo. |
The Manager refreshes the screen and shows the remaining users in the list.
The Manager immediately includes your changes in the active configuration. To save the active configuration and make it the boot configuration, click the Save Needed icon at the top of the Manager window.
These Manager screens let you:
For many of these parameters, you can simply specify that the user "inherit" parameters from a group; and a user can be assigned either to a configured group or to the base group. Users who are not members of a configured group are, by default, members of the base group.
On this screen, you configure four kinds of parameters:
 |
Tip To streamline the configuration process, just fill in the Identity Parameters tab (assigning the user to a configured group), and click Add. Then select the user and click Modify. The user inherits the group parameters, and the Modify screen shows group parameters instead of base-group parameters. |
Before configuring these parameters, you should configure the base-group parameters on the Configuration | User Management | Base Group screen, and configure group parameters on the Configuration |User Management | Groups screen.
This screen includes four tabbed sections. Click each tab to display its parameters. As you move from tab to tab, the Manager retains your settings. When you have finished setting parameters on all tabbed sections, click Add/Apply or Cancel.
This tab lets you configure the name, password, group, and IP address for this user.
Enter a unique name for this user. The maximum name length is 64 characters. Entries are case-sensitive.
If you change this name, this user profile replaces the existing profile.
Enter a unique password for this user. The minimum length must satisfy the minimum for the group to which you assign this user (base group or specific group). The maximum length is 32 characters. Entries are case-sensitive. The field displays only asterisks.
Re-enter the user password to verify it. The field displays only asterisks.
Click the Group drop-down menu button and select the group to which you assign this user. The list shows specific groups you have configured, plus:
Enter the IP address, in dotted decimal notation, assigned to this user. Enter this address only if you assign this user to the base group or an internally configured group, and if you configure Use Address from Authentication Server on the Configuration | System | Address Management | Assignment screen. Otherwise, leave this field blank.
Enter the subnet mask, in dotted decimal notation, assigned to this user. Enter this mask only if you configure an IP address in the preceding field; otherwise leave this field blank.
This tab lets you configure general access, performance, and allowed tunneling protocols that apply to this user.
On the General tabbed section:
To inherit the group setting, check the box (default). To override the group setting, uncheck the box. If you uncheck the check box, you must enter or change any corresponding Value field; do not leave the field blank.
|
Note The setting of the Inherit? check box takes priority over an entry in a Value field. Examine this box before continuing and be sure its setting reflects your intent. |
Click the Access Hours drop-down menu button and select the named hours when this user can access the VPN Concentrator. Configure access hours on the Configuration | Policy Management | Access Hours screen. Default entries are:
Additional named access hours that you have configured also appear on the list.
Enter the number of simultaneous logins permitted for this user. The minimum value is 0, which disables login and prevents user access.
|
Note While there is no maximum limit, allowing several could compromise security and affect performance. |
Enter this user's idle timeout period in minutes. If there is no communication activity on the user's connection in this period, the system terminates the connection. The minimum time is 1 minute, and the maximum time is 2147483647 minutes (over 4000 years). To disable timeout and allow an unlimited idle period, enter 0.
Enter this user's maximum connection time in minutes. At the end of this time, the system terminates the connection. The minimum time is 1 minute, and the maximum time is 2147483647 minutes (over 4000 years). To allow unlimited connection time, enter 0.
Filters consist of rules that determine whether to allow or reject tunneled data packets coming through the VPN Concentrator, based on criteria such as source address, destination address, and protocol. Cisco supplies three default filters, which you can modify. To configure filters and rules, see the Configuration | Policy Management | Traffic Management screens.
Click the Filter drop-down menu button and select the filter to apply to this user:
Additional filters that you have configured also appear on the list.
The VPN Concentrator can contain up to four Scalable Encryption Processing (SEP) modules that handle encryption functions, which are compute-intensive. Two SEP modules handle up to 5000 sessions (users)—the system maximum. Two additional modules can provide automatic failover for the first two. This parameter lets you configure the load on each SEP module.
Check the SEP Card Assignment check box to assign this user to a given SEP module. If your system does not have a given SEP module, the parameter is ignored.
Check the desired Tunneling Protocols check boxes to select the VPN tunneling protocols that this user can use. Configure parameters on the IPSec or PPTP/L2TP tabs as appropriate. Users can use only the selected protocols.
You cannot check both IPSec and L2TP over IPsec. The IPSec parameters differ for these two protocols, and you cannot configure a single user for both.
|
Note If no protocol is selected, this user cannot access or use the VPN. |
This tab lets you configure IP Security Protocol parameters that apply to this user. If you checked IPSec or L2TP over IPSec under Tunneling Protocols on the General Parameters tab, configure this section.
To inherit the group setting, check the box (default). To override the group setting, uncheck the box. If you uncheck the check box, you must enter or change any corresponding Value field; do not leave the field blank.
|
Note The setting of the Inherit? check box takes priority over an entry in a Value field. Examine this box before continuing and be sure its setting reflects your intent. |
Click the IPSec SA drop-down menu button and select the IPSec Security Association (SA) assigned to this IPSec user. During tunnel establishment, the user client and server negotiate a Security Association that governs authentication, encryption, encapsulation, key management, etc. You configure IPSec Security Associations on the Configuration | Policy Management | Traffic Management | Security Associations screens.
To use IPSec with remote-access clients, you must assign an SA. With IPSec LAN-to-LAN connections, the system ignores this selection and uses parameters from the Configuration | System | Tunneling Protocols | IPSec LAN-to-LAN screens.
The VPN Concentrator supplies these default selections:
Additional SAs that you have configured also appear on the list.
Check the Store Password on Client check box to allow this IPSec user (client) to store the login password on the client system. If you do not allow password storage, IPSec users must enter their password each time they seek access to the VPN. For maximum security, we recommend that you not allow password storage.
This parameter has no bearing on interactive hardware client authentication or individual user authentication for a VPN 3002.
This tab lets you configure PPTP and L2TP parameters that apply to this user. During tunnel establishment, the user client and server negotiate access and usage based on these parameters. Only clients that meet these criteria are allowed access. If you checked PPTP, L2TP, or L2TP over IPSec under Tunneling Protocols on the General Parameters tab, configure these parameters.
To inherit the group setting, check the check box (default). To override the group setting, uncheck the box. If you uncheck the check box, you must enter or change any corresponding Value field; do not leave the field blank.
|
Note The setting of the Inherit? check box takes priority over an entry in a Value field. Verify that the status of the checkbox reflects your intended settings before you proceed. |
Check the Use Client Address checkbox to accept and use an IP address that the client supplies. A client must have an IP address in order to function as a tunnel endpoint; for maximum security, we recommend that you control the assigning of IP addresses and do not allow client-specified IP addresses.
Make sure the setting here is consistent with the setting for Use Client Address on the Configuration | System | Address Management | Assignment screen.
Check the PPTP Authentication Protocols check boxes for the authentication protocols that this PPTP user (client) can use. To establish and use a VPN tunnel, users should be authenticated in accordance with some protocol.
|
Caution Unchecking all authentication options means that no authentication is required. That is, PPTP users can connect with no authentication. This configuration is allowed so you can test connections, but it is not secure. |
These choices specify the allowable authentication protocols in order from least secure to most secure.
You can allow a user to use fewer protocols than the assigned group, but not more. You cannot allow a grayed-out protocol.
Check the L2TP Authentication Protocols check boxes for the authentication protocols that this L2TP user (client) can use. To establish and use a VPN tunnel, users should be authenticated in accordance with some protocol.
|
Caution Unchecking all authentication options means that no authentication is required. That is, L2TP users can connect with no authentication. This configuration is allowed so you can test connections, but it is not secure. |
These choices specify the allowable authentication protocols in order from least secure to most secure.
You can allow a user to use fewer protocols than the assigned group, but not more. You cannot allow a grayed-out protocol.
When you finish setting or changing parameters on all tabs, click Add or Apply at the bottom of the screen to Add this user to the list of configured internal users, or to Apply your changes. Both actions include your settings in the active configuration. The Manager returns to the Configuration | User Management | Users screen. Any new users appear in alphabetical order in the Current Users list.
To save the active configuration and make it the boot configuration, click the Save Needed icon at the top of the Manager window.
To discard your settings, click Cancel. The Manager returns to the Configuration | User Management | Users screen, and the Current Users list is unchanged.
![]()
![]()
![]()
![]()
![]()
![]()
![]()
![]()
Posted: Fri Apr 18 18:03:46 PDT 2003
All contents are Copyright © 1992--2002 Cisco Systems, Inc. All rights reserved.
Important Notices and Privacy Statement.