cc/td/doc/product/voice/uae/2_3
hometocprevnextglossaryfeedbacksearchhelp
PDF

Table Of Contents

Maintaining the Cisco Unified Application Environment

Viewing Log Information

Troubleshooting

Backing Up the System

Restoring the System

Reinitializing the Server


Maintaining the Cisco Unified Application Environment


This chapter describes how to view log files, use log files for troubleshooting, and back up and restore the Cisco Unified Application Server software.

This chapter includes these topics:

Viewing Log Information

Troubleshooting

Backing Up the System

Restoring the System

Reinitializing the Server

Viewing Log Information

The following management console logs provide diagnostic information:

Server Logs—Information about server activity.

Event Log—Information about system events (such as whether the H.323 stack is unavailable).

Audit Log—All Application Environment activity.

The Cisco Unified Application Environment supports log level filtering. The log level determines the amount of recorded detail about logged events ( Table 5-1).

Table 5-1 Logging Levels 

Log Level
Description

Off

No logging

Error

Only error messages written to log

Warning

Only warning and error messages written to log

Information

Warning, error, and terse event information messages written to log

Verbose

Warning, error, and detailed event information messages to log


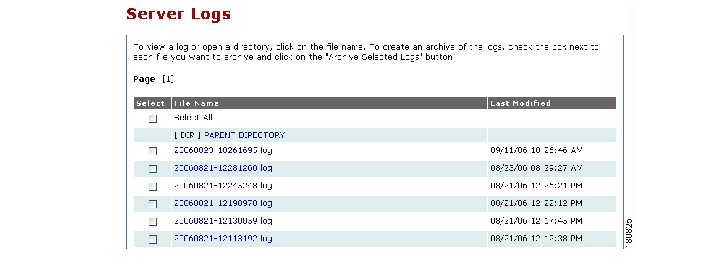
Each log file is assigned a unique name, which consists of a date code and identifier, as in this server log example:

20060823-10261650.log

To view server logs, follow these steps:

Procedure


Step 1 From the Main Control Panel page, click Server Logs.

Step 2 The Server Logs page opens.

Step 3 Click the underlined log name to display the list of log files for that server. Figure 5-1 shows an example excerpt from the AppServer log.

Figure 5-1 AppServer Log Files

Step 4 Click an underlined log file name to display the file contents. If the log list takes up multiple pages, use the links at the bottom of the page for navigation.


To view event or audit logs, follow these steps:

Procedure


Step 1 From the Main Control Panel page, click Event Log or Audit Log.

Step 2 The Event Log or Audit Log page opens. Figure 5-2 shows an example excerpt from the Event log.

Figure 5-2 Event Log

Step 3 To open the Details page for the event, click the underlined ID or Details link. If the log list takes up multiple pages, use the links at the bottom of the page for navigation.


You can archive or delete server log folders from the list of server logs or individual log files from the individual server log pages.

To archive log folders or files, follow these steps:

Procedure


Step 1 From the Main Control Panel page, click Server Logs to display the list of server logs.

Step 2 Select folders or files to archive:

To archive log folders, use the checkboxes to select one or more log folders, or choose Select All to select all of the log folders.

To archive log files, first click the underlined log name to open the log folder. Then use the checkboxes to select one or more log files, or choose Select All to select all of the log files.

Step 3 Click Archive Selected Logs.

The archive is created and a download page opens.

Step 4 Click Download Archive File or Download Log Archive download the files or folders to your computer.


To delete log files or the contents of log folders, follow these steps:


Note When you delete a log folder, the entire folder and all contents are deleted, provided that the service that uses the folder is stopped. If the service is running when the folder delete occurs, the folder and the currently open log remain. The folder is automatically recreated when the first log is generated by the service.


Procedure


Step 1 From the Main Control Panel page, click Server Logs to display the list of server logs.

Step 2 Select folders or files to delete:

To delete the contents of log folders, use the checkboxes to select one or more log folders, or choose Select All to select all of the log folders.

To delete log files, first click the underlined log name to open the log folder. Then use the checkboxes to select one or more log files, or choose Select All to select all of the log files.

Step 3 Click Delete Selected Logs.

The logs are deleted. There is no confirmation message.


Troubleshooting

Follow these high level tasks when troubleshooting application server problems:

1. Check the AppServer log files (choose Server Logs > AppServer from the Main Control Panel).

2. The default logging level for most components is Warning. To aid in diagnosing a problem, choose a higher logging level, such Verbose (see the "Configuring Core Components" section). The Verbose setting allows all inner components to log freely according to their own log level settings.

Specifically, if the application server is not under heavy load, turn up the master log filter for the Log Server to Verbose (Core Components > Logger > Log Server Sink Log Level = Verbose). The Verbose setting allows all inner components to log freely according to their own log level setting. Also set the Telephony Manager component log level to Verbose (Core Components > Telephony Manager > Log Level = Verbose).

3. Run the application again to generate logs under the verbose conditions.

Backing Up the System

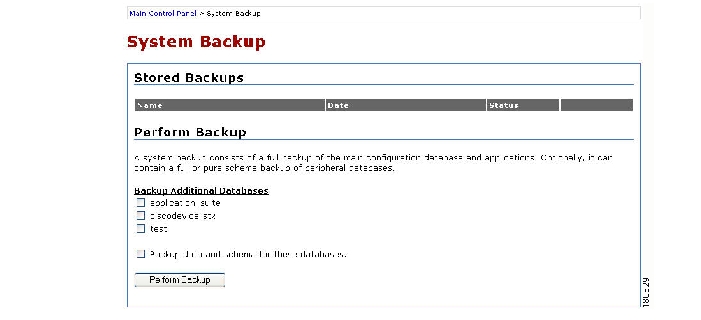
Use the system backup feature to take a snapshot of the current configuration settings in the management console, to save applications, and to save application configurations. A system backup generates a tar file that can be stored in a safe location.


Note A backup can only be used to restore a system of the same version.


Cisco recommends backing up systems regularly to prevent data loss in the unlikely event of system failure. Use the System Backup page ( Figure 5-3) to perform backup operations. See the "Restoring the System" section for instructions on restoring a previously backed up system.

Figure 5-3 System Backup

Page

To perform system backups, follow these steps:

Procedure


Step 1 From the Main Control Panel page, click System Backup.

Step 2 Select the application databases to back up. To back up both the databases and database schema, select Backup data and schema for these databases.


Note The system database is automatically backed up during the backup process. If you do not need to back up the databases, leave the application databases unchecked.


Step 3 Click Perform Backup.

The Performing a Backup page opens.

Step 4 Click Start, and then click Next Step.

The system provides status updates while the backup is in progress.

Step 5 When the page indicates that the backup is complete, click Finish.


You can perform the following actions with a system backup:

To download the backup file, click Download.

To delete the backup file, click Delete.

To view a history of all backups, click All Backups.

Restoring the System

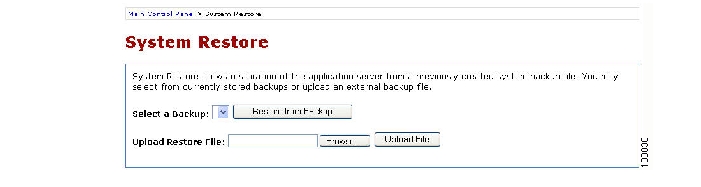
Use the system restore feature to install and activate a previously-generated system backup file, as described in the "Backing Up the System" section.


Caution The configuration contained in the backup file overwrites the current configuration. Once started, the process cannot be stopped or undone. Always back up the system before you restore a system backup file.

Open the System Restore page ( Figure 5-4) to restore system and database files that were previously backed up.

Figure 5-4 System Restore

Page

To restore a backup, follow these steps:

Procedure


Step 1 From the Main Control Panel, click the System Restore.

Step 2 Perform either of the following actions:

To restore from a backup stored on the server, select the backup, then click Restore from Backup.

To restore from a local drive, click Browse and highlight the file, and then click Upload File.


Reinitializing the Server

Use the two DVDs that are shipped with the MCS-7845H-1 server to re-image the system to the factory settings.

One of the DVDs contains the base operating system, and the other contains the Cisco Unified Application Environment software. The Cisco Unified Application Environment DVD contains a readme.txt file in the root directory. Follow the instructions in this file to reinitialize the server.

After the server is reinitialized, you can use the System Restore feature to restore the server back to its previous state. See the "Restoring the System" section.


hometocprevnextglossaryfeedbacksearchhelp

Posted: Tue Oct 17 10:00:43 PDT 2006
All contents are Copyright © 1992--2006 Cisco Systems, Inc. All rights reserved.
Important Notices and Privacy Statement.