|
|

Tunnel Builder Pro allows you to create backup tunnels that protect the following:
SRLGs are sets of links that are likely to go down together (for example, because they have the same underlying fiber).
This chapter provides information you need to do the following:
To protect your network, you must understand the following concepts:
To ensure that the primary tunnel will use bandwidth protection, the tunnel must be fast-reroutable, and the following elements on the primary tunnel path must be bandwidth-protected:
Figure 5-1 illustrates bandwidth protection for a 4-hop primary tunnel.
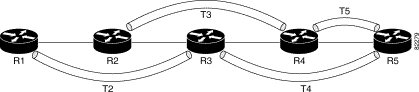
Table 5-1 explains how NHOP and NNHOP tunnels provide bandwidth protection.
| If this element fails... | This backup tunnel provides bandwidth protection for primary tunnel R1—R2—R3—R4—R5 |
|---|---|
Head-end link R1—R2 | T2 |
Node R2 | T2 |
Link R2—R3 | T3 |
Node R3 | T3 |
Link R3—R4 | T4 |
Node R4 | T4 |
Tail-end link R4—R5 | T5 |
Load balancing increases the amount of traffic that can be routed across a network by protecting a single traffic flow (a single NHOP or NNHOP) with more than one backup tunnel. Consequently, primary tunnels that use the same primary bandwidth on a link can be carried over different backup tunnels if an element fails.
For each single flow, the following requirements exist:
The default value of Max Tunnel Number is 1; that is, by default, load balancing does not occur. If you want load balancing to occur, the recommended value for the Max Tunnel Number parameter is 4.
If the Max Tunnel Number is greater than 1, Tunnel Builder Pro still performs load balancing only if it cannot protect the element fully by generating one backup tunnel for each flow to be protected.
Example: To protect a link that has a primary bandwidth of 100 Kbps, and where Max Tunnel Number has been set to 4, Tunnel Builder Pro will create up to 4 backup tunnels per link direction. In the case where 4 backup tunnels are required to protect the link, each will have a bandwidth of 25 Kbps.
For most elements, Tunnel Builder Pro finds backup tunnels that provide a backup protection solution very quickly, or it determines that full protection is not possible.
For a few elements, Tunnel Builder Pro will spend a long time improving the solution. To limit the time spent per calculation, you can specify a timeout value. For example, if you set the timeout to 1000 seconds, the algorithm spends a maximum of 16 minutes 40 seconds.
Response times vary. For example, if you set a timeout of 1000 seconds for all nodes in a large network (for example, a network comprising over 200 nodes), the typical response time is approximately 2 to 3 hours. However, the response time can be shorter or longer.
If a timeout occurs while computing backup tunnels, BRG will return the best solution it has found in the time available.
Asymmetric links are links for which the properties of the interfaces (for example, Max Global Reservable, Max SubPool Reservable) at each end of the link are different. When the Max Global Reservable value for a link is different in each of the link's two interfaces, Tunnel Builder Pro "pads" the lower value to make the link symmetric, so that the Max Global Reservable is assumed to be the higher value in both directions.
This section contains the following procedures:
To interpret the results, go to the following:
Results of backup tunnel computations (Check Protection and Compute Backups) are displayed in the following areas of the Backup Tunnels window:
The following warning conditions are highlighted in the Backup Tunnels list box:
You can display information about requests to run Tunnel Builder Pro's Backup Route Generator (BRG) algorithm for checking or suggesting backup tunnel placement. Click the BRG Status tab in the bottom right corner of the Backup Tunnels window. The following information appears:
This section contains the following procedures:
To identify which links are part of which SRLGs, perform the following steps:
Step 1 Click the Backup tunnels tab. The Backup Tunnels window shown in Figure 5-2 appears.
Step 2 Click SRLGs. The SRLG Management window shown in Figure 5-3 appears with the names of the SRLGs listed in the scroll box.
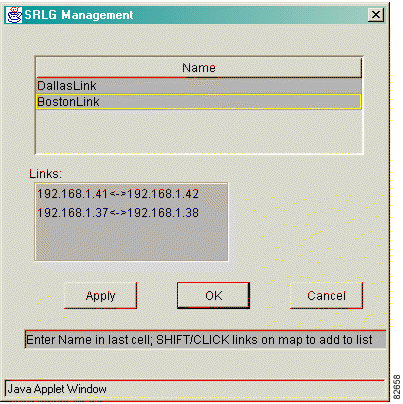
Step 3 Select an SRLG in the list. The links that belong to the SRLG are highlighted in the map, and the link names appear in the Links list as shown in Figure 5-3.
Step 4 Click Cancel to close the window.
 |
Note To delete an SRLG, select the SRLG in the SRLG table and press the Delete key. Click OK. |
To create SRLGs, perform the following steps:
Step 1 Click the Backup tunnels tab. The Backup Tunnels window shown in Figure 5-4 appears.
Step 2 Click SRLGs. The SRLG Management window shown in Figure 5-5 appears.

Step 3 In the Name field, enter the name of the SRLG.
Step 4 Shift-click each link in the network map that you want to include in the SRLG. The selected links appear in the Links field, as shown in Figure 5-6.
Step 5 Click Apply if you want to continue adding links, or click OK to complete SRLG configuration.
To add or delete a link from an SRLG, access the SRLG Management window shown in Figure 5-5 and select the SRLG of interest.
To add a link, Shift-click the link in the network map and click Apply.
To delete a link, select the link in the SRLG Management window and press the Delete key on your keyboard.
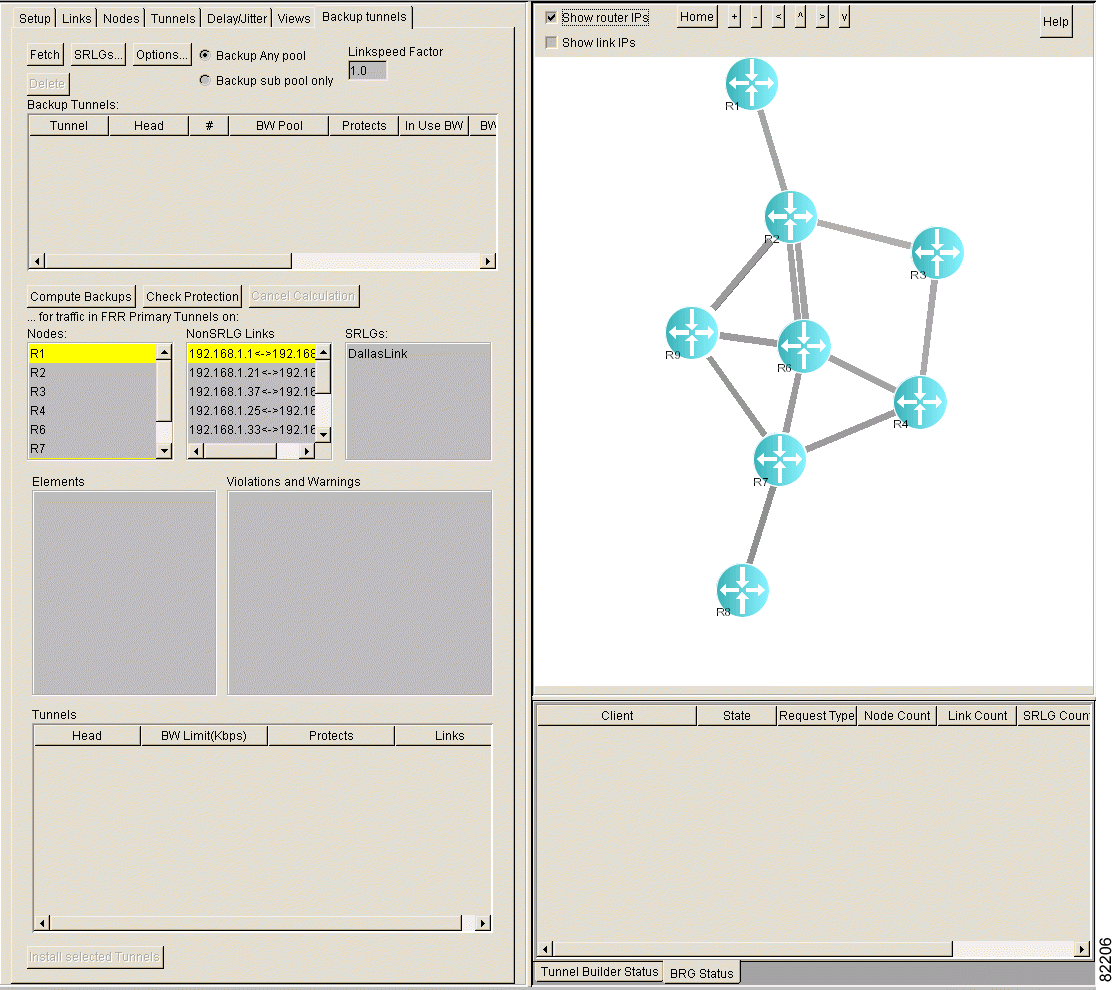
To set up backup tunnel calculations, perform the following steps:
Step 1 Click the Backup Tunnels tab. The Backup Tunnels window shown in Figure 5-7 appears.
Step 2 Click one of the following:
If you click Compute Backups, only tunnels created with the specified parameter are sent to the BRG for consideration in backing up an element.
Step 3 At Linkspeed Factor, enter the number by which the link speed for every link in the TE network will be multiplied before the backup route calculations begin. A value greater than 1 allows overbooking. A value less than 1 ensures bandwidth guarantees. For more information, see the "Protecting Bandwidth" section in "Determining if Your Network is Protected."
You can configure the Backup Route Generator (BRG) options that are used in performing compute backup and check protection operations.
This section describes how to do the following:
To set up BRG options, perform the following steps:
Step 1 Click the Backup tunnels tab. The Backup Tunnels window shown in Figure 5-8 appears.
Step 2 Click Options. The Set BRG Options popup window shown in Figure 5-9 appears.
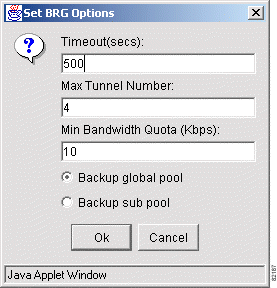
Step 3 At Timeout (secs), enter a timeout value (in seconds). This is the maximum amount of time Tunnel Builder Pro will search for a set of backup tunnels that fully protect an individual element. The default is 500 seconds.
Step 4 At Max Tunnel Number, specify the maximum number of backup tunnels that can be created for a single next hop (NHOP) or next-next hop (NNHOP). The default is 1.
Step 5 At Min Bandwidth Quota (Kbps), enter the minimum amount of bandwidth that a backup tunnel can have. The default is 10 Kbps.
Step 6 Click OK.
To have Tunnel Builder Pro create backup tunnels automatically, perform the following steps:
Step 1 Click the Backup tunnels tab. The Backup Tunnels window shown in Figure 5-10 appears.
Step 2 Specify the nodes, non-SRLG links, and SRLGs that you want to protect by selecting them in the Nodes, NonSRLG Links, and SRLGs list boxes, respectively.
|
Note You can select elements individually, or you can select all the elements within a list box by selecting an element in the box and then pressing Ctrl-A. |
Step 3 Click Compute Backups.
|
Note This may take some time. To stop the compute backup function, click Cancel Calculation. |
After the calculation is complete, the selected elements are listed in the Elements list box. Figure 5-11 shows an example in which a node, a non-SRLG link, and an SRLG were selected, and the elements are in the Elements list box.
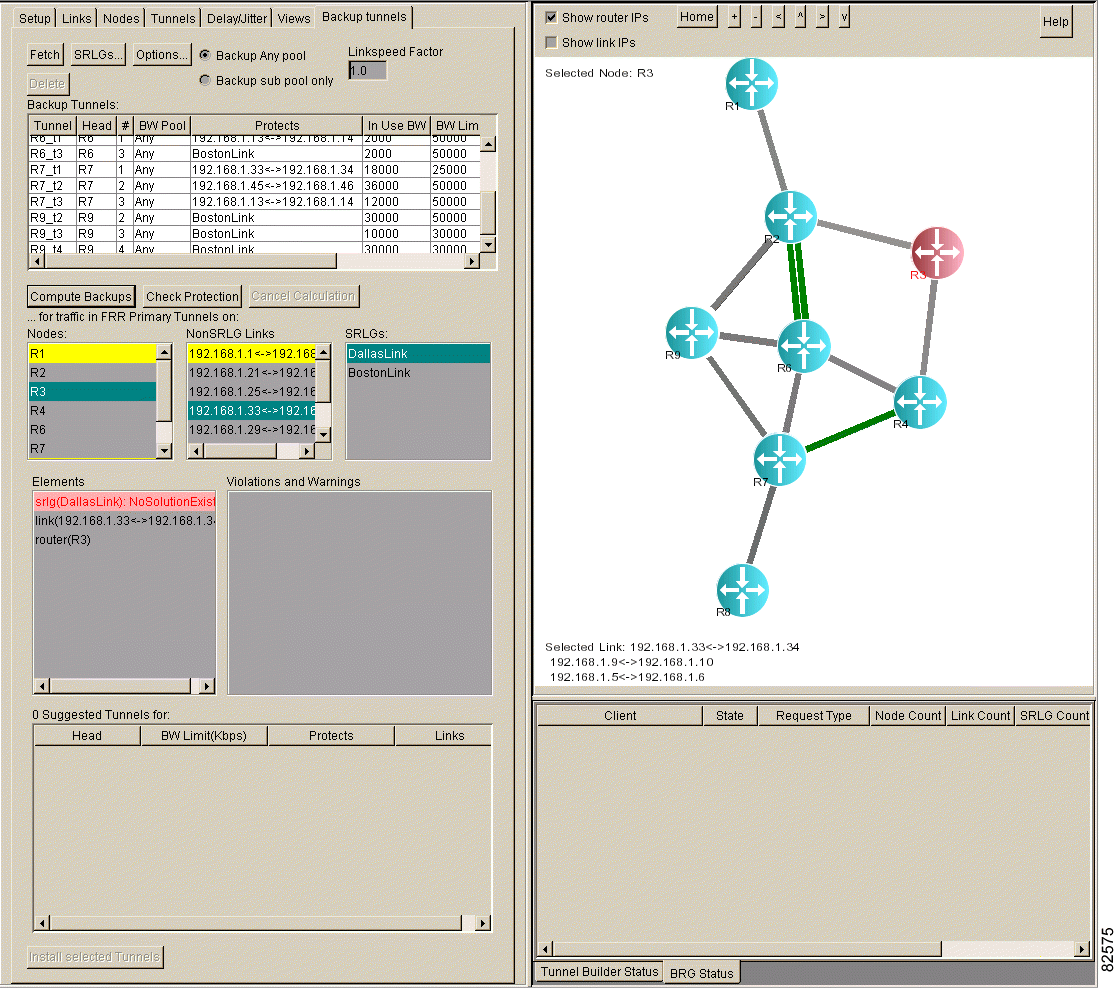
If Tunnel Builder Pro cannot fully protect the element, the element is highlighted in pink in the Elements list box and there is an explanation in the Violations and Warnings list box after you select the element.
Figure 5-12 illustrates elements that cannot be fully protected. We recommend that you delete backup tunnels if they are highlighted in pink in the Backup Tunnels list box. To delete tunnels, select them and then click Delete or press the Delete key.
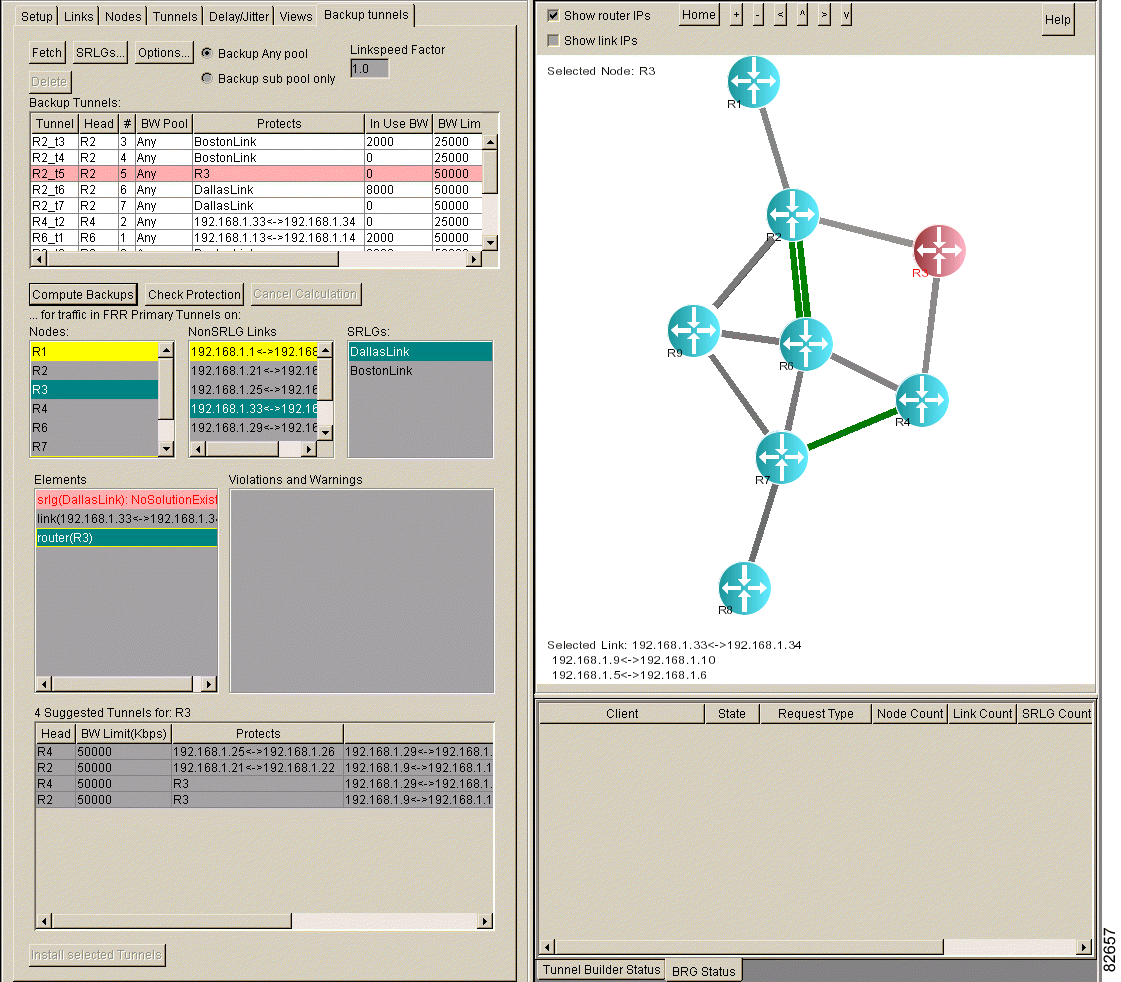
Step 4 To view recommended backup tunnels, select a node, non-SRLG link, or SRLG in the Elements list box. The backup tunnels that you should install are listed in the Suggested Tunnels list box. The following information is displayed for each tunnel, as shown in Figure 5-12:
Existing backup tunnels that protect the selected element are highlighted in green in the Backup Tunnels list box.
|
Note To view the suggested backup tunnels for more than one element at the same time, select more than one element in the Elements list box. To view the suggested backup tunnels for all elements, press Ctrl-A. |
Step 5 Install backup tunnels.
a. In the Suggested Tunnels table, select the backup tunnels that you want to install. To install all suggested backup tunnels, highlight all the backup tunnels by pressing Ctrl-A. Backup tunnels that already protect the node, non-SRLG link, or SRLG are highlighted in green in the Suggested Tunnels list box.
b. Click Install Selected Tunnels. In the bottom right of the window there is text showing the status of the backup tunnel creation process.
|
Note If backup tunnels are highlighted in pink in the Backup Tunnels list box, the computation process recommends that you delete them before installing the suggested tunnels. To delete the backup tunnels, select them and press the Delete key. |
Table 5-2 describes how to respond to status messages that Compute Backups may return. Table 5-3 describes warnings and violations that Compute Backups may return, and how to respond to them.
| Message | Meaning | Solution |
|---|---|---|
NoSolutionExists | The algorithm proved that it is not possible to find backup tunnels that fully protect the element with the current topology, algorithm parameters, and load balancing rules. The algorithm will return the best set of backup tunnels it found during the search. Violations and warnings will be provided for this set of tunnels. | Examine the violations and warnings for a more detailed understanding of which flows could not be protected. From these messages, determine topology and/or parameter changes necessary to achieve full protection. |
TimeOut | The algorithm could not find backup tunnels that fully protect the element in the time specified by the timeout parameter. The algorithm will return the best set of backup tunnels it found. Violations and warnings will be provided for this set of tunnels. | It is possible, but not guaranteed, that you can solve the problem by increasing the timeout. Change the load balancing parameters. Otherwise, examine the violations and warnings for a more detailed understanding of which flows could not be protected within the timeout period. |
Invalid Tunnels | The algorithm could not find backup tunnels that fully protect the element, but could not prove that it would be impossible to do so. The algorithm will return the best set of backup tunnels it found. Violations and warnings will be provided for this set of tunnels. | Examine the violations and warnings for a more detailed understanding of which flows could not be protected. |
| Message | Meaning | Solution |
|---|---|---|
No backup tunnels for flow | No backup tunnels exist for the flow. This message may appear twice for a link, once in each direction. | If there is a problem with connectivity for the element in question, change the topology to allow connectivity. The identification of the flow may help identify where to make the changes. |
WarningFixVetoed | When computing backup tunnels for a router, a solution was generated that would protect the router. However, installing the generated backup tunnels would cause previously protected links attached to the router to become unprotected. | The solution for the router is vetoed in order to maintain protection on the links. |
Insufficient backup tunnel capacity for NHOP (1000 < 2000) | No backup tunnels could be computed for the specified primary flow across the element that satisfied all the constraints (bandwidth and algorithmic parameters). | Do one of the following:
The identification of the flow may help identify the links on which you should make necessary bandwidth changes, or determine how much global parameters must be changed. |
To create backup tunnels manually, perform the following steps:
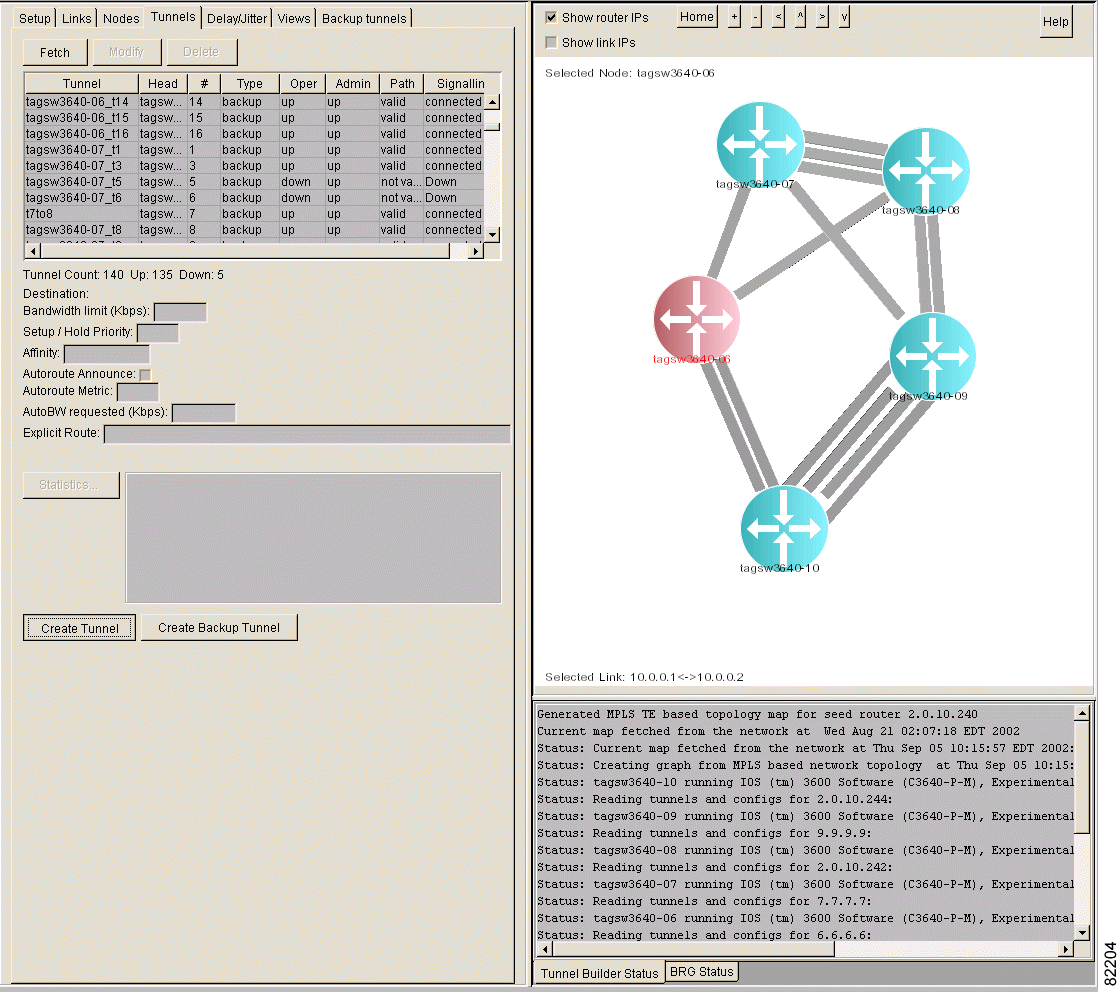
Step 1 Click the Tunnels tab. The Tunnels window shown in Figure 5-13 appears.
Step 2 Do one of the following:
The Create Backup Tunnel window shown in Figure 5-14 appears.
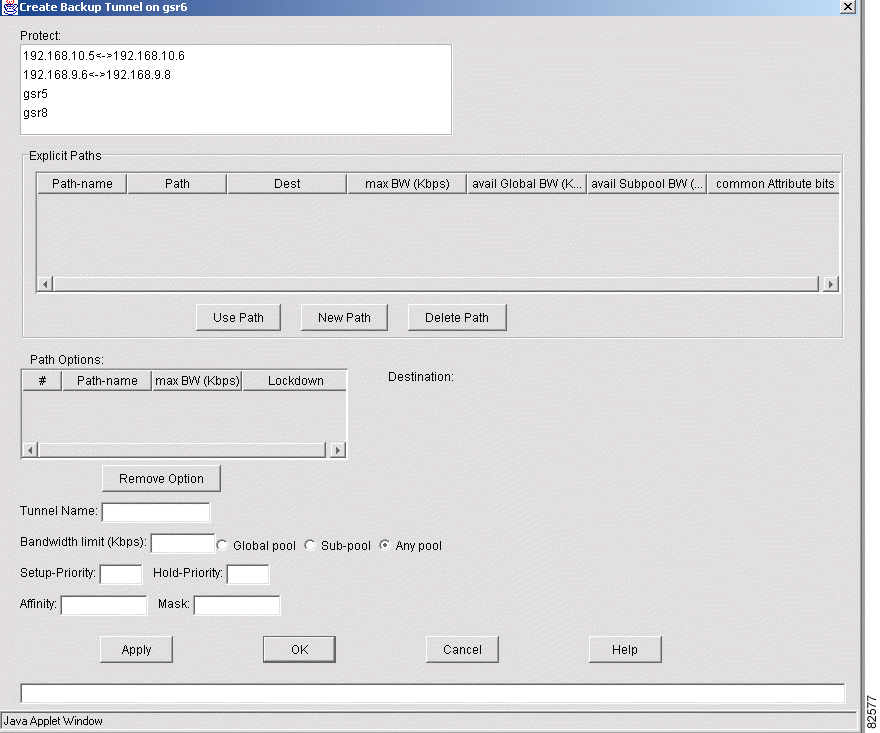
Step 3 In the Protect list box, select the links or nodes you want to protect. The paths that are valid for protecting the selected links or nodes are displayed in the Explicit Paths list box.
Step 4 Select a path in the Explicit Paths list box or click New Path to create a new explicit path.
Step 5 Click Use Path. The path is listed in the Path Options list box.
Step 6 Enter values into the following fields:
Step 7 Click Apply or OK.
To make your changes permanent, see "Using Tunnel Builder Pro for the First Time."
![]()
![]()
![]()
![]()
![]()
![]()
![]()
![]()
Posted: Fri Oct 11 11:21:43 PDT 2002
All contents are Copyright © 1992--2002 Cisco Systems, Inc. All rights reserved.
Important Notices and Privacy Statement.